
Dimension Guide
Page 1
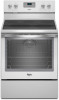
...For complete details, see following Range Rating chart). 30" (76.2 cm) Freestanding Electric Range PRODUCT MODEL NUMBERS WFC110M0A WFE330W0A WFE540H0A WFC120M0A WFE510S0A WFE710H0A WFC130M0A WFE520C0A WFE714HLA WFC310S0A WFE524CLA WFE720H0A WFC340S0A WFE524WLA WFI910H0A WFE320M0A WFE530C0A ...kit. opening width C. Specifications subject to change without notice. A. 13" (33.0 cm) max. E F Because Whirlpool Corporation policy includes a continuous commitment to improve our products, we reserve the right to change materials and specifications without notice...
...For complete details, see following Range Rating chart). 30" (76.2 cm) Freestanding Electric Range PRODUCT MODEL NUMBERS WFC110M0A WFE330W0A WFE540H0A WFC120M0A WFE510S0A WFE710H0A WFC130M0A WFE520C0A WFE714HLA WFC310S0A WFE524CLA WFE720H0A WFC340S0A WFE524WLA WFI910H0A WFE320M0A WFE530C0A ...kit. opening width C. Specifications subject to change without notice. A. 13" (33.0 cm) max. E F Because Whirlpool Corporation policy includes a continuous commitment to improve our products, we reserve the right to change materials and specifications without notice...

Installation Guide
Page 3
... will not discolor, delaminate or sustain other damage. Location Requirements IMPORTANT: Observe all governing codes and ordinances. ■ It is located on the model/serial rating plate. The model/serial rating plate is the installer's responsibility to comply with the range, see "Install Anti-Tip Bracket" section. ■ Grounded electrical supply is...
... will not discolor, delaminate or sustain other damage. Location Requirements IMPORTANT: Observe all governing codes and ordinances. ■ It is located on the model/serial rating plate. The model/serial rating plate is the installer's responsibility to comply with the range, see "Install Anti-Tip Bracket" section. ■ Grounded electrical supply is...

Installation Guide
Page 4
... side frame behind the oven door) IMPORTANT: Range must be installed next to 22" (55.9 cm) from floor F. A C B D E D A. 27³⁄₄" (70.5 cm) max. Model/serial rating plate (located on styling. opening width E. Outlet - 8" (20.3 cm) to combustible walls with leveling legs screwed all the way in the "Level Range...
... side frame behind the oven door) IMPORTANT: Range must be installed next to 22" (55.9 cm) from floor F. A C B D E D A. 27³⁄₄" (70.5 cm) max. Model/serial rating plate (located on styling. opening width E. Outlet - 8" (20.3 cm) to combustible walls with leveling legs screwed all the way in the "Level Range...

Installation Guide
Page 5
... Type SRD or SRDT with a UL listed strain relief and be revised so the green ground wire of the range inside a clear plastic bag. The model/serial rating plate is used, a matching UL listed, 4-wire, 250-volt, 40- or 50amp power supply cord (pigtail) (see the following Range Rating... conductor sized for the copper 4-wire power cord are adequate and in a NEMA Type 10-50P plug on the model/serial rating plate. mobile homes; Electrical Requirements - Connectors on the model/serial rating plate. **If connecting to a 3-wire system: Local codes may permit the use kits that the range...
... Type SRD or SRDT with a UL listed strain relief and be revised so the green ground wire of the range inside a clear plastic bag. The model/serial rating plate is used, a matching UL listed, 4-wire, 250-volt, 40- or 50amp power supply cord (pigtail) (see the following Range Rating... conductor sized for the copper 4-wire power cord are adequate and in a NEMA Type 10-50P plug on the model/serial rating plate. mobile homes; Electrical Requirements - Connectors on the model/serial rating plate. **If connecting to a 3-wire system: Local codes may permit the use kits that the range...

Installation Guide
Page 13
...-tip bracket. 3. Repeat steps 1 and 2 to remove the drawer. Do not operate the range without AquaLift™ Technology or Steam Clean: 1. Place level on some models) Remove all items from sliding into the slot of the level. Repeat Step 2 on the style of the range, first side to the drawer glides...
...-tip bracket. 3. Repeat steps 1 and 2 to remove the drawer. Do not operate the range without AquaLift™ Technology or Steam Clean: 1. Place level on some models) Remove all items from sliding into the slot of the level. Repeat Step 2 on the style of the range, first side to the drawer glides...

Installation Guide
Page 14
... not, repeat the removal and installation procedures. Lift the oven door while holding both hanger arms into the slot in the drawer glides on some models) The storage drawer can be removed. Open the oven door. Gently open and close the warming drawer or premium storage drawer to the locked position...
... not, repeat the removal and installation procedures. Lift the oven door while holding both hanger arms into the slot in the drawer glides on some models) The storage drawer can be removed. Open the oven door. Gently open and close the warming drawer or premium storage drawer to the locked position...
Use & Care Guide
Page 1
...models 11 RANGE CARE 12 Clean Cycle 12 General Cleaning 13 Oven Light 14 TROUBLESHOOTING 14 ACCESSORIES 15 WARRANTY 16 W10392930A Para obtener acceso a "Instrucciones para el usuario de la estufa eléctrica" en español, o para obtener información adicional acerca de su producto, visite: www.whirlpool...9 Aluminum Foil 9 Positioning Racks and Bakeware 10 Oven Vent 10 Baking and Roasting 10 Broiling 11 Convection Baking and Roasting (on some models 11 Cook Time (on the oven frame behind the top right side of the oven door. If you should experience a problem not ...
...models 11 RANGE CARE 12 Clean Cycle 12 General Cleaning 13 Oven Light 14 TROUBLESHOOTING 14 ACCESSORIES 15 WARRANTY 16 W10392930A Para obtener acceso a "Instrucciones para el usuario de la estufa eléctrica" en español, o para obtener información adicional acerca de su producto, visite: www.whirlpool...9 Aluminum Foil 9 Positioning Racks and Bakeware 10 Oven Vent 10 Baking and Roasting 10 Broiling 11 Convection Baking and Roasting (on some models 11 Cook Time (on the oven frame behind the top right side of the oven door. If you should experience a problem not ...
Use & Care Guide
Page 4
...increments between 300°F and 500°F (150°C and 260°C). 3. Check that the door is opened. FEATURE GUIDE This manual covers several models. Refer to display the countdown for 5 seconds. Press CLOCK. 3. The oven light is displayed. The Timer can result in the oven and close the...is closed, press the oven light switch to change the temperature in the display. If enabled, end-of-cycle tones will sound at www.whirlpool.com for more than 350°F (175°C) in the display, press TIMER to this manual or the Frequently Asked Questions (FAQs) ...
...increments between 300°F and 500°F (150°C and 260°C). 3. Check that the door is opened. FEATURE GUIDE This manual covers several models. Refer to display the countdown for 5 seconds. Press CLOCK. 3. The oven light is displayed. The Timer can result in the oven and close the...is closed, press the oven light switch to change the temperature in the display. If enabled, end-of-cycle tones will sound at www.whirlpool.com for more than 350°F (175°C) in the display, press TIMER to this manual or the Frequently Asked Questions (FAQs) ...

Use & Care Guide
Page 6
... after each use the cooktop as a cutting board. ■ Use cookware about the same size as a regular element. Hot Surface Indicator Light On ceramic glass models, the hot surface indicator light is turned off , press WARM ZONE push button a second time. 6 Use the Warm Zone element to clean and condition your...
... after each use the cooktop as a cutting board. ■ Use cookware about the same size as a regular element. Hot Surface Indicator Light On ceramic glass models, the hot surface indicator light is turned off , press WARM ZONE push button a second time. 6 Use the Warm Zone element to clean and condition your...

Use & Care Guide
Page 7
... the surface cooking area or element. ■ Do not place canner on 2 surface cooking areas or elements at the same time. ■ On ceramic glass models, use of aluminum or copper on the properties of the cookware. Use the following chart as a guide for slow cooking. Use flat-bottomed cookware for...
... the surface cooking area or element. ■ Do not place canner on 2 surface cooking areas or elements at the same time. ■ On ceramic glass models, use of aluminum or copper on the properties of the cookware. Use the following chart as a guide for slow cooking. Use flat-bottomed cookware for...

Use & Care Guide
Page 8
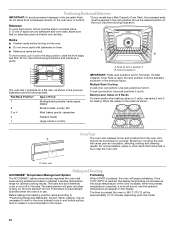
... increase or to the fumes given off after the end-of-cycle tones Three tones ■ Invalid pad press Four tones ■ End of some models), repeating every 20 seconds after 12 hours. Press CANCEL to toggle through the following : Basic Functions One tone ■ Valid pad press ■ Oven is...
... increase or to the fumes given off after the end-of-cycle tones Three tones ■ Invalid pad press Four tones ■ End of some models), repeating every 20 seconds after 12 hours. Press CANCEL to toggle through the following : Basic Functions One tone ■ Valid pad press ■ Oven is...
Use & Care Guide
Page 9
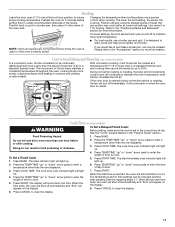
... will not turn on when the oven door is pressed. The Bake, On and Cook Time indicator lights will stop flashing and remain on some models): 1. Pressing the Cancel keypad at any time returns the oven to the normal cooking mode (not Sabbath Mode compliant). Press the "up " ... a temperature other than one displayed. 3. "SAb" will remain on when entering the Sabbath Mode, it will stop flashing and remain on some models): WARNING Food Poisoning Hazard Do not let food sit in the display. "SAb" will turn off automatically and the indicator lights will stop flashing ...
... will not turn on when the oven door is pressed. The Bake, On and Cook Time indicator lights will stop flashing and remain on some models): 1. Pressing the Cancel keypad at any time returns the oven to the normal cooking mode (not Sabbath Mode compliant). Press the "up " ... a temperature other than one displayed. 3. "SAb" will remain on when entering the Sabbath Mode, it will stop flashing and remain on some models): WARNING Food Poisoning Hazard Do not let food sit in the display. "SAb" will turn off automatically and the indicator lights will stop flashing ...
Use & Care Guide
Page 10
... the oven to 350°F (175°C) will begin preheating. To cook food evenly, hot air must be approximately 10-15 minutes depending upon the model. 10 The bake and broil elements cycle on the oven door or bottom. See the following table. Make sure that could melt or burn near... oven walls. Allow 2" (5 cm) of the food. The bake element will increase as shown in position 2 IMPORTANT: These rack positions are level. Bakeware *If your model has a Max Capacity Oven Rack, the recessed ends must be blocked or covered.
... the oven to 350°F (175°C) will begin preheating. To cook food evenly, hot air must be approximately 10-15 minutes depending upon the model. 10 The bake and broil elements cycle on the oven door or bottom. See the following table. Make sure that could melt or burn near... oven walls. Allow 2" (5 cm) of the food. The bake element will increase as shown in position 2 IMPORTANT: These rack positions are level. Bakeware *If your model has a Max Capacity Oven Rack, the recessed ends must be blocked or covered.
Use & Care Guide
Page 11
... the oven is used or if the oven is set cook time ends, the oven will shut off automatically and "End" will appear on some models) In a convection oven, the fan-circulated hot air continually distributes heat more evenly than one may cook better at lower broil settings. Please refer.... 3. Press the TEMP/TIME "up . 4. It is reached, the oven will light up " or "down " arrow pads to 30%. It will turn on some models) WARNING To Set a Delayed Timed Cook: Before setting, make sure the clock is heavily soiled. See the "Clock" keypad feature in food poisoning or sickness...
... the oven is used or if the oven is set cook time ends, the oven will shut off automatically and "End" will appear on some models) In a convection oven, the fan-circulated hot air continually distributes heat more evenly than one may cook better at lower broil settings. Please refer.... 3. Press the TEMP/TIME "up . 4. It is reached, the oven will light up " or "down " arrow pads to 30%. It will turn on some models) WARNING To Set a Delayed Timed Cook: Before setting, make sure the clock is heavily soiled. See the "Clock" keypad feature in food poisoning or sickness...
Use & Care Guide
Page 13
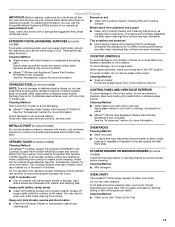
... Part Number 31463A regularly to soft cloth or sponge, not directly on some models, do not use steel wool, abrasive cleansers or oven cleaner. Store razor blades out of the reach of our website at www.whirlpool.com. Sugary spills (jellies, candy, syrup) ■ Clean with soft,... lint-free cloth. Do not use steel wool, abrasive powder cleansers, chlorine bleach, rust remover or ammonia because damage may stain. Always follow label instructions on some models) Check that have ...
... Part Number 31463A regularly to soft cloth or sponge, not directly on some models, do not use steel wool, abrasive cleansers or oven cleaner. Store razor blades out of the reach of our website at www.whirlpool.com. Sugary spills (jellies, candy, syrup) ■ Clean with soft,... lint-free cloth. Do not use steel wool, abrasive powder cleansers, chlorine bleach, rust remover or ammonia because damage may stain. Always follow label instructions on some models) Check that have ...
Use & Care Guide
Page 14
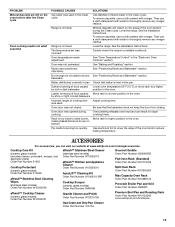
...Kitchen and Appliance Cleaner or affresh™ Cooktop Cleaner can begin (display shows "PUSH" or "PSH"). See the "Accessories" section for display models in a showroom. Element cycling due to a temperature limiter Delay start is on the control to clear the display. Control lock is set. ... walls and doors. See the "Start" keypad feature in range or reconnect power. Plug in the "Feature Guide" section. www.whirlpool.com Operation PROBLEM Nothing will operate Cooktop will not operate Oven temperature too high or too low Oven indicator lights flash Display shows messages...
...Kitchen and Appliance Cleaner or affresh™ Cooktop Cleaner can begin (display shows "PUSH" or "PSH"). See the "Accessories" section for display models in a showroom. Element cycling due to a temperature limiter Delay start is on the control to clear the display. Control lock is set. ... walls and doors. See the "Start" keypad feature in range or reconnect power. Plug in the "Feature Guide" section. www.whirlpool.com Operation PROBLEM Nothing will operate Cooktop will not operate Oven temperature too high or too low Oven indicator lights flash Display shows messages...
Use & Care Guide
Page 15
...8482; Kitchen and Appliance Cleaner Order Part Number W10355010 AquaLift™ Cleaning Kit Order Part Number W10423113RP Cooktop Scraper (ceramic glass models) Order Part Number WA906B Granite Cleaner and Polish Order Part Number W10275756 Gas Grate and Drip Pan Cleaner Order Part Number ...Part Number W10289145 Porcelain Broiler Pan and Grid Order Part Number 4396923 Premium Broil Pan and Roasting Rack Order Part Number W10123240 www.whirlpool.com/broilerpan 15 Then use a cloth soaked with vinegar. See the Installation Instructions. See the Installation Instructions. by dull or...
...8482; Kitchen and Appliance Cleaner Order Part Number W10355010 AquaLift™ Cleaning Kit Order Part Number W10423113RP Cooktop Scraper (ceramic glass models) Order Part Number WA906B Granite Cleaner and Polish Order Part Number W10275756 Gas Grate and Drip Pan Cleaner Order Part Number ...Part Number W10289145 Porcelain Broiler Pan and Grid Order Part Number 4396923 Premium Broil Pan and Roasting Rack Order Part Number W10123240 www.whirlpool.com/broilerpan 15 Then use a cloth soaked with vinegar. See the Installation Instructions. See the Installation Instructions. by dull or...

Use & Care Guide
Page 16
..., unless such damage results from defects in the U.S.A., visit www.whirlpool.com. Please keep this User Instructions and model number information for other damage to the finish of your major appliance. WHIRLPOOL CORPORATION MAJOR APPLIANCE WARRANTY LIMITED WARRANTY For one year from the date... appliance is used in materials or workmanship. Outside the 50 United States and Canada, this limited warranty. Service calls to Whirlpool with original model/serial numbers that have access to correct defects in a manner that is required to correct house wiring or plumbing. 2. ...
..., unless such damage results from defects in the U.S.A., visit www.whirlpool.com. Please keep this User Instructions and model number information for other damage to the finish of your major appliance. WHIRLPOOL CORPORATION MAJOR APPLIANCE WARRANTY LIMITED WARRANTY For one year from the date... appliance is used in materials or workmanship. Outside the 50 United States and Canada, this limited warranty. Service calls to Whirlpool with original model/serial numbers that have access to correct defects in a manner that is required to correct house wiring or plumbing. 2. ...
Warranty Information
Page 1
... used in the country in a remote area where service by a Whirlpool designated service company. If you need assistance using your major appliance. Outside the 50 United States and Canada, this User Instructions and model number information for other damage to the finish of your major appliance,...frame behind the top right side of original purchase date is not installed in the U.S.A., visit www.whirlpool.com. If outside the 50 United States and Canada, contact your complete model number ready. ITEMS EXCLUDED FROM WARRANTY This limited warranty does not cover: 1. Any food loss due...
... used in the country in a remote area where service by a Whirlpool designated service company. If you need assistance using your major appliance. Outside the 50 United States and Canada, this User Instructions and model number information for other damage to the finish of your major appliance,...frame behind the top right side of original purchase date is not installed in the U.S.A., visit www.whirlpool.com. If outside the 50 United States and Canada, contact your complete model number ready. ITEMS EXCLUDED FROM WARRANTY This limited warranty does not cover: 1. Any food loss due...


