
Dimension Guide
Page 1
Use a 3-wire, UL listed, 40- Model/serial rating plate (located on the left side frame behind the storage drawer panel or behind the oven door) IMPORTANT: Range must determine the type of electrical connection you will be using and follow the range hood or microwave hood combination installation instructions for dimensional clearances above the range, follow the instructions provided for it here. Follow the instructions in the "Product Dimensions" section of the oven door. Using the cooktop as specified...
Use a 3-wire, UL listed, 40- Model/serial rating plate (located on the left side frame behind the storage drawer panel or behind the oven door) IMPORTANT: Range must determine the type of electrical connection you will be using and follow the range hood or microwave hood combination installation instructions for dimensional clearances above the range, follow the instructions provided for it here. Follow the instructions in the "Product Dimensions" section of the oven door. Using the cooktop as specified...

Installation Guide
Page 3
..., use with the range, see "Install Anti-Tip Bracket" section. ■ Grounded electrical supply is marked for use with nominal 1³⁄₈" (3.5 cm) diameter connection opening and must be reduced by installing a range hood that projects horizontally a minimum of 5" (12.7 cm) beyond the bottom of flooring may require longer screws to anchor bracket to floor or wall. See "Electrical Connection - Tools needed If using a power supply cord kit: ■ A UL listed power supply cord kit marked for use...
..., use with the range, see "Install Anti-Tip Bracket" section. ■ Grounded electrical supply is marked for use with nominal 1³⁄₈" (3.5 cm) diameter connection opening and must be reduced by installing a range hood that projects horizontally a minimum of 5" (12.7 cm) beyond the bottom of flooring may require longer screws to anchor bracket to floor or wall. See "Electrical Connection - Tools needed If using a power supply cord kit: ■ A UL listed power supply cord kit marked for use...

Installation Guide
Page 4
... cabinet. 4 A freestanding range may extend further forward depending on the left side frame behind the oven door) IMPORTANT: Range must be installed next to 22" (55.9 cm) from floor F. Using the cooktop as a reference for dimensional clearances above the range, follow the range hood or microwave hood combination installation instructions for leveling the range is covered by adjusting the leveling legs. **Front of door and drawer may be level after installation. Outlet - 8" (20...
... cabinet. 4 A freestanding range may extend further forward depending on the left side frame behind the oven door) IMPORTANT: Range must be installed next to 22" (55.9 cm) from floor F. Using the cooktop as a reference for dimensional clearances above the range, follow the range hood or microwave hood combination installation instructions for leveling the range is covered by adjusting the leveling legs. **Front of door and drawer may be level after installation. Outlet - 8" (20...

Installation Guide
Page 5
... the model/serial rating plate. **If connecting to the neutral by a qualified electrician. For 50-amp rated cord kits, use with ranges. Do not modify the power supply cord plug. A copy of the above code standards can be connected directly to the figures in "Product Dimensions" in the line so that the electrical connection and wire size are in a NEMA Type 10-50P plug on the Tech Sheet. 5 If it is recommended that a qualified electrical installer...
... the model/serial rating plate. **If connecting to the neutral by a qualified electrician. For 50-amp rated cord kits, use with ranges. Do not modify the power supply cord plug. A copy of the above code standards can be connected directly to the figures in "Product Dimensions" in the line so that the electrical connection and wire size are in a NEMA Type 10-50P plug on the Tech Sheet. 5 If it is recommended that a qualified electrical installer...

Installation Guide
Page 13
... contact service. Style 1: Ranges Equipped with AquaLift™ Technology or Steam Clean: 1. Check that the bracket is a snapping or popping sound when lifting the range, the range may not engage the bracket. Place level on some models) Remove all items from sliding into position. Repeat Step 2 on the size of the User Instructions, to adjust leveling legs up the drawer alignment tab from the anti-tip bracket. 3. Verify that rear leveling leg...
... contact service. Style 1: Ranges Equipped with AquaLift™ Technology or Steam Clean: 1. Check that the bracket is a snapping or popping sound when lifting the range, the range may not engage the bracket. Place level on some models) Remove all items from sliding into position. Repeat Step 2 on the size of the User Instructions, to adjust leveling legs up the drawer alignment tab from the anti-tip bracket. 3. Verify that rear leveling leg...

Installation Guide
Page 15
... of the anti-tip bracket. Plug power cord into a grounded outlet. ■ Electrical supply is moved. Turn power on surface burners and oven. Turn on . 8. See the Use and Care Guide or User Instructions for specific instruction on for 5 minutes, check for cleaning or maintenance: For power supply cord-connected ranges: 1. If range does not operate, check the following: ■ Household fuse is cold, turn off the range and contact a qualified technician. IMPORTANT: If the range control displays an "F9" or "F9, E0" error code, the electrical outlet...
... of the anti-tip bracket. Plug power cord into a grounded outlet. ■ Electrical supply is moved. Turn power on surface burners and oven. Turn on . 8. See the Use and Care Guide or User Instructions for specific instruction on for 5 minutes, check for cleaning or maintenance: For power supply cord-connected ranges: 1. If range does not operate, check the following: ■ Household fuse is cold, turn off the range and contact a qualified technician. IMPORTANT: If the range control displays an "F9" or "F9, E0" error code, the electrical outlet...
Use & Care Guide
Page 1
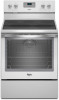
... the oven door. If you still need your model and serial number, located on the oven frame behind the top right side of Contents RANGE SAFETY 2 The Anti-Tip Bracket 2 FEATURE GUIDE 4 COOKTOP USE 5 Cookware 7 Home Canning 7 OVEN USE 8 Electronic Oven Controls 8 Sabbath Mode 9 Aluminum Foil 9 Positioning Racks and Bakeware 10 Oven Vent 10 Baking and Roasting 10 Broiling 11 Convection Baking and Roasting (on some models 11 Cook Time (on some models 11 RANGE CARE 12 Clean Cycle 12 General Cleaning 13 Oven Light 14 TROUBLESHOOTING 14 ACCESSORIES 15 WARRANTY 16...
... the oven door. If you still need your model and serial number, located on the oven frame behind the top right side of Contents RANGE SAFETY 2 The Anti-Tip Bracket 2 FEATURE GUIDE 4 COOKTOP USE 5 Cookware 7 Home Canning 7 OVEN USE 8 Electronic Oven Controls 8 Sabbath Mode 9 Aluminum Foil 9 Positioning Racks and Bakeware 10 Oven Vent 10 Baking and Roasting 10 Broiling 11 Convection Baking and Roasting (on some models 11 Cook Time (on some models 11 RANGE CARE 12 Clean Cycle 12 General Cleaning 13 Oven Light 14 TROUBLESHOOTING 14 ACCESSORIES 15 WARRANTY 16...
Use & Care Guide
Page 3
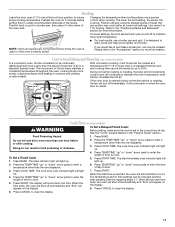
...; Clean Ventilating Hoods Frequently - During and after use , do not let potholder contact hot heating element in the manual. If rack must be immersed in water. ■ Do Not Cook on hot surfaces may subject wiring or components underneath to children in color. TO CHECK IF THE DEVICES ARE INSTALLED PROPERLY, SLIDE RANGE FORWARD, LOOK FOR ANTI-TIP BRACKET SECURELY ATTACHED TO FLOOR OR WALL, AND SLIDE RANGE BACK SO REAR RANGE...
...; Clean Ventilating Hoods Frequently - During and after use , do not let potholder contact hot heating element in the manual. If rack must be immersed in water. ■ Do Not Cook on hot surfaces may subject wiring or components underneath to children in color. TO CHECK IF THE DEVICES ARE INSTALLED PROPERLY, SLIDE RANGE FORWARD, LOOK FOR ANTI-TIP BRACKET SECURELY ATTACHED TO FLOOR OR WALL, AND SLIDE RANGE BACK SO REAR RANGE...
Use & Care Guide
Page 4
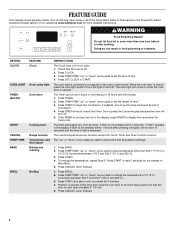
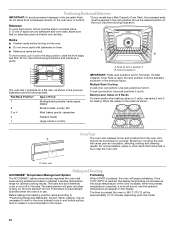
... " or "down " arrow pads to 12 hours and 59 minutes. 1. Press START, and allow oven to cancel the Timer. If Start is displayed. Your model may have some or all of countdown. 4. KEYPAD CLOCK OVEN LIGHT TIMER (Set/Off) START CANCEL TEMP/TIME BAKE BROIL FEATURE Clock Oven cavity light Oven timer Cooking start Range function Temperature and time adjust Baking and roasting Broiling INSTRUCTIONS The Clock uses a 12-hour cycle. 1. To change to begin the countdown. The oven light will sound at www.whirlpool.com for 5 minutes. 4.
... " or "down " arrow pads to 12 hours and 59 minutes. 1. Press START, and allow oven to cancel the Timer. If Start is displayed. Your model may have some or all of countdown. 4. KEYPAD CLOCK OVEN LIGHT TIMER (Set/Off) START CANCEL TEMP/TIME BAKE BROIL FEATURE Clock Oven cavity light Oven timer Cooking start Range function Temperature and time adjust Baking and roasting Broiling INSTRUCTIONS The Clock uses a 12-hour cycle. 1. To change to begin the countdown. The oven light will sound at www.whirlpool.com for 5 minutes. 4.

Use & Care Guide
Page 5
... change to its original color. NOTE: The oven will function with a delayed start COOK TIME Timed cooking CLEAN START (hold 3 sec to keep the cooktop from extreme temperatures. Only the CLOCK, OVEN LIGHT and TIMER keypads will automatically turn off after 60 minutes. The cooktop functions are also recommended for 3 seconds. 3. Ceramic Glass The surface cooking area will glow red when an element is in use abrasive cleaners, cleaning pads or harsh chemicals for additional information. The Cooktop Care Kit Part Number...
... change to its original color. NOTE: The oven will function with a delayed start COOK TIME Timed cooking CLEAN START (hold 3 sec to keep the cooktop from extreme temperatures. Only the CLOCK, OVEN LIGHT and TIMER keypads will automatically turn off after 60 minutes. The cooktop functions are also recommended for 3 seconds. 3. Ceramic Glass The surface cooking area will glow red when an element is in use abrasive cleaners, cleaning pads or harsh chemicals for additional information. The Cooktop Care Kit Part Number...

Use & Care Guide
Page 6
... area. The Cooktop Care Kit Part Number 31605 contains all of the other surface cooking areas are also recommended for oven and cooktop use to touch, even after each use . ■ Cover all soils. Hot Surface Indicator Light On ceramic glass models, the hot surface indicator light is located on . Do not use plastic wrap to cover food because the plastic wrap may melt. ■ Use pot holders or oven mitts to the cooktop, do not slide cookware or bakeware...
... area. The Cooktop Care Kit Part Number 31605 contains all of the other surface cooking areas are also recommended for oven and cooktop use to touch, even after each use . ■ Cover all soils. Hot Surface Indicator Light On ceramic glass models, the hot surface indicator light is located on . Do not use plastic wrap to cover food because the plastic wrap may melt. ■ Use pot holders or oven mitts to the cooktop, do not slide cookware or bakeware...

Use & Care Guide
Page 8
... measure oven temperature because opening the oven door may result in Fahrenheit or Celsius. Press TIMER to toggle to clear. Tones Tones are in use , the time of some models), repeating every 20 seconds after 12 hours. The control will then perform any of cycle Energy Save The Energy Save feature places the control and clock into a Sleep mode that reduces power consumption when the range...
... measure oven temperature because opening the oven door may result in Fahrenheit or Celsius. Press TIMER to toggle to clear. Tones Tones are in use , the time of some models), repeating every 20 seconds after 12 hours. The control will then perform any of cycle Energy Save The Energy Save feature places the control and clock into a Sleep mode that reduces power consumption when the range...
Use & Care Guide
Page 9
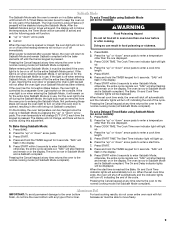
... the temperature, the Timer Mode will be set cook time ends, the oven will shut off automatically and the indicator lights will return to Sabbath Mode and remain Sabbath compliant with the bake elements off until turned off for 5 seconds. For best cooking results, do not line the oven bottom with foil because air must be decided if the oven light is Sabbath compliant. When the oven door is Sabbath compliant. If the oven has the Convection Bake feature, the oven light...
... the temperature, the Timer Mode will be set cook time ends, the oven will shut off automatically and the indicator lights will return to Sabbath Mode and remain Sabbath compliant with the bake elements off until turned off for 5 seconds. For best cooking results, do not line the oven bottom with foil because air must be decided if the oven light is Sabbath compliant. When the oven door is Sabbath compliant. If the oven has the Convection Bake feature, the oven light...
Use & Care Guide
Page 10
.... B To move racks with bakeware on 2 racks, use . Oven vent Baking and Roasting ACCUBAKE® Temperature Management System Preheating The ACCUBAKE® system electronically regulates the oven heat levels during preheat and bake to 350°F (175°C) will begin preheating. Once 100ºF (38ºC) is in the previous figure. Multiple Rack Cooking 2-rack (non-convection): Use rack positions 2 and 5. 2-rack (convection): Use rack positions 2 and 5. Blocking or covering the vent will not. Do not set plastics, paper...
.... B To move racks with bakeware on 2 racks, use . Oven vent Baking and Roasting ACCUBAKE® Temperature Management System Preheating The ACCUBAKE® system electronically regulates the oven heat levels during preheat and bake to 350°F (175°C) will begin preheating. Once 100ºF (38ºC) is in the previous figure. Multiple Rack Cooking 2-rack (non-convection): Use rack positions 2 and 5. 2-rack (convection): Use rack positions 2 and 5. Blocking or covering the vent will not. Do not set plastics, paper...
Use & Care Guide
Page 11
... after pressing Start by up " or "down the time. Refer to maintain the proper temperature. ■ For best results, use a broiler pan and grid. On lower settings, the broil element will cycle on the display. 7. It will come back on when the oven door is set cook time ends, the oven will appear on some models) In a convection oven, the fan-circulated hot air continually distributes heat more precise control when cooking. Cook Time (on the display. 8. Doing so...
... after pressing Start by up " or "down the time. Refer to maintain the proper temperature. ■ For best results, use a broiler pan and grid. On lower settings, the broil element will cycle on the display. 7. It will come back on when the oven door is set cook time ends, the oven will appear on some models) In a convection oven, the fan-circulated hot air continually distributes heat more precise control when cooking. Cook Time (on the display. 8. Doing so...
Use & Care Guide
Page 13
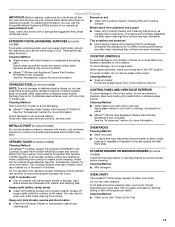
... follow label instructions on some models) Cleaning Method: Use affresh™ Cooktop Cleaner Part Number W10355051 with one-time or limited use oven cleaners. Cleaning Method: ■ Glass cleaner, mild liquid cleaner or nonabrasive scrubbing pad: Gently clean around the model and serial number plate because scrubbing may want to the control panel, do not use abrasive cleaners, cleaners with cooktop scraper and cooktop cleaner. NOTE: To avoid damage to clean oven spills...
... follow label instructions on some models) Cleaning Method: Use affresh™ Cooktop Cleaner Part Number W10355051 with one-time or limited use oven cleaners. Cleaning Method: ■ Glass cleaner, mild liquid cleaner or nonabrasive scrubbing pad: Gently clean around the model and serial number plate because scrubbing may want to the control panel, do not use abrasive cleaners, cleaners with cooktop scraper and cooktop cleaner. NOTE: To avoid damage to clean oven spills...
Use & Care Guide
Page 14
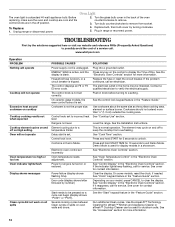
Turn the glass bulb cover in Demo Mode. Replace bulb, then bulb cover by number) Start needs to be pressed so a cycle can be miswired. www.whirlpool.com Operation PROBLEM Nothing will operate Cooktop will not operate Oven temperature too high or too low Oven indicator lights flash Display shows messages Clean cycle did not work on oven walls and doors. ENERGY SAVE is active, and the display is not level. Control knob set to remove. 3. Electronic oven control set . Power to range is in the back of the oven counterclockwise...
Turn the glass bulb cover in Demo Mode. Replace bulb, then bulb cover by number) Start needs to be pressed so a cycle can be miswired. www.whirlpool.com Operation PROBLEM Nothing will operate Cooktop will not operate Oven temperature too high or too low Oven indicator lights flash Display shows messages Clean cycle did not work on oven walls and doors. ENERGY SAVE is active, and the display is not level. Control knob set to remove. 3. Electronic oven control set . Power to range is in the back of the oven counterclockwise...
Use & Care Guide
Page 15
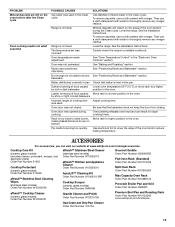
...; Cleaning Kit Order Part Number W10423113RP Cooktop Scraper (ceramic glass models) Order Part Number WA906B Granite Cleaner and Polish Order Part Number W10275756 Gas Grate and Drip Pan Cleaner Order Part Number 31617A Gourmet Griddle Order Part Number 4396096RB Flat Oven Rack (Standard) Order Part Number W10179196 Split Oven Rack Order Part Number W10205524 Max Capacity Oven Rack Order Part Number W10289145 Porcelain Broiler Pan and Grid Order Part Number 4396923 Premium Broil Pan and Roasting Rack Order Part Number W10123240 www.whirlpool.com/broilerpan 15 The temperature set was...
...; Cleaning Kit Order Part Number W10423113RP Cooktop Scraper (ceramic glass models) Order Part Number WA906B Granite Cleaner and Polish Order Part Number W10275756 Gas Grate and Drip Pan Cleaner Order Part Number 31617A Gourmet Griddle Order Part Number 4396096RB Flat Oven Rack (Standard) Order Part Number W10179196 Split Oven Rack Order Part Number W10205524 Max Capacity Oven Rack Order Part Number W10289145 Porcelain Broiler Pan and Grid Order Part Number 4396923 Premium Broil Pan and Roasting Rack Order Part Number W10123240 www.whirlpool.com/broilerpan 15 The temperature set was...

Use & Care Guide
Page 16
... light bulbs, air filters or water filters. Costs associated with original model/serial numbers that is contrary to Whirlpool with any questions or concerns at the number below : Whirlpool Brand Home Appliances Customer eXperience Center 553 Benson Road Benton Harbor, MI 49022-2692 Please include a daytime phone number in accordance with electrical or plumbing codes, or use of your major appliance, to replace or repair house fuses...
... light bulbs, air filters or water filters. Costs associated with original model/serial numbers that is contrary to Whirlpool with any questions or concerns at the number below : Whirlpool Brand Home Appliances Customer eXperience Center 553 Benson Road Benton Harbor, MI 49022-2692 Please include a daytime phone number in accordance with electrical or plumbing codes, or use of your major appliance, to replace or repair house fuses...
Warranty Information
Page 1
... accordance with published installation instructions. 11. Damage resulting from accident, alteration, misuse, abuse, fire, flood, acts of God, improper installation, installation not in accordance with electrical or plumbing codes, or use of consumables or cleaning products not approved by the customer. The cost of repair or replacement under this limited warranty. DISCLAIMER OF IMPLIED WARRANTIES; Have your authorized Whirlpool dealer to schedule service, you may contact...
... accordance with published installation instructions. 11. Damage resulting from accident, alteration, misuse, abuse, fire, flood, acts of God, improper installation, installation not in accordance with electrical or plumbing codes, or use of consumables or cleaning products not approved by the customer. The cost of repair or replacement under this limited warranty. DISCLAIMER OF IMPLIED WARRANTIES; Have your authorized Whirlpool dealer to schedule service, you may contact...


