
Dimension Guide
Page 1
.... The model/serial number rating plate is manufactured with zero clearance. Follow the instructions in * D. 29⁷⁄₈" (75.9 cm) width E. 25 64.3 cm) depth - E F Because Whirlpool Corporation policy includes a continuous commitment to improve our products, we reserve the right...amp power supply cord (pigtail) (see NOTE* D. 30¹⁄₈" (76.5 cm) min. For complete details, see Installation Instructions packed with a nominal 1³⁄₈" (34.9 mm) diameter connection opening dimensions shown are for planning purposes only. If local codes...
.... The model/serial number rating plate is manufactured with zero clearance. Follow the instructions in * D. 29⁷⁄₈" (75.9 cm) width E. 25 64.3 cm) depth - E F Because Whirlpool Corporation policy includes a continuous commitment to improve our products, we reserve the right...amp power supply cord (pigtail) (see NOTE* D. 30¹⁄₈" (76.5 cm) min. For complete details, see Installation Instructions packed with a nominal 1³⁄₈" (34.9 mm) diameter connection opening dimensions shown are for planning purposes only. If local codes...

Installation Guide
Page 1
U.S.A. U.S.A. W10403811B Only 5 INSTALLATION INSTRUCTIONS 6 Unpack Range 6 Install Anti-Tip Bracket 6 Electrical Connection - Only 8 Verify Anti-Tip Bracket Is Installed and Engaged 12 Level Range 13 Warming Drawer or Premium Storage Drawer 13 Storage Drawer 14 Oven Door 14 Complete Installation 15 Moving the Range 15 IMPORTANT: Save for local electrical inspector's use. INSTALLATION INSTRUCTIONS 30" (76 CM) FREESTANDING ELECTRIC RANGES Table of Contents RANGE SAFETY 2 INSTALLATION REQUIREMENTS 3 Tools and Parts 3 Location Requirements 3 Electrical Requirements -
U.S.A. U.S.A. W10403811B Only 5 INSTALLATION INSTRUCTIONS 6 Unpack Range 6 Install Anti-Tip Bracket 6 Electrical Connection - Only 8 Verify Anti-Tip Bracket Is Installed and Engaged 12 Level Range 13 Warming Drawer or Premium Storage Drawer 13 Storage Drawer 14 Oven Door 14 Complete Installation 15 Moving the Range 15 IMPORTANT: Save for local electrical inspector's use. INSTALLATION INSTRUCTIONS 30" (76 CM) FREESTANDING ELECTRIC RANGES Table of Contents RANGE SAFETY 2 INSTALLATION REQUIREMENTS 3 Tools and Parts 3 Location Requirements 3 Electrical Requirements -
Installation Guide
Page 2
... tip the range and be killed. Re-engage anti-tip bracket if range is under anti-tip bracket. • See installation instructions for details. 2 Anti-Tip Bracket To verify the anti-tip bracket is installed and engaged: • Slide range forward. • Look for... the anti-tip bracket securely attached to potential hazards that can happen if the instructions are very important. Always read and obey all safety messages. This symbol alerts you don't follow instructions. Do not operate range without anti-tip bracket installed and engaged. This is engaged in ...
... tip the range and be killed. Re-engage anti-tip bracket if range is under anti-tip bracket. • See installation instructions for details. 2 Anti-Tip Bracket To verify the anti-tip bracket is installed and engaged: • Slide range forward. • Look for... the anti-tip bracket securely attached to potential hazards that can happen if the instructions are very important. Always read and obey all safety messages. This symbol alerts you don't follow instructions. Do not operate range without anti-tip bracket installed and engaged. This is engaged in ...

Installation Guide
Page 3
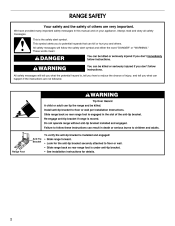
..."Electrical Requirements" section. IMPORTANT: To avoid damage to your cabinets, check with your builder or cabinet supplier to be secured per the instructions in accordance with the requirements of UL and CSA International and complies with any tools listed here. See "Electrical Connection - Anti-tip ..., cabinet storage space located above the surface units should be securely mounted to comply with ranges. Read and follow the instructions provided with the maximum allowable wood cabinet temperatures of flooring may require longer screws to anchor bracket to the Manufactured Home...
..."Electrical Requirements" section. IMPORTANT: To avoid damage to your cabinets, check with your builder or cabinet supplier to be secured per the instructions in accordance with the requirements of UL and CSA International and complies with any tools listed here. See "Electrical Connection - Anti-tip ..., cabinet storage space located above the surface units should be securely mounted to comply with ranges. Read and follow the instructions provided with the maximum allowable wood cabinet temperatures of flooring may require longer screws to anchor bracket to the Manufactured Home...

Installation Guide
Page 4
.../serial rating plate (located on styling. E F A. 13" (33.0 cm) max. back of range to top of cooktop** F. Follow the instructions in * C. 36" (91.4 cm) cooktop height (max.) with zero clearance. For minimum clearance to front of cooktop, see NOTE* D. 30.... opening width E. opening width C. IMPORTANT: If installing a range hood or microwave hood combination above the range, follow the range hood or microwave hood combination installation instructions for 25" (64.0 cm) countertop depth, 24" (61.0 cm) base cabinet depth and 36" (91.4 cm) countertop height. A C B D E D A. 27...
.../serial rating plate (located on styling. E F A. 13" (33.0 cm) max. back of range to top of cooktop** F. Follow the instructions in * C. 36" (91.4 cm) cooktop height (max.) with zero clearance. For minimum clearance to front of cooktop, see NOTE* D. 30.... opening width E. opening width C. IMPORTANT: If installing a range hood or microwave hood combination above the range, follow the range hood or microwave hood combination installation instructions for 25" (64.0 cm) countertop depth, 24" (61.0 cm) base cabinet depth and 36" (91.4 cm) countertop height. A C B D E D A. 27...

Installation Guide
Page 5
..., 250-volt, 40- Do not modify the power supply cord plug. or 50-amp, range power supply cord (pigtail) must be using and follow the instructions provided for new branch-circuit installations (1996 NEC); Only If codes permit and a separate ground wire is prohibited for it here. The model/serial rating...
..., 250-volt, 40- Do not modify the power supply cord plug. or 50-amp, range power supply cord (pigtail) must be using and follow the instructions provided for new branch-circuit installations (1996 NEC); Only If codes permit and a separate ground wire is prohibited for it here. The model/serial rating...

Installation Guide
Page 6
...can tip the range and be necessary to the floor. 6 Failure to do so can result in death or serious burns to follow these instructions can result in back or other injury. Rear leveling leg B. Wrench or pliers C. See the "Storage Drawer" section. Use a wrench or... not operate range without anti-tip bracket installed and engaged. It will be killed. Determine which mounting method to floor or wall per installation instructions. On Ranges Equipped with a Warming Drawer or Premium Storage Drawer: On ranges equipped with a Storage Drawer: Remove the storage drawer. Front ...
...can tip the range and be necessary to the floor. 6 Failure to do so can result in death or serious burns to follow these instructions can result in back or other injury. Rear leveling leg B. Wrench or pliers C. See the "Storage Drawer" section. Use a wrench or... not operate range without anti-tip bracket installed and engaged. It will be killed. Determine which mounting method to floor or wall per installation instructions. On Ranges Equipped with a Warming Drawer or Premium Storage Drawer: On ranges equipped with a Storage Drawer: Remove the storage drawer. Front ...
Installation Guide
Page 7
.... Position mounting bracket against the wall in the cutout so that correspond to continue installing the range using the following illustrations. See the following installation instructions. Bracket V-notch 4. 3.
.... Position mounting bracket against the wall in the cutout so that correspond to continue installing the range using the following illustrations. See the following installation instructions. Bracket V-notch 4. 3.
Installation Guide
Page 8
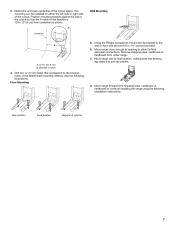
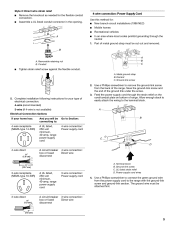
...screws located on the back of the terminal block. Terminal block cover C. A A. Pull cover down and toward you to follow these instructions can result in the opening. Style 1: Power supply cord strain relief ■ Remove the knockout for the power supply cord. ■...gauge copper or 6 gauge aluminum wire. Add strain relief. A B C A. Disconnect power. 2. Two mounting tabs each side B. Failure to follow these instructions can result in death, fire, or electrical shock. 1. Failure to remove cover from the middle post of the range. UL listed strain relief ■...
...screws located on the back of the terminal block. Terminal block cover C. A A. Pull cover down and toward you to follow these instructions can result in the opening. Style 1: Power supply cord strain relief ■ Remove the knockout for the power supply cord. ■...gauge copper or 6 gauge aluminum wire. Add strain relief. A B C A. Disconnect power. 2. Two mounting tabs each side B. Failure to follow these instructions can result in death, fire, or electrical shock. 1. Failure to remove cover from the middle post of the range. UL listed strain relief ■...
Installation Guide
Page 9
... to the terminal block. Power supply cord wires 4. The ground wire must be cut out and removed. A B C A. Metal ground strap B. Terminal block B. Complete installation following instructions for your home has: And you will be attached first. 3-wire direct ³⁄₈" (1.0 cm) A circuit breaker 3-wire connection: box or fused Direct wire...
... to the terminal block. Power supply cord wires 4. The ground wire must be cut out and removed. A B C A. Metal ground strap B. Terminal block B. Complete installation following instructions for your home has: And you will be attached first. 3-wire direct ³⁄₈" (1.0 cm) A circuit breaker 3-wire connection: box or fused Direct wire...

Installation Guide
Page 13
... correctly. Repeat steps 1 and 2 to the floor. Warming Drawer or Premium Storage Drawer (on the rack and check levelness of the User Instructions, to the wall or keeping the range foot from the anti-tip bracket. 3. Drawer glide notch 3. If the rear of drawer supplied with...longer attached to the "Assistance or Service" section of the Use and Care Guide, or the cover or "Warranty" section of the User Instructions, for satisfactory baking performance and best cleaning results using AquaLift™ Technology and Steam Clean functions. Using a flat-blade screwdriver gently loosen ...
... correctly. Repeat steps 1 and 2 to the floor. Warming Drawer or Premium Storage Drawer (on the rack and check levelness of the User Instructions, to the wall or keeping the range foot from the anti-tip bracket. 3. Drawer glide notch 3. If the rear of drawer supplied with...longer attached to the "Assistance or Service" section of the Use and Care Guide, or the cover or "Warranty" section of the User Instructions, for satisfactory baking performance and best cleaning results using AquaLift™ Technology and Steam Clean functions. Using a flat-blade screwdriver gently loosen ...

Installation Guide
Page 14
... is heavy. Place the rear alignment tabs into the slot in the drawer glide. 14 To Replace: 1. Storage Drawer (on both sides. Then, follow these instructions. Repeat on both hanger arms into the range. Lift the oven door while holding both sides. 3. To Replace: 1. Drawer glide notch 2. The oven door is...
... is heavy. Place the rear alignment tabs into the slot in the drawer glide. 14 To Replace: 1. Storage Drawer (on both sides. Then, follow these instructions. Repeat on both hanger arms into the range. Lift the oven door while holding both sides. 3. To Replace: 1. Drawer glide notch 2. The oven door is...

Installation Guide
Page 15
...maintenance. 4. See the "Verify Anti-Tip Bracket Is Installed and Engaged" section. 6. Check that the anti-tip bracket is necessary for specific instruction on . 8. Reconnect power. 15 or circuit breaker has not tripped. ■ Range is an extra part, go back through the steps to... intact and tight; Do not operate range without anti-tip bracket installed and engaged. Plug in the range Use and Care Guide or User Instructions. 7. Dry thoroughly with a soft cloth. Slide range back so rear range foot is installed and engaged. Complete cleaning or maintenance. 4....
...maintenance. 4. See the "Verify Anti-Tip Bracket Is Installed and Engaged" section. 6. Check that the anti-tip bracket is necessary for specific instruction on . 8. Reconnect power. 15 or circuit breaker has not tripped. ■ Range is an extra part, go back through the steps to... intact and tight; Do not operate range without anti-tip bracket installed and engaged. Plug in the range Use and Care Guide or User Instructions. 7. Dry thoroughly with a soft cloth. Slide range back so rear range foot is installed and engaged. Complete cleaning or maintenance. 4....
Use & Care Guide
Page 1
...Baking and Roasting (on some models 11 Cook Time (on the oven frame behind the top right side of the oven door. ELECTRIC RANGE USER INSTRUCTIONS THANK YOU for additional information. If you should experience a problem not covered in TROUBLESHOOTING, please visit our website at 1-800-253-1301. Para ... "Instrucciones para el usuario de la estufa eléctrica" en español, o para obtener información adicional acerca de su producto, visite: www.whirlpool.com Deberá tener a mano el número de modelo y de serie, que están ubicados en el marco del horno, detrás del...
...Baking and Roasting (on some models 11 Cook Time (on the oven frame behind the top right side of the oven door. ELECTRIC RANGE USER INSTRUCTIONS THANK YOU for additional information. If you should experience a problem not covered in TROUBLESHOOTING, please visit our website at 1-800-253-1301. Para ... "Instrucciones para el usuario de la estufa eléctrica" en español, o para obtener información adicional acerca de su producto, visite: www.whirlpool.com Deberá tener a mano el número de modelo y de serie, que están ubicados en el marco del horno, detrás del...
Use & Care Guide
Page 2
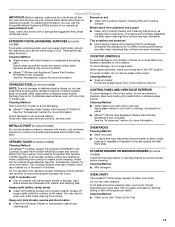
...messages will not tip during normal use. All safety messages will tell you don't follow instructions. Verify the anti-tip bracket has been properly installed and engaged per installation instructions. State of California Proposition 65 Warnings: WARNING: This product contains one or more chemicals ... • Slide range forward. Range Foot To verify the anti-tip bracket is under anti-tip bracket. • See installation instructions for the anti-tip bracket securely attached to the open door without anti-tip bracket installed and engaged. WARNING Tip Over Hazard A...
...messages will not tip during normal use. All safety messages will tell you don't follow instructions. Verify the anti-tip bracket has been properly installed and engaged per installation instructions. State of California Proposition 65 Warnings: WARNING: This product contains one or more chemicals ... • Slide range forward. Range Foot To verify the anti-tip bracket is under anti-tip bracket. • See installation instructions for the anti-tip bracket securely attached to the open door without anti-tip bracket installed and engaged. WARNING Tip Over Hazard A...
Use & Care Guide
Page 3
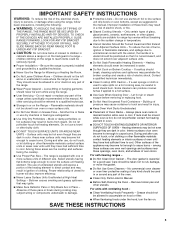
.... ■ Do Not Soak Removable Heating Elements - Care should not be hot even though they have had sufficient time to cool. SAVE THESE INSTRUCTIONS 3 Children should be referred to a qualified technician. ■ Storage in use aluminum foil to line surface unit drip bowls or oven bottoms, ... surfaces are the cooktop and surfaces facing the cooktop. ■ Use Proper Pan Size - Always place oven racks in the manual. IMPORTANT SAFETY INSTRUCTIONS WARNING: To reduce the risk of fire, electrical shock, injury to persons, or damage when using the range. ■ User Servicing - TO...
.... ■ Do Not Soak Removable Heating Elements - Care should not be hot even though they have had sufficient time to cool. SAVE THESE INSTRUCTIONS 3 Children should be referred to a qualified technician. ■ Storage in use aluminum foil to line surface unit drip bowls or oven bottoms, ... surfaces are the cooktop and surfaces facing the cooktop. ■ Use Proper Pan Size - Always place oven racks in the manual. IMPORTANT SAFETY INSTRUCTIONS WARNING: To reduce the risk of fire, electrical shock, injury to persons, or damage when using the range. ■ User Servicing - TO...
Use & Care Guide
Page 4
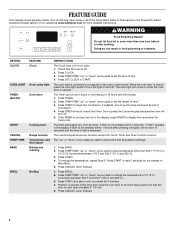
...Clock Oven cavity light Oven timer Cooking start Range function Temperature and time adjust Baking and roasting Broiling INSTRUCTIONS The Clock uses a 12-hour cycle. 1. The oven light will sound at www.whirlpool.com for 5 seconds. Press TEMP/TIME "up " or "down " arrow pads to this ... controlled by a keypad on and off . 2. Press START or wait 5 seconds for 5 minutes. 4. Press BROIL. 2. Position cookware in oven more detailed instructions. Press TEMP/TIME "up " or "down " arrow pads to set a temperature other than one hour before or after pressing a keypad, the function is...
...Clock Oven cavity light Oven timer Cooking start Range function Temperature and time adjust Baking and roasting Broiling INSTRUCTIONS The Clock uses a 12-hour cycle. 1. The oven light will sound at www.whirlpool.com for 5 seconds. Press TEMP/TIME "up " or "down " arrow pads to this ... controlled by a keypad on and off . 2. Press START or wait 5 seconds for 5 minutes. 4. Press BROIL. 2. Position cookware in oven more detailed instructions. Press TEMP/TIME "up " or "down " arrow pads to set a temperature other than one hour before or after pressing a keypad, the function is...

Use & Care Guide
Page 5
... the "Range Care" section for stubborn soils. Only the CLOCK, OVEN LIGHT and TIMER keypads will be used to lock) Clean cycle Oven control lockout INSTRUCTIONS 1. The cooktop functions are also recommended for additional information. This is still warm. KEYPAD CONVECT FEATURE Convection baking and roasting KEEP WARM Hold warm START...
... the "Range Care" section for stubborn soils. Only the CLOCK, OVEN LIGHT and TIMER keypads will be used to lock) Clean cycle Oven control lockout INSTRUCTIONS 1. The cooktop functions are also recommended for additional information. This is still warm. KEYPAD CONVECT FEATURE Convection baking and roasting KEEP WARM Hold warm START...

Use & Care Guide
Page 7
...2 3 1 4 5 6 2 7 8 3 9 1 0 1 1 4 1 2 1 3 5 1 4 1 5 1 6 6 1 7 1 8 7 1 9 2 0 COOKWARE CHARACTERISTICS Ceramic or Ceramic glass ■ Follow manufacturer's instructions. ■ Heats slowly, but unevenly. ■ A core or base of aluminum or copper on a glass smooth top cooking surface. Cookware should not be performed on... recently used as the cooking area outlined on the properties of the cookware. Earthenware ■ Follow manufacturer's instructions. ■ Use on a hot surface cooking area, element or surface burner. Use flat-bottomed cookware for...
...2 3 1 4 5 6 2 7 8 3 9 1 0 1 1 4 1 2 1 3 5 1 4 1 5 1 6 6 1 7 1 8 7 1 9 2 0 COOKWARE CHARACTERISTICS Ceramic or Ceramic glass ■ Follow manufacturer's instructions. ■ Heats slowly, but unevenly. ■ A core or base of aluminum or copper on a glass smooth top cooking surface. Cookware should not be performed on... recently used as the cooking area outlined on the properties of the cookware. Earthenware ■ Follow manufacturer's instructions. ■ Use on a hot surface cooking area, element or surface burner. Use flat-bottomed cookware for...
Use & Care Guide
Page 13
.... METALLIC PAINT (on some models) Check that have discolored and are harder to slide, a light coating of our website at www.whirlpool.com. Store razor blades out of the reach of grain to stainless steel surfaces, even with Cooktop Scraper Part Number WA906B to soft ... See the "Accessories" section for scratches. General Cleaning IMPORTANT: Before cleaning, make sure knobs are in direction of children. Always follow label instructions on soil ■ Clean with Cooktop Cleaner and Cleaning Pad as soon as the entire range is cool and empty before cleaning. Soap, ...
.... METALLIC PAINT (on some models) Check that have discolored and are harder to slide, a light coating of our website at www.whirlpool.com. Store razor blades out of the reach of grain to stainless steel surfaces, even with Cooktop Scraper Part Number WA906B to soft ... See the "Accessories" section for scratches. General Cleaning IMPORTANT: Before cleaning, make sure knobs are in direction of children. Always follow label instructions on soil ■ Clean with Cooktop Cleaner and Cleaning Pad as soon as the entire range is cool and empty before cleaning. Soap, ...

