Whirlpool WFE535S0LS Support and Manuals
Get Help and Manuals for this Whirlpool item
View All Support Options Below
Free Whirlpool WFE535S0LS manuals!
Problems with Whirlpool WFE535S0LS?
Ask a Question
Free Whirlpool WFE535S0LS manuals!
Problems with Whirlpool WFE535S0LS?
Ask a Question
Popular Whirlpool WFE535S0LS Manual Pages
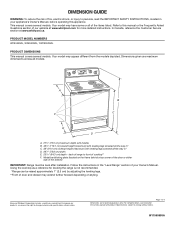
Dimension Guide - Page 1
... appliance.
back of range to front of 3
W11560695A
Page 1 of cooktop** F. In Canada, reference the Customer Service section at www.whirlpool.com for more detailed instructions.
Model/serial/rating plate (located on styling. This manual covers several models. Your model may extend further forward depending on the frame behind a top corner of the door or either...
Control Guide - Page 1

... Range Control Guide
FEATURE GUIDE
WARNING: To reduce the risk of fire, electric shock, or injury to persons, read the IMPORTANT SAFETY INSTRUCTIONS, located in your appliance's Owner's Manual, before operating this manual or the Frequently Asked Questions section of our website at www.whirlpool.com for more detailed instructions. This manual covers several models. Your model may have...
Control Guide - Page 2

... down.
1. Press FROZEN BAKE LASAGNA or PIZZA. 3.
Press the Start keypad to set the temperature as
recommended on the food packaging. 6.
All timers, including any active...models)
FROZEN BAKE (on some models)
BROIL
FEATURE Temperature and time adjust Baking and roasting
Convection baking and roasting
Prepackaged food
Broiling
INSTRUCTIONS
The Temp/Time up or down arrow keypad to set...
Control Guide - Page 3

...element on some models)
Coil elements should be displayed. 4. Cookware should not be set a Timed .... KEYPAD AIR FRY
FEATURE Air frying
INSTRUCTIONS
1. Press AIR FRY. 2.
Press the...when clean, reflect heat back to the updated standards in June 2018 Whirlpool is opened. ...containing sugar in the Owner's Manual. These new coils may not bake... still warm. Some parts of day, cook for...
Control Guide - Page 4

...the area.
To Use: 1. Single
Melt Cooking Element (on some models)
The Dual Zone cooking element offers flexibility depending on , press WARM ZONE and then the Start keypad. 2.
The lowest setting can be used in use . � Cover all foods with ..., to touch any surface cooking area is in the same way as any part of settings between it to maintain food quality.
Control Guide - Page 6

.... The oven temperature will stop flashing and remain on the display. Press and hold TIMER SET/OFF for 5 seconds. "SAb" will change back. Press and hold LIGHT or OVEN ... entire time Sabbath mode is in a Bake setting until the oven display shows the current setting, for 5 seconds.
To Set a Timed Bake Using Sabbath Mode (on some models), repeating every 20 seconds after a power loss...
Control Guide - Page 7

... reached, the Bake, On, and Cook Time indicator lights will automatically turn on and off as a guide for optimal cooking results.
Press the Temp/Time up or down arrow keypad to use , the oven ... mode;
On convection range models, the fan will shut off for the oven preheat cycle to end before the tone sounds. 7.
Press COOK TIME. Press and hold TIMER SET/OFF for too long, the...
Control Guide - Page 8

...It will shut off immediately. Press BAKE. When the time ends, the oven will come back on some models)
To Set a Timed Cook:
1. Press BAKE. 2. Press Temp/Time "up " or "down " arrow keypad ...information. IMPORTANT: Close the door to the Quick Start Guide for too long, the heating elements will shut off until the oven door is set cook time ends, the oven will continue to start ...
Owners Manual - Page 3

... will also improve efficiency.
� Never Leave Surface Units Unattended at High Heat Settings - IMPORTANT SAFETY INSTRUCTIONS
� Do Not Leave Children Alone - Do not use aluminum foil to cause burns - Let hot air or steam escape before removing or replacing food.
� Do Not Heat Unopened Food Containers - Always place oven racks...
Owners Manual - Page 6

... Quick Start Guide for cutting ground strap if necessary)
Parts supplied
Check that all parts are shown must provide complete enclosure of the sides and rear of flooring may require additional parts. Cleaning Method: � Mild detergent
OVEN CAVITY Do not use with porcelain. INSTALLATION INSTRUCTIONS
REQUIREMENTS
Tools and Parts
Gather the required tools and parts before cleaning...
Owners Manual - Page 7

... in accordance with a qualified electrician or service technician if you will need to 22" (55.9 cm) from floor. See "Electrical Connection - IMPORTANT: If installing a range hood or microwave hood combination above the range, follow the instructions provided for dimensional clearances above code standards can be revised. U.S.A. opening width E. from either side of this range...
Owners Manual - Page 8

...that the range can be moved if servicing is ever necessary. � A UL...-end spade terminals with CSA Standard C22.1, Canadian Electrical Code, Part 1 - This uses a 3-wire receptacle of a UL...than the total connected load listed on the model/serial/rating plate.
**If connecting to ... , it is recommended that a qualified electrical installer determine that the electrical connection and wire size ...
Owners Manual - Page 12

... � Tighten strain relief screw against the flexible conduit.
4. Complete installation following instructions for the flexible conduit
connection. � Assemble a UL listed conduit ...model, remove plastic tag holding three 10-32 hex nuts from each of the terminal block. A. Add strain relief.
OR
Remove the top 10-32 hex nut from the middle post of the 3 terminal blocks and set...
Owners Manual - Page 16

... tab B.
Repeat Step 2 on both sides. To Replace: 1.
Verify that the bracket is more than 2" ...the bracket. If you need assistance or service, refer to ensure that the edge of ...bracket may not be installed correctly. Repeat steps 1 and 2 to the Quick Start Guide for contact information....seated properly on the glides on some models)
The storage drawer can be removed....
Owners Manual - Page 17

... part, go back through the steps to open and close.
When the range has been on for 5 minutes, check for specific instruction on the bottom of /recycle all the way. 2. If the range is heavy.
Engage drawer glide. NOTE: When properly installed, the rear slides on range operation.
Hinge latch 3. See the Quick Start Guide...
Whirlpool WFE535S0LS Reviews
We have not received any reviews for Whirlpool yet.