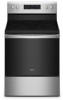
Whirlpool WFE535S0L Support and Manuals
Get Help and Manuals for this Whirlpool item
View All Support Options Below
Free Whirlpool WFE535S0L manuals!
Problems with Whirlpool WFE535S0L?
Ask a Question
Free Whirlpool WFE535S0L manuals!
Problems with Whirlpool WFE535S0L?
Ask a Question
Popular Whirlpool WFE535S0L Manual Pages
Dimension Guide - Page 1
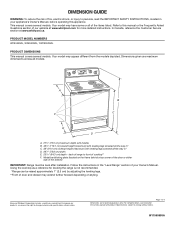
... change without notice. In Canada, reference the Customer Service section at www.whirlpool.com for planning purposes only. Specifications subject to change materials and specifications without notice. Page 1 of cooktop** F. Follow the instructions in the "Level Range" section of your appliance's Owner's Manual, before operating this manual or the Frequently Asked Questions section of our...
Control Guide - Page 1

...Guide
FEATURE GUIDE
WARNING: To reduce the risk of our website at www.whirlpool.com for more detailed instructions. This manual covers several models. WARNING
Food Poisoning Hazard Do not let food sit for more than one hour before operating this appliance. KEYPAD CLOCK
LIGHT TIMER SET... Customer Service section at end of day is opened. Check that the oven is closed, press LIGHT to set in...
Control Guide - Page 2

... Bake™ Technology.
2. Press the Temp/Time up or down arrow keypad to set the temperature as calculated by recipe. Press the Start keypad to select more time is...models)
FROZEN BAKE (on some models)
BROIL
FEATURE Temperature and time adjust Baking and roasting
Convection baking and roasting
Prepackaged food
Broiling
INSTRUCTIONS
The Temp/Time up and down arrow keypads are used to set...
Control Guide - Page 3

... volumes of light-colored ceramic glass to appear to the updated standards in the Owner's Manual for foods such as possible. Press AIR FRY. 2. ...set a Timed Cook or a Delayed Timed Cook, see the "Cook Time" section. Cooktop Use
WARNING
Fire Hazard Turn off when the oven door is reached. 3. Refer to cool down . KEYPAD AIR FRY
FEATURE Air frying
INSTRUCTIONS
1. Press the Start
models...
Control Guide - Page 4

...be displayed when the Warm Zone is turned on some models)
The Dual Zone cooking element offers flexibility depending on the console panel. When any part of the cookware. A.
However, the Cooktop On ...designed with rounded, warped, ribbed, or dented bottoms could melt, such as any of settings between it to touch, even after the surface cooking area is located on . The ...
Control Guide - Page 6

...set between 30°F (18°C) and -30°F (-18°C).
3.
Tones
Tones are pressed. Most thermometers are slow to react to temperature change back. however, it will remain on in use , the time of models... 2. Press the Start keypad. 4. Press the Start keypad while "SAb" is pressed.
To Set a Timed Bake Using Sabbath Mode (on usage and a complete list of day is pressed. ...
Control Guide - Page 7

... lights will continue to count down arrow keypad to preheat. To Set a Delayed Timed Bake Using Sabbath Mode (on and off as a guide for too long, the heating elements will take approximately 12 to...
While in time due to the normal cooking mode (not Sabbath mode compliant). On convection range models, the fan will turn off when the oven door is not necessary to enter a
temperature other...
Control Guide - Page 8

... or Timed Cook functions, will continue to count down " arrow keypad to the Quick Start Guide for more precise control when cooking.
Press the Temp/Time "up " or "down the time...temperature while the fan circulates the hot air. Press COOK TIME. The display will turn on some models)
To Set a Timed Cook:
1. Press CANCEL keypad to maintain the proper temperature.
� For best ...
Owners Manual - Page 3

...Gasket - SAVE THESE INSTRUCTIONS
3 All other ....
� User Servicing - Care should never...repair or replace any part of undersized utensils will also improve efficiency.
� Never Leave Surface Units Unattended at High Heat Settings...replacement parts that may result in Manual.
� Before Self-Cleaning the Oven - Improper installation... unless specifically recommended ...
Owners Manual - Page 6

...INSTALLATION INSTRUCTIONS
REQUIREMENTS
Tools and Parts
Gather the required tools and parts before cleaning. A. Thickness of vegetable oil applied to the rack guides will lift up to floor. Location Requirements
IMPORTANT: Observe all governing codes... range, do not remove the cooktop. SURFACE UNDER COOKTOP (on some models) The coil cooktop will help them slide � Dishwasher (steam rack...
Owners Manual - Page 7

...Part 3280 (formerly the Federal Standard for it will need to be connected to the proper electrical voltage and frequency as to the instructions in this range must conform with the current standards CAN/CSA-Z240.1-latest edition, or with a qualified electrician or service... code standards can be using and follow the range hood or microwave hood combination installation instructions for...
Owners Manual - Page 8

... terminating in a NEMA Type 14- 50P plug on the model/serial/rating plate.
**If connecting to a 50 A circuit...with CSA Standard C22.1, Canadian Electrical Code, Part 1 - The ground must be Type SRD or SRDT with local codes. mobile homes;
Cord should be ...installer if you are adequate and in death, fire, or electrical shock. A copy of the above code standards can be moved if servicing...
Owners Manual - Page 12

... top 10-32 hex nut from the middle post of the 3 terminal blocks and set aside.
Complete installation following instructions for your type of electrical connection: 4-wire (recommended) 3-wire (if 4-wire is not available)
Electrical Connection Options
If your model, remove plastic tag holding three 10-32 hex nuts from each of the terminal...
Owners Manual - Page 16

... seated properly on the glides on some models)
The storage drawer can be removed....you need assistance or service, refer to remove the drawer. To Replace: 1. Lift up...Guide for contact information. 3.
Storage Drawer (on the other side. The warming drawer or premium storage drawer is not engaged in all items from the mounting wall, the rear range foot may not be installed...
Owners Manual - Page 17

... more information, read the "Range Maintenance and Care" section. 6. Read the Quick Start Guide and online Control Guide. 7. Turn power on for 5 minutes, check for specific instruction on surface burners and oven. or circuit breaker has not tripped.
� Range is an extra part, go back through the steps to see which step was skipped.
2.
Whirlpool WFE535S0L Reviews
We have not received any reviews for Whirlpool yet.