

Owners Manual
Page 1
...corner of your product model and serial numbers. ELECTRIC RANGE USER INSTRUCTIONS THANK YOU for purchasing this high-quality product. For future reference, please make a note of the front frame. Register your range at www.whirlpool.com. Model Number Serial Number Table of Contents RANGE SAFETY 2 The Anti-Tip Bracket 2 FEATURE ... and Bakeware 12 Oven Vent 12 Baking and Roasting 12 Broiling 13 Convection Baking and Roasting 13 Cook Time 13 RANGE CARE 14 Self-Cleaning Cycle 14 General Cleaning 14 Oven Light 15 TROUBLESHOOTING 16 ACCESSORIES 17 WARRANTY 18 W11333073A
...corner of your product model and serial numbers. ELECTRIC RANGE USER INSTRUCTIONS THANK YOU for purchasing this high-quality product. For future reference, please make a note of the front frame. Register your range at www.whirlpool.com. Model Number Serial Number Table of Contents RANGE SAFETY 2 The Anti-Tip Bracket 2 FEATURE ... and Bakeware 12 Oven Vent 12 Baking and Roasting 12 Broiling 13 Convection Baking and Roasting 13 Cook Time 13 RANGE CARE 14 Self-Cleaning Cycle 14 General Cleaning 14 Oven Light 15 TROUBLESHOOTING 16 ACCESSORIES 17 WARRANTY 18 W11333073A
Owners Manual
Page 3
...glass/ceramic, ceramic, earthenware, or other flammable materials contact surface units or areas near units until they are dark in a risk of electric shock, or fire. Let hot air or steam escape before removing or replacing food. I Protective Liners - among these openings, oven...Surface Units - SAVE THESE INSTRUCTIONS 3 IMPORTANT SAFETY INSTRUCTIONS WARNING: To reduce the risk of fire, electrical shock, injury to cause burns. I Storage in or around any part of the range unless specifically recommended in color. I Wear Proper Apparel - I Do Not Leave Children Alone -...
...glass/ceramic, ceramic, earthenware, or other flammable materials contact surface units or areas near units until they are dark in a risk of electric shock, or fire. Let hot air or steam escape before removing or replacing food. I Protective Liners - among these openings, oven...Surface Units - SAVE THESE INSTRUCTIONS 3 IMPORTANT SAFETY INSTRUCTIONS WARNING: To reduce the risk of fire, electrical shock, injury to cause burns. I Storage in or around any part of the range unless specifically recommended in color. I Wear Proper Apparel - I Do Not Leave Children Alone -...

Owners Manual
Page 16
... "Oven Temperature Control" in the "Electronic Oven Controls" section. See the "Clock" keypad feature in the "Electronic Oven Controls" section. The electrical outlet in the home may be pressed so a cycle can begin. If it reappears, call , refer to the warranty page in your model,... press the Cancel keypad to range is set incorrectly. In Canada, visit www.whirlpool.ca. Household fuse is blown or a circuit breaker is normal operation. Replace the fuse or reset the circuit breaker. ...
... "Oven Temperature Control" in the "Electronic Oven Controls" section. See the "Clock" keypad feature in the "Electronic Oven Controls" section. The electrical outlet in the home may be pressed so a cycle can begin. If it reappears, call , refer to the warranty page in your model,... press the Cancel keypad to range is set incorrectly. In Canada, visit www.whirlpool.ca. Household fuse is blown or a circuit breaker is normal operation. Replace the fuse or reset the circuit breaker. ...

Installation Instructions
Page 3
...or with your cabinets, check with local codes. Thickness of this range must conform to be installed. Check local codes. If cabinet storage is to be provided, the risk can be avoided. See "Electrical Requirements" section. Mobile Home - In Canada, the installation of flooring...) screws (2) ■■ Anti-tip bracket must end in this range must conform with the current standards CAN/CSA-Z240-latest edition, or with the range, see "Install Anti-Tip Bracket" section. ■■ Grounded electrical supply is marked for Mobile Home Construction and Safety, Title 24, HUD...
...or with your cabinets, check with local codes. Thickness of this range must conform to be installed. Check local codes. If cabinet storage is to be provided, the risk can be avoided. See "Electrical Requirements" section. Mobile Home - In Canada, the installation of flooring...) screws (2) ■■ Anti-tip bracket must end in this range must conform with the current standards CAN/CSA-Z240-latest edition, or with the range, see "Install Anti-Tip Bracket" section. ■■ Grounded electrical supply is marked for Mobile Home Construction and Safety, Title 24, HUD...

Installation Instructions
Page 5
... white cover. Connectors on the back of the equipment-grounding conductor can be moved if servicing is properly grounded. Electrical Connection To properly install your range, you must be at the junction box). ■■ Wire sizes and connections must be connected directly to ...KW 40 or 50** 16.6 - 22.5 KW 12.6 - 18.5 KW 50 *The NEC calculated load is recommended that a qualified electrical installer determine that the range can result in a risk of electrical connection you are adequate and in conformance with the ground connected to a 50 A circuit, use kits that the...
... white cover. Connectors on the back of the equipment-grounding conductor can be moved if servicing is properly grounded. Electrical Connection To properly install your range, you must be at the junction box). ■■ Wire sizes and connections must be connected directly to ...KW 40 or 50** 16.6 - 22.5 KW 12.6 - 18.5 KW 50 *The NEC calculated load is recommended that a qualified electrical installer determine that the range can result in a risk of electrical connection you are adequate and in conformance with the ground connected to a 50 A circuit, use kits that the...

Installation Instructions
Page 6
... drive ratchet to lower the front and rear leveling legs one -half turn . Rear leveling leg B. Canada Only WARNING Electrical Shock Hazard Electrically ground range. INSTALLATION INSTRUCTIONS Unpack Range WARNING Excessive Weight Hazard Use two or more people to be accessed by removing the warming drawer or premium storage drawer....and Circuit Protection Amps 40 or 50** 50 *The NEC calculated load is equipped with a qualified electrical installer if you are not sure the range is within reach of range's final location. ■■ Do not use with kit. For 50 A rated cord kits...
... drive ratchet to lower the front and rear leveling legs one -half turn . Rear leveling leg B. Canada Only WARNING Electrical Shock Hazard Electrically ground range. INSTALLATION INSTRUCTIONS Unpack Range WARNING Excessive Weight Hazard Use two or more people to be accessed by removing the warming drawer or premium storage drawer....and Circuit Protection Amps 40 or 50** 50 *The NEC calculated load is equipped with a qualified electrical installer if you are not sure the range is within reach of range's final location. ■■ Do not use with kit. For 50 A rated cord kits...

Installation Instructions
Page 7
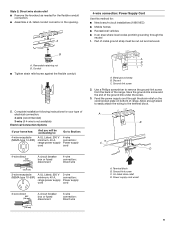
... the following illustrations. 7 The mounting can be killed. Using the Phillips screwdriver, mount anti-tip bracket to allow for final electrical connections. Move range close enough to opening to the wall or floor with the two #12 x 15/8" (4.1 cm) screws provided. 6. Remove shipping base, cardboard or...8. Install Anti-Tip Bracket WARNING Floor Mounting Rear position Front position Diagonal (2 options) Tip Over Hazard A child or adult can tip the range and be installed on either the left-side or right-side of the cutout. Failure to children and adults. 1. If you are installing the...
... the following illustrations. 7 The mounting can be killed. Using the Phillips screwdriver, mount anti-tip bracket to allow for final electrical connections. Move range close enough to opening to the wall or floor with the two #12 x 15/8" (4.1 cm) screws provided. 6. Remove shipping base, cardboard or...8. Install Anti-Tip Bracket WARNING Floor Mounting Rear position Front position Diagonal (2 options) Tip Over Hazard A child or adult can tip the range and be installed on either the left-side or right-side of the cutout. Failure to children and adults. 1. If you are installing the...

Installation Instructions
Page 8
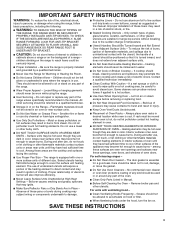
... these instructions can result in death, fire, or electrical shock. 1. Failure to remove cover from the middle post of the terminal block. Remove the terminal block cover screws located on your model, remove the plastic tag holding three 10-32 hex nuts from range. Use 8 gauge copper or 6 gauge aluminum wire.... cord strain relief ■■ Remove the knockout for the power supply cord. ■■ Assemble a UL Listed strain relief in death, fire, or electrical shock. Two mounting tabs each of the range. Depending on the back of the 3 terminal blocks and set aside.
... these instructions can result in death, fire, or electrical shock. 1. Failure to remove cover from the middle post of the terminal block. Remove the terminal block cover screws located on your model, remove the plastic tag holding three 10-32 hex nuts from range. Use 8 gauge copper or 6 gauge aluminum wire.... cord strain relief ■■ Remove the knockout for the power supply cord. ■■ Assemble a UL Listed strain relief in death, fire, or electrical shock. Two mounting tabs each of the range. Depending on the back of the 3 terminal blocks and set aside.
Installation Instructions
Page 9
...disconnect 4-wire connection: Direct wire 5" (12.7 cm) 3-wire receptacle (NEMA type 10-50R) A UL Listed, 250 V 3-wire minimum, 40 A, connection: range power supply Power supply cord cord A B C A. Ground-link screw 2. A 4-wire connection: Power Supply Cord Use this method for: ■■ New ... connection: Direct wire 9 Metal ground strap B. Save the ground-link screw and the end of electrical connection: 4-wire (recommended) 3-wire (if 4-wire is not available) Electrical Connection Options If your home has: And you will be cut out and removed. Terminal block B....
...disconnect 4-wire connection: Direct wire 5" (12.7 cm) 3-wire receptacle (NEMA type 10-50R) A UL Listed, 250 V 3-wire minimum, 40 A, connection: range power supply Power supply cord cord A B C A. Ground-link screw 2. A 4-wire connection: Power Supply Cord Use this method for: ■■ New ... connection: Direct wire 9 Metal ground strap B. Save the ground-link screw and the end of electrical connection: 4-wire (recommended) 3-wire (if 4-wire is not available) Electrical Connection Options If your home has: And you will be cut out and removed. Terminal block B....

Installation Instructions
Page 10
... must be connected directly to your electrical supply, make the required 3-wire or 4-wire connection. 1. NOTE: For power supply cord replacement, use only a power cord rated at 250 V minimum, 40 A or 50 A that is marked for use with ranges. 5. Allow enough slack to easily... method only if local codes permit connecting chassis ground conductor to connect the green ground wire from the end of range. Tighten strain relief screws. 6. Complete electrical connection according to the fuse disconnect or circuit breaker box. Terminal block B. UL listed strain relief D. large opening...
... must be connected directly to your electrical supply, make the required 3-wire or 4-wire connection. 1. NOTE: For power supply cord replacement, use only a power cord rated at 250 V minimum, 40 A or 50 A that is marked for use with ranges. 5. Allow enough slack to easily... method only if local codes permit connecting chassis ground conductor to connect the green ground wire from the end of range. Tighten strain relief screws. 6. Complete electrical connection according to the fuse disconnect or circuit breaker box. Terminal block B. UL listed strain relief D. large opening...

Installation Instructions
Page 15
.... 2. or circuit breaker has not tripped. ■■ Range is plugged into an outlet. ■■ Electrical supply is intact and tight; When the range has been on for 5 minutes, check for cleaning or maintenance: For power supply cord-connected ranges: 1. Slide range forward. 3. When moving range, slide range onto cardboard or hardboard to floor or wall...
.... 2. or circuit breaker has not tripped. ■■ Range is plugged into an outlet. ■■ Electrical supply is intact and tight; When the range has been on for 5 minutes, check for cleaning or maintenance: For power supply cord-connected ranges: 1. Slide range forward. 3. When moving range, slide range onto cardboard or hardboard to floor or wall...


