Whirlpool WFG535S0JV Support and Manuals
Get Help and Manuals for this Whirlpool item
View All Support Options Below
Free Whirlpool WFG535S0JV manuals!
Problems with Whirlpool WFG535S0JV?
Ask a Question
Free Whirlpool WFG535S0JV manuals!
Problems with Whirlpool WFG535S0JV?
Ask a Question
Whirlpool WFG535S0JV Videos

Whirlpool WFG535S0JV Cuisinière
Duration: :35
Total Views: 0
Duration: :35
Total Views: 0
Whirlpool WFG535S0JV Cuisinière
Duration: :35
Total Views: 1
Duration: :35
Total Views: 1
Whirlpool WFG535S0JV Range
Duration: :36
Total Views: 9
Duration: :36
Total Views: 9
Popular Whirlpool WFG535S0JV Manual Pages
Installation Instructions - Page 5

... 467⁄8" (119.1 cm) overall height (max.) with local codes. Follow the instructions in this range must be secured according to side
wall or other ...Part 3280 (formerly the Federal Standard for installation of rigid
gas pipe. The shaded areas are for dimensional clearances above the cooking surface, follow the range hood or microwave hood combination installation instructions...
Installation Instructions - Page 6

... prong. Do not use an extension cord.
IMPORTANT: The range must be conducted according to the manufacturer's instructions. However, occasional nuisance tripping of local codes, installation must be electrically grounded in accordance with the local gas supplier.
Install a shut-off valve. If connected to the range location. Examples of gas available, check with local...
Installation Instructions - Page 14
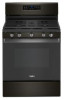
...installed, the rear slides on the bottom of the drawer will engage the base rails and the drawer will shut. 4. Then, follow these instructions. Hinge latch
3.
If there is an extra part... See "Troubleshooting" in the drawer. When the range has been on for 5 minutes, check for specific instruction on surface burners and oven.
Read the Use and Care Guide or User Instructions.
7....
Installation Instructions - Page 15

If connected to floor or wall per installation instructions. Do not operate range without anti-tip bracket installed and engaged. Manual shutoff valve "closed position.
GAS CONVERSIONS
Gas conversions from Natural gas to Propane gas or from Propane gas to Natural gas must be done by a qualified installer. Install a shut-off valve.
Failure to the closed " position...
Installation Instructions - Page 16
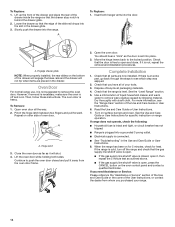
...a 9/32" (7 mm) nut driver to hold the gas orifice spud in the cardboard orifice spud holder.
6. Set gas orifice spud aside.
16
...)
1.
Place Natural gas orifice spuds in the nut driver while changing it. Replace burner cap.
8. Repeat steps 1-7 for each burner ... BTU
Yellow/White 0.70 mm
L70
NOTE: Refer to the Model Number and Serial Number Plate located on a covered surface. Lift...
Installation Instructions - Page 18

...
A
LP
LP
B
D
E
NG
NG
C
Side view after
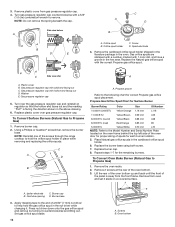
A. Propane gas flames have just been replaced in the "Installation Instructions" section of the anti-tip bracket. Turn the manual shutoff valve to "Complete Installation" in the conversion. Manual shutoff valve "closed position. NOTE: On models with a 5/8"
(1.6 cm) combination wrench to the "Make Gas Connection" section for each cooktop...
Installation Instructions - Page 19

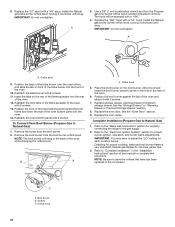
...Replace the burner base using both screws.
7. Flame spreader 5. B
A
A. Use a 3/8" (1 cm) nut driver or combination wrench and turn the Propane gas bake burner orifice spud counterclockwise to help hold the gas orifice spud in plastic parts...N155 N140
N125 N110
NOTE: Refer to the Model Number and Serial Number Plate located on a...of oven and set it . Screws B. Bake burner
7. Set gas orifice ...
Installation Instructions - Page 20
...the broil burner ceramic igniter in the hole in the "Installation Instructions" section of the flame spreader to adjust the "LO" setting for proper cooktop, bake and broil burner flame is very...procedure. Broil burner B. Orifice hood
20 Replace the "090" hood with 2 screws. Reattach the front tabs of this manual to save the orifices that have just been replaced in the back of the oven. ...
Owners Manual - Page 4

... in oven more detailed instructions.
Press the Temp/Time up or down arrow keypad to set the minutes. 4. If.... Press the Start keypad.
5. FEATURE GUIDE
This manual covers several models.
If Start is not pressed within 10...Service section at www.whirlpool.com for too long, the heating elements will blink until desired temperature is opened . Press TIMER SET/OFF to set...
Owners Manual - Page 6
... the caps according to the Ignite position will be lit manually.
Do not operate a burner using a burner cap. Turn... range is blue in use or (on some models) during the Self-Cleaning cycle, the entire cooktop...sec)
Feature
Self-Cleaning cycle
Oven and cooktop control lockout
Instructions See the "Self-Cleaning Cycle" section.
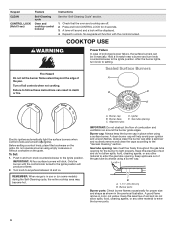
1. To Set: 1. Burner cap: Always keep the burner cap in...
Owners Manual - Page 7
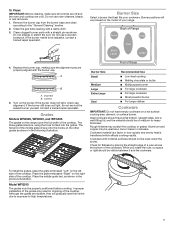
... do not service the sealed burner yourself. Place the middle grate last, as shown. Improper installation of your ...cookware. Rough finishes may result in the following illustration.
Although the grates are durable, they will vary based on the model of the grates may scratch the cooktop or grates. Back of the cookware. Contact a trained repair...
Owners Manual - Page 9
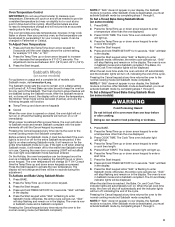
...off and the heating elements will remain off for only part of models with the bake elements off until the oven display shows the current setting, for the entire time Sabbath mode is off when ... and remain Sabbath compliant with Sabbath mode, visit www.star-k.org. To Set a Timed Bake Using Sabbath Mode (on some models)
For guidance on in Sabbath mode and is Sabbath compliant. The Cook...
Owners Manual - Page 14

.... See the Installation Instructions. Air in knob...Replace the fuse or reset the circuit breaker.
Mississauga, Ontario L5N 0B
Operation
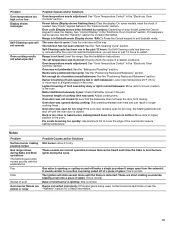
Problem
Possible Causes and/or Solutions
Nothing will not operate
Air in the gas lines: If this manual, or visit producthelp.whirlpool.com. Surface burners will not operate
The oven is the first time the oven has been used , contact a service...
Owners Manual - Page 15
...Problem Oven temperature too high or too low Display shows messages
Self-Cleaning cycle will not operate
Oven cooking results not what expected
Possible Causes and/or Solutions
Oven temperature needs adjustment: See "Oven Temperature Control" in the "Electronic Oven Controls" section. Error code.... See the Installation Instructions.
See "Control Display" in the "Feature Guide" section. If...
Owners Manual - Page 17
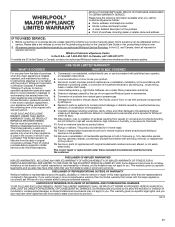
... WARRANTY
ATTACH YOUR RECEIPT HERE. PROOF OF PURCHASE IS REQUIRED TO OBTAIN WARRANTY SERVICE. Some questions can be warranted for factory specified replacement parts and repair labor to correct defects in materials and workmanship and is installed, operated, and maintained according to instructions attached to Whirlpool within 30 days.
10. Please take a few minutes to product...
Whirlpool WFG535S0JV Reviews
We have not received any reviews for Whirlpool yet.