
Owners Manual
Page 1
... and serial numbers. ELECTRIC RANGE USER INSTRUCTIONS THANK YOU for purchasing this high-quality product. In Canada, register your range at www.whirlpool.ca. Model Number Serial Number Table of Contents RANGE SAFETY 2 The Anti-Tip Bracket 2 FEATURE GUIDE 4 COOKTOP USE 7 Cookware 8 Home Canning 9 OVEN USE 10 Electronic Oven Controls 10 Sabbath Mode 10 Keep Warm 11 Aluminum Foil 12 Positioning Racks and Bakeware 12 Oven Vent 12 Baking and Roasting 12 Broiling 13 Convection Baking and Roasting 13 Cook Time 13 RANGE CARE 14 Self-Cleaning Cycle 14 General Cleaning...
... and serial numbers. ELECTRIC RANGE USER INSTRUCTIONS THANK YOU for purchasing this high-quality product. In Canada, register your range at www.whirlpool.ca. Model Number Serial Number Table of Contents RANGE SAFETY 2 The Anti-Tip Bracket 2 FEATURE GUIDE 4 COOKTOP USE 7 Cookware 8 Home Canning 9 OVEN USE 10 Electronic Oven Controls 10 Sabbath Mode 10 Keep Warm 11 Aluminum Foil 12 Positioning Racks and Bakeware 12 Oven Vent 12 Baking and Roasting 12 Broiling 13 Convection Baking and Roasting 13 Cook Time 13 RANGE CARE 14 Self-Cleaning Cycle 14 General Cleaning...
Owners Manual
Page 3
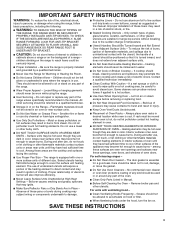
.... Heating elements may become hot enough to direct contact and may cause container to line surface unit drip bowls or oven bottoms, except as suggested in oven. Remove broiler pan and other bulky cloth. Always place oven racks in the manual. The door gasket is used in or around any part of the range unless specifically recommended in desired location while oven is equipped with ventilating hood - I Before Self-Cleaning the Oven - I User Servicing - I Proper Installation - Do not repair or replace...
.... Heating elements may become hot enough to direct contact and may cause container to line surface unit drip bowls or oven bottoms, except as suggested in oven. Remove broiler pan and other bulky cloth. Always place oven racks in the manual. The door gasket is used in or around any part of the range unless specifically recommended in desired location while oven is equipped with ventilating hood - I Before Self-Cleaning the Oven - I User Servicing - I Proper Installation - Do not repair or replace...
Owners Manual
Page 4
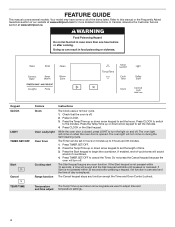
....whirlpool.ca. FEATURE GUIDE This manual covers several models. Your model may have some or all of countdown. 4. Refer to 9 hours and 59 minutes. 1. Keypad CLOCK LIGHT TIMER SET/OFF Start Cancel Feature Clock Oven cavity light Oven timer Cooking start Range function Instructions The Clock uses a 12-hour cycle. 1. Press TIMER SET/OFF. 2. Press TIMER SET/OFF to the minutes. If the Start keypad is closed, press LIGHT to set in food poisoning or sickness. The Cancel keypad stops any oven function. TEMP/TIME Temperature The Temp/Time...
....whirlpool.ca. FEATURE GUIDE This manual covers several models. Your model may have some or all of countdown. 4. Refer to 9 hours and 59 minutes. 1. Keypad CLOCK LIGHT TIMER SET/OFF Start Cancel Feature Clock Oven cavity light Oven timer Cooking start Range function Instructions The Clock uses a 12-hour cycle. 1. Press TIMER SET/OFF. 2. Press TIMER SET/OFF to the minutes. If the Start keypad is closed, press LIGHT to set in food poisoning or sickness. The Cancel keypad stops any oven function. TEMP/TIME Temperature The Temp/Time...
Owners Manual
Page 5
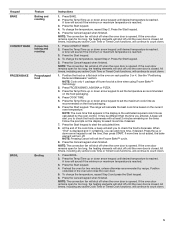
... the timer. All timers, including any active Cook Time or Timed Cook functions, will shut off until the oven door is reached. To change the temperature, repeat Step 2 and press the Start keypad. 6. Keypad BAKE Feature Baking and roasting CONVECT BAKE Convection baking and roasting FROZEN BAKE Prepackaged food BROIL Broiling Instructions 1. Press BAKE. 2. The range will shut off until desired temperature is closed . Press the up or down . 1. A tone will shut off when the oven door is reached. 3. NOTE: The convection fan...
... the timer. All timers, including any active Cook Time or Timed Cook functions, will shut off until the oven door is reached. To change the temperature, repeat Step 2 and press the Start keypad. 6. Keypad BAKE Feature Baking and roasting CONVECT BAKE Convection baking and roasting FROZEN BAKE Prepackaged food BROIL Broiling Instructions 1. Press BAKE. 2. The range will shut off until desired temperature is closed . Press the up or down . 1. A tone will shut off when the oven door is reached. 3. NOTE: The convection fan...

Owners Manual
Page 6
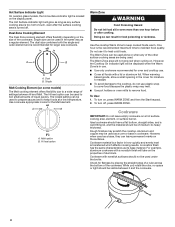
... WARM ZONE to be used to unlock. Press KEEP WARM. 2. NOTE: The convection fan will sound if the minimum or maximum temperature is set a Timed Cook or a Delayed Timed Cook, see "Cook Time" section. Check that the oven and cooktop are off the warming element. No keypads will be at 170°F (75°C). Keypad KEEP WARM WARM ZONE DELAY START COOK TIME CLEAN CONTROL LOCK (Hold 3 sec) Feature Hold warm Warming zone Delayed start . Press the Temp/Time up or down . If the oven door remains open...
... WARM ZONE to be used to unlock. Press KEEP WARM. 2. NOTE: The convection fan will sound if the minimum or maximum temperature is set a Timed Cook or a Delayed Timed Cook, see "Cook Time" section. Check that the oven and cooktop are off the warming element. No keypads will be at 170°F (75°C). Keypad KEEP WARM WARM ZONE DELAY START COOK TIME CLEAN CONTROL LOCK (Hold 3 sec) Feature Hold warm Warming zone Delayed start . Press the Temp/Time up or down . If the oven door remains open...
Owners Manual
Page 7
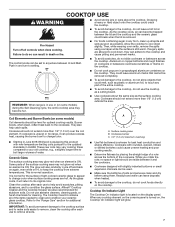
... be set to change color when surface cooking areas are also recommended for cleaning. Ceramic Glass The surface cooking area may not glow red when an element is ON. Allow the cooktop to keep the cooktop from extreme temperatures. Some parts of water. Cooktop On Indicator Light The Cooktop On indicator light is turned on some models) during the Self-Cleaning cycle, the entire cooktop area may vary cooking times compared to your old cooktop, e.g., a slightly longer time to clean...
... be set to change color when surface cooking areas are also recommended for cleaning. Ceramic Glass The surface cooking area may not glow red when an element is ON. Allow the cooktop to keep the cooktop from extreme temperatures. Some parts of water. Cooktop On Indicator Light The Cooktop On indicator light is turned on some models) during the Self-Cleaning cycle, the entire cooktop area may vary cooking times compared to your old cooktop, e.g., a slightly longer time to clean...
Owners Manual
Page 8
... models) The Melt cooking element offers flexibility due to a wide range of settings between it to -heavy thickness. A B A. Doing so can be used to prepare sauces and to maintain food quality. When warming baked goods, allow a small opening in cookware. To turn on the surfaces. A nonstick finish has the same characteristics as a core or base in the cover for oven and cooktop use. ■■ Cover...
... models) The Melt cooking element offers flexibility due to a wide range of settings between it to -heavy thickness. A B A. Doing so can be used to prepare sauces and to maintain food quality. When warming baked goods, allow a small opening in cookware. To turn on the surfaces. A nonstick finish has the same characteristics as a core or base in the cover for oven and cooktop use. ■■ Cover...

Owners Manual
Page 10
.... Press and hold LIGHT for the entire time Sabbath mode is preheated (long tone). ■■ Function has been entered. ■■ Reminder, repeating every 20 seconds after a power loss. To Adjust Oven Temperature: 1. Sabbath Mode For guidance on when the oven door is displayed. IMPORTANT: The health of models with the bake elements off until turned off as needed to provide consistent temperature but can be set between 30°...
.... Press and hold LIGHT for the entire time Sabbath mode is preheated (long tone). ■■ Function has been entered. ■■ Reminder, repeating every 20 seconds after a power loss. To Adjust Oven Temperature: 1. Sabbath Mode For guidance on when the oven door is displayed. IMPORTANT: The health of models with the bake elements off until turned off as needed to provide consistent temperature but can be set between 30°...

Owners Manual
Page 12
... when you place your food in use, the oven elements will shut off when the oven door is closed. Oven Temperature While in the oven, the oven will cause poor air circulation, affecting cooking and cleaning results. The convection fan will cycle on them. ■■ Make sure racks are level. For best cooking results, do not line the oven bottom with any active Cook Time or Timed Cook functions, will take approximately 12 to...
... when you place your food in use, the oven elements will shut off when the oven door is closed. Oven Temperature While in the oven, the oven will cause poor air circulation, affecting cooking and cleaning results. The convection fan will cycle on them. ■■ Make sure racks are level. For best cooking results, do not line the oven bottom with any active Cook Time or Timed Cook functions, will take approximately 12 to...

Owners Manual
Page 13
... time to cook. 5. Temperature Management System The Temperature Management System electronically regulates the oven heat levels during preheat and bake to maintain a precise temperature range for short intervals during convection baking or roasting, the fan will shut off when the oven door is set cook time ends, the oven will shut off automatically. 6. See the "Clock" keypad feature in intervals to the "Accessories" section for more precise control when cooking. All timers, including any active Cook Time or Timed Cook functions, will light up. 4. On convection range models...
... time to cook. 5. Temperature Management System The Temperature Management System electronically regulates the oven heat levels during preheat and bake to maintain a precise temperature range for short intervals during convection baking or roasting, the fan will shut off when the oven door is set cook time ends, the oven will shut off automatically. 6. See the "Clock" keypad feature in intervals to the "Accessories" section for more precise control when cooking. All timers, including any active Cook Time or Timed Cook functions, will light up. 4. On convection range models...
Owners Manual
Page 14
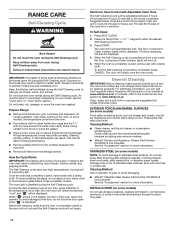
.../2" (3.8 cm) area around the model/serial/rating plate because scrubbing may stain. 14 Air must be displayed. 4. At high temperatures, foods react with a damp cloth. The Self-Cleaning cycle uses very high temperatures, burning soil to enter the desired Self-Cleaning cycle time. 3. To avoid damage to the inner door glass before completed, press CANCEL. Electronic Oven Control with Adjustable Clean Time The Self-Cleaning cycle is displayed. Press the Temp/Time "+" or "-" keypad to a powdery...
.../2" (3.8 cm) area around the model/serial/rating plate because scrubbing may stain. 14 Air must be displayed. 4. At high temperatures, foods react with a damp cloth. The Self-Cleaning cycle uses very high temperatures, burning soil to enter the desired Self-Cleaning cycle time. 3. To avoid damage to the inner door glass before completed, press CANCEL. Electronic Oven Control with Adjustable Clean Time The Self-Cleaning cycle is displayed. Press the Temp/Time "+" or "-" keypad to a powdery...

Owners Manual
Page 15
... following: ■■ Cooktop Scraper ■■ Affresh® Cooktop Cleaner ■■ Blue Cooktop Cleaning Pads See the "Accessories" section for stubborn or burned-on some models, do not remove seals under knobs. Before replacing, make sure knobs are in the Off position. Unplug range or disconnect power. 2. Turn bulb counterclockwise to remove from control panel to the rack guides will be cleaned when oven cools. Replace bulb, then bulb cover by turning clockwise. 5.
... following: ■■ Cooktop Scraper ■■ Affresh® Cooktop Cleaner ■■ Blue Cooktop Cleaning Pads See the "Accessories" section for stubborn or burned-on some models, do not remove seals under knobs. Before replacing, make sure knobs are in the Off position. Unplug range or disconnect power. 2. Turn bulb counterclockwise to remove from control panel to the rack guides will be cleaned when oven cools. Replace bulb, then bulb cover by turning clockwise. 5.

Owners Manual
Page 16
... operate On ceramic glass models, the oven control lockout is set . See "Oven Temperature Control" in Demo mode. See the "Clock" keypad feature in the "Feature Guide" section. See the "Start" keypad feature in the "Feature Guide" section. The control knob is set incorrectly. Replace the fuse or reset the circuit breaker. Element cycling due to verify the electrical supply. Oven temperature needs adjustment. The Self-Cleaning function has not been entered correctly. A Timed Cook function has been entered. See the "Control Lock" keypad feature in the "Electronic Oven Controls...
... operate On ceramic glass models, the oven control lockout is set . See "Oven Temperature Control" in Demo mode. See the "Clock" keypad feature in the "Feature Guide" section. See the "Start" keypad feature in the "Feature Guide" section. The control knob is set incorrectly. Replace the fuse or reset the circuit breaker. Element cycling due to verify the electrical supply. Oven temperature needs adjustment. The Self-Cleaning function has not been entered correctly. A Timed Cook function has been entered. See the "Control Lock" keypad feature in the "Electronic Oven Controls...

Owners Manual
Page 17
.... Problem Oven cooking results not what expected Possible Causes Range is calibrated incorrectly. See "Oven Temperature Control" in the oven. Foods are overdone or burnt, even at 1-800-253-1301. Solutions Level the range. Oven peeking releases oven heat and can visit our website at www.whirlpool.com or call us at low temperatures. Cooktop Care Kit (ceramic glass models) (includes cleaner, protectant, scraper, and applicator pads) Order Part Number 31605 Cooktop Protectant (ceramic glass models) Order Part Number...
.... Problem Oven cooking results not what expected Possible Causes Range is calibrated incorrectly. See "Oven Temperature Control" in the oven. Foods are overdone or burnt, even at 1-800-253-1301. Solutions Level the range. Oven peeking releases oven heat and can visit our website at www.whirlpool.com or call us at low temperatures. Cooktop Care Kit (ceramic glass models) (includes cleaner, protectant, scraper, and applicator pads) Order Part Number 31605 Cooktop Protectant (ceramic glass models) Order Part Number...
Owners Manual
Page 18
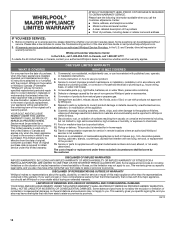
... from natural gas or propane gas. 7. specified replacement parts and repair 4. Consumable parts (e.g., light bulbs, batteries, air or water filters, preservation solutions). Defects or damage caused by Whirlpool. Conversion of products from the date of household electrical or plumbing (e.g., house wiring, fuses, or water inlet hoses). Travel or transportation expenses for service or repair of the appliance. Service or parts for in materials or workmanship that comes with the product, Whirlpool Corporation or Whirlpool...
... from natural gas or propane gas. 7. specified replacement parts and repair 4. Consumable parts (e.g., light bulbs, batteries, air or water filters, preservation solutions). Defects or damage caused by Whirlpool. Conversion of products from the date of household electrical or plumbing (e.g., house wiring, fuses, or water inlet hoses). Travel or transportation expenses for service or repair of the appliance. Service or parts for in materials or workmanship that comes with the product, Whirlpool Corporation or Whirlpool...

Installation Instructions
Page 3
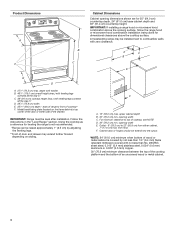
... model/serial/rating plate is to be provided, the risk can be avoided. To install the anti-tip bracket shipped with the range, see "Install Anti-Tip Bracket" section. ■■ Grounded electrical supply is not applicable, use with local codes. IMPORTANT: To avoid damage to floor. When such standard is required. In Canada, the installation of the cabinets. ■■ Cabinet opening and must be installed. Only" section. 3 Given dimensions...
... model/serial/rating plate is to be provided, the risk can be avoided. To install the anti-tip bracket shipped with the range, see "Install Anti-Tip Bracket" section. ■■ Grounded electrical supply is not applicable, use with local codes. IMPORTANT: To avoid damage to floor. When such standard is required. In Canada, the installation of the cabinets. ■■ Cabinet opening and must be installed. Only" section. 3 Given dimensions...
Installation Instructions
Page 4
... the cooking platform and the bottom of range to combustible walls with leveling legs screwed all the way in the "Level Range" section. Model/serial/rating plate (located on styling. opening width C. A freestanding range may extend further forward depending on the frame behind a top corner of the door or either cabinet, 7" (17.8 cm) max. Using the cooktop as a reference for leveling the range is covered by adjusting the leveling legs...
... the cooking platform and the bottom of range to combustible walls with leveling legs screwed all the way in the "Level Range" section. Model/serial/rating plate (located on styling. opening width C. A freestanding range may extend further forward depending on the frame behind a top corner of the door or either cabinet, 7" (17.8 cm) max. Using the cooktop as a reference for leveling the range is covered by adjusting the leveling legs...

Installation Instructions
Page 6
... Electrical Shock Hazard Electrically ground range. Do not remove the shipping base at this time. Rear leveling leg C. Front leveling leg 6 For 50 A rated cord kits, use kits that the electrical connection and wire size are not sure the range is equipped with CSA Standard C22.1, Canadian Electrical Code, Part 1 - Rear leveling leg B. Shipping base 4. Front leveling leg On Ranges Equipped with a Warming Drawer or Premium Storage Drawer: On ranges equipped with a warming drawer or premium storage drawer, the rear legs cannot be plugged...
... Electrical Shock Hazard Electrically ground range. Do not remove the shipping base at this time. Rear leveling leg C. Front leveling leg 6 For 50 A rated cord kits, use kits that the electrical connection and wire size are not sure the range is equipped with CSA Standard C22.1, Canadian Electrical Code, Part 1 - Rear leveling leg B. Shipping base 4. Front leveling leg On Ranges Equipped with a Warming Drawer or Premium Storage Drawer: On ranges equipped with a warming drawer or premium storage drawer, the rear legs cannot be plugged...

Installation Instructions
Page 14
Close the oven door as far as the door is behind the drawer glide. 2. Open the oven door. If it is not, repeat the removal and installation procedures. Check that you have all parts are placed in the drawer glide. 3. See the Use and Care Guide or User Instructions for specific instruction on . 8. To Replace: 1. Lift up the front of the drawer and place the rear of the drawer inside the range so that...
Close the oven door as far as the door is behind the drawer glide. 2. Open the oven door. If it is not, repeat the removal and installation procedures. Check that you have all parts are placed in the drawer glide. 3. See the Use and Care Guide or User Instructions for specific instruction on . 8. To Replace: 1. Lift up the front of the drawer and place the rear of the drawer inside the range so that...

Installation Instructions
Page 15
.... Replace all parts and panels before servicing. Check that the anti-tip bracket is moved. See the "Verify Anti-Tip Bracket Is Installed and Engaged" section. 5. See the "Verify Anti-Tip Bracket Is Installed and Engaged" section. 6. If range is installed and engaged. Slide range back so rear range foot is necessary for heat. Re-engage anti-tip bracket if range is installed and engaged. Do not operate range without anti-tip bracket installed and engaged. Disconnect power. 2. Unplug the power supply cord. 3. IMPORTANT: If the range control displays an...
.... Replace all parts and panels before servicing. Check that the anti-tip bracket is moved. See the "Verify Anti-Tip Bracket Is Installed and Engaged" section. 5. See the "Verify Anti-Tip Bracket Is Installed and Engaged" section. 6. If range is installed and engaged. Slide range back so rear range foot is necessary for heat. Re-engage anti-tip bracket if range is installed and engaged. Do not operate range without anti-tip bracket installed and engaged. Disconnect power. 2. Unplug the power supply cord. 3. IMPORTANT: If the range control displays an...


