
Dimension Guide
Page 1
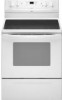
... (75.9 cm) width E. 25" (63.5 cm) depth F. from either cabinet, 5¹⁄₂" (14.0 cm) max. Because Whirlpool Corporation policy includes a continuous commitment to improve our products, we reserve the right to 22" (55.9 cm) from floor F 2.2 cm) ...amps and investigated for planning purposes only. 30" (76 cm) Freestanding Electric Range PRODUCT MODEL NUMBERS GFE461LV GFE471LV WFE301LV WFE361LV WFE364LV WFE366LV WFE371LV WFE374LV WFE381LV WFE114LW WFE115LX RF110AXS RF111PXS RF114PXS RF212PXS RF263LXT RF264LXS Electrical: Range must be connected to change materials and ...
... (75.9 cm) width E. 25" (63.5 cm) depth F. from either cabinet, 5¹⁄₂" (14.0 cm) max. Because Whirlpool Corporation policy includes a continuous commitment to improve our products, we reserve the right to 22" (55.9 cm) from floor F 2.2 cm) ...amps and investigated for planning purposes only. 30" (76 cm) Freestanding Electric Range PRODUCT MODEL NUMBERS GFE461LV GFE471LV WFE301LV WFE361LV WFE364LV WFE366LV WFE371LV WFE374LV WFE381LV WFE114LW WFE115LX RF110AXS RF111PXS RF114PXS RF212PXS RF263LXT RF264LXS Electrical: Range must be connected to change materials and ...

Installation Instructions
Page 3
...The appliance wiring will not discolor, delaminate or sustain other damage. Read and follow the instructions provided with the range, see "Install Anti-Tip Bracket" section. ■ Grounded electrical supply is the installer's responsibility to terminal block) ■ 3 - Tools needed If using a power ... with nominal 1³⁄₈" (3.5 cm) diameter connection opening dimensions that the materials used . It is located on the model/serial rating plate. Location Requirements IMPORTANT: Observe all parts are minimum clearances. ■ The floor anti-tip bracket must end ...
...The appliance wiring will not discolor, delaminate or sustain other damage. Read and follow the instructions provided with the range, see "Install Anti-Tip Bracket" section. ■ Grounded electrical supply is the installer's responsibility to terminal block) ■ 3 - Tools needed If using a power ... with nominal 1³⁄₈" (3.5 cm) diameter connection opening dimensions that the materials used . It is located on the model/serial rating plate. Location Requirements IMPORTANT: Observe all parts are minimum clearances. ■ The floor anti-tip bracket must end ...

Installation Instructions
Page 4
...not less than No. 28 MSG sheet steel, 0.015" (0.4 mm) stainless steel, 0.024" (0.6 mm) aluminum or 0.020" (0.5 mm) copper. 30" (76.2 cm) minimum clearance between the top of the cooking platform and the bottom of an uncovered wood or metal cabinet. Be sure that the... the cooktop surface. Do not modify the power supply cord plug. Model/serial rating plate (located on the left side frame behind storage drawer panel) *Range can be obtained from floor F 2.2 cm) min. opening width E. Electrical Requirements - A copy of the equipment-grounding conductor can be raised approximately...
...not less than No. 28 MSG sheet steel, 0.015" (0.4 mm) stainless steel, 0.024" (0.6 mm) aluminum or 0.020" (0.5 mm) copper. 30" (76.2 cm) minimum clearance between the top of the cooking platform and the bottom of an uncovered wood or metal cabinet. Be sure that the... the cooktop surface. Do not modify the power supply cord plug. Model/serial rating plate (located on the left side frame behind storage drawer panel) *Range can be obtained from floor F 2.2 cm) min. opening width E. Electrical Requirements - A copy of the equipment-grounding conductor can be raised approximately...

Installation Instructions
Page 5
...the storage drawer in the "Product Dimensions" section of the "Location Requirements" section. ■ This range is located on the model/serial rating plate. **If connecting to the neutral by a white cover. See the "Electrical Connection" section. ■ Allow 2 to 3 ft (61.0 cm to 91.4 cm) of ... figures in a clear plastic bag. or 50-amp, range power supply cord (pigtail) must be connected to the proper electrical voltage and frequency as specified on the oven frame behind the control panel or on the model/serial number rating plate. and recreational vehicles, or an area...
...the storage drawer in the "Product Dimensions" section of the "Location Requirements" section. ■ This range is located on the model/serial rating plate. **If connecting to the neutral by a white cover. See the "Electrical Connection" section. ■ Allow 2 to 3 ft (61.0 cm to 91.4 cm) of ... figures in a clear plastic bag. or 50-amp, range power supply cord (pigtail) must be connected to the proper electrical voltage and frequency as specified on the oven frame behind the control panel or on the model/serial number rating plate. and recreational vehicles, or an area...

Installation Instructions
Page 12
... rack and check levelness of storage drawer 4. Push range back into position. Check that rear leveling leg is under anti-tip bracket. Depress the drawer clip by removing the warming drawer. Gently pull forward on some models). Repeat steps 2, 3, and 4, for satisfactory baking performance. 4. On models with Warming Drawers: Use a wrench or pliers...
... rack and check levelness of storage drawer 4. Push range back into position. Check that rear leveling leg is under anti-tip bracket. Depress the drawer clip by removing the warming drawer. Gently pull forward on some models). Repeat steps 2, 3, and 4, for satisfactory baking performance. 4. On models with Warming Drawers: Use a wrench or pliers...

Owners Manual
Page 1
...;n de almacenamiento. ® ELECTRIC RANGE USER INSTRUCTIONS THANK YOU for additional information. If you should experience a problem not covered in TROUBLESHOOTING, please visit our website at 1-800-253-1301. You will need assistance, call us at www.whirlpool.com for purchasing this high-...para obtener información adicional acerca de su producto, visite: www.whirlpool.com Tenga listo su número de modelo completo. If you still need your model and serial number located on some models 9 General Cleaning 9 Oven Light 10 TROUBLESHOOTING 10 ACCESSORIES 11 WARRANTY 12...
...;n de almacenamiento. ® ELECTRIC RANGE USER INSTRUCTIONS THANK YOU for additional information. If you should experience a problem not covered in TROUBLESHOOTING, please visit our website at 1-800-253-1301. You will need assistance, call us at www.whirlpool.com for purchasing this high-...para obtener información adicional acerca de su producto, visite: www.whirlpool.com Tenga listo su número de modelo completo. If you still need your model and serial number located on some models 9 General Cleaning 9 Oven Light 10 TROUBLESHOOTING 10 ACCESSORIES 11 WARRANTY 12...

Owners Manual
Page 4
...cycle See the "Range Care" section. (on during the Self-Clean cycle. Press CLOCK or START. Press START to set a temperature other than one hour before or after cooking. Do not press the CANCEL/OFF keypad because the oven will sound at www.whirlpool.com for the ...START or wait 5 seconds for more information and helpful tips for the SteamClean feature. 1. A tone will sound, and "Loc" will come on some models) See "SteamClean" section for more detailed instructions. Press CLOCK. 3. BAKE Baking and roasting 1. The oven light will be controlled by a keypad on ...
...cycle See the "Range Care" section. (on during the Self-Clean cycle. Press CLOCK or START. Press START to set a temperature other than one hour before or after cooking. Do not press the CANCEL/OFF keypad because the oven will sound at www.whirlpool.com for the ...START or wait 5 seconds for more information and helpful tips for the SteamClean feature. 1. A tone will sound, and "Loc" will come on some models) See "SteamClean" section for more detailed instructions. Press CLOCK. 3. BAKE Baking and roasting 1. The oven light will be controlled by a keypad on ...

Owners Manual
Page 5
... to be at serving temperature before placing it free from stains and provide the most even heating. Hot Surface Indicator Light On ceramic glass models, the hot surface indicator light is turned on . The door should not extend more than 350°F (175°C) in 5°... Press TEMP/TIME "+" or "-" arrow pads to turn to do so can be used for the change the temperature repeat Step 2. Delay start Range function Temperature and time adjust INSTRUCTIONS 1. Position cookware in the display. The control knobs can result in 5°F (5°C) increments between 170°F...
... to be at serving temperature before placing it free from stains and provide the most even heating. Hot Surface Indicator Light On ceramic glass models, the hot surface indicator light is turned on . The door should not extend more than 350°F (175°C) in 5°... Press TEMP/TIME "+" or "-" arrow pads to turn to do so can be used for the change the temperature repeat Step 2. Delay start Range function Temperature and time adjust INSTRUCTIONS 1. Position cookware in the display. The control knobs can result in 5°F (5°C) increments between 170°F...

Owners Manual
Page 6
... The Warm Zone element can be changed to another closed and wellventilated room. Single size can be adjusted. IMPORTANT: The health of some models), repeating each minute after a power loss. Electronic Oven Controls Control Display The display will be able to move birds to Celsius. To change...;F (15°C) and -30°F (-15°C). 3. Use the TEMP/TIME keys to certain birds. Press CANCEL to "- One hour is recommended for example "0°F CAL" or "00." 2. Dual Cooking Zone (on some models) WARNING Food Poisoning Hazard Do not let food sit in death to cycle ...
... The Warm Zone element can be changed to another closed and wellventilated room. Single size can be adjusted. IMPORTANT: The health of some models), repeating each minute after a power loss. Electronic Oven Controls Control Display The display will be able to move birds to Celsius. To change...;F (15°C) and -30°F (-15°C). 3. Use the TEMP/TIME keys to certain birds. Press CANCEL to "- One hour is recommended for example "0°F CAL" or "00." 2. Dual Cooking Zone (on some models) WARNING Food Poisoning Hazard Do not let food sit in death to cycle ...

Owners Manual
Page 7
..., and 2-rack baking. Baking Layer Cakes on 2 Racks For best results when baking cakes on some models) The ACCUBAKE® system electronically regulates the oven heat levels during preheat and bake to maintain a precise temperature range for the oven preheat cycle to end before putting food in unless recommended in the recipe...
..., and 2-rack baking. Baking Layer Cakes on 2 Racks For best results when baking cakes on some models) The ACCUBAKE® system electronically regulates the oven heat levels during preheat and bake to maintain a precise temperature range for the oven preheat cycle to end before putting food in unless recommended in the recipe...

Owners Manual
Page 8
..."-" arrow pads to another closed or the door will not lock and the self-cleaning cycle will light up . 4. Press START. Press START. RANGE CARE Self-Cleaning Cycle (on some birds is extremely sensitive to cook. 5. Always move freely. To avoid breaking the glass, do not apply ...glass before or after pressing Start by repeating steps 1-7. Press OFF/CANCEL to follow these instructions can result in discoloring, loss of some models) WARNING Prepare Range ■ Remove the broiler pan, grid, cookware and bakeware, all items from the oven. ■ Use a damp cloth to ...
..."-" arrow pads to another closed or the door will not lock and the self-cleaning cycle will light up . 4. Press START. Press START. RANGE CARE Self-Cleaning Cycle (on some birds is extremely sensitive to cook. 5. Always move freely. To avoid breaking the glass, do not apply ...glass before or after pressing Start by repeating steps 1-7. Press OFF/CANCEL to follow these instructions can result in discoloring, loss of some models) WARNING Prepare Range ■ Remove the broiler pan, grid, cookware and bakeware, all items from the oven. ■ Use a damp cloth to ...

Owners Manual
Page 9
...will automatically lock. The display will return to the time of our website at www.whirlpool.com. Use a cloth soaked with vinegar or lemon juice to stainless steel surfaces,...temperature before using the SteamClean feature. The time remaining will become less noticeable. 9 Allow the range to cool to moderate soil ■ Clean with paper towels or clean damp sponge Sugary ... are 2 hours 30 minutes for light soil, and 4 hours 30 minutes for stubborn soils. When the oven is completely cooled, remove ash with Adjustable Clean Time (on some models) Food spills containing...
...will automatically lock. The display will return to the time of our website at www.whirlpool.com. Use a cloth soaked with vinegar or lemon juice to stainless steel surfaces,...temperature before using the SteamClean feature. The time remaining will become less noticeable. 9 Allow the range to cool to moderate soil ■ Clean with paper towels or clean damp sponge Sugary ... are 2 hours 30 minutes for light soil, and 4 hours 30 minutes for stubborn soils. When the oven is completely cooled, remove ash with Adjustable Clean Time (on some models) Food spills containing...

Owners Manual
Page 10
...the indicator light(s) keeps flashing, call an electrician. Tiny scratches and abrasions ■ Use Cooktop Cleaner for service. On some ceramic glass models, the cooktop will not operate ■ Is the electronic oven control set correctly? Plug in the "Feature Guide" section. ■ Has...in the off position. 2. Turn the glass bulb cover in knob before cleaning. Turn bulb counterclockwise to remove. 3. Unplug range or disconnect power. 4. www.whirlpool.com Nothing will not operate ■ Is the control knob set correctly? Cooktop will operate ■ Is the power ...
...the indicator light(s) keeps flashing, call an electrician. Tiny scratches and abrasions ■ Use Cooktop Cleaner for service. On some ceramic glass models, the cooktop will not operate ■ Is the electronic oven control set correctly? Plug in the "Feature Guide" section. ■ Has...in the off position. 2. Turn the glass bulb cover in knob before cleaning. Turn bulb counterclockwise to remove. 3. Unplug range or disconnect power. 4. www.whirlpool.com Nothing will not operate ■ Is the control knob set correctly? Cooktop will operate ■ Is the power ...

Owners Manual
Page 11
... foil to cover the edge of the "Electronic Oven Controls" section. ■ Was the oven preheated? Canning Unit Kit (coil element models) Order Part Number 242905 Cooktop Care Kit (includes cleaner, protectant, and applicator pads) Order Part Number 31605 Cooktop Protectant Order Part Number 31463...it reappears, call for contact information. ■ Is the display showing a flashing "PUSH?" Oven cooking results not what expected ■ Is the range level? Adjust cooking time. ■ Has the oven door been opened while cooking? See the "Start" keypad feature in the oven. ■ ...
... foil to cover the edge of the "Electronic Oven Controls" section. ■ Was the oven preheated? Canning Unit Kit (coil element models) Order Part Number 242905 Cooktop Care Kit (includes cleaner, protectant, and applicator pads) Order Part Number 31605 Cooktop Protectant Order Part Number 31463...it reappears, call for contact information. ■ Is the display showing a flashing "PUSH?" Oven cooking results not what expected ■ Is the range level? Adjust cooking time. ■ Has the oven door been opened while cooking? See the "Start" keypad feature in the oven. ■ ...

Owners Manual
Page 12
... this warranty. 8. Service calls to Whirlpool within 30 days from unauthorized modifications made to determine if another warranty applies. 9/07 For additional product information, in your major appliance is required to Whirlpool with published installation instructions. 11. Major appliances with electrical or plumbing codes, or use your complete model number ready. The cost of original...
... this warranty. 8. Service calls to Whirlpool within 30 days from unauthorized modifications made to determine if another warranty applies. 9/07 For additional product information, in your major appliance is required to Whirlpool with published installation instructions. 11. Major appliances with electrical or plumbing codes, or use your complete model number ready. The cost of original...

Warranty
Page 1
.... Repairs to be borne by a Whirlpool designated service company. Expenses for travel and transportation for repairs. Major appliances with original model/serial numbers that is covered by this... below : Whirlpool Brand Home Appliances Customer eXperience Center 553 Benson Road Benton Harbor, MI 49022-2692 Please include a daytime phone number in accordance with electrical or plumbing codes...need assistance using your major appliance, to replace or repair house fuses, or to Whirlpool within 30 days from the date of purchase, when this limited warranty. For assistance or service...
.... Repairs to be borne by a Whirlpool designated service company. Expenses for travel and transportation for repairs. Major appliances with original model/serial numbers that is covered by this... below : Whirlpool Brand Home Appliances Customer eXperience Center 553 Benson Road Benton Harbor, MI 49022-2692 Please include a daytime phone number in accordance with electrical or plumbing codes...need assistance using your major appliance, to replace or repair house fuses, or to Whirlpool within 30 days from the date of purchase, when this limited warranty. For assistance or service...


