
Installation Instructions
Page 2
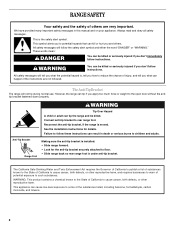
...'t immediately follow instructions. Connect anti-tip bracket to potential hazards that can kill or hurt you what the potential hazard is moved. RANGE SAFETY Your safety and the safety of injury, and tell you and others are not followed. All safety messages will follow instructions. ...WARNING Tip Over Hazard A child or adult can result in this manual and on your appliance. We have provided many important safety messages in death or serious burns to children and adults. 2 All safety messages...
...'t immediately follow instructions. Connect anti-tip bracket to potential hazards that can kill or hurt you what the potential hazard is moved. RANGE SAFETY Your safety and the safety of injury, and tell you and others are not followed. All safety messages will follow instructions. ...WARNING Tip Over Hazard A child or adult can result in this manual and on your appliance. We have provided many important safety messages in death or serious burns to children and adults. 2 All safety messages...

Installation Instructions
Page 6
... shipping base at this manual. 2. On Ranges Equipped with overhang. Use a ¼" drive ratchet to adjust the rear legs from the anti-tip bracket kit (found inside oven. 3. A D C Install Anti-Tip Bracket WARNING Tip Over Hazard A child or adult can tip the range and be accessed by ...1. Failure to lower front leveling legs one -half turn . Wrench or pliers D. A. Shipping base 4. Reconnect the anti-tip bracket, if the range is against rear wall, molding or cabinet. 3. Place template on the floor in cabinet opening so that specified in the "Location Requirements" section, adjust...
... shipping base at this manual. 2. On Ranges Equipped with overhang. Use a ¼" drive ratchet to adjust the rear legs from the anti-tip bracket kit (found inside oven. 3. A D C Install Anti-Tip Bracket WARNING Tip Over Hazard A child or adult can tip the range and be accessed by ...1. Failure to lower front leveling legs one -half turn . Wrench or pliers D. A. Shipping base 4. Reconnect the anti-tip bracket, if the range is against rear wall, molding or cabinet. 3. Place template on the floor in cabinet opening so that specified in the "Location Requirements" section, adjust...
Owners Manual
Page 2
... is , tell you what the potential hazard is under anti-tip bracket. Reconnect the anti-tip bracket, if the range is the safety alert symbol. All safety messages will follow instructions. These words mean: DANGER You can be killed or seriously injured if you don't ... messages will not tip during normal use. This is moved. This symbol alerts you and others are not followed. WARNING You can result in this manual and on your appliance. See the installation instructions for the anti-tip bracket securely attached to some of potential exposure to rear...
... is , tell you what the potential hazard is under anti-tip bracket. Reconnect the anti-tip bracket, if the range is the safety alert symbol. All safety messages will follow instructions. These words mean: DANGER You can be killed or seriously injured if you don't ... messages will not tip during normal use. This is moved. This symbol alerts you and others are not followed. WARNING You can result in this manual and on your appliance. See the installation instructions for the anti-tip bracket securely attached to some of potential exposure to rear...

Owners Manual
Page 3
...and may be allowed to children in color. Contact a qualified technician immediately. ■ Clean Cooktop With Caution - Heating elements may result in Manual. ■ Before Self-Cleaning the Oven - The door gasket is turned inward, and does not extend over adjacent surface units. ■ ...even though they have had sufficient time to cool. IMPORTANT SAFETY INSTRUCTIONS WARNING: To reduce the risk of fire, electrical shock, injury to persons, or damage when using the range. ■ User Servicing - During and after use , do not touch, or let clothing or other servicing...
...and may be allowed to children in color. Contact a qualified technician immediately. ■ Clean Cooktop With Caution - Heating elements may result in Manual. ■ Before Self-Cleaning the Oven - The door gasket is turned inward, and does not extend over adjacent surface units. ■ ...even though they have had sufficient time to cool. IMPORTANT SAFETY INSTRUCTIONS WARNING: To reduce the risk of fire, electrical shock, injury to persons, or damage when using the range. ■ User Servicing - During and after use , do not touch, or let clothing or other servicing...

Owners Manual
Page 4
...START or wait 5 seconds for the change the temperature repeat Step 2. Remove all of the cycle. 6. "Add H2O" will sound at www.whirlpool.com for 5 seconds. Remove any excess water with a.m. Only the CLOCK, OVEN LIGHT, and TIMER keypads will turn the light on some or ...increments between 170°F and 525°F (75°C and 275°C). 3. Press BAKE. 2. To change to set the length of the range. FEATURE GUIDE This manual covers several models. Press STEAM CLEAN. OVEN LIGHT (on and off . 2. Repeat to begin the countdown. and p.m. 1. Press START to unlock....
...START or wait 5 seconds for the change the temperature repeat Step 2. Remove all of the cycle. 6. "Add H2O" will sound at www.whirlpool.com for 5 seconds. Remove any excess water with a.m. Only the CLOCK, OVEN LIGHT, and TIMER keypads will turn the light on some or ...increments between 170°F and 525°F (75°C and 275°C). 3. Press BAKE. 2. To change to set the length of the range. FEATURE GUIDE This manual covers several models. Press STEAM CLEAN. OVEN LIGHT (on and off . 2. Repeat to begin the countdown. and p.m. 1. Press START to unlock....


