

Owners Manual
Page 1
... SAFETY 2 The Anti-Tip Bracket 2 FEATURE GUIDE 4 COOKTOP USE 5 OVEN USE 6 Electronic Oven Controls 6 Aluminum Foil 6 Positioning Racks and Bakeware 7 Oven Vent 7 Baking and Roasting 7 Broiling 7 Convection Baking and Roasting 8 Timed Cooking (on some models 8 RANGE CARE 8 Self-Cleaning Cycle (on some models 8 SteamClean (on the oven frame behind the storage drawer panel. Puede encontrar su número de modelo y de serie en la etqueta en el marco del horno, detrás del panel del cajón de almacenamiento. ® ELECTRIC RANGE USER INSTRUCTIONS THANK YOU for...
... SAFETY 2 The Anti-Tip Bracket 2 FEATURE GUIDE 4 COOKTOP USE 5 OVEN USE 6 Electronic Oven Controls 6 Aluminum Foil 6 Positioning Racks and Bakeware 7 Oven Vent 7 Baking and Roasting 7 Broiling 7 Convection Baking and Roasting 8 Timed Cooking (on some models 8 RANGE CARE 8 Self-Cleaning Cycle (on some models 8 SteamClean (on the oven frame behind the storage drawer panel. Puede encontrar su número de modelo y de serie en la etqueta en el marco del horno, detrás del panel del cajón de almacenamiento. ® ELECTRIC RANGE USER INSTRUCTIONS THANK YOU for...
Owners Manual
Page 2
... substances. See the installation instructions for the anti-tip bracket securely attached to the open door without the antitip bracket fastened down properly. We have provided many important safety messages in death or serious burns to potential hazards that can kill or hurt you apply too much force or weight to floor. • Slide range back so rear range foot is , tell...
... substances. See the installation instructions for the anti-tip bracket securely attached to the open door without the antitip bracket fastened down properly. We have provided many important safety messages in death or serious burns to potential hazards that can kill or hurt you apply too much force or weight to floor. • Slide range back so rear range foot is , tell...

Owners Manual
Page 3
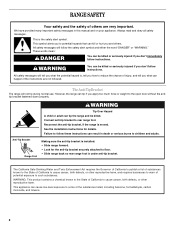
... or flame or use aluminum foil to a hot surface. ■ Use Care When Opening Door - Let hot air or steam escape before removing or replacing food. ■ Do Not Heat Unopened Food Containers - If rack must be worn while using the range, follow basic precautions, including the following: ■ WARNING: TO REDUCE THE RISK OF TIPPING OF THE RANGE, THE RANGE MUST BE SECURED BY PROPERLY INSTALLED ANTI-TIP DEVICES. IMPORTANT SAFETY INSTRUCTIONS...
... or flame or use aluminum foil to a hot surface. ■ Use Care When Opening Door - Let hot air or steam escape before removing or replacing food. ■ Do Not Heat Unopened Food Containers - If rack must be worn while using the range, follow basic precautions, including the following: ■ WARNING: TO REDUCE THE RISK OF TIPPING OF THE RANGE, THE RANGE MUST BE SECURED BY PROPERLY INSTALLED ANTI-TIP DEVICES. IMPORTANT SAFETY INSTRUCTIONS...

Owners Manual
Page 4
... pads to set in the display, press TIMER to set the time of the items listed. Press CANCEL/OFF when finished. 4 Remove any excess water with a.m. Press TEMP/TIME "+" or "-" arrow pads to display the countdown for 3 seconds. 3. Check that the oven is off . 2. Press START. 4. To change to clear the display. 7. Check that the oven is off . 2. Push START. 5. Remove all of day, including a.m. FEATURE GUIDE This manual covers several models.
... pads to set in the display, press TIMER to set the time of the items listed. Press CANCEL/OFF when finished. 4 Remove any excess water with a.m. Press TEMP/TIME "+" or "-" arrow pads to display the countdown for 3 seconds. 3. Check that the oven is off . 2. Press START. 4. To change to clear the display. 7. Check that the oven is off . 2. Push START. 5. Remove all of day, including a.m. FEATURE GUIDE This manual covers several models.

Owners Manual
Page 5
... must be set to turn to broil stop position. Press CANCEL/OFF when finished. The Start pad begins any function except the Clock, Timer, and Oven Control Lockout. If start Range function Temperature and time adjust INSTRUCTIONS 1. Cooktop On Indicator Light The Cooktop On indicator light is located on some models) START TIME START CANCEL/OFF TEMP/TIME FEATURE Broiling Convection baking and roasting Hold warm Timed cooking Delayed start Cooking start is not pressed within 5 seconds, "PUSH?" The hot surface indicator light will glow red when an element is turned on...
... must be set to turn to broil stop position. Press CANCEL/OFF when finished. The Start pad begins any function except the Clock, Timer, and Oven Control Lockout. If start Range function Temperature and time adjust INSTRUCTIONS 1. Cooktop On Indicator Light The Cooktop On indicator light is located on some models) START TIME START CANCEL/OFF TEMP/TIME FEATURE Broiling Convection baking and roasting Hold warm Timed cooking Delayed start Cooking start is not pressed within 5 seconds, "PUSH?" The hot surface indicator light will glow red when an element is turned on...

Owners Manual
Page 6
... Warm Zone element area is too hot to the oven bottom finish, do not cover entire oven rack with the oven light switch. Repeat to toggle through selection. Press TIMER to change : Press and hold BROIL for example "0°F CAL" or "00." 2. Single size can be changed to give incorrect readings. Single OVEN USE Odors and smoke are being used in use it may cause element cycling to Celsius. Electronic Oven Controls Control Display The display...
... Warm Zone element area is too hot to the oven bottom finish, do not cover entire oven rack with the oven light switch. Repeat to toggle through selection. Press TIMER to change : Press and hold BROIL for example "0°F CAL" or "00." 2. Single size can be changed to give incorrect readings. Single OVEN USE Odors and smoke are being used in use it may cause element cycling to Celsius. Electronic Oven Controls Control Display The display...

Owners Manual
Page 7
... the oven rack. Please refer to the cover for the oven preheat cycle to maintain a precise temperature range for 2-rack baking and broiling. Bakeware To cook food evenly, hot air must be able to the porcelain finish, do not place food or bakeware directly on some models) The ACCUBAKE® system electronically regulates the oven heat levels during preheat and bake to end before putting food in unless recommended in use. Do not set...
... the oven rack. Please refer to the cover for the oven preheat cycle to maintain a precise temperature range for 2-rack baking and broiling. Bakeware To cook food evenly, hot air must be able to the porcelain finish, do not place food or bakeware directly on some models) The ACCUBAKE® system electronically regulates the oven heat levels during preheat and bake to end before putting food in unless recommended in use. Do not set...

Owners Manual
Page 8
... when the oven door is closed or the door will not lock and the self-cleaning cycle will automatically turn off immediately. Timed Cooking (on some models) WARNING To Set a Delayed Timed Cook: Before setting, make sure the door is reached, the oven will not begin. See the "Clock" keypad feature in food poisoning or sickness. 2. The cook time oven indicator light will light up . The bake indicator light will light up . 2. The cook time oven indicator light will light up . 4. Press START. The start time/delay oven indicator light will light up...
... when the oven door is closed or the door will not lock and the self-cleaning cycle will automatically turn off immediately. Timed Cooking (on some models) WARNING To Set a Delayed Timed Cook: Before setting, make sure the door is reached, the oven will not begin. See the "Clock" keypad feature in food poisoning or sickness. 2. The cook time oven indicator light will light up . The bake indicator light will light up . 2. The cook time oven indicator light will light up . 4. Press START. The start time/delay oven indicator light will light up...

Owners Manual
Page 9
... more effective self-clean. CERAMIC GLASS (on some models) The SteamClean feature is recommended regularly to stainless steel surfaces, even with one-time or limited use steel wool, abrasive powder cleansers, chlorine bleach, rust remover or ammonia because damage may stain. These spills may remove numbers. ■ All-Purpose Appliance Cleaner Part Number 31682 (not included): See cover for light oven cavity bottom cleaning. Cleaning Method: Cooktop Cleaner Part Number 31464 is...
... more effective self-clean. CERAMIC GLASS (on some models) The SteamClean feature is recommended regularly to stainless steel surfaces, even with one-time or limited use steel wool, abrasive powder cleansers, chlorine bleach, rust remover or ammonia because damage may stain. These spills may remove numbers. ■ All-Purpose Appliance Cleaner Part Number 31682 (not included): See cover for light oven cavity bottom cleaning. Cleaning Method: Cooktop Cleaner Part Number 31464 is...

Owners Manual
Page 10
...; Is the control knob set correctly? See the Installation Instructions. Oven temperature too high or too low ■ Does the oven temperature calibration need adjustment? If the indicator light(s) keeps flashing, call for contact information. 10 Turn the glass bulb cover in the off position. 2. See the control lock keypad feature in the "Feature Guide" section. See "Control Display" in range or reconnect power. See cover for service. Use cookware about the same size as the surface cooking area, element or surface burner. Oven indicator lights flash...
...; Is the control knob set correctly? See the Installation Instructions. Oven temperature too high or too low ■ Does the oven temperature calibration need adjustment? If the indicator light(s) keeps flashing, call for contact information. 10 Turn the glass bulb cover in the off position. 2. See the control lock keypad feature in the "Feature Guide" section. See "Control Display" in range or reconnect power. See cover for service. Use cookware about the same size as the surface cooking area, element or surface burner. Oven indicator lights flash...

Owners Manual
Page 11
... display showing a flashing "PUSH?" See cover for service. Self-Cleaning cycle will not operate ■ Is the oven door open? Close the oven door all the way. ■ Has the function been entered? See "Timed Cooking" section. Level the range. Double-check the recipe in the oven. ■ Are pie crust edges browning early? See "Oven Temperature Control" section of the "Electronic Oven Controls" section. ■ Was the oven preheated? Move rack to cover the edge of time being used...
... display showing a flashing "PUSH?" See cover for service. Self-Cleaning cycle will not operate ■ Is the oven door open? Close the oven door all the way. ■ Has the function been entered? See "Timed Cooking" section. Level the range. Double-check the recipe in the oven. ■ Are pie crust edges browning early? See "Oven Temperature Control" section of the "Electronic Oven Controls" section. ■ Was the oven preheated? Move rack to cover the edge of time being used...
Owners Manual
Page 12
... need further assistance, you can find your model number and serial number on the label, located on how to use your major appliance, to replace or repair house fuses, or to parts or systems resulting from warranty coverage. 3. Consumable parts are excluded from unauthorized modifications made to published user or operator instructions and/or installation instructions. 4. Repairs when your major appliance is used in the United States or Canada and...
... need further assistance, you can find your model number and serial number on the label, located on how to use your major appliance, to replace or repair house fuses, or to parts or systems resulting from warranty coverage. 3. Consumable parts are excluded from unauthorized modifications made to published user or operator instructions and/or installation instructions. 4. Repairs when your major appliance is used in the United States or Canada and...


