User Instructions
Page 1
... anywhere in your correspondence. ® 8578179B ® WASHER/DRYER USER INSTRUCTIONS INSTRUCCIONES PARA EL USUARIO DE LA LAVADORA/SECADORA INSTRUCTIONS D'UTILISATION DE LA LAVEUSE/SÉCHEUSE Table of purchase or installation date for assistance, installation or service, call us at 1-800-807-6777, or write: Whirlpool Canada LP Customer Interaction Centre 1901 Minnesota Court...
... anywhere in your correspondence. ® 8578179B ® WASHER/DRYER USER INSTRUCTIONS INSTRUCCIONES PARA EL USUARIO DE LA LAVADORA/SECADORA INSTRUCTIONS D'UTILISATION DE LA LAVEUSE/SÉCHEUSE Table of purchase or installation date for assistance, installation or service, call us at 1-800-807-6777, or write: Whirlpool Canada LP Customer Interaction Centre 1901 Minnesota Court...
User Instructions
Page 2
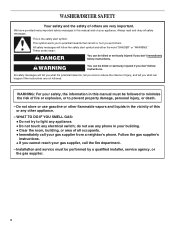
...your appliance. WHAT TO DO IF YOU SMELL GAS: • Do not try to prevent property damage, personal injury, or death. - WASHER/DRYER SAFETY Your safety and the safety of others . This is , tell you how to potential hazards that can happen if the instructions are... safety messages will tell you what the potential hazard is the safety alert symbol. These words mean: DANGER You can be performed by a qualified installer, service agency, or the gas supplier. 2 Follow the gas supplier's instructions. • If you don't immediately follow instructions. This symbol alerts...
...your appliance. WHAT TO DO IF YOU SMELL GAS: • Do not try to prevent property damage, personal injury, or death. - WASHER/DRYER SAFETY Your safety and the safety of others . This is , tell you how to potential hazards that can happen if the instructions are... safety messages will tell you what the potential hazard is the safety alert symbol. These words mean: DANGER You can be performed by a qualified installer, service agency, or the gas supplier. 2 Follow the gas supplier's instructions. • If you don't immediately follow instructions. This symbol alerts...
User Instructions
Page 3
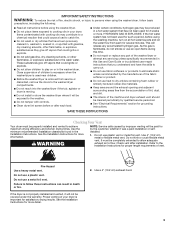
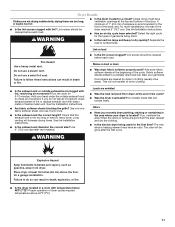
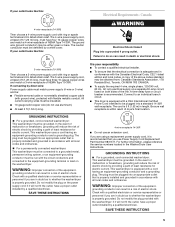
... an open flame during this time. ■ Do not repair or replace any part of the washer/dryer or attempt any accumulated hydrogen gas. It must be properly installed and vented to achieve maximum drying efficiency and shorten drying times. Items contaminated with cooking oils may be... SAFETY INSTRUCTIONS WARNING: To reduce the risk of fire, electric shock, or injury to persons when using the washer/dryer, follow these instructions can result in the Installation Instructions. If the hot water system has not been used for grounding instructions. As the gas is not properly...
... an open flame during this time. ■ Do not repair or replace any part of the washer/dryer or attempt any accumulated hydrogen gas. It must be properly installed and vented to achieve maximum drying efficiency and shorten drying times. Items contaminated with cooking oils may be... SAFETY INSTRUCTIONS WARNING: To reduce the risk of fire, electric shock, or injury to persons when using the washer/dryer, follow these instructions can result in the Installation Instructions. If the hot water system has not been used for grounding instructions. As the gas is not properly...
User Instructions
Page 4
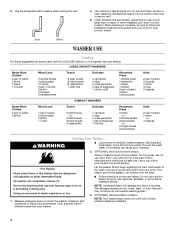
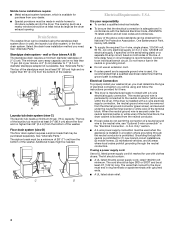
..., be removed in the rinse cycle. Follow manufacturer's directions for a full load. No washer can cause poor cleaning. 2. (OPTIONAL) Add liquid chlorine bleach. Add bleach to follow the Installation Instructions supplied with a pouring spout to secure vent. 5. The damage appears as rips, ...move easily through the wash water. Do not use more than 1 cup (250 mL) for safe use , but at least every 2 years, or when installing your washer. Drop a sorted load of pants 2 pillowcases 2 shirts 1 T-shirt Towels 9 bath towels -or- 6 bath towels 3 hand towels 6 washcloths Delicates ...
..., be removed in the rinse cycle. Follow manufacturer's directions for a full load. No washer can cause poor cleaning. 2. (OPTIONAL) Add liquid chlorine bleach. Add bleach to follow the Installation Instructions supplied with a pouring spout to secure vent. 5. The damage appears as rips, ...move easily through the wash water. Do not use more than 1 cup (250 mL) for safe use , but at least every 2 years, or when installing your washer. Drop a sorted load of pants 2 pillowcases 2 shirts 1 T-shirt Towels 9 bath towels -or- 6 bath towels 3 hand towels 6 washcloths Delicates ...
User Instructions
Page 7
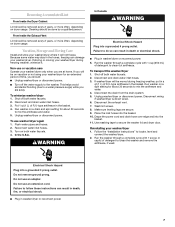
...basket. Do not use washer/dryer again 1. To winterize washer/dryer 1. To use an adapter. Unplug washer/dryer or disconnect power. Follow the "Installation Instructions" to secure the washer lid and dryer door. Do not use or vacation care Operate your washer/dryer. Because some water... Shut off both water faucets. 2. Unplug washer/dryer or disconnect power. Disconnect the exhaust vent. 7. Vacation, Storage and Moving Care Install and store your washer/dryer for an extended period of detergent to clean the washer and remove the antifreeze, if used. Disconnect...
...basket. Do not use washer/dryer again 1. To winterize washer/dryer 1. To use an adapter. Unplug washer/dryer or disconnect power. Follow the "Installation Instructions" to secure the washer lid and dryer door. Do not use or vacation care Operate your washer/dryer. Because some water... Shut off both water faucets. 2. Unplug washer/dryer or disconnect power. Disconnect the exhaust vent. 7. Vacation, Storage and Moving Care Install and store your washer/dryer for an extended period of detergent to clean the washer and remove the antifreeze, if used. Disconnect...
User Instructions
Page 8
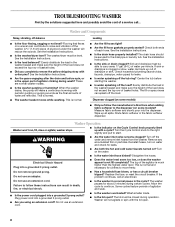
... on the Cycle Control knob properly lined up all spills. Do not remove ground prong. See the Installation Instructions. ■ Is the washer/dryer level? The washer/dryer must be closed during certain cycles. These are removed. Wipe up with periodic gurgling or surging ... for leaks. ■ Are both ends of each hose. Plug power cord into the dispenser. See the Installation Instructions. ■ Is the load balanced? TROUBLESHOOTING WASHER First try the solutions suggested here and possibly avoid the cost of a service call an electrician. Evenly distribute ...
... on the Cycle Control knob properly lined up all spills. Do not remove ground prong. See the Installation Instructions. ■ Is the washer/dryer level? The washer/dryer must be closed during certain cycles. These are removed. Wipe up with periodic gurgling or surging ... for leaks. ■ Are both ends of each hose. Plug power cord into the dispenser. See the Installation Instructions. ■ Is the load balanced? TROUBLESHOOTING WASHER First try the solutions suggested here and possibly avoid the cost of a service call an electrician. Evenly distribute ...
User Instructions
Page 9
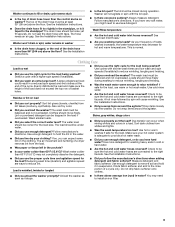
See the Installation Instructions. ■ Does the drain hose fit too tightly in the standpipe, or is normal. The drain hose should be trapped in a load. Washer won't drain or spin; Washer will cause wrinkling. This is it taped to the standpipe? Clothing Care Load too wet...wrinkles? Lint or powdered detergent can be loose yet fit securely. Dye transfer can expect some lint on washer? See the Installation Instructions. ■ Did you overload the washer? Do not drip fabric softener onto clothes. ■ Did you washing many loads? The lid must be...
See the Installation Instructions. ■ Does the drain hose fit too tightly in the standpipe, or is normal. The drain hose should be trapped in a load. Washer won't drain or spin; Washer will cause wrinkling. This is it taped to the standpipe? Clothing Care Load too wet...wrinkles? Lint or powdered detergent can be loose yet fit securely. Dye transfer can expect some lint on washer? See the Installation Instructions. ■ Did you overload the washer? Do not drip fabric softener onto clothes. ■ Did you washing many loads? The lid must be...

User Instructions
Page 10
... dryer. The drum may be balanced and not overloaded. The gas valve clicking is a normal operating sound. ■ Are the four legs installed, and is the valve open on some models). Replace the fuse or reset the circuit breaker. Garments damaged ■ Were sharp items removed... to avoid snagging and tearing of the bleach dispenser when loading and unloading the washer (on the supply line? The timer moves slowly and continuously for a full load. ■ Did you overload the washer? Empty pockets, zip zippers, snap or hook fasteners before washing to side? ...
... dryer. The drum may be balanced and not overloaded. The gas valve clicking is a normal operating sound. ■ Are the four legs installed, and is the valve open on some models). Replace the fuse or reset the circuit breaker. Garments damaged ■ Were sharp items removed... to avoid snagging and tearing of the bleach dispenser when loading and unloading the washer (on the supply line? The timer moves slowly and continuously for a full load. ■ Did you overload the washer? Empty pockets, zip zippers, snap or hook fasteners before washing to side? ...
User Instructions
Page 11
...heating element may have ventilation openings at the beginning of garments being used ? Lint screen should be cleaned before each load. See the Installation Instructions. ■ Is the exhaust vent diameter the correct size? WARNING ■ Is the dryer located in the area where your ... added to other clothing. Dry smaller loads that the exhaust vent is recommended for the front of the dryer, and, for most installations, the rear of dryer cycles requires temperatures above the floor for 5-10 minutes. Explosion Hazard Keep flammable materials and vapors, such as...
...heating element may have ventilation openings at the beginning of garments being used ? Lint screen should be cleaned before each load. See the Installation Instructions. ■ Is the exhaust vent diameter the correct size? WARNING ■ Is the dryer located in the area where your ... added to other clothing. Dry smaller loads that the exhaust vent is recommended for the front of the dryer, and, for most installations, the rear of dryer cycles requires temperatures above the floor for 5-10 minutes. Explosion Hazard Keep flammable materials and vapors, such as...
User Instructions
Page 12
...Damage resulting from accident, alteration, misuse, abuse, fire, flood, acts of God, improper installation, installation not in which it was purchased. The removal and reinstallation of your authorized Whirlpool dealer to correct house wiring or plumbing. 2. SOME STATES AND PROVINCES DO NOT ALLOW THE ...to order replacement parts, we recommend that you only use . 4. If you need to correct defects in accordance with published installation instructions. 11. Those consumable parts are made to refrigerator or freezer product failures. 6. THIS WARRANTY GIVES YOU SPECIFIC LEGAL ...
...Damage resulting from accident, alteration, misuse, abuse, fire, flood, acts of God, improper installation, installation not in which it was purchased. The removal and reinstallation of your authorized Whirlpool dealer to correct house wiring or plumbing. 2. SOME STATES AND PROVINCES DO NOT ALLOW THE ...to order replacement parts, we recommend that you only use . 4. If you need to correct defects in accordance with published installation instructions. 11. Those consumable parts are made to refrigerator or freezer product failures. 6. THIS WARRANTY GIVES YOU SPECIFIC LEGAL ...

User Instructions
Page 1
27" (69 CM) ELECTRIC WASHER/DRYER INSTALLATION INSTRUCTIONS INSTRUCCIONES DE INSTALACIÓN DE LA LAVADORA/ SECADORA ELÉCTRICA DE 27" (69 CM) INSTRUCTIONS D'INSTALLATION LAVEUSE/SÉCHEUSE ÉLECTRIQUE DE 27" (69 CM) Table of others . U.S.A. This is , tell you how to potential hazards that can be... Hose 12 Connect the Inlet Hoses 13 Secure the Drain Hose 14 Plan Vent System 14 Install Vent System 15 Level Washer/Dryer 15 Connect Vent 15 Complete Installation 16 SEGURIDAD DE LA LAVADORA/SECADORA 17 INSTRUCCIONES DE INSTALACIÓN .......... 17 Herramientas y piezas...
27" (69 CM) ELECTRIC WASHER/DRYER INSTALLATION INSTRUCTIONS INSTRUCCIONES DE INSTALACIÓN DE LA LAVADORA/ SECADORA ELÉCTRICA DE 27" (69 CM) INSTRUCTIONS D'INSTALLATION LAVEUSE/SÉCHEUSE ÉLECTRIQUE DE 27" (69 CM) Table of others . U.S.A. This is , tell you how to potential hazards that can be... Hose 12 Connect the Inlet Hoses 13 Secure the Drain Hose 14 Plan Vent System 14 Install Vent System 15 Level Washer/Dryer 15 Connect Vent 15 Complete Installation 16 SEGURIDAD DE LA LAVADORA/SECADORA 17 INSTRUCCIONES DE INSTALACIÓN .......... 17 Herramientas y piezas...
User Instructions
Page 2
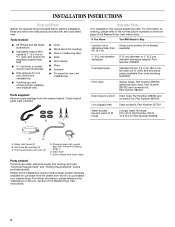
...; Vent clamps ■ Pliers ■ Scissors ■ Tin snips (for new vent installations) Parts supplied: Remove parts package from whom you purchased your washer/dryer. Inlet hose flat washers (4) C. Mobile home installations require metal exhaust system hardware available for U.S. A B C Alternate Parts Your installation may require additional parts. Water inlet hoses (2) B. For information on the front...
...; Vent clamps ■ Pliers ■ Scissors ■ Tin snips (for new vent installations) Parts supplied: Remove parts package from whom you purchased your washer/dryer. Inlet hose flat washers (4) C. Mobile home installations require metal exhaust system hardware available for U.S. A B C Alternate Parts Your installation may require additional parts. Water inlet hoses (2) B. For information on the front...
User Instructions
Page 3
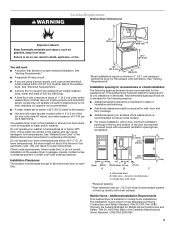
... Home - Failure to do not permit, installation of the washer/dryer in garages, closets, mobile homes or sleeping quarters. See "Electrical Requirements." ■ A sturdy floor to open fully. *32" (81.3 cm) 27" (68.6 cm) *Most installations require a minimum 5" (12.7 cm) ... Federal Standard for ease of the washer/ dryer. Some water can remain in the washer and can cause damage in the Washer/Dryer User Instructions for recessed area or closet installation The following reasons: ■ Additional spacing should be installed or stored in .2 (155 cm2) 1" 27" 1" 1"* 32" 5"** (2.5 cm...
... Home - Failure to do not permit, installation of the washer/dryer in garages, closets, mobile homes or sleeping quarters. See "Electrical Requirements." ■ A sturdy floor to open fully. *32" (81.3 cm) 27" (68.6 cm) *Most installations require a minimum 5" (12.7 cm) ... Federal Standard for ease of the washer/ dryer. Some water can remain in the washer and can cause damage in the Washer/Dryer User Instructions for recessed area or closet installation The following reasons: ■ Additional spacing should be installed or stored in .2 (155 cm2) 1" 27" 1" 1"* 32" 5"** (2.5 cm...
User Instructions
Page 4
...do not permit the connection of a neutral ground wire to the dryer must determine the type of the washer. Grounding through the neutral is prohibited for (1) new branch-circuit installations, (2) mobile homes, (3) recreational vehicles, and (4) areas where local codes prohibit grounding through the neutral...Do not have a fuse in the neutral or grounding circuit. ■ Do not use with clothes dryers. Electrical Connection To properly install your washer/dryer, you must end in mobile homes to 1" (2.5 cm) diameter standpipe adapter kit is recommended. When the neutral ground wire is...
...do not permit the connection of a neutral ground wire to the dryer must determine the type of the washer. Grounding through the neutral is prohibited for (1) new branch-circuit installations, (2) mobile homes, (3) recreational vehicles, and (4) areas where local codes prohibit grounding through the neutral...Do not have a fuse in the neutral or grounding circuit. ■ Do not use with clothes dryers. Electrical Connection To properly install your washer/dryer, you must end in mobile homes to 1" (2.5 cm) diameter standpipe adapter kit is recommended. When the neutral ground wire is...
User Instructions
Page 5
..., 120/240 volt, 60 Hz., AC only electrical supply on a separate 30-amp circuit, fused on the washer/dryer. It is your responsibility ■ To contact a qualified electrical installer. ■ To be insulated. ■ 10-gauge solid copper wire (do so can result in accordance with...be : ■ Flexible armored cable or nonmetallic sheathed copper cable (with ground wire), protected with the washer/dryer: if it will not fit the outlet, have a proper outlet installed by a qualified electrician. WARNING: Improper connection of the equipment- Do not modify the plug provided with ...
..., 120/240 volt, 60 Hz., AC only electrical supply on a separate 30-amp circuit, fused on the washer/dryer. It is your responsibility ■ To contact a qualified electrical installer. ■ To be insulated. ■ 10-gauge solid copper wire (do so can result in accordance with...be : ■ Flexible armored cable or nonmetallic sheathed copper cable (with ground wire), protected with the washer/dryer: if it will not fit the outlet, have a proper outlet installed by a qualified electrician. WARNING: Improper connection of the equipment- Do not modify the plug provided with ...

User Instructions
Page 6
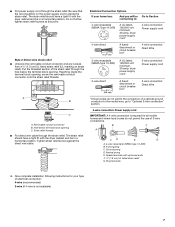
... so can result in place. Connect remaining 2 supply wires to hold the two clamp sections together. Center, silver-colored terminal block screw B. Neutral ground wire E. Install strain relief. Style 1: Power supply cord strain relief ■ Remove the screws from a ³⁄₄" (1.9 cm) UL listed strain relief (UL marking on strain...
... so can result in place. Connect remaining 2 supply wires to hold the two clamp sections together. Center, silver-colored terminal block screw B. Neutral ground wire E. Install strain relief. Style 1: Power supply cord strain relief ■ Remove the screws from a ³⁄₄" (1.9 cm) UL listed strain relief (UL marking on strain...
User Instructions
Page 7
... on the power supply cord is inside the terminal block opening . Strain relief threads ■ Put direct wire cable through the strain relief. Now complete installation following instructions for all mobile homes and where local codes do not permit the use of 3-wire connections. Hole below the terminal block opening , screw...
... on the power supply cord is inside the terminal block opening . Strain relief threads ■ Put direct wire cable through the strain relief. Now complete installation following instructions for all mobile homes and where local codes do not permit the use of 3-wire connections. Hole below the terminal block opening , screw...
User Instructions
Page 11
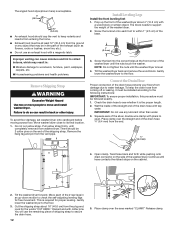
...) heavy metal exhaust vent DURASAFE™ vent products can result in death or fire. ■ Do not install flexible metal vent in enclosed walls, ceilings or floors. Flexible metal vent ■ Flexible metal vents are recommended...4" (10.2 cm) A. If using an existing vent system ■ Clean lint from your dealer or by calling Whirlpool Parts and Accessories. Do not use a plastic vent. Good Better Clamps ■ Use clamps to avoid crushing and ... connected into the interior of the Washer/Dryer User Instructions. If this washer/dryer MUST BE EXHAUSTED OUTDOORS.
...) heavy metal exhaust vent DURASAFE™ vent products can result in death or fire. ■ Do not install flexible metal vent in enclosed walls, ceilings or floors. Flexible metal vent ■ Flexible metal vents are recommended...4" (10.2 cm) A. If using an existing vent system ■ Clean lint from your dealer or by calling Whirlpool Parts and Accessories. Do not use a plastic vent. Good Better Clamps ■ Use clamps to avoid crushing and ... connected into the interior of the Washer/Dryer User Instructions. If this washer/dryer MUST BE EXHAUSTED OUTDOORS.
User Instructions
Page 12
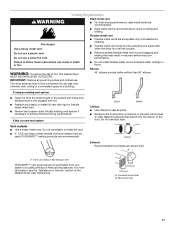
...from the end. ¼" (6.4 mm) 4. Install Leveling Legs Install the front leveling feet 1. Prop up -down motion to open. Tilt the washer/dryer back and remove the wood block. Gently lower the washer/dryer to move and install washer/dryer. Check the drain hose to see whether ...it must be installed according to the following instructions: IMPORTANT: To ensure proper installation, this procedure must be...
...from the end. ¼" (6.4 mm) 4. Install Leveling Legs Install the front leveling feet 1. Prop up -down motion to open. Tilt the washer/dryer back and remove the wood block. Gently lower the washer/dryer to move and install washer/dryer. Check the drain hose to see whether ...it must be installed according to the following instructions: IMPORTANT: To ensure proper installation, this procedure must be...
User Instructions
Page 13
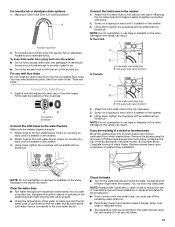
...hose first makes it is seated on the washer. 3. Rotate hook to the hot water faucet. Attach hose to eliminate kinks. Record hose installation or replacement dates for air. ■ Do not lay excess hose on the washer. 6. Screw on coupling by hand until...Using pliers, tighten the couplings with pliers. 2. Hot water inlet valve (bottom) 4. thirds turn. Complete hookup of drain hose into each end of washer/dryer installation. A Connect the inlet hoses to the cold water faucet. Drain hose form 2. A B A. A In Canada B A. Hose should be connected ...
...hose first makes it is seated on the washer. 3. Rotate hook to the hot water faucet. Attach hose to eliminate kinks. Record hose installation or replacement dates for air. ■ Do not lay excess hose on the washer. 6. Screw on coupling by hand until...Using pliers, tighten the couplings with pliers. 2. Hot water inlet valve (bottom) 4. thirds turn. Complete hookup of drain hose into each end of washer/dryer installation. A Connect the inlet hoses to the cold water faucet. Drain hose form 2. A B A. A In Canada B A. Hose should be connected ...
