
Installation Instructions
Page 1
... symbol. W10255468C W10259190B - SP ONLY Para una versión de estas instrucciones en español, visite www.Whirlpool.com TABLE OF CONTENTS DRYER SAFETY 1 INSTALLATION REQUIREMENTS 2 Tools and Parts 2 Optional Equipment 3 Location Requirements 3 ELECTRIC DRYER POWER HOOKUP 5 Electrical Requirements 5 Electrical Connection 6 VENTING 11 Venting Requirements 11 Plan Vent System 12 Install Vent System...
... symbol. W10255468C W10259190B - SP ONLY Para una versión de estas instrucciones en español, visite www.Whirlpool.com TABLE OF CONTENTS DRYER SAFETY 1 INSTALLATION REQUIREMENTS 2 Tools and Parts 2 Optional Equipment 3 Location Requirements 3 ELECTRIC DRYER POWER HOOKUP 5 Electrical Requirements 5 Electrical Connection 6 VENTING 11 Venting Requirements 11 Plan Vent System 12 Install Vent System...

Installation Instructions
Page 2
...; Adjustable wrench that opens to the "Assistance or Service" section in your dryer. "Y" connector C. NOTE: Do not use leveling legs supplied with dryer if installing on a pedestal. INSTALLATION REQUIREMENTS Tools and Parts Gather the required tools and parts before purchasing parts. Check that all parts are included. Short inlet hose D. Check existing electrical supply and venting...
...; Adjustable wrench that opens to the "Assistance or Service" section in your dryer. "Y" connector C. NOTE: Do not use leveling legs supplied with dryer if installing on a pedestal. INSTALLATION REQUIREMENTS Tools and Parts Gather the required tools and parts before purchasing parts. Check that all parts are included. Short inlet hose D. Check existing electrical supply and venting...

Installation Instructions
Page 3
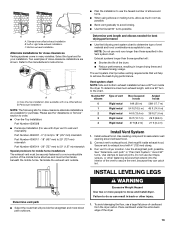
... on when the diamond marking on the leveling foot is greater than 1" (25 mm), install Extended Dryer Feet Kit, Part Number 279810. Location Requirements Installation clearances The location must not be exposed to place the dryer at least 18" (460 mm) above the floor. Steam (Electric or Gas) A 38" ...) 31 1/2" (800 mm) 27" (686 mm) 51 1/2" (1308 mm) NOTE: Most installations require a minimum 5" (127 mm) clearance behind the dryer for your dryer. If using a pedestal, you will be installed or stored in an area where it will need to water and/or weather. Check code requirements...
... on when the diamond marking on the leveling foot is greater than 1" (25 mm), install Extended Dryer Feet Kit, Part Number 279810. Location Requirements Installation clearances The location must not be exposed to place the dryer at least 18" (460 mm) above the floor. Steam (Electric or Gas) A 38" ...) 31 1/2" (800 mm) 27" (686 mm) 51 1/2" (1308 mm) NOTE: Most installations require a minimum 5" (127 mm) clearance behind the dryer for your dryer. If using a pedestal, you will be installed or stored in an area where it will need to water and/or weather. Check code requirements...

Installation Instructions
Page 5
...; Metal exhaust system hardware, which is suitable for Mobile Home Construction and Safety, Title 24, HUD Part 280) or Standard CAN/CSA-Z240 MH. ELECTRIC DRYER POWER HOOKUP Electrical Requirements It is your responsibility ■ To contact a qualified electrical installer. ■...Electrical Code requires a 4-wire power supply connection for cabinet installation. ■ For cabinet installation, with stacked washer and dryer The dimensions shown are for stacked recessed or closet installation. Recommended installation spacing for cabinet installation NOTE: Some models are not...
...; Metal exhaust system hardware, which is suitable for Mobile Home Construction and Safety, Title 24, HUD Part 280) or Standard CAN/CSA-Z240 MH. ELECTRIC DRYER POWER HOOKUP Electrical Requirements It is your responsibility ■ To contact a qualified electrical installer. ■...Electrical Code requires a 4-wire power supply connection for cabinet installation. ■ For cabinet installation, with stacked washer and dryer The dimensions shown are for stacked recessed or closet installation. Recommended installation spacing for cabinet installation NOTE: Some models are not...
Installation Instructions
Page 13
A B A. NOTE: Do not use with dryer vent to wall vent mismatch): Part Number 4396037 - 0" (0 mm) to 18" (457 mm) mismatch Part Number 4396011 - 18" (457 mm) to 29" (737 mm) mismatch Part Number 4396014 - 29" (737 mm) to 50" (1.27 m) mismatch Special provisions for mobile home installations The exhaust vent must be securely fastened to...
A B A. NOTE: Do not use with dryer vent to wall vent mismatch): Part Number 4396037 - 0" (0 mm) to 18" (457 mm) mismatch Part Number 4396011 - 18" (457 mm) to 29" (737 mm) mismatch Part Number 4396014 - 29" (737 mm) to 50" (1.27 m) mismatch Special provisions for mobile home installations The exhaust vent must be securely fastened to...

Installation Instructions
Page 15
...water system, which step was skipped. 2. Check levelness first side to side, then front to the need for certain part replacement or repair. If the dryer is an extra part, go away. Excessive scale buildup may not have not tripped. The odor will not start, check the following: ... is common when the heating element is not crushed or kinked. 5. Check that both fuses are intact and tight, or that all parts are on the dryer. 7. Check with a damp cloth to the estimated time remaining. 15 Replace the fuse or reset the circuit breaker. COMPLETE INSTALLATION ...
...water system, which step was skipped. 2. Check levelness first side to side, then front to the need for certain part replacement or repair. If the dryer is an extra part, go away. Excessive scale buildup may not have not tripped. The odor will not start, check the following: ... is common when the heating element is not crushed or kinked. 5. Check that both fuses are intact and tight, or that all parts are on the dryer. 7. Check with a damp cloth to the estimated time remaining. 15 Replace the fuse or reset the circuit breaker. COMPLETE INSTALLATION ...
Owners Manual
Page 2
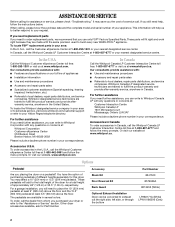
.... Accessory Stack Kit Door Reversal Kit Back Guard Optional Exhaust Installation Dryer can write to Whirlpool Corporation with : ■ Use and maintenance procedures ■ Accessory and repair parts sales ■ Referrals to your request. ASSISTANCE OR SERVICE Before calling for this dryer. In Canada, call . For further assistance If you need further assistance, you...
.... Accessory Stack Kit Door Reversal Kit Back Guard Optional Exhaust Installation Dryer can write to Whirlpool Corporation with : ■ Use and maintenance procedures ■ Accessory and repair parts sales ■ Referrals to your request. ASSISTANCE OR SERVICE Before calling for this dryer. In Canada, call . For further assistance If you need further assistance, you...
Owners Manual
Page 7
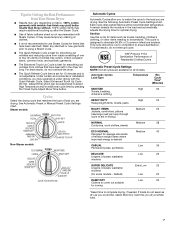
...Sanitization Performance of one to complete drying, if needed. Default) Extra Low 25 Low 25 DAMP DRY Clothes to aid in the dryer too long. This cycle should be sanitized. Cycle Time* (Minutes) SANITIZE Towels, bedding, children's clothing High 60 HEAVY DUTY High... 50 Heavyweight items, towels, jeans BULKY ITEMS Medium 55 Jackets, comforters, pillows (rearrange load part way through cycle to come out suitable for optimal drying. See the following Automatic Preset Cycle Settings chart. This cycle is not ...
...Sanitization Performance of one to complete drying, if needed. Default) Extra Low 25 Low 25 DAMP DRY Clothes to aid in the dryer too long. This cycle should be sanitized. Cycle Time* (Minutes) SANITIZE Towels, bedding, children's clothing High 60 HEAVY DUTY High... 50 Heavyweight items, towels, jeans BULKY ITEMS Medium 55 Jackets, comforters, pillows (rearrange load part way through cycle to come out suitable for optimal drying. See the following Automatic Preset Cycle Settings chart. This cycle is not ...

Owners Manual
Page 11
...fuse or reset the circuit breaker. Use a time-delay fuse. 11 Replace all parts and panels before servicing. Transport hose separately. 5. Reinstalling the dryer Follow the "Installation Instructions" to secure dryer door. Special Instructions for Steam Models Water Inlet Hoses Replace inlet hoses and hose screen... after 5 years of hose failure. Unplug dryer or disconnect power. 2. Disconnect water inlet hose from faucet, then drain the hose. Remove the cover. 3. Replace the bulb ...
...fuse or reset the circuit breaker. Use a time-delay fuse. 11 Replace all parts and panels before servicing. Transport hose separately. 5. Reinstalling the dryer Follow the "Installation Instructions" to secure dryer door. Special Instructions for Steam Models Water Inlet Hoses Replace inlet hoses and hose screen... after 5 years of hose failure. Unplug dryer or disconnect power. 2. Disconnect water inlet hose from faucet, then drain the hose. Remove the cover. 3. Replace the bulb ...


