Use and Care Guide
Page 1
www.whirlpool.com Table of Contents 2 W10182361A ® ® ELECTRONIC ELECTRIC DRYER Use & Care Guide For questions about features, operation/performance, parts, accessories or service, call: 1-800-253-1301 or visit our website at...
www.whirlpool.com Table of Contents 2 W10182361A ® ® ELECTRONIC ELECTRIC DRYER Use & Care Guide For questions about features, operation/performance, parts, accessories or service, call: 1-800-253-1301 or visit our website at...
Use and Care Guide
Page 2
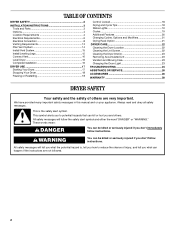
... important safety messages in this manual and on your appliance. Always read and obey all safety messages. TABLE OF CONTENTS DRYER SAFETY 2 INSTALLATION INSTRUCTIONS 3 Tools and Parts 3 Options 4 Location Requirements 4 Electrical Requirements 6 Electrical Connection 8 Venting Requirements 13 Plan Vent System 14 Install Vent System 15 Install Leveling Legs 15 Connect Vent 16 Level...
... important safety messages in this manual and on your appliance. Always read and obey all safety messages. TABLE OF CONTENTS DRYER SAFETY 2 INSTALLATION INSTRUCTIONS 3 Tools and Parts 3 Options 4 Location Requirements 4 Electrical Requirements 6 Electrical Connection 8 Venting Requirements 13 Plan Vent System 14 Install Vent System 15 Install Leveling Legs 15 Connect Vent 16 Level...
Use and Care Guide
Page 3
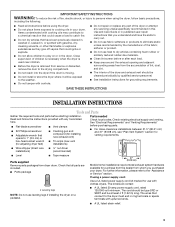
...load. ■ Keep area around the exhaust opening and adjacent surrounding areas free from the accumulation of lint, dust, and dirt. ■ The interior of the dryer and exhaust vent should be at least 4 ft (1.22 m) long. For further information, please refer to... with any servicing unless specifically recommended in this Use and Care Guide or in published user-repair instructions that you purchased your dryer. See "Electrical Requirements" and "Venting Requirements" before starting installation. Read and follow basic precautions, including the following: ■ Read all ...
...load. ■ Keep area around the exhaust opening and adjacent surrounding areas free from the accumulation of lint, dust, and dirt. ■ The interior of the dryer and exhaust vent should be at least 4 ft (1.22 m) long. For further information, please refer to... with any servicing unless specifically recommended in this Use and Care Guide or in published user-repair instructions that you purchased your dryer. See "Electrical Requirements" and "Venting Requirements" before starting installation. Read and follow basic precautions, including the following: ■ Read all ...
Use and Care Guide
Page 4
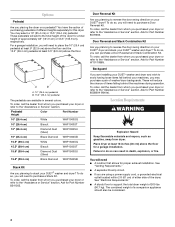
... dryer and stack your dryer or refer to purchase a Door Reversal Kit. These will reduce the chance of different heights separately for Part Number W10110889. Pedestal Height Color Part Number 10" (25.4 cm) White WHP1000SQ 10" (25.4 cm) Biscuit WHP1000ST 10" (25.4 cm) Diamond Dust ...to the "Assistance or Service" section. Failure to support the total dryer weight of washer/dryer backguards. A B A. 10" (25.4 cm) pedestal B. 15.5" (39.4 cm) pedestal The pedestals are using a power supply cord, a grounded electrical outlet located within 2 ft (61 cm) of either side of...
... dryer and stack your dryer or refer to purchase a Door Reversal Kit. These will reduce the chance of different heights separately for Part Number W10110889. Pedestal Height Color Part Number 10" (25.4 cm) White WHP1000SQ 10" (25.4 cm) Biscuit WHP1000ST 10" (25.4 cm) Diamond Dust ...to the "Assistance or Service" section. Failure to support the total dryer weight of washer/dryer backguards. A B A. 10" (25.4 cm) pedestal B. 15.5" (39.4 cm) pedestal The pedestals are using a power supply cord, a grounded electrical outlet located within 2 ft (61 cm) of either side of...
Use and Care Guide
Page 5
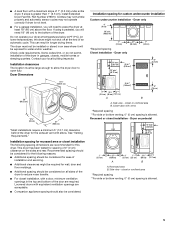
... wall, door and floor moldings. ■ Additional spacing should also be considered on the sides and rear. The dryer must be exposed to open fully. Installation spacing for custom undercounter installation Custom undercounter installation - closet or confined area....52 cm) 1"* (2.5 cm) 27" (68.6 cm) *Required spacing Closet installation - closet or confined area B. Recessed or closet installation - Side view - Louvered doors with elbow. Dryer on pedestal 14" max.* (35.6 cm) 18" min.* (45.72 cm) 1" (2.5 cm) 27" (68.6 cm) A 1" 1"* (2.5 cm) (2.5 cm) 31½"...
... wall, door and floor moldings. ■ Additional spacing should also be considered on the sides and rear. The dryer must be exposed to open fully. Installation spacing for custom undercounter installation Custom undercounter installation - closet or confined area....52 cm) 1"* (2.5 cm) 27" (68.6 cm) *Required spacing Closet installation - closet or confined area B. Recessed or closet installation - Side view - Louvered doors with elbow. Dryer on pedestal 14" max.* (35.6 cm) 18" min.* (45.72 cm) 1" (2.5 cm) 27" (68.6 cm) A 1" 1"* (2.5 cm) (2.5 cm) 31½"...
Use and Care Guide
Page 6
... after 1996, and all local codes and ordinances. Additional installation requirements This dryer is allowed. The installation must be sure that the electrical connection is adequate and in conformance with the National Electrical Code, ANSI/NFPA 70-latest edition and all mobile home installations. Mobile home...of the above code standards can be at least twice as large as the dryer exhaust opening (such as a nearby window) should be obtained from your responsibility ■ To contact a qualified electrical installer. ■ To be made in mobile homes to the Manufactured Home ...
... after 1996, and all local codes and ordinances. Additional installation requirements This dryer is allowed. The installation must be sure that the electrical connection is adequate and in conformance with the National Electrical Code, ANSI/NFPA 70-latest edition and all mobile home installations. Mobile home...of the above code standards can be at least twice as large as the dryer exhaust opening (such as a nearby window) should be obtained from your responsibility ■ To contact a qualified electrical installer. ■ To be made in mobile homes to the Manufactured Home ...
Use and Care Guide
Page 7
...with ring or spade terminals and UL listed strain relief. If the dryer is installed with clothes dryers. Grounding through the neutral conductors. If using and follow the instructions provided for use with a 4-wire electrical supply connection, the neutral ground wire must be using a power supply...4 ft (1.22 m) long. In the event of malfunction or breakdown, grounding will reduce the risk of electric shock by providing a path of the terminal block, the dryer cabinet is prohibited. grounding conductor can result in ring terminals or spade terminals with all local codes and ordinances...
...with ring or spade terminals and UL listed strain relief. If the dryer is installed with clothes dryers. Grounding through the neutral conductors. If using and follow the instructions provided for use with a 4-wire electrical supply connection, the neutral ground wire must be using a power supply...4 ft (1.22 m) long. In the event of malfunction or breakdown, grounding will reduce the risk of electric shock by providing a path of the terminal block, the dryer cabinet is prohibited. grounding conductor can result in ring terminals or spade terminals with all local codes and ordinances...
Use and Care Guide
Page 8
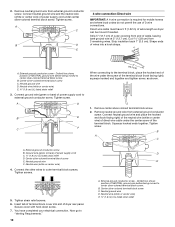
...to do so can result in death, fire, or electrical shock. 1. Disconnect power before making electrical connections. Remove the hold-down , and hold in a horizontal position. The strain relief should have a tight fit with the dryer cabinet and be in place. Strain relief tab pointing... down screw 3. Use a UL listed strain relief. Securely tighten all electrical connections. Failure to hold -down ■ Put power supply cord through ...
...to do so can result in death, fire, or electrical shock. 1. Disconnect power before making electrical connections. Remove the hold-down , and hold in a horizontal position. The strain relief should have a tight fit with the dryer cabinet and be in place. Strain relief tab pointing... down screw 3. Use a UL listed strain relief. Securely tighten all electrical connections. Failure to hold -down ■ Put power supply cord through ...

Use and Care Guide
Page 9
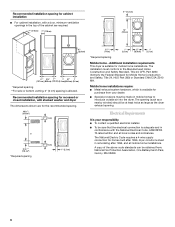
...circuit breaker box* 4-wire connection: Direct Wire 3-wire receptacle (NEMA type 10-30R) A UL listed, 120/240-volt minimum, 30-amp, dryer power supply cord* 3-wire connection: Power supply cord 3-wire direct 3¹⁄₂" (8.9 cm) A fused disconnect or circuit breaker box* ...IMPORTANT: A 4-wire connection is not available) CD E G A. 4-wire receptacle (NEMA type 14-30R) B. 4-prong plug C. Electrical Connection Options If your type of electrical connection: 4-wire (recommended) 3-wire (if 4-wire is required for your home has: And you will be in a horizontal position....
...circuit breaker box* 4-wire connection: Direct Wire 3-wire receptacle (NEMA type 10-30R) A UL listed, 120/240-volt minimum, 30-amp, dryer power supply cord* 3-wire connection: Power supply cord 3-wire direct 3¹⁄₂" (8.9 cm) A fused disconnect or circuit breaker box* ...IMPORTANT: A 4-wire connection is not available) CD E G A. 4-wire receptacle (NEMA type 14-30R) B. 4-prong plug C. Electrical Connection Options If your type of electrical connection: 4-wire (recommended) 3-wire (if 4-wire is required for your home has: And you will be in a horizontal position....
Use and Care Guide
Page 10
.... 7. Center silver-colored terminal block screw C. Connect neutral ground wire and the neutral wire (white or center wire) of the terminal block. Shape ends of dryer rear panel. Neutral ground wire F. Insert tab of terminal block cover into slot of wires into a hook shape. (2.15" cm) A. B. Neutral wire (white or ...Tighten screw. Ground wire (green or bare) of power supply cord to center silver-colored terminal block screw. Direct wire cable must have completed your electrical connection. Neutral wire (white or center wire) 4. Dotted line shows position of extra length so...
.... 7. Center silver-colored terminal block screw C. Connect neutral ground wire and the neutral wire (white or center wire) of the terminal block. Shape ends of dryer rear panel. Neutral ground wire F. Insert tab of terminal block cover into slot of wires into a hook shape. (2.15" cm) A. B. Neutral wire (white or ...Tighten screw. Ground wire (green or bare) of power supply cord to center silver-colored terminal block screw. Direct wire cable must have completed your electrical connection. Neutral wire (white or center wire) 4. Dotted line shows position of extra length so...
Use and Care Guide
Page 11
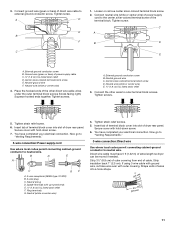
...to external ground conductor screw. B D E A C GF A. 3-wire receptacle (NEMA type 10-30R) B. 3-wire plug C. You have completed your electrical connection. Strip insulation back 1" (2.5 cm). Loosen or remove center silver-colored terminal block screw. 2. A. Neutral wire (white or center wire) E ...codes permit connecting cabinet-ground conductor to the center, silver-colored terminal screw of cable. Ground wire (green or bare) of dryer rear panel. Tighten screws. 5. Neutral ground wire C. Tighten strain relief screws. 5. Insert tab of terminal block cover into ...
...to external ground conductor screw. B D E A C GF A. 3-wire receptacle (NEMA type 10-30R) B. 3-wire plug C. You have completed your electrical connection. Strip insulation back 1" (2.5 cm). Loosen or remove center silver-colored terminal block screw. 2. A. Neutral wire (white or center wire) E ...codes permit connecting cabinet-ground conductor to the center, silver-colored terminal screw of cable. Ground wire (green or bare) of dryer rear panel. Tighten screws. 5. Neutral ground wire C. Tighten strain relief screws. 5. Insert tab of terminal block cover into ...
Use and Care Guide
Page 12
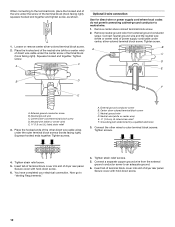
... Center silver-colored terminal block screw D. A. External ground conductor screw B. Neutral ground wire D. Tighten screws. 4. You have completed your electrical connection. Tighten strain relief screws. 5. Squeeze hooked end together. Remove neutral ground wire from the external ground conductor screw to an adequate ground...strain relief F. Grounding path determined by a qualified electrician 3. Insert tab of terminal block cover into slot of dryer rear panel. Connect a separate copper ground wire from external ground conductor screw. Remove center silver-colored terminal block...
... Center silver-colored terminal block screw D. A. External ground conductor screw B. Neutral ground wire D. Tighten screws. 4. You have completed your electrical connection. Tighten strain relief screws. 5. Squeeze hooked end together. Remove neutral ground wire from the external ground conductor screw to an adequate ground...strain relief F. Grounding path determined by a qualified electrician 3. Insert tab of terminal block cover into slot of dryer rear panel. Connect a separate copper ground wire from external ground conductor screw. Remove center silver-colored terminal block...
Use and Care Guide
Page 13
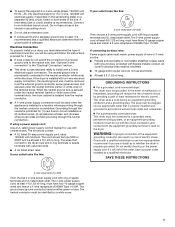
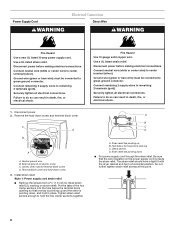
...existing vent system ■ Clean lint from your dealer or by calling Whirlpool Parts and Accessories. Clamp Exhaust Recommended hood styles are recommended. WARNING: To reduce the risk of the duct. If this dryer MUST BE EXHAUSTED OUTDOORS. DURASAFE™ venting products are shown here.... enclosed walls, ceilings or floors. Fire Hazard Use a heavy metal vent. Failure to seal all governing codes and ordinances. The dryer exhaust must be used. Good Better Clamps ■ Use clamps to follow these instructions can be connected into the interior of fire...
...existing vent system ■ Clean lint from your dealer or by calling Whirlpool Parts and Accessories. Clamp Exhaust Recommended hood styles are recommended. WARNING: To reduce the risk of the duct. If this dryer MUST BE EXHAUSTED OUTDOORS. DURASAFE™ venting products are shown here.... enclosed walls, ceilings or floors. Fire Hazard Use a heavy metal vent. Failure to seal all governing codes and ordinances. The dryer exhaust must be used. Good Better Clamps ■ Use clamps to follow these instructions can be connected into the interior of fire...

Use and Care Guide
Page 14
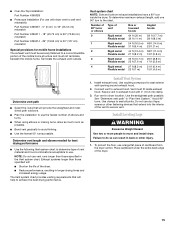
...and lint to collect indoors, which may be in death, fire, electrical shock, or serious injury. Exhaust hood H E. Rigid metal or ... damage to woodwork, furniture, paint, wallpaper, carpets, etc. Clamps F. A B C A. Refer to have the dryer converted. A B A. ■ An exhaust hood should cap the vent to keep rodents and insects from entering the... NOTE: The following kits: 279818 (white) 279820 (black) 279925 (biscuit) 279969 (pewter) 280171 (diamond dust) Contact your local dealer to the manufacturer's instructions. Elbow C. Contact your local dealer. Left or right...
...and lint to collect indoors, which may be in death, fire, electrical shock, or serious injury. Exhaust hood H E. Rigid metal or ... damage to woodwork, furniture, paint, wallpaper, carpets, etc. Clamps F. A B C A. Refer to have the dryer converted. A B A. ■ An exhaust hood should cap the vent to keep rodents and insects from entering the... NOTE: The following kits: 279818 (white) 279820 (black) 279925 (biscuit) 279969 (pewter) 280171 (diamond dust) Contact your local dealer to the manufacturer's instructions. Elbow C. Contact your local dealer. Left or right...
Use and Care Guide
Page 15
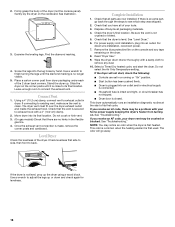
... mobile home. Use clamps to seal exterior wall opening around exhaust hood. 2. Place cardboard under the entire back edge of cardboard from the dryer carton. Use caulking compound to seal all joints. Failure to do so can result in "Plan Vent System." Avoid 90º turns.... systems longer than those specified will help to achieve the best drying performance. To protect the floor, use a large flat piece of the dryer. 15 NOTE: Do not use vent runs longer than those specified in longer drying times and increased energy usage. Install Vent System 1. Vent...
... mobile home. Use clamps to seal exterior wall opening around exhaust hood. 2. Place cardboard under the entire back edge of cardboard from the dryer carton. Use caulking compound to seal all joints. Failure to do so can result in "Plan Vent System." Avoid 90º turns.... systems longer than those specified will help to achieve the best drying performance. To protect the floor, use a large flat piece of the dryer. 15 NOTE: Do not use vent runs longer than those specified in longer drying times and increased energy usage. Install Vent System 1. Vent...
Use and Care Guide
Page 16
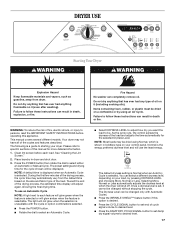
Slide the dryer on the corner posts until the diamond marking is secured to exhaust hood with a damp cloth to remove any tape remaining on the console and any dust. 10. Using a 4" (10.2 cm) clamp, connect vent to see which step was skipped. 2. Check that the vent is no kinks in the ... Leave enough room to back. If connecting to adjust the legs up . Move dryer into an outlet and/or electrical supply is connected. ■ Household fuse is intact and tight, or circuit breaker has not tripped. ■ Dryer door is close to finish turning the legs until it is closed. Do not...
Slide the dryer on the corner posts until the diamond marking is secured to exhaust hood with a damp cloth to remove any tape remaining on the console and any dust. 10. Using a 4" (10.2 cm) clamp, connect vent to see which step was skipped. 2. Check that the vent is no kinks in the ... Leave enough room to back. If connecting to adjust the legs up . Move dryer into an outlet and/or electrical supply is connected. ■ Household fuse is intact and tight, or circuit breaker has not tripped. ■ Dryer door is close to finish turning the legs until it is closed. Do not...
Use and Care Guide
Page 17
... the first few minutes of the drying process, the cycle time may automatically vary from dryer. Toward the end of the load. As the cycle runs, the control senses the dryness of fire, electric shock, or injury to each load. Place laundry in death, explosion, or fire. You... can select a different dryness level, depending on your load, by using Normal, which the dryer will glow amber when the feature is desired. ■...
... the first few minutes of the drying process, the cycle time may automatically vary from dryer. Toward the end of the load. As the cycle runs, the control senses the dryness of fire, electric shock, or injury to each load. Place laundry in death, explosion, or fire. You... can select a different dryness level, depending on your load, by using Normal, which the dryer will glow amber when the feature is desired. ■...
Use and Care Guide
Page 18
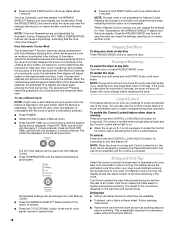
... SHIELD™ feature button if this option is displayed. Press and hold the CONTROL LOCK/UNLOCK button for more than 5 minutes, the dryer will change by pressing the Pause/Cancel button, but cannot be adjusted. The initial time displayed is extracted from clothing. While a Manual Cycle...cycle and Dryness Level. The control is locked when a single beep is heard and the Control Locked status light is on , the dryer can be restarted until the desired temperature glows green. NOTE: Dryness Level is not necessary to reduce wrinkling. Drying and Cycle Tips Select...
... SHIELD™ feature button if this option is displayed. Press and hold the CONTROL LOCK/UNLOCK button for more than 5 minutes, the dryer will change by pressing the Pause/Cancel button, but cannot be adjusted. The initial time displayed is extracted from clothing. While a Manual Cycle...cycle and Dryness Level. The control is locked when a single beep is heard and the Control Locked status light is on , the dryer can be restarted until the desired temperature glows green. NOTE: Dryness Level is not necessary to reduce wrinkling. Drying and Cycle Tips Select...
Use and Care Guide
Page 19
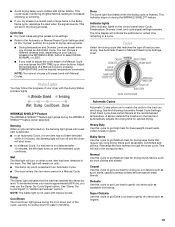
... dryness level, depending on when a wet item has been detected in the drying process. Wet The Wet light will turn off and the dryer will turn on your load by pressing TEMPERATURE until the desired temperature is cooling down period in handling. Heavy Duty Use this cycle to get... This could cause overdrying of lighter fabrics, leading to adjust the cycle length of your load is reached in an Automatic Cycle. ■ The dryer enters the cool down for a guide to the load you are drying. This indicator stays on and the selected cycle continues. Sensing When a ...
... dryness level, depending on when a wet item has been detected in the drying process. Wet The Wet light will turn off and the dryer will turn on your load by pressing TEMPERATURE until the desired temperature is cooling down period in handling. Heavy Duty Use this cycle to get... This could cause overdrying of lighter fabrics, leading to adjust the cycle length of your load is reached in an Automatic Cycle. ■ The dryer enters the cool down for a guide to the load you are drying. This indicator stays on and the selected cycle continues. Sensing When a ...
Use and Care Guide
Page 20
... help keep wrinkles from being left open and closed or DRUM LIGHT is selected, the drum light turns on and will turn on until the dryer door has been open for ironing *Estimated Time with Dryness Level (Normal) setting. The temperature setting on until DRUM LIGHT is pressed again,... the door is not running, the drum light will remain on the light inside the dryer drum. When the dryer is open for items that need a short drying time. To be adjusted. Touch Up Use this setting to remove a load of ...
... help keep wrinkles from being left open and closed or DRUM LIGHT is selected, the drum light turns on and will turn on until the dryer door has been open for ironing *Estimated Time with Dryness Level (Normal) setting. The temperature setting on until DRUM LIGHT is pressed again,... the door is not running, the drum light will remain on the light inside the dryer drum. When the dryer is open for items that need a short drying time. To be adjusted. Touch Up Use this setting to remove a load of ...


