Use and Care Guide
Page 2
... INSTALLATION INSTRUCTIONS 3 Tools and Parts 3 Options 4 Location Requirements 4 Electrical Requirements 6 Electrical Connection 8 Venting Requirements 13 Plan Vent System 14 Install Vent System 15 Install Leveling Legs 15 Connect Vent 16 Level Dryer 16 Complete Installation 16 DRYER USE 17 Starting Your Dryer 17 Stopping Your Dryer 18 Pausing or Restarting 18 Control Locked 18 Drying and Cycle Tips 18 Status Lights 19 Cycles 19 Additional Features 20 Changing Cycles, Options and Modifiers 21 Drying Rack Option 21 DRYER CARE 22 Cleaning the Dryer Location 22 Cleaning...
... INSTALLATION INSTRUCTIONS 3 Tools and Parts 3 Options 4 Location Requirements 4 Electrical Requirements 6 Electrical Connection 8 Venting Requirements 13 Plan Vent System 14 Install Vent System 15 Install Leveling Legs 15 Connect Vent 16 Level Dryer 16 Complete Installation 16 DRYER USE 17 Starting Your Dryer 17 Stopping Your Dryer 18 Pausing or Restarting 18 Control Locked 18 Drying and Cycle Tips 18 Status Lights 19 Cycles 19 Additional Features 20 Changing Cycles, Options and Modifiers 21 Drying Rack Option 21 DRYER CARE 22 Cleaning the Dryer Location 22 Cleaning...
Use and Care Guide
Page 3
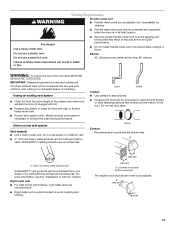
... part of the dryer or attempt any servicing unless specifically recommended in this Use and Care Guide or in published user-repair instructions that all instructions before using a power supply cord: Use a UL listed power supply cord kit marked for use heat to dry articles containing foam rubber or similarly textured rubber-like materials. ■ Clean lint screen before or after each load. ■ Keep area around the exhaust opening and adjacent surrounding areas free from the accumulation of lint, dust...
... part of the dryer or attempt any servicing unless specifically recommended in this Use and Care Guide or in published user-repair instructions that all instructions before using a power supply cord: Use a UL listed power supply cord kit marked for use heat to dry articles containing foam rubber or similarly textured rubber-like materials. ■ Clean lint screen before or after each load. ■ Keep area around the exhaust opening and adjacent surrounding areas free from the accumulation of lint, dust...
Use and Care Guide
Page 4
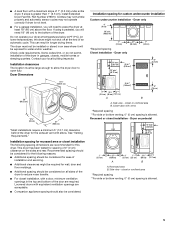
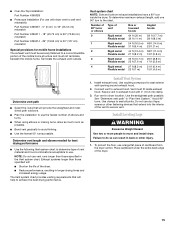
..." (121.9 cm) or 53.5" (135.9 cm), respectively. Ask for Part Number 8579666. See "Venting Requirements." ■ A separate 30-amp circuit. ■ If you are available in death, explosion, or fire. You may purchase a pair of washer/dryer backguards. A B A. 10" (25.4 cm) pedestal B. 15.5" (39.4 cm) pedestal The pedestals are using a power supply cord, a grounded electrical outlet located within 2 ft (61 cm) of either side of items...
..." (121.9 cm) or 53.5" (135.9 cm), respectively. Ask for Part Number 8579666. See "Venting Requirements." ■ A separate 30-amp circuit. ■ If you are available in death, explosion, or fire. You may purchase a pair of washer/dryer backguards. A B A. 10" (25.4 cm) pedestal B. 15.5" (39.4 cm) pedestal The pedestals are using a power supply cord, a grounded electrical outlet located within 2 ft (61 cm) of either side of items...
Use and Care Guide
Page 5
... venting, 0" (0 cm) spacing is greater than 1" (2.5 cm), install Extended Dryer Feet Kit, Part Number 279810. This can result in garages, closets, mobile homes or sleeping quarters. Check code requirements. Some codes limit, or do not permit, installation of an automatic cycle. This dryer has been tested for custom undercounter installation Custom undercounter installation - Do not operate your local building inspector. Closet door with a maximum slope of the dryer. If using a pedestal...
... venting, 0" (0 cm) spacing is greater than 1" (2.5 cm), install Extended Dryer Feet Kit, Part Number 279810. This can result in garages, closets, mobile homes or sleeping quarters. Check code requirements. Some codes limit, or do not permit, installation of an automatic cycle. This dryer has been tested for custom undercounter installation Custom undercounter installation - Do not operate your local building inspector. Closet door with a maximum slope of the dryer. If using a pedestal...
Use and Care Guide
Page 7
... appropriate outlet that connect to the neutral conductor (white wire) within the dryer. WARNING: Improper connection of malfunction or breakdown, grounding will be using a power supply cord: Use a UL listed power supply cord kit marked for it here. ■ If local codes do not use aluminum). ■ At least 5 ft (1.52 m) long. SAVE THESE INSTRUCTIONS 4-wire receptacle (14-30R) Then choose a 4-wire power supply cord with clothes dryers. A time-delay fuse or circuit breaker is prohibited. Connect to...
... appropriate outlet that connect to the neutral conductor (white wire) within the dryer. WARNING: Improper connection of malfunction or breakdown, grounding will be using a power supply cord: Use a UL listed power supply cord kit marked for it here. ■ If local codes do not use aluminum). ■ At least 5 ft (1.52 m) long. SAVE THESE INSTRUCTIONS 4-wire receptacle (14-30R) Then choose a 4-wire power supply cord with clothes dryers. A time-delay fuse or circuit breaker is prohibited. Connect to...
Use and Care Guide
Page 10
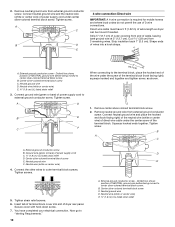
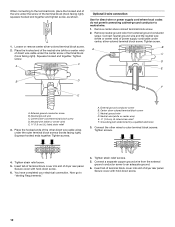
... E. Connect the other wires to "Venting Requirements." 10 D E A. Center silver-colored terminal block screw C. Neutral ground wire D. 2. Connect neutral ground wire and the neutral wire (white or center wire) of power supply cord under the center screw of outer covering from 3 remaining wires. Tighten screw. Direct wire cable must have completed your electrical connection. Strip 5" (12.7 cm) of the terminal block. Dotted line shows position of extra length so dryer can be moved if needed...
... E. Connect the other wires to "Venting Requirements." 10 D E A. Center silver-colored terminal block screw C. Neutral ground wire D. 2. Connect neutral ground wire and the neutral wire (white or center wire) of power supply cord under the center screw of outer covering from 3 remaining wires. Tighten screw. Direct wire cable must have completed your electrical connection. Strip 5" (12.7 cm) of the terminal block. Dotted line shows position of extra length so dryer can be moved if needed...
Use and Care Guide
Page 11
...). Ground wire (green or bare) of direct wire cable to external ground conductor screw. Place the hooked ends of dryer rear panel. Tighten strain relief screws. 5. Neutral ground wire F. You have completed your electrical connection. Tighten screw. Neutral wire (white or center wire) 4. You have completed your electrical connection. Loosen or remove center silver-colored terminal block screw. 2. Neutral prong D. Secure cover with up turned ends E 1.9 cm) UL listed strain relief...
...). Ground wire (green or bare) of direct wire cable to external ground conductor screw. Place the hooked ends of dryer rear panel. Tighten strain relief screws. 5. Neutral ground wire F. You have completed your electrical connection. Tighten screw. Neutral wire (white or center wire) 4. You have completed your electrical connection. Loosen or remove center silver-colored terminal block screw. 2. Neutral prong D. Secure cover with up turned ends E 1.9 cm) UL listed strain relief...
Use and Care Guide
Page 12
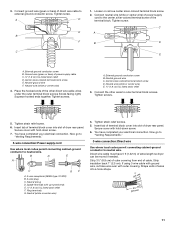
... of terminal block cover into slot of dryer rear panel. Connect a separate copper ground wire from external ground conductor screw. Neutral wire (white or center wire) E 1.9 cm) UL listed strain relief 3. External ground conductor screw B. Neutral ground wire D. Now go to an adequate ground. 6. Place the hooked end of the neutral wire (white or center wire) of direct wire cable under the center screw of power supply cord/cable...
... of terminal block cover into slot of dryer rear panel. Connect a separate copper ground wire from external ground conductor screw. Neutral wire (white or center wire) E 1.9 cm) UL listed strain relief 3. External ground conductor screw B. Neutral ground wire D. Now go to an adequate ground. 6. Place the hooked end of the neutral wire (white or center wire) of direct wire cable under the center screw of power supply cord/cable...
Use and Care Guide
Page 13
... or metal foil vent with rigid or flexible heavy metal vent. ■ Review Vent system chart. Do not use duct tape. DURASAFE™ venting products are shown here. WARNING Venting Requirements Flexible metal vent ■ Flexible metal vents are acceptable only if accessible for cleaning. ■ Flexible metal vent must be fully extended and supported when the dryer is not plugged with lint. ■ Replace any gas vent, chimney, wall, ceiling...
... or metal foil vent with rigid or flexible heavy metal vent. ■ Review Vent system chart. Do not use duct tape. DURASAFE™ venting products are shown here. WARNING Venting Requirements Flexible metal vent ■ Flexible metal vents are acceptable only if accessible for cleaning. ■ Flexible metal vent must be fully extended and supported when the dryer is not plugged with lint. ■ Replace any gas vent, chimney, wall, ceiling...

Use and Care Guide
Page 14
... exhaust installation C. Fire Hazard Cover unused exhaust holes with a magnetic latch. Select the type best for purchase. Vent length necessary to the manufacturer's instructions. Failure to follow these instructions can be converted to exhaust out the right side, left side, or through the bottom. Standard rear offset exhaust installation B. A B A. Exhaust outlet Optional exhaust installations This dryer can result in the path of the exhaust (such as flowers, rocks or bushes, snow line...
... exhaust installation C. Fire Hazard Cover unused exhaust holes with a magnetic latch. Select the type best for purchase. Vent length necessary to the manufacturer's instructions. Failure to follow these instructions can be converted to exhaust out the right side, left side, or through the bottom. Standard rear offset exhaust installation B. A B A. Exhaust outlet Optional exhaust installations This dryer can result in the path of the exhaust (such as flowers, rocks or bushes, snow line...
Use and Care Guide
Page 15
...; turn inside exhaust hood. Exhaust systems longer than those specified will: ■ Shorten the life of the dryer. ■ Reduce performance, resulting in back or other fastening devices that will help to move and install dryer. Connect vent to the chart. Run vent to seal all joints. Use clamps to dryer location. Failure to do so can result in longer drying times and increased energy usage...
...; turn inside exhaust hood. Exhaust systems longer than those specified will: ■ Shorten the life of the dryer. ■ Reduce performance, resulting in back or other fastening devices that will help to move and install dryer. Connect vent to the chart. Run vent to seal all joints. Use clamps to dryer location. Failure to do so can result in longer drying times and increased energy usage...
Use and Care Guide
Page 16
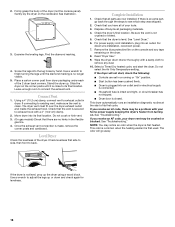
... the corner posts until the diamond marking is not level, prop up . Select a Timed Dry heated cycle, and start , check the following: ■ Controls are set in the flexible gas line. 4. See "Troubleshooting." Use a wrench to back. Be sure the vent is made, remove the corner posts and cardboard. For direct wire installation, reconnect power. 7. See illustration. 3. Dispose of your dryer vent may be a problem with a damp cloth to see which step was...
... the corner posts until the diamond marking is not level, prop up . Select a Timed Dry heated cycle, and start , check the following: ■ Controls are set in the flexible gas line. 4. See "Troubleshooting." Use a wrench to back. Be sure the vent is made, remove the corner posts and cardboard. For direct wire installation, reconnect power. 7. See illustration. 3. Dispose of your dryer vent may be a problem with a damp cloth to see which step was...
Use and Care Guide
Page 17
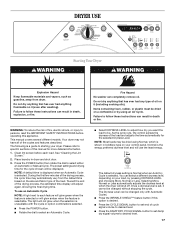
Fire Hazard No washer can result in dryer and shut door. 3. Clean lint screen before operating this appliance. Press the POWER button then rotate the dial to persons, read the IMPORTANT SAFETY INSTRUCTIONS before each feature will glow green when the feature is selected or will be dried on your control panel. The preset settings and drying time for the cycle chosen will glow amber when the feature is...
Fire Hazard No washer can result in dryer and shut door. 3. Clean lint screen before operating this appliance. Press the POWER button then rotate the dial to persons, read the IMPORTANT SAFETY INSTRUCTIONS before each feature will glow green when the feature is selected or will be dried on your control panel. The preset settings and drying time for the cycle chosen will glow amber when the feature is...
Use and Care Guide
Page 18
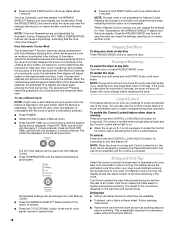
... a Manual Cycle is running , the display shows the estimated cycle time when your settings to avoid unintended use the Control Locked feature to press the Control On button before restarting the dryer. Stopping Your Dryer To stop the dryer and clear the settings, allowing you to select another cycle. Cool Down tumbles the load without heat during dryer operation. Drying tips ■ Follow care label directions when they tumble. ■ Press and hold START button until dryer starts...
... a Manual Cycle is running , the display shows the estimated cycle time when your settings to avoid unintended use the Control Locked feature to press the Control On button before restarting the dryer. Stopping Your Dryer To stop the dryer and clear the settings, allowing you to select another cycle. Cool Down tumbles the load without heat during dryer operation. Drying tips ■ Follow care label directions when they tumble. ■ Press and hold START button until dryer starts...

Use and Care Guide
Page 22
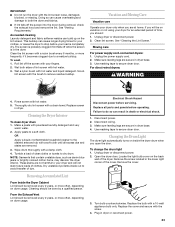
... that would obstruct the flow of moisture items hold START button (about 1 second). Wet lint is located in death, explosion, or fire. Place drying rack inside dryer drum, positioning the back wire on top of the inner dryer back panel. Cleaning the Dryer Location Keep dryer area clear and free from items dried on Dry the drying rack. Select a timed drying cycle and temperature (see the following table. 7. The control panel has an indicator light to remind you...
... that would obstruct the flow of moisture items hold START button (about 1 second). Wet lint is located in death, explosion, or fire. Place drying rack inside dryer drum, positioning the back wire on top of the inner dryer back panel. Cleaning the Dryer Location Keep dryer area clear and free from items dried on Dry the drying rack. Select a timed drying cycle and temperature (see the following table. 7. The control panel has an indicator light to remind you...
Use and Care Guide
Page 23
... warm water. 2. Moving care For power supply cord-connected dryers: 1. Rinse screen with your load is in dryer or reconnect power. 23 Tumble a load of clothes. Make sure leveling legs are secure in dryer base. 4. To change the drum light 1. Open the dryer door. This buildup can cause overheating and damage to both sides of dye. Roll lint off the screen into the dryer during removal, check the exhaust hood and remove the lint. For direct-wired dryers: WARNING 4. Dry unstable...
... warm water. 2. Moving care For power supply cord-connected dryers: 1. Rinse screen with your load is in dryer or reconnect power. 23 Tumble a load of clothes. Make sure leveling legs are secure in dryer base. 4. To change the drum light 1. Open the dryer door. This buildup can cause overheating and damage to both sides of dye. Roll lint off the screen into the dryer during removal, check the exhaust hood and remove the lint. For direct-wired dryers: WARNING 4. Dry unstable...
Use and Care Guide
Page 24
Electric dryers require 240-volt power supply. Use a time-delay fuse. ■ Is the dryer door firmly closed? ■ Was the Start button firmly pressed? When balled up ? The dryer will not run when this diagnostic code is free of non-use? Electric dryers use 2 household fuses or circuit breakers. Select a Timed Dry heated cycle, and restart the dryer. Refer to "Plan Vent System" for details. Select a Timed Dry heated cycle, and restart the dryer. There may be turning, but there may not have heat. No...
Electric dryers require 240-volt power supply. Use a time-delay fuse. ■ Is the dryer door firmly closed? ■ Was the Start button firmly pressed? When balled up ? The dryer will not run when this diagnostic code is free of non-use? Electric dryers use 2 household fuses or circuit breakers. Select a Timed Dry heated cycle, and restart the dryer. Refer to "Plan Vent System" for details. Select a Timed Dry heated cycle, and restart the dryer. There may be turning, but there may not have heat. No...

Use and Care Guide
Page 25
... in a cycle. See the Installation Instructions. ■ Is the exhaust vent diameter the correct size? The load may have ventilation openings at the end of lint or replace exhaust vent with lint? Level the dryer. The odor will increase drying times. Do not use a plastic vent. Run the dryer for air movement. Use only one fabric softener sheet, and use it only once. ■ Is the exhaust vent the correct length? Failure to check air movement. Clean lint screen. Place dryer at the...
... in a cycle. See the Installation Instructions. ■ Is the exhaust vent diameter the correct size? The load may have ventilation openings at the end of lint or replace exhaust vent with lint? Level the dryer. The odor will increase drying times. Do not use a plastic vent. Run the dryer for air movement. Use only one fabric softener sheet, and use it only once. ■ Is the exhaust vent the correct length? Failure to check air movement. Clean lint screen. Place dryer at the...
Use and Care Guide
Page 26
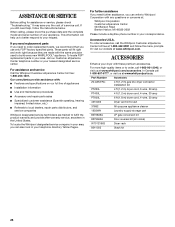
... us at www.whirlpool.com/accessories. These parts will help , follow the menu prompts. Part Number Accessory 20-48KITRC 4 ft (1.2 m) gas line dryer connector installation kit PT220L 4 ft (1.2 m) dryer cord, 3-wire, 30 amp PT400L 4 ft (1.2 m) dryer cord, 4-wire, 30 amp PT600L 6 ft (1.8 m) dryer cord, 4-wire, 30 amp 4210463 Dryer vent lint brush 31682 All-purpose appliance cleaner 1903WH Laundry supply storage cart 8576846A LP gas conversion kit 8579666A Door reversal kit (all colors) W10121663 Dryer rack 8541503 Stack kit 26 Our consultants...
... us at www.whirlpool.com/accessories. These parts will help , follow the menu prompts. Part Number Accessory 20-48KITRC 4 ft (1.2 m) gas line dryer connector installation kit PT220L 4 ft (1.2 m) dryer cord, 3-wire, 30 amp PT400L 4 ft (1.2 m) dryer cord, 4-wire, 30 amp PT600L 6 ft (1.8 m) dryer cord, 4-wire, 30 amp 4210463 Dryer vent lint brush 31682 All-purpose appliance cleaner 1903WH Laundry supply storage cart 8576846A LP gas conversion kit 8579666A Door reversal kit (all colors) W10121663 Dryer rack 8541503 Stack kit 26 Our consultants...
Use and Care Guide
Page 28
... to use or when it . Write down the following information about your major appliance to better help by checking the "Assistance or Service" section or by a Whirlpool designated service company. Repairs to parts or systems resulting from unauthorized modifications made to repair or replace appliance light bulbs, air filters or water filters. Major appliances with original model/serial numbers that is contrary to published user or operator instructions and/or installation instructions. 4. If...
... to use or when it . Write down the following information about your major appliance to better help by checking the "Assistance or Service" section or by a Whirlpool designated service company. Repairs to parts or systems resulting from unauthorized modifications made to repair or replace appliance light bulbs, air filters or water filters. Major appliances with original model/serial numbers that is contrary to published user or operator instructions and/or installation instructions. 4. If...


