Whirlpool WED9270XL Support and Manuals
Get Help and Manuals for this Whirlpool item
View All Support Options Below
Free Whirlpool WED9270XL manuals!
Problems with Whirlpool WED9270XL?
Ask a Question
Free Whirlpool WED9270XL manuals!
Problems with Whirlpool WED9270XL?
Ask a Question
Most Recent Whirlpool WED9270XL Questions

Show Me How To Install New Heating Element For Whirlpool Dryer Model Ler8648pwo
(Posted by Anonymous-111040 10 years ago)

What Is The Capacity Of This Dryer?
Thanks
(Posted by mjweissman123 11 years ago)

Whirlpool Dryer
I have a steam Whirlpool dryer. Instead of drying the clothes, the clothes left wet and hot. Please...
I have a steam Whirlpool dryer. Instead of drying the clothes, the clothes left wet and hot. Please...
(Posted by nkozelkova 11 years ago)
Popular Whirlpool WED9270XL Manual Pages
Installation Instructions - Page 2
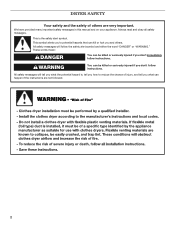
DRYER SAFETY
Your safety and the safety of injury, and tell you what the ...instructions. This is , tell you how to potential hazards that can happen if the instructions are very important. WARNING
You can be killed or seriously injured if you what can kill or hurt you don't follow instructions.
We have provided many important safety messages in this manual and on your appliance...
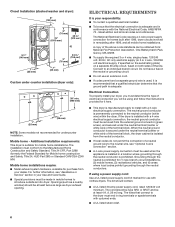
Installation Instructions - Page 3

...: If installing dryer on pedestal, do not permit, installing dryer in dryer drum. Check existing electrical supply and venting. Check that all models):
Flat-blade screwdriver
#2 Phillips screwdriver
Leveling legs (4) Parts supplied (steam models):
Wire stripper (direct wire installations)
Tin snips (new vent installations)
"Y" connector
Short inlet hose
1/4" nut driver (recommended...
Installation Instructions - Page 4
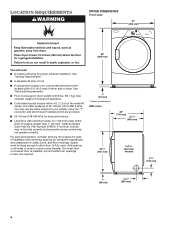
... 4 ft. (1.2 m) of the water fill valves, and water pressure of dryer. spacing for companion appliances and clearances for ease of installation and servicing; measurement Side view:
361/4"
(921... mm), install Extended Dryer Feet Kit, Part Number 279810. Space must support dryer weight of dryer to fully open. Also consider weight of companion appliance.
■■ Cold water faucets located...
Installation Instructions - Page 5
... on all sides of the dryer to reduce noise transfer.
■■ For closet installation, with elbow. Louvered doors with equivalent ventilitation openings are acceptable.
■■ Companion appliance spacing should also be considered on sides and rear.
■■ Additional spacing should be considered for ease of installation and servicing.
■■ Additional clearances...
Installation Instructions - Page 6
....
If using and follow the instructions provided for purchase from the neutral conductor.
■■ If local codes do not permit the connection of a neutral ground wire to the neutral wire, see "Assistance or Service" section in your dealer. If the dryer is installed with a 3-wire electrical supply connection.
The kit should be type SRD or...
Installation Instructions - Page 7
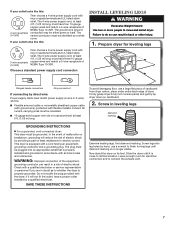
...install dryer. Check with a qualified electrician or service representative or personnel if you are in leveling legs
diamond marking
GROUNDING INSTRUCTIONS
� For a grounded, cord-connected dryer: This dryer... stand the dryer on cardboard....dryer.
Choose a standard power supply cord connector:
Install...dryer is properly installed and grounded in a risk of cardboard from dryer...
Installation Instructions - Page 9
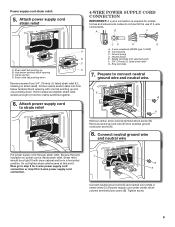
...power supply cord
E
connection.
Hole below terminal block opening
C. Clamp section
D. Spade terminals with dryer cabinet and be in place and tighten strain relief screws enough to step 5 for 4-wire power... supply cord
connection or step 9 for mobile homes and where local codes do not permit the use of power supply cord under center, silvercolored terminal block screw ...
Installation Instructions - Page 10
... supply cord to center, silver-colored terminal block screw (B). Finally, reinsert tab of terminal block cover into slot of dryer rear panel. Remove center screw
F B
A
Connect ground wire (F) (green or bare) of power supply cord to... go to Venting Requirements.
3-wire Power supply cord Connection
Use where local codes permit connecting cabinet-ground conductor to Venting Requirements.
10
Installation Instructions - Page 13
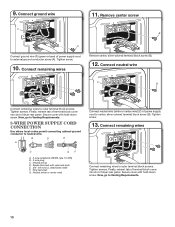
...
B
C
B
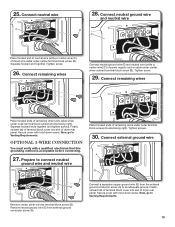
Place hooked end of neutral wire (white or center wire) (C) of dryer rear panel. Squeeze hooked ends together and tighten screws. Finally, reinsert tab of terminal block...center terminal block screw (B). Tighten screw.
26. Connect remaining wires
Place hooked ends of dryer rear panel.
Squeeze hooked end together. Remove center, silver-colored terminal block screw (B). Now...
Installation Instructions - Page 14
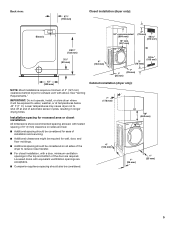
...supported in final dryer location.
■■ Remove excess to follow these instructions can result in enclosed walls, ceilings, or floors.
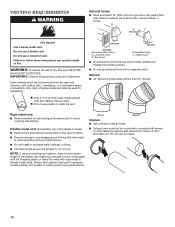
■■ The total length should cap vent to achieve best drying performance. Dryer exhaust must not be used .
Replace... for best drying performance and to seal all governing codes and ordinances. Rigid metal vent: ■■ ...
Installation Instructions - Page 15
... in:
Moisture damage to have dryer converted. Housecleaning problems and health problems.
Alternate exhaust installations (for mobile homes: Exhaust vent must contact your Use and Care Guide. Do not use a heavy metal vent. Improper venting can cause moisture and lint to collect indoors, which may be converted to follow these instructions can be securely fastened to...
Installation Instructions - Page 16
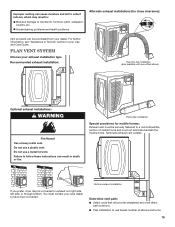
...min. (305 mm)
Install exhaust hood and use caulking compound to secure vent, because they can catch lint. Install exhaust hood
12" min. (305 mm)
Turn cold water faucet off , remove and
replace rubber washer
1
Rigid...metal 64 ft. (20 m) 58 ft. (17.7 m)
Vent must be connected to dryer location using straightest path possible. Remove old rubber washer from the total exhaust length in Vent...
Installation Instructions - Page 17
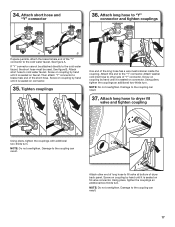
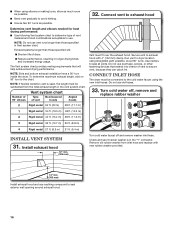
.... Attach other side of the "Y" connector to the coupling can result. Damage to the cold water faucet. If "Y" connector cannot be attached directly to cold water faucet. Attach long hose to the coupling can result.
17 Damage to dryer fill
valve and tighten coupling
A
B
Using pliers, tighten the couplings with additional two-thirds...
Installation Instructions - Page 18
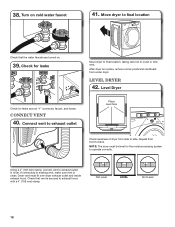
... outlet in place, remove corner posts and cardboard from under dryer. Check that the water faucets are turned on cold water faucet
41.
Move dryer to final location
Check that vent is secured to back.
Connect vent
40. Level Dryer
Place level here
Check levelness of dryer from front to exhaust hood with a 4" (102 mm) clamp...
Installation Instructions - Page 19
... using a wood block, use of a water softener is not level, prop up or down, and check again for certain part replacement or repair.
Once legs are level, make sure all of your Use and Care Guide. q Check for troubleshooting information.
19 q Remove film on dryer. If there is not crushed
or kinked.
Troubleshooting
See the Use and Care...
Whirlpool WED9270XL Reviews
We have not received any reviews for Whirlpool yet.