Whirlpool WED9270XL Support Question
Whirlpool WED9270XL Support Question
Find answers below for this question about Whirlpool WED9270XL.Need a Whirlpool WED9270XL manual? We have 1 online manual for this item!
Question posted by nkozelkova on July 9th, 2012
Whirlpool Dryer
I have a steam Whirlpool dryer. Instead of drying the clothes, the clothes left wet and hot.
Please let me know the trouble shouting instructions.
Current Answers
Related Whirlpool WED9270XL Manual Pages
Installation Instructions - Page 2
... this manual and on your appliance. This symbol alerts you to reduce the chance of others .
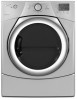
DRYER SAFETY
Your safety and the safety of injury, and tell you what the potential hazard is the ... be killed or seriously injured if you don't follow instructions. WARNING
You can happen if the instructions are very important.
Always read and obey all safety messages. All safety messages...
Installation Instructions - Page 3

...If installing dryer on pedestal, do not permit, installing dryer in dryer drum. Check existing electrical supply and venting. Contact your dryer.
Tools needed : (Not supplied with dryer) Refer to...all models):
Flat-blade screwdriver
#2 Phillips screwdriver
Leveling legs (4) Parts supplied (steam models):
Wire stripper (direct wire installations)
Tin snips (new vent installations)
...
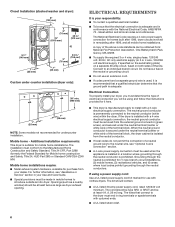
Installation Instructions - Page 4
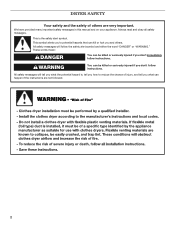
... (138-690 kPa) for ease of dryer to fully open. spacing for companion appliances and clearances for proper exhaust installation. If not level, clothes may not tumble properly and automatic sensor cycles...200 lbs. (90.7 kg). measurement Side view:
361/4"
(921 mm)
29" (736 mm)
271/4"
(695 mm)
Left or right side exhaust
41/4"
(108 mm)
1" (25 mm)
101/4"
(260 mm)
4 You may not operate ...
Installation Instructions - Page 5
... floor moldings.
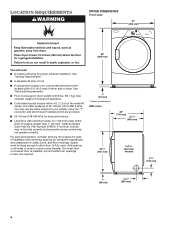
■■ Additional spacing should also be considered on all sides of the dryer to water, weather, or at end of automatic sensor cycles, resulting in longer drying times. Back view:
61/4"
(159 mm)
Closet installation (dryer only):
Electric
34" recommended (864 mm)
18" min. (457 mm)
3" (76 mm)
48 in...
Installation Instructions - Page 6
...30-amp power supply cord, rated 120/240 volt minimum. If using and follow the instructions provided for mobile home installations. The cord should be type SRD or SRDT and be...To contact a qualified electrical installer.
■■ To be made in mobile homes to install with clothes dryers. Closet Installation (stacked washer and dryer):
6" (152 mm)
3" (76 mm)
76" (1930 mm)
48 in.2 (310 cm2...
Installation Instructions - Page 7
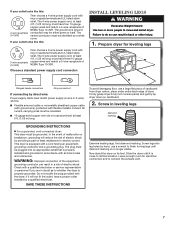
... power supply cord with ring or spade terminals and UL listed strain relief. WARNING: Improper connection of dryer. grounding conductor can result in leveling legs
diamond marking
GROUNDING INSTRUCTIONS
� For a grounded, cord-connected dryer: This dryer must have a proper outlet installed by providing a path of electric shock by a qualified electrician. Do not modify...
Installation Instructions - Page 9
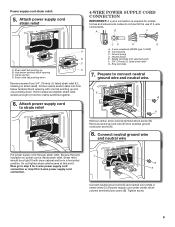
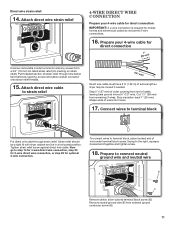
... tab pointing up and one pointing down
Remove screws from external ground conductor screw (A).
8. Ground prong D. Ring terminals
7. Strain relief
should be a tight fit with dryer cabinet and be in place and tighten strain relief screws enough to step 5 for 4-wire power supply cord
connection or step 9 for mobile homes and...
Installation Instructions - Page 10
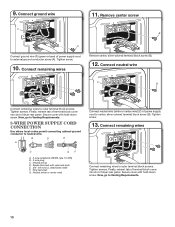
... (A). Now, go to outer terminal block screws. Remove center screw
F B
A
Connect ground wire (F) (green or bare) of dryer rear panel. Spade terminals with hold -down screw. Ring terminals G. Connect remaining wires
Connect remaining wires to neutral wire. Connect ground ... Neutral (white or center wire)
Connect neutral wire (white or center wire) (C) of dryer rear panel. 9.
Installation Instructions - Page 11
...conductor screw (A).
11 To connect wires to terminal block, place hooked end of extra length so dryer may be in a horizontal position. Prepare to terminal block
Put direct wire cable through hole ... screws from end of wires into hooks.
17. Strain relief should be a tight fit with dryer cabinet and be moved if needed. Connect wires to connect neutral
ground wire and neutral wire
B...
Installation Instructions - Page 12
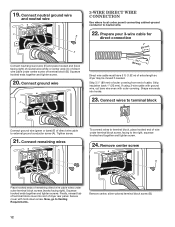
...52 m) of cable. Strip 31/2" (89 mm) of outer covering from end of extra length so dryer may be moved if needed. Secure cover with outer covering. Squeeze hooked ends together and tighten screws. ... (25 mm). Connect wires to terminal block
A
Connect ground wire (green or bare) (F) of dryer rear panel. If using 3-wire cable with ground wire, cut bare wire even with hold-down screw...
Installation Instructions - Page 13
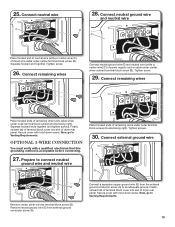
... ground conductor screw (A) to connect neutral
ground wire and neutral wire
Place hooked ends of dryer rear panel. Connect neutral wire
C
28. Connect remaining wires
E
Connect neutral ground wire ... screws. Now, go to Venting Requirements. Connect remaining wires
Place hooked ends of dryer rear panel. 25. Remove center, silver-colored terminal block screw (B). Secure cover with ...
Installation Instructions - Page 14
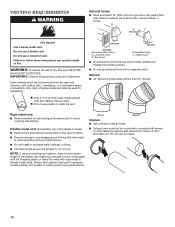
WARNING: To reduce the risk of a building. Dryer exhaust must not be used for best drying performance and to avoid
crushing and kinking.
Rigid metal vent:...Do not use a metal foil vent. Angled hood
■■ An exhaust hood should cap vent to follow these instructions can result in enclosed walls, ceilings, or floors.
■■ The total length should not exceed 73/4 ft...
Installation Instructions - Page 15
...use a plastic vent. Terminate exhaust vent outside. If you prefer, dryer may result in:
Moisture damage to follow these instructions can result in your Use and Care Guide. You must contact your... local dealer to exhaust out right side, left side, or through bottom.
Bottom ...
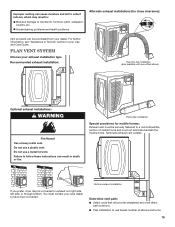
Installation Instructions - Page 16
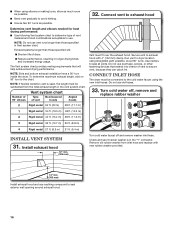
... VENT SYSTEM
31. The Vent system chart provides venting requirements that extend into interior of dryer.
■■Reduce performance, resulting in the vent system chart.
Remove old rubber washer from the total exhaust length in longer drying times and increased energy usage. NOTE: Do not use vent runs longer than those...
Installation Instructions - Page 17
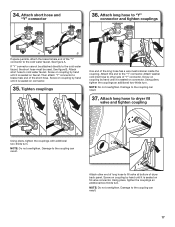
.... Attach short hose and
"Y" connector
36. See figure A. See figure B. Attach short hose to dryer fill
valve and tighten coupling
A
B
Using pliers, tighten the couplings with additional two-thirds turn. Then... attach "Y" connector to the "Y" connector. Attach this end to brass male end of dryer back panel. Attach washer cold inlet hose to other end of the long hose has a wire...
Installation Instructions - Page 18
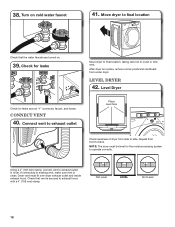
... that the water faucets are turned on cold water faucet
41. Using a 4" (102 mm) clamp, connect vent to existing vent, make sure vent is in dryer. 38.
Level dryer
42.
If connecting to exhaust outlet in place, remove corner posts and cardboard from side to exhaust hood with a 4" (102 mm) clamp. Move...
Installation Instructions - Page 19
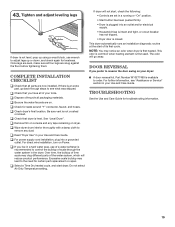
...available to see "Assistance or Service" section in the dryer. q Wipe dryer drum interior thoroughly with a damp cloth to the need for levelness.
Door Reversal
If you ...Dryer is recommended to reverse the door swing on dryer. 43.
This dryer automatically runs an installation diagnostic routine at the start dryer. For further information, see what was skipped. q Select a Time Dry...
Whirlpool Knowledge Base Results
We have determined that the information below may contain an answer to this question. If you find an answer, please remember to return to this page and add it here using the "I KNOW THE ANSWER!" button above. It's that easy to earn points!-
Loads are wrinkled - Cabrio® washer with Dispensers in Corners
...when the Add a Garment light is connected to the cold-water faucet. See the Installation Instructions for proper connection to avoid the same problem. washer with Dispensers in Corners Loads are ...room to the hot-water faucet and that the cold-water inlet hose is on. Dryer Loads are wrinkled - Top-load washer with reduced spin speeds. Were the clothes left in hot or warm rinse... -
Product Registrations
...here . Email: Your Feedback: The answer describes my issue, but does not solve my problem Compact Dryer - Gas Drying Cabinet Freezer Hood & Vent Hot Water Dispenser Ice Maker (50lb) Ironing Cabinet Jetted Sink Microwave Parts & Accessories Range - Not Helpful ... to take a moment to mail in Oven Combo Washer Dryer Compactor Cooktop Custom Laundry Option Dehumidifier Dishwasher Disposer... -
Lint is on the load - Top-load HE washer with Dispenser Drawer - video
... High Efficiency washer. Also sort by paper or tissues left in the first few washes. The air movement and ...Lint is HE High Efficiency detergent the only type of a dryer removes lint from lint takers (corduroys, synthetics, permanent press...and not tightly packed. Clothes must move freely. Is your laundered items when line drying. Was the laundry sorted? Follow the detergent ...
Similar Questions

Dryer Takes Too Long To Dry Clothes
Have to set dryer to one setting for towels to dry any type load . After cycle of 54 minutes is done...
Have to set dryer to one setting for towels to dry any type load . After cycle of 54 minutes is done...
(Posted by plazajoe 7 years ago)

Dryer Stops Before Clothes Are Dry
dryer stops before clothes are dry
dryer stops before clothes are dry
(Posted by shannonbolt 9 years ago)
Show Me How To Install New Heating Element For Whirlpool Dryer Model Ler8648pwo
(Posted by Anonymous-111040 10 years ago)


Dryer Has No Heat And Not Drying Clothes
MY DRYER IS NOT DRYING THE CLOTHES AND NOT HOT AT ALL
MY DRYER IS NOT DRYING THE CLOTHES AND NOT HOT AT ALL
(Posted by MBUN27 12 years ago)