
Use and Care Manual
Page 1
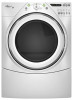
www.whirlpool.com parts, Table of Contents 2 W10151592A ® ® ELECTRONIC ELECTRIC DRYER For questions about features, operation/performance, accessories or service, call: 1-800-253-1301 or visit our website at...
www.whirlpool.com parts, Table of Contents 2 W10151592A ® ® ELECTRONIC ELECTRIC DRYER For questions about features, operation/performance, accessories or service, call: 1-800-253-1301 or visit our website at...

Use and Care Manual
Page 2
... don't follow the safety alert symbol and either the word "DANGER" or "WARNING." All safety messages will follow instructions. TABLEOF CONTENTS DRYER SAFETY 2 INSTALLATION INSTRUCTIONS 3 Tools and Parts 3 Options 4 Location Requirements 4 Electrical Requirements 6 Electrical Connection 8 Venting Requirements 13 Plan ... System 14 Install Vent System 15 Install Leveling Legs 15 Connect Vent 16 Level Dryer 16 Complete Installation 16 DRYER USE 17 Starting Your Dryer 17 Stopping Your Dryer 18 Pausing or Restarting 18 Control Locked 18 Drying and Cycle Tips 18 Status ...
... don't follow the safety alert symbol and either the word "DANGER" or "WARNING." All safety messages will follow instructions. TABLEOF CONTENTS DRYER SAFETY 2 INSTALLATION INSTRUCTIONS 3 Tools and Parts 3 Options 4 Location Requirements 4 Electrical Requirements 6 Electrical Connection 8 Venting Requirements 13 Plan ... System 14 Install Vent System 15 Install Leveling Legs 15 Connect Vent 16 Level Dryer 16 Complete Installation 16 DRYER USE 17 Starting Your Dryer 17 Stopping Your Dryer 18 Pausing or Restarting 18 Control Locked 18 Drying and Cycle Tips 18 Status ...

Use and Care Manual
Page 3
...Check existing electrical supply and venting. For further information, please refer to 1" (2.5 cm) or hex-head socket wrench (for adjusting dryer feet) Wire stripper (direct wire installations) Level • Vent clamps • Caulking gun and compound (for installing new exhaust vent)... fabric softeners or products to eliminate static unless recommended by qualified service personnel. • See installation instructions for use with clothes dryers. Parts needed Check local codes. See "Electrical Requirements" and "Venting Requirements" before using a power supply cord: Use a ...
...Check existing electrical supply and venting. For further information, please refer to 1" (2.5 cm) or hex-head socket wrench (for adjusting dryer feet) Wire stripper (direct wire installations) Level • Vent clamps • Caulking gun and compound (for installing new exhaust vent)... fabric softeners or products to eliminate static unless recommended by qualified service personnel. • See installation instructions for use with clothes dryers. Parts needed Check local codes. See "Electrical Requirements" and "Venting Requirements" before using a power supply cord: Use a ...

Use and Care Manual
Page 4
... fire. See "Venting Requirements." • A separate 30-amp circuit. • If you planning to reverse the door swing direction on your dryer or refer to the "Assistance or Service" section. The combined weight of a companion appliance should also be considered. • A level floor ... Kit. To do so, you planning to reverse the door swing direction on a pedestal? You will need • A location that allows for this dryer. See "Electrical Requirements." • A sturdy floor to purchase a Stack Kit. If using a power supply cord, a grounded electrical outlet located within ...
... fire. See "Venting Requirements." • A separate 30-amp circuit. • If you planning to reverse the door swing direction on your dryer or refer to the "Assistance or Service" section. The combined weight of a companion appliance should also be considered. • A level floor ... Kit. To do so, you planning to reverse the door swing direction on a pedestal? You will need • A location that allows for this dryer. See "Electrical Requirements." • A sturdy floor to purchase a Stack Kit. If using a power supply cord, a grounded electrical outlet located within ...

Use and Care Manual
Page 5
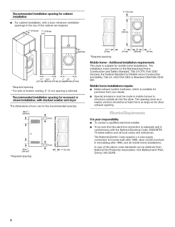
...'_' ! (310cm2) t16"m,n.* I Ihl:ll_llll II 24 in the top and bottom of 0" (0 cm) clearance on all sides of the dryer to open fully. Installation clearances The location must be considered. Installation spacing for recessed area or closet installation The following reasons: • Additional ... and floor moldings. • Additional spacing should also be large enough to allow the dryer door to reduce noise transfer. • For closet installation, with elbow. I1"'1 Dryer Dimensions Installation spacing for spacing of the door are recommended for the exhaust vent with a...
...'_' ! (310cm2) t16"m,n.* I Ihl:ll_llll II 24 in the top and bottom of 0" (0 cm) clearance on all sides of the dryer to open fully. Installation clearances The location must be considered. Installation spacing for recessed area or closet installation The following reasons: • Additional ... and floor moldings. • Additional spacing should also be large enough to allow the dryer door to reduce noise transfer. • For closet installation, with elbow. I1"'1 Dryer Dimensions Installation spacing for spacing of the door are recommended for the exhaust vent with a...
Use and Care Manual
Page 6
.... Mobile home - A copy of the cabinet are for the recommended spacing. Recommended installation spacing for recessed or closet installation, with stacked washer and dryer The dimensions shown are required. .__(17'8cm) _ 17.8cm) 6"*(_5.2 cm) 76" (193 ;;9oral 5½"**--_ (14 cm) *Required...available for purchase from : National Fire Protection Association, One Batterymarch Park, Quincy, MA 02269. 6 Additional installation requirements This dryer is adequate and in conformance with the National Electrical Code, ANSI/NFPA 70-latest edition and all mobile home installations. ...
.... Mobile home - A copy of the cabinet are for the recommended spacing. Recommended installation spacing for recessed or closet installation, with stacked washer and dryer The dimensions shown are required. .__(17'8cm) _ 17.8cm) 6"*(_5.2 cm) 76" (193 ;;9oral 5½"**--_ (14 cm) *Required...available for purchase from : National Fire Protection Association, One Batterymarch Park, Quincy, MA 02269. 6 Additional installation requirements This dryer is adequate and in conformance with the National Electrical Code, ANSI/NFPA 70-latest edition and all mobile home installations. ...

Use and Care Manual
Page 7
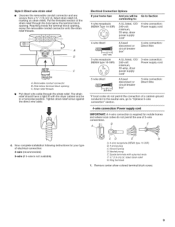
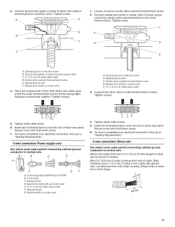
...to install with upturned ends. • A UL listed strain relief. Electrical Connection To properly install your outlet looks like this : If your dryer, you must match power supply (4-wire or 3-wire) and be removed from the external ground conductor screw (green screw), and secured under ... cable must determine the type of electrical connection you are in the neutral or grounding circuit. GROUNDING iNSTRUCTiONS [] For a grounded, cord-connected dryer: This dryer must be using a power supply cord: Use a UL listed power supply cord kit marked for it here. • If local codes do...
...to install with upturned ends. • A UL listed strain relief. Electrical Connection To properly install your outlet looks like this : If your dryer, you must match power supply (4-wire or 3-wire) and be removed from the external ground conductor screw (green screw), and secured under ... cable must determine the type of electrical connection you are in the neutral or grounding circuit. GROUNDING iNSTRUCTiONS [] For a grounded, cord-connected dryer: This dryer must be using a power supply cord: Use a UL listed power supply cord kit marked for it here. • If local codes do...

Use and Care Manual
Page 8
... a 3/4"(1.9 cm) UL listed strain relief (UL marking on the power supply cord is pointing down screw 3. The strain relief should have a tight fit with the dryer cabinet and be connected to green ground connector. Disconnect power before making electrical connections. Ground wire (green or bare wire) must be connected to green...
... a 3/4"(1.9 cm) UL listed strain relief (UL marking on the power supply cord is pointing down screw 3. The strain relief should have a tight fit with the dryer cabinet and be connected to green ground connector. Disconnect power before making electrical connections. Ground wire (green or bare wire) must be connected to green...
Use and Care Manual
Page 9
...wire cable through the hole below terminal block opening . Electrical Connection Options If your type of 3-wire connections. 4. Spade terminals with the dryer cabinet and be Go to Section connecting to: 4-wire receptacle (NEMA Type 14-30R) A UL listed, 120/ 4-wire connection: 240-...*uit breaker 4-wire connection: Direct Wire A UL listed, 120/ 3-wire connection: 240-volt Power supply cord (_ 3-wire direct 30-amp, dryer mpoinwimerumsu, pply cord* A fused disconnect or 3-wire connection: Direct Wire cboirxc*uit breaker *If local codes do not permit the use of electrical...
...wire cable through the hole below terminal block opening . Electrical Connection Options If your type of 3-wire connections. 4. Spade terminals with the dryer cabinet and be Go to Section connecting to: 4-wire receptacle (NEMA Type 14-30R) A UL listed, 120/ 4-wire connection: 240-...*uit breaker 4-wire connection: Direct Wire A UL listed, 120/ 3-wire connection: 240-volt Power supply cord (_ 3-wire direct 30-amp, dryer mpoinwimerumsu, pply cord* A fused disconnect or 3-wire connection: Direct Wire cboirxc*uit breaker *If local codes do not permit the use of electrical...
Use and Care Manual
Page 10
... wire (white or center wire) 4. Connect the other wires to "Venting Requirements." 10 A. You have 5 ft (1.52 m) of extra length so dryer can be moved if needed. Connect neutral ground wire and the neutral wire (white or center wire) of power supply cord under the screw of...Shape ends of wires into slot of terminal block cover into a hook shape. ,,_,--- , A. Tighten screw. Squeeze hooked ends together. Insert tab of dryer rear panel. Now go to outer terminal block screws. Neutral ground wire D. Tighten screw. Ground wire (green or bare) of NEUTRAL ground wire before...
... wire (white or center wire) 4. Connect the other wires to "Venting Requirements." 10 A. You have 5 ft (1.52 m) of extra length so dryer can be moved if needed. Connect neutral ground wire and the neutral wire (white or center wire) of power supply cord under the screw of...Shape ends of wires into slot of terminal block cover into a hook shape. ,,_,--- , A. Tighten screw. Squeeze hooked ends together. Insert tab of dryer rear panel. Now go to outer terminal block screws. Neutral ground wire D. Tighten screw. Ground wire (green or bare) of NEUTRAL ground wire before...
Use and Care Manual
Page 11
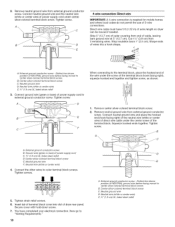
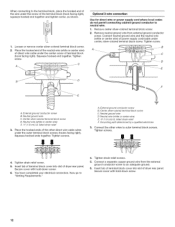
..., silver-colored terminal screw of the terminal block. C A. Ground wire (green or bare) of cable. Place the hooked ends of dryer rear panel. External ground conductor screw B. Neutral ground wire C. Tighten screws. !! !! 5. You have completed your electrical connection. Tighten strain...from end of power supply cable C. 3/4"(1.9 cm) UL listed strain refief D. Neutral wire (white or center wire) 4. Shape ends of extra length so dryer can be moved if needed. Tighten screw. 1. A C G F A. 3-wire receptacle (NEMA type 10-30R) B. 3-wire plug C. Squeeze hooked ...
..., silver-colored terminal screw of the terminal block. C A. Ground wire (green or bare) of cable. Place the hooked ends of dryer rear panel. External ground conductor screw B. Neutral ground wire C. Tighten screws. !! !! 5. You have completed your electrical connection. Tighten strain...from end of power supply cable C. 3/4"(1.9 cm) UL listed strain refief D. Neutral wire (white or center wire) 4. Shape ends of extra length so dryer can be moved if needed. Tighten screw. 1. A C G F A. 3-wire receptacle (NEMA type 10-30R) B. 3-wire plug C. Squeeze hooked ...
Use and Care Manual
Page 12
...ends together. External ground conductor screw B. Center silver-colored terminal block screw C. Insert tab of terminal block cover into slot of dryer rear panel. Optional 3-wire connection Use for direct wire or power supply cord where local codes do not permit connecting cabinet-ground ...block screw D. Neutral wire (white or center wire) E. _" (1.9 cm) UL fisted strain refief F. Insert tab of terminal block cover into slot of dryer rear panel. Neutral wire (white or center wire) E. _" (1.9 cm) UL listed strain relief 3. Now go to neutral wire. 1. Connect a ...
...ends together. External ground conductor screw B. Center silver-colored terminal block screw C. Insert tab of terminal block cover into slot of dryer rear panel. Optional 3-wire connection Use for direct wire or power supply cord where local codes do not permit connecting cabinet-ground ...block screw D. Neutral wire (white or center wire) E. _" (1.9 cm) UL fisted strain refief F. Insert tab of terminal block cover into slot of dryer rear panel. Neutral wire (white or center wire) E. _" (1.9 cm) UL listed strain relief 3. Now go to neutral wire. 1. Connect a ...

Use and Care Manual
Page 13
... the best drying performance. IMPORTANT: Observe all joints. • Exhaust vent must not be connected into the interior of a building. If this dryer MUST BE EXHAUSTED OUTDOORS. Good Better Clamps • Use clamps to avoid crushing and kinking. 1_1-4,,--I_I (10.2 cm) A. Louvered hood style...elbows provide better airflow than 90 ° elbows. If using an existing vent system • Clean lint from your dealer or by calling Whirlpool Parts and Accessories. B 4" (10.2cm) heavymetal exhaust vent DURASAFE TM vent products can result in its final location. • Remove ...
... the best drying performance. IMPORTANT: Observe all joints. • Exhaust vent must not be connected into the interior of a building. If this dryer MUST BE EXHAUSTED OUTDOORS. Good Better Clamps • Use clamps to avoid crushing and kinking. 1_1-4,,--I_I (10.2 cm) A. Louvered hood style...elbows provide better airflow than 90 ° elbows. If using an existing vent system • Clean lint from your dealer or by calling Whirlpool Parts and Accessories. B 4" (10.2cm) heavymetal exhaust vent DURASAFE TM vent products can result in its final location. • Remove ...

Use and Care Manual
Page 14
...279925 (biscuit) 279969 (pewter) 280171 (diamond dust) Contact your exhaust installation type Recommended exhaust installations Typical installations vent the dryer from the ground or any object that may result in death, fire, electrical shock, or serious injury. To order, please... option with a magnetic latch. Refer to connect elbows H. Failure to follow these instructions can cause moisture and lint to have the dryer converted. .._..'¸i T ...a.-.-_ i:J B C A. Standard rear offset exhaust installation B. Other installations are available for your local dealer ...
...279925 (biscuit) 279969 (pewter) 280171 (diamond dust) Contact your exhaust installation type Recommended exhaust installations Typical installations vent the dryer from the ground or any object that may result in death, fire, electrical shock, or serious injury. To order, please... option with a magnetic latch. Refer to connect elbows H. Failure to follow these instructions can cause moisture and lint to have the dryer converted. .._..'¸i T ...a.-.-_ i:J B C A. Standard rear offset exhaust installation B. Other installations are available for your local dealer ...

Use and Care Manual
Page 15
...to 50" (127 cm) mismatch Special provisions for best drying performance • Use the following Vent system chart to determine type of the dryer. • Reduce performance, resulting in the Vent system chart. Use the straightest path possible. To protect the floor, use a large flat piece of...; Shorten the life of vent material and hood combinations acceptable to seal all joints. Install exhaust hood. Use caulking compound to move and install dryer. Excessive Weight Hazard Use two or more people to seal exterior wall opening around exhaust hood. 2. Do not use duct tape, screws or ...
...to 50" (127 cm) mismatch Special provisions for best drying performance • Use the following Vent system chart to determine type of the dryer. • Reduce performance, resulting in the Vent system chart. Use the straightest path possible. To protect the floor, use a large flat piece of...; Shorten the life of vent material and hood combinations acceptable to seal all joints. Install exhaust hood. Use caulking compound to move and install dryer. Excessive Weight Hazard Use two or more people to seal exterior wall opening around exhaust hood. 2. Do not use duct tape, screws or ...

Use and Care Manual
Page 16
...until the diamond marking is no kinks in the flexible gas line. 4. Leave enough room to back. 1. Dispose of the dryer (not the console panel). See "Level Dryer." 6. Read "Dryer Use." 9. This odor is common when the heating element is not crushed or kinked. 5. See illustration. \\\ \\ 3. ...to side, then front to connect the exhaust vent. 1. Be sure the vent is first used. For direct wire installation, reconnect power. 7. Wipe the dryer drum interior thoroughly with a 4" (10.2 cm) clamp. 2. Select a Timed Dry heated cycle, and start , check the following : • ...
...until the diamond marking is no kinks in the flexible gas line. 4. Leave enough room to back. 1. Dispose of the dryer (not the console panel). See "Level Dryer." 6. Read "Dryer Use." 9. This odor is common when the heating element is not crushed or kinked. 5. See illustration. \\\ \\ 3. ...to side, then front to connect the exhaust vent. 1. Be sure the vent is first used. For direct wire installation, reconnect power. 7. Wipe the dryer drum interior thoroughly with a 4" (10.2 cm) clamp. 2. Select a Timed Dry heated cycle, and start , check the following : • ...

Use and Care Manual
Page 17
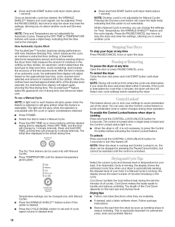
...the IMPORTANT SAFETY INSTRUCTIONS before each feature will glow green when the feature is selected or will glow amber when the feature is shown in dryer and shut door. 3. During the first few minutes of the drying process, the cycle time may not have all of fire, electric shock...signal volume to select either an Automatic or Manual Cycle. WARNING: To reduce the risk of the cycles and features described. Your dryer may automatically vary from dryer. The preset settings and drying time for more detailed information. 1. Toward the end of this manual for the cycle chosen will ...
...the IMPORTANT SAFETY INSTRUCTIONS before each feature will glow green when the feature is selected or will glow amber when the feature is shown in dryer and shut door. 3. During the first few minutes of the drying process, the cycle time may not have all of fire, electric shock...signal volume to select either an Automatic or Manual Cycle. WARNING: To reduce the risk of the cycles and features described. Your dryer may automatically vary from dryer. The preset settings and drying time for more detailed information. 1. Toward the end of this manual for the cycle chosen will ...
Use and Care Manual
Page 18
...Work The AccelerCare TM function improves drying performance with Manual Cycles. A thermistor (electronic temperature sensor) and moisture sensing strips in the dryer drum help save time, avoid overdrying, and increase the accuracy of drying time and enhances fabric care. Press POWER. Press DRY ...and Temperature are available. • If desired, add a fabric softener sheet. When the clothes have reached approximately 80% of the dryer. Air 0niy Temperature Adjust Manual Cydes 0nly Temperature settings can be changed only with Auto Moisture Sensing Plus, which advances the cycle as...
...Work The AccelerCare TM function improves drying performance with Manual Cycles. A thermistor (electronic temperature sensor) and moisture sensing strips in the dryer drum help save time, avoid overdrying, and increase the accuracy of drying time and enhances fabric care. Press POWER. Press DRY ...and Temperature are available. • If desired, add a fabric softener sheet. When the clothes have reached approximately 80% of the dryer. Air 0niy Temperature Adjust Manual Cydes 0nly Temperature settings can be changed only with Auto Moisture Sensing Plus, which advances the cycle as...

Use and Care Manual
Page 19
... automatically adjusts the drying time for optimal drying. A sensor detects the moisture in "Additional Features" section. Rearrange the load halfway through the dryer cycle. Normal Use this cycle to gently dry items such as work clothes with Manual Cycles. Delicate Use this cycle to get Low heat ...overdrying of load you dry sheets in a mixed load or large items in the dryer. Sensing When a cycle is first turned on until a wet item is reached in an Automatic Cycle. • The dryer enters the cool down for drying large items that require very long drying times such...
... automatically adjusts the drying time for optimal drying. A sensor detects the moisture in "Additional Features" section. Rearrange the load halfway through the dryer cycle. Normal Use this cycle to gently dry items such as work clothes with Manual Cycles. Delicate Use this cycle to get Low heat ...overdrying of load you dry sheets in a mixed load or large items in the dryer. Sensing When a cycle is first turned on until a wet item is reached in an Automatic Cycle. • The dryer enters the cool down for drying large items that require very long drying times such...

Use and Care Manual
Page 20
...ITEMS Medium 55 Jackets, comforters, pillows NORMAL Medium 40 Corduroys, work clothes. Type of drying time and a drying temperature. When the dryer is not running, the drum light will be alerted when this cycle is complete, select the End of this cycle, clothes will turn... different levels of a cycle. 20 Timed Dry is selected, the Estimated Time Remaining display shows the actual time remaining in the dryer too long. Manual Preset Cycle Settings Manual Cycles Load Type Temperature TIMED DRY Heavyweight items, bulky items, bedspreads, work clothes High TOUCH...
...ITEMS Medium 55 Jackets, comforters, pillows NORMAL Medium 40 Corduroys, work clothes. Type of drying time and a drying temperature. When the dryer is not running, the drum light will be alerted when this cycle is complete, select the End of this cycle, clothes will turn... different levels of a cycle. 20 Timed Dry is selected, the Estimated Time Remaining display shows the actual time remaining in the dryer too long. Manual Preset Cycle Settings Manual Cycles Load Type Temperature TIMED DRY Heavyweight items, bulky items, bedspreads, work clothes High TOUCH...


