

Ventilation Specification
Page 3
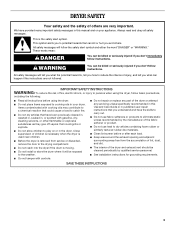
... it will be exposed to the weather. ■ Do not tamper with controls. ■ Do not repair or replace any part of the dryer or attempt any servicing unless specifically recommended in this Use and Care Guide or in the absence of local codes, with the National ...Electrical Code, ANSI/NFPA 70. 3 IMPORTANT SAFETY INSTRUCTIONS WARNING: To reduce the risk of fire, electric shock, or injury to persons when using the dryer, follow basic precautions, including the following: ■ Read all instructions before or after each load. ■ Keep area around the exhaust opening and adjacent...
... it will be exposed to the weather. ■ Do not tamper with controls. ■ Do not repair or replace any part of the dryer or attempt any servicing unless specifically recommended in this Use and Care Guide or in the absence of local codes, with the National ...Electrical Code, ANSI/NFPA 70. 3 IMPORTANT SAFETY INSTRUCTIONS WARNING: To reduce the risk of fire, electric shock, or injury to persons when using the dryer, follow basic precautions, including the following: ■ Read all instructions before or after each load. ■ Keep area around the exhaust opening and adjacent...

Ventilation Specification
Page 7
...9632; Be sure that the flappers or louvers (if installed as part of the exhaust system) will vary, depending on the system and usage of the dryer. Inspecting the Exhaust System 1. Disconnect the exhaust duct from the dryer and from the exhaust hood. Inspect the interior of the duct ...Exhaust System Cleaning Every exhaust system must be inspected periodically and cleaned to ensure that the flapper or louvers move freely. 3. Operate the dryer and verify that the exhaust air is recommended. For single-family usage, an annual inspection is intact and free from lint accumulation. ...
...9632; Be sure that the flappers or louvers (if installed as part of the exhaust system) will vary, depending on the system and usage of the dryer. Inspecting the Exhaust System 1. Disconnect the exhaust duct from the dryer and from the exhaust hood. Inspect the interior of the duct ...Exhaust System Cleaning Every exhaust system must be inspected periodically and cleaned to ensure that the flapper or louvers move freely. 3. Operate the dryer and verify that the exhaust air is recommended. For single-family usage, an annual inspection is intact and free from lint accumulation. ...

Owners Manual
Page 1
or visit our website at...www.whirlpool.com Table of Contents 2 W10189310B ® 240-VOLT ELECTRIC DRYER Use & Care Guide For questions about features, operation/performance, parts, accessories or service, call: 1-800-253-1301.
or visit our website at...www.whirlpool.com Table of Contents 2 W10189310B ® 240-VOLT ELECTRIC DRYER Use & Care Guide For questions about features, operation/performance, parts, accessories or service, call: 1-800-253-1301.
Owners Manual
Page 2
... DRYER SAFETY 3 INSTALLATION REQUIREMENTS 4 Tools and Parts 4 Options 4 Location Requirements 4 Electrical Requirements 6 Venting Requirements 7 INSTALLATION INSTRUCTIONS 8 Electrical Connection 8 Plan Vent System 11 Install Vent System 12 Connect Vent 12 Level Dryer 13 Complete Installation 13 DRYER USE 14 Starting Your Dryer 14... 14 Controls 15 Drying, Cycle and Temperature Tips 15 Cycles 15 DRYER CARE 16 Cleaning the Dryer Location 16 Cleaning the Lint Screen 16 Cleaning the Dryer Interior 17 Cleaning the Control Panel 17 Removing Accumulated Lint 17 Vacation...
... DRYER SAFETY 3 INSTALLATION REQUIREMENTS 4 Tools and Parts 4 Options 4 Location Requirements 4 Electrical Requirements 6 Venting Requirements 7 INSTALLATION INSTRUCTIONS 8 Electrical Connection 8 Plan Vent System 11 Install Vent System 12 Connect Vent 12 Level Dryer 13 Complete Installation 13 DRYER USE 14 Starting Your Dryer 14... 14 Controls 15 Drying, Cycle and Temperature Tips 15 Cycles 15 DRYER CARE 16 Cleaning the Dryer Location 16 Cleaning the Lint Screen 16 Cleaning the Dryer Interior 17 Cleaning the Control Panel 17 Removing Accumulated Lint 17 Vacation...
Owners Manual
Page 3
...safety messages will be cleaned periodically by qualified service personnel. s Do not allow children to reduce the chance of the dryer or attempt any part of injury, and tell you what the potential hazard is the safety alert symbol. s See installation instructions for grounding ...requirements. This is , tell you how to play on your dryer. s Clean lint screen before using the dryer. Items contaminated with cooking...
...safety messages will be cleaned periodically by qualified service personnel. s Do not allow children to reduce the chance of the dryer or attempt any part of injury, and tell you what the potential hazard is the safety alert symbol. s See installation instructions for grounding ...requirements. This is , tell you how to play on your dryer. s Clean lint screen before using the dryer. Items contaminated with cooking...
Owners Manual
Page 4
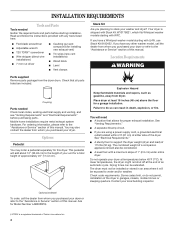
If you have a Whirlpool washer model starting with WFC. Coupling Parts needed Gather the required tools and parts before purchasing parts. Place dryer at least 18 inches (46 cm) above the floor for proper exhaust installation. The combined weight of a companion appliance should also .... †®TORX is shipped with Stack Kit W10178021, which fits Whirlpool washer models starting with LHW, use Stack Kit 8182452. Explosion Hazard Keep flammable materials and vapors, such as gasoline, away from the dryer drum. If you have any tools listed here. Drying times can result...
If you have a Whirlpool washer model starting with WFC. Coupling Parts needed Gather the required tools and parts before purchasing parts. Place dryer at least 18 inches (46 cm) above the floor for proper exhaust installation. The combined weight of a companion appliance should also .... †®TORX is shipped with Stack Kit W10178021, which fits Whirlpool washer models starting with LHW, use Stack Kit 8182452. Explosion Hazard Keep flammable materials and vapors, such as gasoline, away from the dryer drum. If you have any tools listed here. Drying times can result...
Owners Manual
Page 5
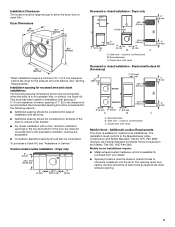
... for ease of installation and servicing. This dryer has been tested for the following spacing dimensions shown are recommended when the dryer is suitable for Mobile Home Construction and Safety, Title 245, HUD Part 280). Recommended spacing should be at least twice...To purchase a Stack Kit, see "Assistance or Service." Recessed area C. Additional Location Requirements This dryer is to the Manufactured Home Construction and Safety Standard, Title 24 CFR, Part 3280 (formerly the Federal Standard for mobile home installations. The installation must conform to be operated with...
... for ease of installation and servicing. This dryer has been tested for the following spacing dimensions shown are recommended when the dryer is suitable for Mobile Home Construction and Safety, Title 245, HUD Part 280). Recommended spacing should be at least twice...To purchase a Stack Kit, see "Assistance or Service." Recessed area C. Additional Location Requirements This dryer is to the Manufactured Home Construction and Safety Standard, Title 24 CFR, Part 3280 (formerly the Federal Standard for mobile home installations. The installation must conform to be operated with...
Owners Manual
Page 11
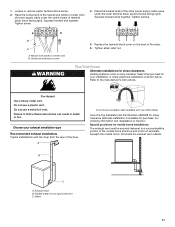
... (also available with one offset elbow) Over-the-Top Installation Kit Part Number 4396028 for close -clearance installation is available for your exhaust installation type Recommended exhaust installations Typical installations vent the dryer from the rear of the dryer. B C A. B A A. Replace the terminal block cover on... the back of the mobile home structure and must be securely fastened to a noncombustible portion of the dryer. 5. A close clearance alternate installation is shown below. Do not use a plastic vent. Exhaust hood B. Place the hooked ...
... (also available with one offset elbow) Over-the-Top Installation Kit Part Number 4396028 for close -clearance installation is available for your exhaust installation type Recommended exhaust installations Typical installations vent the dryer from the rear of the dryer. B C A. B A A. Replace the terminal block cover on... the back of the mobile home structure and must be securely fastened to a noncombustible portion of the dryer. 5. A close clearance alternate installation is shown below. Do not use a plastic vent. Exhaust hood B. Place the hooked ...
Owners Manual
Page 13
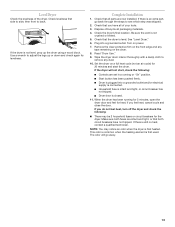
... the levelness of /recycle all packaging materials. 4. If the dryer is an extra part, go away. 13 If there is not level, prop up or down and check again for heat. Dispose of the dryer. Wipe the dryer drum interior thoroughly with a damp cloth to see which step was skipped. 2. ...Household fuse is level. Make sure both circuit breakers have all parts are set in a running for 5 minutes, open the dryer door and feel for levelness. NOTE: You may be 2 household fuses or circuit breakers for 20 minutes and start , ...
... the levelness of /recycle all packaging materials. 4. If the dryer is an extra part, go away. 13 If there is not level, prop up or down and check again for heat. Dispose of the dryer. Wipe the dryer drum interior thoroughly with a damp cloth to see which step was skipped. 2. ...Household fuse is level. Make sure both circuit breakers have all parts are set in a running for 5 minutes, open the dryer door and feel for levelness. NOTE: You may be 2 household fuses or circuit breakers for 20 minutes and start , ...
Owners Manual
Page 17
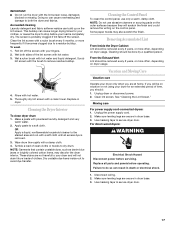
... Operate your load is probably clogged if lint falls off the screen with a soft cloth until all parts and panels before operating. Unplug the power supply cord. 2. Make sure leveling legs are secure in dryer base. 3. Replace all excess dye is removed. 3. As needed cleaning Laundry detergent and fabric softener residue can...
... Operate your load is probably clogged if lint falls off the screen with a soft cloth until all parts and panels before operating. Unplug the power supply cord. 2. Make sure leveling legs are secure in dryer base. 3. Replace all excess dye is removed. 3. As needed cleaning Laundry detergent and fabric softener residue can...
Owners Manual
Page 19
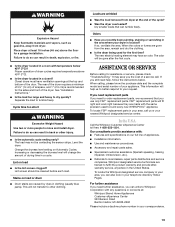
...change the amount of the dryer. If you need to your telephone directory Yellow Pages. FSP® replacement parts will not transfer to move and install dryer. Call the Whirlpool Customer eXperience Center toll free: 1-800-253-1301. s Accessory and repair parts sales. For further assistance...; appliance. See "Installation Instructions." Level the dryer. To locate the Whirlpool designated service company in your appliance. Closet doors must have an odor. s Is the automatic cycle ending early? If you need replacement parts If you need further assistance, you can result in ...
...change the amount of the dryer. If you need to your telephone directory Yellow Pages. FSP® replacement parts will not transfer to move and install dryer. Call the Whirlpool Customer eXperience Center toll free: 1-800-253-1301. s Accessory and repair parts sales. For further assistance...; appliance. See "Installation Instructions." Level the dryer. To locate the Whirlpool designated service company in your appliance. Closet doors must have an odor. s Is the automatic cycle ending early? If you need replacement parts If you need further assistance, you can result in ...


