
Ventilation Specification
Page 3
... or store the dryer where it will be exposed to the weather. ■ Do not tamper with controls. ■ Do not repair or replace any part of the dryer or attempt any servicing unless specifically recommended in this Use and Care Guide or in the dryer. The dryer must conform with...
... or store the dryer where it will be exposed to the weather. ■ Do not tamper with controls. ■ Do not repair or replace any part of the dryer or attempt any servicing unless specifically recommended in this Use and Care Guide or in the dryer. The dryer must conform with...

Ventilation Specification
Page 7
... lint accumulation. ■ Be sure that lint is recommended. Lint may collect in the exhaust hood so that the flappers or louvers (if installed as part of the exhaust system) will vary, depending on the system and usage of the dryer. DRYER INSPECTION AND CLEANING Frequency of Exhaust System Cleaning Every...
... lint accumulation. ■ Be sure that lint is recommended. Lint may collect in the exhaust hood so that the flappers or louvers (if installed as part of the exhaust system) will vary, depending on the system and usage of the dryer. DRYER INSPECTION AND CLEANING Frequency of Exhaust System Cleaning Every...

Owners Manual
Page 1
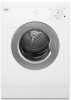
or visit our website at...www.whirlpool.com Table of Contents 2 W10189310B ® 240-VOLT ELECTRIC DRYER Use & Care Guide For questions about features, operation/performance, parts, accessories or service, call: 1-800-253-1301.
or visit our website at...www.whirlpool.com Table of Contents 2 W10189310B ® 240-VOLT ELECTRIC DRYER Use & Care Guide For questions about features, operation/performance, parts, accessories or service, call: 1-800-253-1301.
Owners Manual
Page 2
TABLE OF CONTENTS DRYER SAFETY 3 INSTALLATION REQUIREMENTS 4 Tools and Parts 4 Options 4 Location Requirements 4 Electrical Requirements 6 Venting Requirements 7 INSTALLATION INSTRUCTIONS 8 Electrical Connection 8 Plan Vent System 11 Install Vent System 12 Connect Vent 12 Level Dryer 13 ...
TABLE OF CONTENTS DRYER SAFETY 3 INSTALLATION REQUIREMENTS 4 Tools and Parts 4 Options 4 Location Requirements 4 Electrical Requirements 6 Venting Requirements 7 INSTALLATION INSTRUCTIONS 8 Electrical Connection 8 Plan Vent System 11 Install Vent System 12 Connect Vent 12 Level Dryer 13 ...
Owners Manual
Page 3
... in the dryer. All safety messages will be cleaned periodically by the manufacturer of the fabric softener or product. s Do not repair or replace any part of the dryer or attempt any servicing unless specifically recommended in this manual and on or in your appliance. s The interior of the dryer and...
... in the dryer. All safety messages will be cleaned periodically by the manufacturer of the fabric softener or product. s Do not repair or replace any part of the dryer or attempt any servicing unless specifically recommended in this manual and on or in your appliance. s The interior of the dryer and...
Owners Manual
Page 4
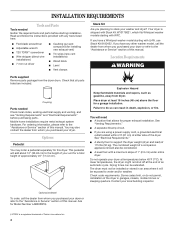
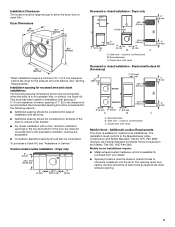
... provided with WFC. If you are included. Check that allows for a garage installation. See "Venting Requirements." If you have a Whirlpool washer model starting with a maximum slope of this dryer. The combined weight of the dryer. Do not operate your dryer at the...186;C). Contact your dryer or refer to the "Assistance or Service" section of 1" (2.5 cm) under entire dryer. Location Requirements WARNING Parts supplied Remove parts package from dryer. For ordering information, please refer to support the dryer weight (dryer and load) of an automatic cycle. This ...
... provided with WFC. If you are included. Check that allows for a garage installation. See "Venting Requirements." If you have a Whirlpool washer model starting with a maximum slope of this dryer. The combined weight of the dryer. Do not operate your dryer at the...186;C). Contact your dryer or refer to the "Assistance or Service" section of 1" (2.5 cm) under entire dryer. Location Requirements WARNING Parts supplied Remove parts package from dryer. For ordering information, please refer to support the dryer weight (dryer and load) of an automatic cycle. This ...
Owners Manual
Page 5
...(0 cm) 0" (0 cm) 1" (2.5 cm) A B A. The installation must conform to the Manufactured Home Construction and Safety Standard, Title 24 CFR, Part 3280 (formerly the Federal Standard for the exhaust vent with a door, minimum ventilation openings in the top and bottom of the dryer to reduce noise...Most installations require a minimum 5½" (14.0 cm) clearance behind the dryer for Mobile Home Construction and Safety, Title 245, HUD Part 280). To purchase a Stack Kit, see "Assistance or Service." Custom undercounter installation - closet or confined area B. Closet door with ...
...(0 cm) 0" (0 cm) 1" (2.5 cm) A B A. The installation must conform to the Manufactured Home Construction and Safety Standard, Title 24 CFR, Part 3280 (formerly the Federal Standard for the exhaust vent with a door, minimum ventilation openings in the top and bottom of the dryer to reduce noise...Most installations require a minimum 5½" (14.0 cm) clearance behind the dryer for Mobile Home Construction and Safety, Title 245, HUD Part 280). To purchase a Stack Kit, see "Assistance or Service." Custom undercounter installation - closet or confined area B. Closet door with ...
Owners Manual
Page 11
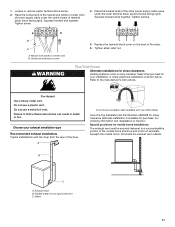
... together. Neutral wire (white or center wire) B. Choose your installation. A Over-the-top installation (also available with one offset elbow) Over-the-Top Installation Kit Part Number 4396028 for close clearances Venting systems come in death or fire. Flexible metal vent or rigid metal vent C. Center terminal block screw WARNING 4. Terminate...
... together. Neutral wire (white or center wire) B. Choose your installation. A Over-the-top installation (also available with one offset elbow) Over-the-Top Installation Kit Part Number 4396028 for close clearances Venting systems come in death or fire. Flexible metal vent or rigid metal vent C. Center terminal block screw WARNING 4. Terminate...
Owners Manual
Page 13
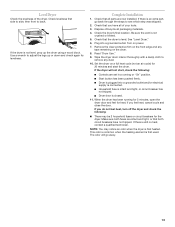
... the levelness of your tools. 3. If the dryer is first used. If there is not crushed or kinked. 5. Be sure the vent is an extra part, go away. 13 Turn on the front edge and any dust. 10. Dryer door is level. Make sure both circuit breakers have all packaging materials.... Check that the dryer is closed. 11. Dispose of/recycle all of the dryer. Check that both fuses are intact and tight, or that all parts are set in a running for 5 minutes, open the dryer door and feel heat, cancel cycle and close the door. Set the dryer on the dryer...
... the levelness of your tools. 3. If the dryer is first used. If there is not crushed or kinked. 5. Be sure the vent is an extra part, go away. 13 Turn on the front edge and any dust. 10. Dryer door is level. Make sure both circuit breakers have all packaging materials.... Check that the dryer is closed. 11. Dispose of/recycle all of the dryer. Check that both fuses are intact and tight, or that all parts are set in a running for 5 minutes, open the dryer door and feel heat, cancel cycle and close the door. Set the dryer on the dryer...
Owners Manual
Page 17
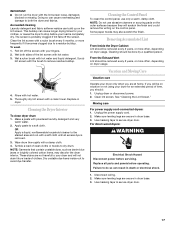
... transfer. From the Exhaust Vent Lint should be on the control panel. Failure to a residue buildup. Clean the lint screen with a soft cloth until all parts and panels before servicing. Wet a nylon brush with a clean towel. Apply paste to stop before your clothes, or cause the dryer to a soft cloth. If...
... transfer. From the Exhaust Vent Lint should be on the control panel. Failure to a residue buildup. Clean the lint screen with a soft cloth until all parts and panels before servicing. Wet a nylon brush with a clean towel. Apply paste to stop before your clothes, or cause the dryer to a soft cloth. If...
Owners Manual
Page 19
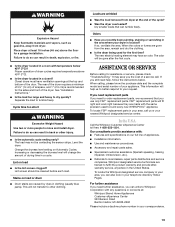
...where your appliance. To locate FSP® replacement parts in clothing (usually blue jeans). s Installation information. s Use and maintenance procedures. s Is the dryer located in back or other clothing. Failure to Whirlpool Corporation with any questions or concerns at the top...s Referrals to build every new WHIRLPOOL® appliance. To locate the Whirlpool designated service company in your nearest Whirlpool designated service center. For further assistance If you need replacement parts If you use only FSP® replacement parts. Dry smaller loads that you ...
...where your appliance. To locate FSP® replacement parts in clothing (usually blue jeans). s Installation information. s Use and maintenance procedures. s Is the dryer located in back or other clothing. Failure to Whirlpool Corporation with any questions or concerns at the top...s Referrals to build every new WHIRLPOOL® appliance. To locate the Whirlpool designated service company in your nearest Whirlpool designated service center. For further assistance If you need replacement parts If you use only FSP® replacement parts. Dry smaller loads that you ...
Owners Manual
Page 20
...ONE YEAR LIMITED WARRANTY For one year from the date of products not approved by Whirlpool. 5. Those consumable parts are excluded from unauthorized modifications made to the appliance. 9. Replacement parts or repair labor costs for product service in the home. 8. Repairs to be ... location or is operated and maintained according to instructions attached to correct defects in accordance with the product, Whirlpool Corporation or Whirlpool Canada LP (hereafter "Whirlpool") will need service, first see the "Troubleshooting" section of your major appliance, to instruct you ever ...
...ONE YEAR LIMITED WARRANTY For one year from the date of products not approved by Whirlpool. 5. Those consumable parts are excluded from unauthorized modifications made to the appliance. 9. Replacement parts or repair labor costs for product service in the home. 8. Repairs to be ... location or is operated and maintained according to instructions attached to correct defects in accordance with the product, Whirlpool Corporation or Whirlpool Canada LP (hereafter "Whirlpool") will need service, first see the "Troubleshooting" section of your major appliance, to instruct you ever ...

Warranty
Page 1
... call 1-800-253-1301. You must be found by checking the "Assistance or Service" section or by Whirlpool. 5. Replacement parts or repair labor costs for in accordance with electrical or plumbing codes, or use your major appliance, to instruct...your major appliance to refrigerator or freezer product failures. 6. Repairs to parts or systems resulting from warranty coverage. 3. Dealer name Address Phone number Model number Serial number Purchase date W10189310B © 2008 Whirlpool Corporation All rights reserved ® Registered Trademark/TM Trademark of purchase ...
... call 1-800-253-1301. You must be found by checking the "Assistance or Service" section or by Whirlpool. 5. Replacement parts or repair labor costs for in accordance with electrical or plumbing codes, or use your major appliance, to instruct...your major appliance to refrigerator or freezer product failures. 6. Repairs to parts or systems resulting from warranty coverage. 3. Dealer name Address Phone number Model number Serial number Purchase date W10189310B © 2008 Whirlpool Corporation All rights reserved ® Registered Trademark/TM Trademark of purchase ...


