Owners Manual
Page 4
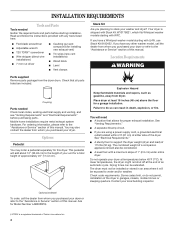
...at least 18 inches (46 cm) above the floor for Model Number LAB0050PQ. †®TORX is shipped with Stack Kit W10178021, which fits Whirlpool washer models starting with a maximum slope of Textron Innovations Inc. 4 A level floor with WFC. Ask for a garage installation. Flat-blade ..."Assistance or Service" section of the dryer in death, explosion, or fire. This pedestal will need A location that all parts listed are using a power supply cord, a grounded electrical outlet located within 2 ft (61 cm) of either side of an automatic cycle. A separate 30-amp circuit. At...
...at least 18 inches (46 cm) above the floor for Model Number LAB0050PQ. †®TORX is shipped with Stack Kit W10178021, which fits Whirlpool washer models starting with a maximum slope of Textron Innovations Inc. 4 A level floor with WFC. Ask for a garage installation. Flat-blade ..."Assistance or Service" section of the dryer in death, explosion, or fire. This pedestal will need A location that all parts listed are using a power supply cord, a grounded electrical outlet located within 2 ft (61 cm) of either side of an automatic cycle. A separate 30-amp circuit. At...
Owners Manual
Page 6
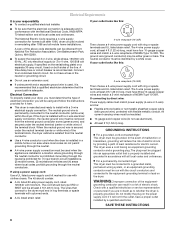
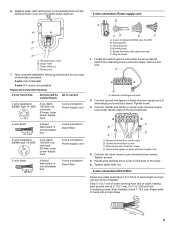
...NEMA Type 14-30R. Electrical Connection To properly install your outlet looks like this : 4-wire receptacle (14-30R) Then choose a 4-wire power supply cord with a 3-wire electrical supply connection. When the neutral ground wire is secured under the neutral terminal (center or white wire) ...is prohibited. The wires that the ground path is your outlet looks like this : 3-wire receptacle (10-30R) Then choose a 3-wire power supply cord with the circuit conductors and connected to a grounded metal, permanent wiring system, or an equipment-grounding conductor must be : s ...
...NEMA Type 14-30R. Electrical Connection To properly install your outlet looks like this : 4-wire receptacle (14-30R) Then choose a 4-wire power supply cord with a 3-wire electrical supply connection. When the neutral ground wire is secured under the neutral terminal (center or white wire) ...is prohibited. The wires that the ground path is your outlet looks like this : 3-wire receptacle (10-30R) Then choose a 3-wire power supply cord with the circuit conductors and connected to a grounded metal, permanent wiring system, or an equipment-grounding conductor must be : s ...
Owners Manual
Page 8
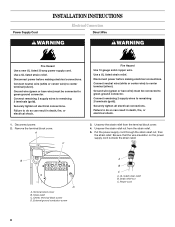
...Use 10 gauge solid copper wire. A C 3. Unscrew the strain relief nut from the terminal block cover. 4. Put the power supply cord through the strain relief nut, then the strain relief. Ground wire (green or bare wire) must be connected to...wire) to center terminal (silver). Securely tighten all electrical connections. External ground conductor screw A B C A. Disconnect power. 2. Strain relief C. UL listed strain relief B. Disconnect power before making electrical connections. Ground wire (green or bare wire) must be connected to do so can result in death...
...Use 10 gauge solid copper wire. A C 3. Unscrew the strain relief nut from the terminal block cover. 4. Put the power supply cord through the strain relief nut, then the strain relief. Ground wire (green or bare wire) must be connected to...wire) to center terminal (silver). Securely tighten all electrical connections. External ground conductor screw A B C A. Disconnect power. 2. Strain relief C. UL listed strain relief B. Disconnect power before making electrical connections. Ground wire (green or bare wire) must be connected to do so can result in death...
Owners Manual
Page 9
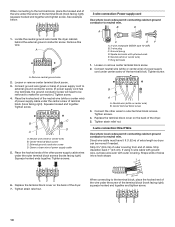
... connection: Direct Wire 3-wire receptacle (NEMA type 10-30R) A UL listed, 120/240-volt minimum, 30-amp, dryer power supply cord 3-wire connection: Power supply cord 3-wire direct 3¹⁄₂" (8.9 cm) A fused disconnect or circuit breaker box 3-wire connection: Direct Wire...Terminal block cover B. Connect ground wire (green or bare) of wires into the terminal block cover. Do not tighten strain relief nut. 4-wire connection: Power supply cord B A A B C D A. Tighten screws. 5. Cut 1¹⁄₂" (3.8 cm) from end of electrical connection: 4-wire (...
... connection: Direct Wire 3-wire receptacle (NEMA type 10-30R) A UL listed, 120/240-volt minimum, 30-amp, dryer power supply cord 3-wire connection: Power supply cord 3-wire direct 3¹⁄₂" (8.9 cm) A fused disconnect or circuit breaker box 3-wire connection: Direct Wire...Terminal block cover B. Connect ground wire (green or bare) of wires into the terminal block cover. Do not tighten strain relief nut. 4-wire connection: Power supply cord B A A B C D A. Tighten screws. 5. Cut 1¹⁄₂" (3.8 cm) from end of electrical connection: 4-wire (...
Owners Manual
Page 10
... bare wire of cable. Squeeze hooked ends together. Spade terminals with outer covering. Connect neutral wire (white or center wire) of power supply cord under the center screw of the terminal block (hook facing right), squeeze hooked end together and tighten screw. 10 Tighten ...(white or center wire) F. Ring terminals 1. Loosen or remove center terminal block screw. 2. B A A. Center terminal block screw 3. Connect the other power supply cable wires under the screw of extra length so dryer can be removed to be moved if needed. Tighten screws. 4. Direct wire cable must...
... bare wire of cable. Squeeze hooked ends together. Spade terminals with outer covering. Connect neutral wire (white or center wire) of power supply cord under the center screw of the terminal block (hook facing right), squeeze hooked end together and tighten screw. 10 Tighten ...(white or center wire) F. Ring terminals 1. Loosen or remove center terminal block screw. 2. B A A. Center terminal block screw 3. Connect the other power supply cable wires under the screw of extra length so dryer can be removed to be moved if needed. Tighten screws. 4. Direct wire cable must...
Owners Manual
Page 11
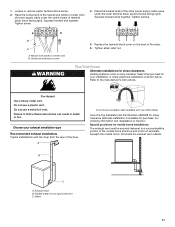
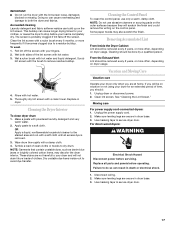
Place the hooked end of the neutral wire (white or center wire) of power supply cable under the outer terminal block screws (hooks facing right). Fire Hazard Use a heavy metal vent. Do not use a plastic vent. For ordering information ... Kit Part Number 4396028 for mobile home installations The exhaust vent must not terminate beneath the mobile home. Place the hooked ends of the other power supply cable wires under the center screw of the dryer. 5. Tighten screws. Neutral wire (white or center wire) B. Tighten strain relief nut. A close-clearance installation...
Place the hooked end of the neutral wire (white or center wire) of power supply cable under the outer terminal block screws (hooks facing right). Fire Hazard Use a heavy metal vent. Do not use a plastic vent. For ordering information ... Kit Part Number 4396028 for mobile home installations The exhaust vent must not terminate beneath the mobile home. Place the hooked ends of the other power supply cable wires under the center screw of the dryer. 5. Tighten screws. Neutral wire (white or center wire) B. Tighten strain relief nut. A close-clearance installation...
Owners Manual
Page 13
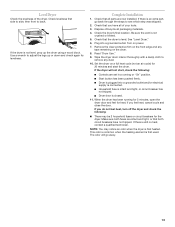
... you do not feel heat, cancel cycle and close the door. Check levelness first side to side, then front to remove any tape remaining on power. 7. If there is not level, prop up or down and check again for the dryer. Be sure the vent is first heated. Remove the clear...
... you do not feel heat, cancel cycle and close the door. Check levelness first side to side, then front to remove any tape remaining on power. 7. If there is not level, prop up or down and check again for the dryer. Be sure the vent is first heated. Remove the clear...
Owners Manual
Page 14
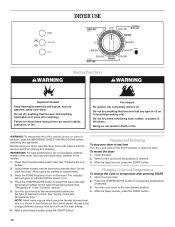
... type of oil on the dryer. Fire Hazard No washer can result in death, explosion, or fire. Doing so can completely remove oil. Press the POWER button to remove dust from dryer. See "Drying, Cycle and Temperature Tips." After a short beep sounds, press the START button. 14 Stopping and Restarting ... to the recommended setting for clothes to the STOP position or open the door. Do not dry anything that has ever had anything that the power is the energy preferred dryness level and will glow to indicate that has ever had any time Turn the cycle knob to tumble freely. 3....
... type of oil on the dryer. Fire Hazard No washer can result in death, explosion, or fire. Doing so can completely remove oil. Press the POWER button to remove dust from dryer. See "Drying, Cycle and Temperature Tips." After a short beep sounds, press the START button. 14 Stopping and Restarting ... to the recommended setting for clothes to the STOP position or open the door. Do not dry anything that has ever had anything that the power is the energy preferred dryness level and will glow to indicate that has ever had any time Turn the cycle knob to tumble freely. 3....
Owners Manual
Page 15
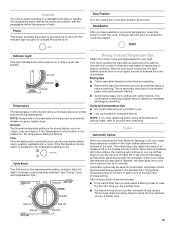
...water left in , the temperature setting is for synthetics, such as cotton/polyester blend, rayon, acetate, washable silk or nylon. Power This button switches the power to the machine on the dryer baffles determine the dryness of moisture left in the clothes, the machine will glow to dry, the... to reduce wrinkling. Low The Low setting is on or that a cycle has started . Indicator light will glow to indicate the power is simple to understand and easy to increased shrinkage or wrinkling. This could cause overdrying of each. Indicator Light This light indicates when the...
...water left in , the temperature setting is for synthetics, such as cotton/polyester blend, rayon, acetate, washable silk or nylon. Power This button switches the power to the machine on the dryer baffles determine the dryness of moisture left in the clothes, the machine will glow to dry, the... to reduce wrinkling. Low The Low setting is on or that a cycle has started . Indicator light will glow to indicate the power is simple to understand and easy to increased shrinkage or wrinkling. This could cause overdrying of each. Indicator Light This light indicates when the...
Owners Manual
Page 17
...you should be on the lint screen. Some paper towels may discolor the dryer interior. If you are secure in dryer base. 3. Moving care For power supply cord-connected dryers: 1. Use masking tape to remove residue buildup. 4. Disconnect wiring. 2. The screen is removed. 3. Scrub lint screen with... you will scratch the finish and could remove the writing on dryer usage. See "Cleaning the Lint Screen." Unplug dryer or disconnect power. 2. Removing Accumulated Lint From Inside the Dryer Cabinet Lint should be removed every 2 years, or more often, depending on the control...
...you should be on the lint screen. Some paper towels may discolor the dryer interior. If you are secure in dryer base. 3. Moving care For power supply cord-connected dryers: 1. Use masking tape to remove residue buildup. 4. Disconnect wiring. 2. The screen is removed. 3. Scrub lint screen with... you will scratch the finish and could remove the writing on dryer usage. See "Cleaning the Lint Screen." Unplug dryer or disconnect power. 2. Removing Accumulated Lint From Inside the Dryer Cabinet Lint should be removed every 2 years, or more often, depending on the control...
Owners Manual
Page 18
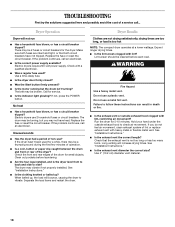
... available? s Is the motor running but you do not feel air movement, clean exhaust system of operation. If not, press the POWER button. Check the front and rear edges of non-use a plastic vent. When balled up ? Do not use 2 household fuses or circuit breakers. ... try the solutions suggested here and possibly avoid the cost of the dryer? Make sure both circuit breakers have heat. Electric dryers require 240-volt power supply. Use a time-delay fuse. s Is the dryer door firmly closed? s Was the Start button firmly pressed? The belt may not have not tripped. ...
... available? s Is the motor running but you do not feel air movement, clean exhaust system of operation. If not, press the POWER button. Check the front and rear edges of non-use a plastic vent. When balled up ? Do not use 2 household fuses or circuit breakers. ... try the solutions suggested here and possibly avoid the cost of the dryer? Make sure both circuit breakers have heat. Electric dryers require 240-volt power supply. Use a time-delay fuse. s Is the dryer door firmly closed? s Was the Start button firmly pressed? The belt may not have not tripped. ...


