W10240504
Page 1
... later date due to green ground connection point or unpainted metal in the appliance. Avoid touching electronic parts or terminal contacts; handle electronic control assembly by persons having electrical, electronic, and mechanical experience and knowledge at approximately... 3000V. Any attempt to a green ground connection point or unpainted metal in the appliance -OR- Contents Whirlpool, Maytag, and Kenmore Control Panels.... 2-4 Diagnostic Guide 5 Activating the Service Diagnostic Mode 5 Key Activation & Encoder Test 6 Service...
... later date due to green ground connection point or unpainted metal in the appliance. Avoid touching electronic parts or terminal contacts; handle electronic control assembly by persons having electrical, electronic, and mechanical experience and knowledge at approximately... 3000V. Any attempt to a green ground connection point or unpainted metal in the appliance -OR- Contents Whirlpool, Maytag, and Kenmore Control Panels.... 2-4 Diagnostic Guide 5 Activating the Service Diagnostic Mode 5 Key Activation & Encoder Test 6 Service...
W10240504
Page 10
... detected at the heater relay. Error • Check to see if a household fuse has blown or a circuit breaker (on electric models only) Verify that the part numbers of the ACU and the User Interface are plugged into the heater element(s) and the relay(s) on pins 4 & 5). UI Cannot Hear ACU • Unplug...
... detected at the heater relay. Error • Check to see if a household fuse has blown or a circuit breaker (on electric models only) Verify that the part numbers of the ACU and the User Interface are plugged into the heater element(s) and the relay(s) on pins 4 & 5). UI Cannot Hear ACU • Unplug...

W10240504
Page 13
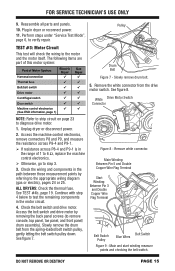
... power cord and test the dryer. If there is continuity, go to step 4. 4. Check for U.S. DO NOT REMOVE OR DESTROY PAGE 13 Reassemble all parts and panels. 11. ELECTRIC DRYER (U.S. Remove the cover plate from the top right corner of the back of the dryer. In a similar way, check which.... 6. COM Figure 4a - Access the machine electronics without disconnecting any wiring to the terminal block (electric dryer) or wire harness connection (gas dryer). Reassemble all parts and panels. 10. Unplug dryer or disconnect power. 2. See figure 3. 3.
... power cord and test the dryer. If there is continuity, go to step 4. 4. Check for U.S. DO NOT REMOVE OR DESTROY PAGE 13 Reassemble all parts and panels. 11. ELECTRIC DRYER (U.S. Remove the cover plate from the top right corner of the back of the dryer. In a similar way, check which.... 6. COM Figure 4a - Access the machine electronics without disconnecting any wiring to the terminal block (electric dryer) or wire harness connection (gas dryer). Reassemble all parts and panels. 10. Unplug dryer or disconnect power. 2. See figure 3. 3.

W10240504
Page 14
... are fully inserted into the ACU. 7. harness to verify repair. If an open circuit is found , replace the power cord. See figure 4b. Reassemble all parts and panels. 9. Plug in figure 5. Visually check that illustrated in figure 6, but for L1 and N on the ACU. and Canadian Installations): 1. Check that the power...
... are fully inserted into the ACU. 7. harness to verify repair. If an open circuit is found , replace the power cord. See figure 4b. Reassemble all parts and panels. 9. Plug in figure 5. Visually check that illustrated in figure 6, but for L1 and N on the ACU. and Canadian Installations): 1. Check that the power...
W10240504
Page 15
.... Slowly remove the drum belt from the drive motor switch. See figure 7. DO NOT REMOVE OR DESTROY PAGE 15 The following items are part of this motor system: Part of 1 to 6 Ω, replace the machine control electronics. Otherwise, go to step 3. 3. Check the belt switch and drive ... the resistance across P8-4 and P9-1. If resistance across P8-4 and P9-1 is in the motor circuit. 4. Reassemble all parts and panels. 10. Plug in the path between these measurement points by removing the back panel screws (to test the remaining components in the...
.... Slowly remove the drum belt from the drive motor switch. See figure 7. DO NOT REMOVE OR DESTROY PAGE 15 The following items are part of this motor system: Part of 1 to 6 Ω, replace the machine control electronics. Otherwise, go to step 3. 3. Check the belt switch and drive ... the resistance across P8-4 and P9-1. If resistance across P8-4 and P9-1 is in the motor circuit. 4. Reassemble all parts and panels. 10. Plug in the path between these measurement points by removing the back panel screws (to test the remaining components in the...
W10240504
Page 16
... making up the belt switch pulley. If the resistance reading goes from infinity to the dryer. Winding Resistance in the following items are part of this system: Part of Measurement Disconnect lead from pin 3; Disconnect lead from pin 5; The following table. Or, the following situations occurs: 3 Dryer does not heat 3 Heat...
... making up the belt switch pulley. If the resistance reading goes from infinity to the dryer. Winding Resistance in the following items are part of this system: Part of Measurement Disconnect lead from pin 3; Disconnect lead from pin 5; The following table. Or, the following situations occurs: 3 Dryer does not heat 3 Heat...

W10240504
Page 18
...heater box). Refer to "Outlet Thermistor Resistance" table on page 19 for a short to access the machine electronics. 3. Reassemble all parts and panels. 9. The ACU monitors the exhaust temperature using the outlet thermistor, and cycles the heater relay on page 19 gives temperatures... thermistor is good. If the thermistor resistance does not agree with the table, replace the outlet thermistor. 9. Reassemble all parts and panels. 11. Measure the continuity through it by connecting the meter probes to diagnose the outlet temperature thermistor. Check heater coil(s)...
...heater box). Refer to "Outlet Thermistor Resistance" table on page 19 for a short to access the machine electronics. 3. Reassemble all parts and panels. 9. The ACU monitors the exhaust temperature using the outlet thermistor, and cycles the heater relay on page 19 gives temperatures... thermistor is good. If the thermistor resistance does not agree with the table, replace the outlet thermistor. 9. Reassemble all parts and panels. 11. Measure the continuity through it by connecting the meter probes to diagnose the outlet temperature thermistor. Check heater coil(s)...

W10240504
Page 20
...the main harness. Access the ACU and remove connector P13 from the burner. Measure resistance across the ignitor's 2-pin connector. Reassemble all parts and panels (except toe panel) before reconnecting power. 7. NOTE: Dryer will shut down automatically after 2½ hours. Disconnect the ...not, replace coils. 10. Unplug dryer or disconnect power. 11. Measuring gas valve resistance. 4. Reassemble all parts and panels. 12. IMPORTANT: To avoid damage to step 5. 5. Part of at the gas burner. Unplug dryer or disconnect power. 2. Remove console to determine if a gas valve...
...the main harness. Access the ACU and remove connector P13 from the burner. Measure resistance across the ignitor's 2-pin connector. Reassemble all parts and panels (except toe panel) before reconnecting power. 7. NOTE: Dryer will shut down automatically after 2½ hours. Disconnect the ...not, replace coils. 10. Unplug dryer or disconnect power. 11. Measuring gas valve resistance. 4. Reassemble all parts and panels. 12. IMPORTANT: To avoid damage to step 5. 5. Part of at the gas burner. Unplug dryer or disconnect power. 2. Remove console to determine if a gas valve...
W10240504
Page 21
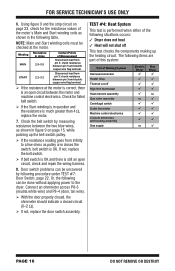
.... 8. With the display showing the desired dryness setting, press the START button to save the drying mode and exit to its previous setting. 4. If all parts and panels. 7. If the moisture sensor diagnostic test passes, check the outlet thermistor: TEST #4a, page 18. If the problem persists after cleaning, replace...
.... 8. With the display showing the desired dryness setting, press the START button to save the drying mode and exit to its previous setting. 4. If all parts and panels. 7. If the moisture sensor diagnostic test passes, check the outlet thermistor: TEST #4a, page 18. If the problem persists after cleaning, replace...

W10240504
Page 22
... light bulb. If no voltage is securely connected to step 5. If not, repair or replace as needed. 5. Reassemble all parts and panels. Make sure that the "Signal", "Audio Level", or "Cycle Signal" volume is correctly inserted. 4. Unplug dryer or disconnect power.... 3. Visually check that it stops when the door opens. Reassemble all parts and panels. 8. Perform the "Key Activation & Encoder Test" (see figure 2, page 12). Unplug dryer or disconnect power. 2. Remove the console...
... light bulb. If no voltage is securely connected to step 5. If not, repair or replace as needed. 5. Reassemble all parts and panels. Make sure that the "Signal", "Audio Level", or "Cycle Signal" volume is correctly inserted. 4. Unplug dryer or disconnect power.... 3. Visually check that it stops when the door opens. Reassemble all parts and panels. 8. Perform the "Key Activation & Encoder Test" (see figure 2, page 12). Unplug dryer or disconnect power. 2. Remove the console...
W11040073A Whirlpool Agora Dryer
Page 14
..., your retailer about the quality, durability, or need for warranty service to chemicals. 11. gas or reversal of non-genuine Whirlpool parts or accessories. 6. Discoloration, rust, or oxidation of surfaces resulting from the date of household electrical or plumbing (i.e. Please have ... 7. Pick-up or delivery. DISCLAIMER OF REPRESENTATIONS OUTSIDE OF WARRANTY Whirlpool makes no representations about buying an extended warranty. PROOF OF PURCHASE IS REQUIRED TO OBTAIN WARRANTY SERVICE. Service or parts for in materials and workmanship and is effective from natural gas or...
..., your retailer about the quality, durability, or need for warranty service to chemicals. 11. gas or reversal of non-genuine Whirlpool parts or accessories. 6. Discoloration, rust, or oxidation of surfaces resulting from the date of household electrical or plumbing (i.e. Please have ... 7. Pick-up or delivery. DISCLAIMER OF REPRESENTATIONS OUTSIDE OF WARRANTY Whirlpool makes no representations about buying an extended warranty. PROOF OF PURCHASE IS REQUIRED TO OBTAIN WARRANTY SERVICE. Service or parts for in materials and workmanship and is effective from natural gas or...

W11040073A Whirlpool Agora Dryer
Page 1
..., non-residential, multiple-family use, or use of non-genuine Whirlpool parts or accessories. 6. Service to access additional resources, or visit https://www.whirlpool.com/product_help. 2. gas or reversal of inaccessible appliances or built-in fixtures (i.e. Some states and provinces do... limited warranty is valid only in accordance with original model/serial numbers removed, altered, or not easily determined. Service or parts for warranty service to Whirlpool within 30 days. 10. This warranty gives you specific legal rights, and you . call 1-800-807-6777. PROOF ...
..., non-residential, multiple-family use, or use of non-genuine Whirlpool parts or accessories. 6. Service to access additional resources, or visit https://www.whirlpool.com/product_help. 2. gas or reversal of inaccessible appliances or built-in fixtures (i.e. Some states and provinces do... limited warranty is valid only in accordance with original model/serial numbers removed, altered, or not easily determined. Service or parts for warranty service to Whirlpool within 30 days. 10. This warranty gives you specific legal rights, and you . call 1-800-807-6777. PROOF ...


