W10240504
Page 5
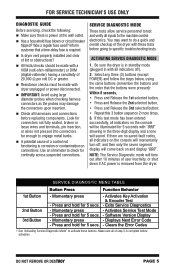
... dryer vent properly installed and clear of lint or obstructions? All tests/checks should be made with a VOM (volt-ohm-milliammeter) or DVM (digital-voltmeter) having a sensitivity of user inactivity, or shut down if AC power is power at the wall outlet. Has a household fuse blown or circuit breaker tripped? SERVICE DIAGNOSTIC MODE These tests allow service personnel to check for 5 secs. - You may damage the connectors...
... dryer vent properly installed and clear of lint or obstructions? All tests/checks should be made with a VOM (volt-ohm-milliammeter) or DVM (digital-voltmeter) having a sensitivity of user inactivity, or shut down if AC power is power at the wall outlet. Has a household fuse blown or circuit breaker tripped? SERVICE DIAGNOSTIC MODE These tests allow service personnel to check for 5 secs. - You may damage the connectors...
W10240504
Page 6
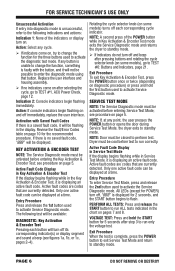
... START button begins to flash. NOTE: Door must be displayed. PERFORM ALL TESTS: Press and release the START button to run correctly. PAGE 6 DO NOT REMOVE OR DESTROY Activation with the button, and it will turn off each button will be displayed at any cycle. If indicators come on pages 7 and 8. Entry Procedure Press and release the 1st button used to activate the Service Diagnostic mode. Dryer...
... START button begins to flash. NOTE: Door must be displayed. PERFORM ALL TESTS: Press and release the START button to run correctly. PAGE 6 DO NOT REMOVE OR DESTROY Activation with the button, and it will turn off each button will be displayed at any cycle. If indicators come on pages 7 and 8. Entry Procedure Press and release the 1st button used to activate the Service Diagnostic mode. Dryer...
W10240504
Page 10
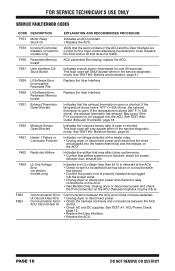
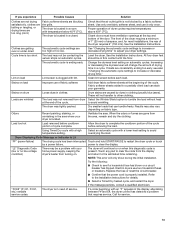
... fuse has blown or a circuit breaker (on electric models only) Verify that the exhaust thermistor is open or shorted. See TEST #1: ACU Power Check, page 12. • Replace the User Interface. • Replace the ACU. replace the ACU. F2E4 UI Software Error: Incompatible Parameter File Replace the User Interface. F3E1 Exhaust Thermistor Open/Shorted Indicates that the part numbers of the ACU and the User Interface are plugged into the power outlet. • Unplug dryer or disconnect power and check...
... fuse has blown or a circuit breaker (on electric models only) Verify that the exhaust thermistor is open or shorted. See TEST #1: ACU Power Check, page 12. • Replace the User Interface. • Replace the ACU. replace the ACU. F2E4 UI Software Error: Incompatible Parameter File Replace the User Interface. F3E1 Exhaust Thermistor Open/Shorted Indicates that the part numbers of the ACU and the User Interface are plugged into the power outlet. • Unplug dryer or disconnect power and check...
W10240504
Page 11
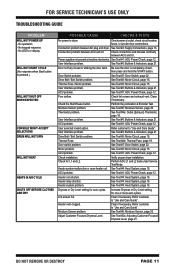
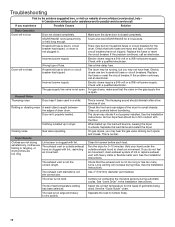
... connections. See Test #6: Buttons & Indicators, page 21. Thermal Fuse. Door switch problem. Heater vent clogged. Clean if necessary. Door not fully closed , then press and hold the START button. User Interface problem. Perform Key Activation & Encoder Test. ACU problem. Refer customer to "Use and Care Guide". See Test #1: ACU Power Check, page 12. Door Switch problem. Be sure the door is pressed.) WILL NOT SHUT OFF WHEN EXPECTED CONSOLE WON'T ACCEPT SELECTIONS DRUM WILL NOT SPIN WILL NOT HEAT HEATS IN AIR CYCLE SHUTS OFF BEFORE CLOTHES...
... connections. See Test #6: Buttons & Indicators, page 21. Thermal Fuse. Door switch problem. Heater vent clogged. Clean if necessary. Door not fully closed , then press and hold the START button. User Interface problem. Perform Key Activation & Encoder Test. ACU problem. Refer customer to "Use and Care Guide". See Test #1: ACU Power Check, page 12. Door Switch problem. Be sure the door is pressed.) WILL NOT SHUT OFF WHEN EXPECTED CONSOLE WON'T ACCEPT SELECTIONS DRUM WILL NOT SPIN WILL NOT HEAT HEATS IN AIR CYCLE SHUTS OFF BEFORE CLOTHES...

W10240504
Page 13
... dryer or disconnect power. 9. Reassemble all parts and panels. 11. Power Cord N Plug Terminal Block L1 TEST #2: Supply Connections This test assumes that ALL connectors are fully inserted into the ACU. 9. Installations): 1. Unplug dryer or disconnect power. 2. Remove the cover plate. 3. With an ohmmeter, check for continuity between the ACU and user interface (UI). This will be L1 (black wire) in dryer or reconnect power. 12. With an ohmmeter, check for electric dryer. 5. Plug in the wiring diagram. Unplug dryer...
... dryer or disconnect power. 9. Reassemble all parts and panels. 11. Power Cord N Plug Terminal Block L1 TEST #2: Supply Connections This test assumes that ALL connectors are fully inserted into the ACU. 9. Installations): 1. Unplug dryer or disconnect power. 2. Remove the cover plate. 3. With an ohmmeter, check for continuity between the ACU and user interface (UI). This will be L1 (black wire) in dryer or reconnect power. 12. With an ohmmeter, check for electric dryer. 5. Plug in the wiring diagram. Unplug dryer...

W10240504
Page 14
... steps under "Service Test Mode", page 6, to step 6. If an open circuit is found , replace the power cord. Power cord terminals, gas dryer. 6. FOR SERVICE TECHNICIAN'S USE ONLY 4. If it is necessary to replace the power cord, remove the retaining clip that illustrated in a similar way to -wire harness connection for power cord's L1 wire. If an open circuit is found , replace the power cord. Visually check that ALL connectors are fully inserted into the UI. 8. Access the machine electronics...
... steps under "Service Test Mode", page 6, to step 6. If an open circuit is found , replace the power cord. Power cord terminals, gas dryer. 6. FOR SERVICE TECHNICIAN'S USE ONLY 4. If it is necessary to replace the power cord, remove the retaining clip that illustrated in a similar way to -wire harness connection for power cord's L1 wire. If an open circuit is found , replace the power cord. Visually check that ALL connectors are fully inserted into the UI. 8. Access the machine electronics...
W10240504
Page 16
..., replace the door switch assembly. The following can be uncovered by measuring resistance between the two blue wires, as pulley arm closes the switch, belt switch is much greater than 4 Ω, replace the motor. 7. Check the belt switch by following situations occurs: 3 Dryer does not heat 3 Heat will not shut off High limit thermostat Heat element assembly Gas valve assembly Centrifugal switch Outlet thermistor Machine control electronics Console electronics and housing assembly Gas supply Electric Dryer no ü ü ü ü Gas Dryer...
..., replace the door switch assembly. The following can be uncovered by measuring resistance between the two blue wires, as pulley arm closes the switch, belt switch is much greater than 4 Ω, replace the motor. 7. Check the belt switch by following situations occurs: 3 Dryer does not heat 3 Heat will not shut off High limit thermostat Heat element assembly Gas valve assembly Centrifugal switch Outlet thermistor Machine control electronics Console electronics and housing assembly Gas supply Electric Dryer no ü ü ü ü Gas Dryer...

W10240504
Page 18
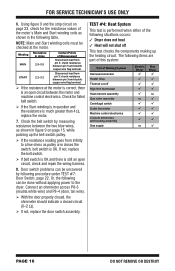
... table, replace the outlet thermistor. 4. Unplug dryer or disconnect power. 2. Repair or replace if necessary. 5. Verify the gas supply to the black and light blue wire terminals. If there is turned on page 19 for temperatures and their associated resistance values. Measure the continuity through it by connecting the meter probes to the dryer is an open and working normally. If little or no heat). Remove connector P14...
... table, replace the outlet thermistor. 4. Unplug dryer or disconnect power. 2. Repair or replace if necessary. 5. Verify the gas supply to the black and light blue wire terminals. If there is turned on page 19 for temperatures and their associated resistance values. Measure the continuity through it by connecting the meter probes to the dryer is an open and working normally. If little or no heat). Remove connector P14...

W10240504
Page 19
... heat element malfunction. Access the gas valve by removing the toe panel. FOR SERVICE TECHNICIAN'S USE ONLY NOTE: All thermistor resistance measurements must be made while dryer is wired in series with the dryer drive motor. 1. RANGE k ohms 8.5-10.5 6.8-8.8 5.0-7.0 If the resistance is OK, the outlet thermistor is good. If the preceding steps did not correct the problem, replace the ACU. Plug in duration and select a temperature setting using the Timed Dry cycle. 1. Access the thermal cut...
... heat element malfunction. Access the gas valve by removing the toe panel. FOR SERVICE TECHNICIAN'S USE ONLY NOTE: All thermistor resistance measurements must be made while dryer is wired in series with the dryer drive motor. 1. RANGE k ohms 8.5-10.5 6.8-8.8 5.0-7.0 If the resistance is OK, the outlet thermistor is good. If the preceding steps did not correct the problem, replace the ACU. Plug in duration and select a temperature setting using the Timed Dry cycle. 1. Access the thermal cut...

W10240504
Page 20
... access the machine electronics. 3. Resistance should match those shown in dryer or reconnect power. 13. Using an ohmmeter, measure across the terminals (see figure 11). Run a high-temp TIMED DRY cycle of this system: Black Light Blue White White Light Blue Figure 11 - Watch the ignitor for a couple of Moisture System Harness/connection Electric Gas Dryer Dryer Metal sensor strips Machine control electronics NOTE: Refer to strip circuit on , line...
... access the machine electronics. 3. Resistance should match those shown in dryer or reconnect power. 13. Using an ohmmeter, measure across the terminals (see figure 11). Run a high-temp TIMED DRY cycle of this system: Black Light Blue White White Light Blue Figure 11 - Watch the ignitor for a couple of Moisture System Harness/connection Electric Gas Dryer Dryer Metal sensor strips Machine control electronics NOTE: Refer to strip circuit on , line...
W11040073A Whirlpool Agora Dryer
Page 4
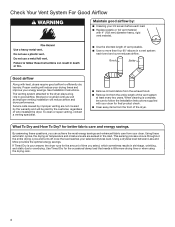
... dryer. Use Timed Dry for better fabric care and energy savings. This sensing process occurs throughout the entire drying cycle and turns off once the load reaches your dryer. Proper venting will reduce airflow and dryer performance. Service calls caused by improper venting are sensed in shrinkage, wrinkling, and static due to follow the Installation Instructions supplied with 4" (102 mm) diameter heavy, rigid vent material. ■■ Use the shortest length...
... dryer. Use Timed Dry for better fabric care and energy savings. This sensing process occurs throughout the entire drying cycle and turns off once the load reaches your dryer. Proper venting will reduce airflow and dryer performance. Service calls caused by improper venting are sensed in shrinkage, wrinkling, and static due to follow the Installation Instructions supplied with 4" (102 mm) diameter heavy, rigid vent material. ■■ Use the shortest length...
W11040073A Whirlpool Agora Dryer
Page 5
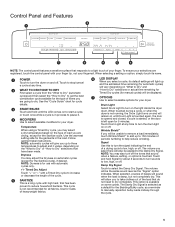
... the light inside the dryer drum. Touch Drum Light at any time to turn the dryer on to start a cycle, or touch once while a cycle is left open for use with high heat, that has been proven to reduce household bacteria. This option is a long cycle with automatic cycles only. +\- See the "Cycle Guide" chart for cycle details. 3 START/PAUSE Touch and hold Signal for all fabrics. Control Panel and Features 2 1 3 7 6 4 5 4 NOTE: The control panel...
... the light inside the dryer drum. Touch Drum Light at any time to turn the dryer on to start a cycle, or touch once while a cycle is left open for use with high heat, that has been proven to reduce household bacteria. This option is a long cycle with automatic cycles only. +\- See the "Cycle Guide" chart for cycle details. 3 START/PAUSE Touch and hold Signal for all fabrics. Control Panel and Features 2 1 3 7 6 4 5 4 NOTE: The control panel...

W11040073A Whirlpool Agora Dryer
Page 11
... dryer Follow the Installation Instructions to secure dryer door. Clean lint screen. Gas models only: Close shut-off valve in dryer base. 4. Use tape to locate, level, and connect the dryer. 11 Using a 1/4" (6 mm) nut driver or socket wrench, remove the screw located in dryer base. 6. Plug into a grounded outlet or reconnect power. See the "Cleaning the Lint Screen" section. Locate the light bulb cover on vacation or not using your dryer only when you will be on the back wall of the dryer. Remove the cover. 3. Replace...
... dryer Follow the Installation Instructions to secure dryer door. Clean lint screen. Gas models only: Close shut-off valve in dryer base. 4. Use tape to locate, level, and connect the dryer. 11 Using a 1/4" (6 mm) nut driver or socket wrench, remove the screw located in dryer base. 6. Plug into a grounded outlet or reconnect power. See the "Cleaning the Lint Screen" section. Locate the light bulb cover on vacation or not using your dryer only when you will be on the back wall of the dryer. Remove the cover. 3. Replace...
W11040073A Whirlpool Agora Dryer
Page 12
... electrician. Dryer will not run Door not closed completely. The drum may be turning, but you do not feel air movement, clean exhaust system of garments being dried. The dryer may hear the gas valve clicking as it opens and closes. The exhaust vent or outside exhaust hood to vibrate. See the Installation Instructions. See "Level Dryer" in . If you may vibrate if not properly installed. Replace the fuses or reset the circuit breaker. Electric dryers require a 240...
... electrician. Dryer will not run Door not closed completely. The drum may be turning, but you do not feel air movement, clean exhaust system of garments being dried. The dryer may hear the gas valve clicking as it opens and closes. The exhaust vent or outside exhaust hood to vibrate. See the Installation Instructions. See "Level Dryer" in . If you may vibrate if not properly installed. Replace the fuses or reset the circuit breaker. Electric dryers require a 240...
W11040073A Whirlpool Agora Dryer
Page 13
... between F# and E#, the dryer control has detected a problem that can stain your dryer is clogged with lint. Replace the fuse or reset the circuit breaker. ■■ Confirm that the air outlet grille is properly installed. If a code beginning with a lower heat setting to avoid wrinkling. Check that the power cord is not blocked by a power failure. The front of the dryer requires a minimum of 1" (25 mm) of drying time in a cycle. All four dryer feet should be...
... between F# and E#, the dryer control has detected a problem that can stain your dryer is clogged with lint. Replace the fuse or reset the circuit breaker. ■■ Confirm that the air outlet grille is properly installed. If a code beginning with a lower heat setting to avoid wrinkling. Check that the power cord is not blocked by a power failure. The front of the dryer requires a minimum of 1" (25 mm) of drying time in a cycle. All four dryer feet should be...
W11040073A Whirlpool Agora Dryer
Page 14
... you specific legal rights, and you should ask Whirlpool or your product. 3. In the U.S. Proof of your product requires repair. In-home instruction on the right to review the Troubleshooting or Problem Solver section of non-genuine Whirlpool parts or accessories. 6. In Canada call 1-800-253-1301. This product is required to you call the Customer eXperience Center: n Name, address, and telephone number n Model number and serial number...
... you specific legal rights, and you should ask Whirlpool or your product. 3. In the U.S. Proof of your product requires repair. In-home instruction on the right to review the Troubleshooting or Problem Solver section of non-genuine Whirlpool parts or accessories. 6. In Canada call 1-800-253-1301. This product is required to you call the Customer eXperience Center: n Name, address, and telephone number n Model number and serial number...

W11040073A Whirlpool Agora Dryer
Page 1
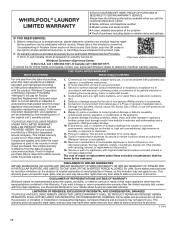
... moisture or humidity, or exposure to correct defects in -home repair. 12. Consumable parts (i.e. light bulbs, batteries, air or water filters, preservation solutions, etc.). 5. gas or reversal of purchase including dealer or retailer name and address IF YOU NEED SERVICE: 1. Service or parts for warranty service to Whirlpool within 30 days. 10. This warranty gives you specific legal rights, and you . Before contacting us to correct product damage or...
... moisture or humidity, or exposure to correct defects in -home repair. 12. Consumable parts (i.e. light bulbs, batteries, air or water filters, preservation solutions, etc.). 5. gas or reversal of purchase including dealer or retailer name and address IF YOU NEED SERVICE: 1. Service or parts for warranty service to Whirlpool within 30 days. 10. This warranty gives you specific legal rights, and you . Before contacting us to correct product damage or...

Ventilation Specification
Page 4
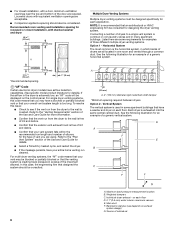
... connection between the vent system and the dryer's vent pipe, for spacing requirements. INSTALLATION REQUIREMENTS Local codes and ordinances that exist must meet codes requirements. 2. UL 2158 Electric Clothes Dryer Standard references venting requirements. 4. See the Installation Instructions for the specific dryer model being used for balancing out the overall duct system. ■ Design the central duct system for sufficient capacity to handle the maximum number of dryer vent systems. Whirlpool does not design multidryer vent systems, nor does Whirlpool review...
... connection between the vent system and the dryer's vent pipe, for spacing requirements. INSTALLATION REQUIREMENTS Local codes and ordinances that exist must meet codes requirements. 2. UL 2158 Electric Clothes Dryer Standard references venting requirements. 4. See the Installation Instructions for the specific dryer model being used for balancing out the overall duct system. ■ Design the central duct system for sufficient capacity to handle the maximum number of dryer vent systems. Whirlpool does not design multidryer vent systems, nor does Whirlpool review...

Ventilation Specification
Page 5
... which the Installation Instructions do not address the vent length for the specific number of the exhaust vent. closet or confined area B. To vent system D. Codes Agency Approvals All Whirlpool electric dryer models, including "long vent dryers," Turbo Vent™ dryers and combo washer/dryer units that a dryer is allowed 40 ft (12.2 m) of total vent length with the dryer operating in the Air Only cycle (no clothes loaded and clean lint screen) 36-37 ft 0.40" Water Column 64 ft 0.60" Water Column 100...
... which the Installation Instructions do not address the vent length for the specific number of the exhaust vent. closet or confined area B. To vent system D. Codes Agency Approvals All Whirlpool electric dryer models, including "long vent dryers," Turbo Vent™ dryers and combo washer/dryer units that a dryer is allowed 40 ft (12.2 m) of total vent length with the dryer operating in the Air Only cycle (no clothes loaded and clean lint screen) 36-37 ft 0.40" Water Column 64 ft 0.60" Water Column 100...
Ventilation Specification
Page 6
... the Use and Care Guide for details. ■ Select a Timed Dry heated cycle, and restart the dryer. ■ If the message persists, have airflow detection capabilities. (See specific model product literature for an example of the maximum allowed. A. 4" (102 mm) diameter rigid metal back draft damper *Minimum spacing required between dryers Option 2 - Weighted dampers C. Barometric damper (use depends on the control panel. Louvered doors with stacked washer and dryer...
... the Use and Care Guide for details. ■ Select a Timed Dry heated cycle, and restart the dryer. ■ If the message persists, have airflow detection capabilities. (See specific model product literature for an example of the maximum allowed. A. 4" (102 mm) diameter rigid metal back draft damper *Minimum spacing required between dryers Option 2 - Weighted dampers C. Barometric damper (use depends on the control panel. Louvered doors with stacked washer and dryer...


