Owners Manual
Page 2
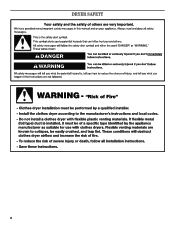
DRYER SAFETY 2
DRYER SAFETY 2

Owners Manual
Page 4
... away items from the entire length of the vent system at least every 2 years. This sensing occurs throughout the drying cycle and the dryer shuts off when the load reaches the selected dryness. The venting system attached to efficiently dry laundry. Proper venting will be sure to provide... During Automatic Cycles, drying air temperature and moisture level are not covered by the warranty and will reduce your drying times and improve your dryer for final product check. n Use no more drying time or when using the drying rack. 4 Use Timed Dry for Better Fabric Care...
... away items from the entire length of the vent system at least every 2 years. This sensing occurs throughout the drying cycle and the dryer shuts off when the load reaches the selected dryness. The venting system attached to efficiently dry laundry. Proper venting will be sure to provide... During Automatic Cycles, drying air temperature and moisture level are not covered by the warranty and will reduce your drying times and improve your dryer for final product check. n Use no more drying time or when using the drying rack. 4 Use Timed Dry for Better Fabric Care...
Owners Manual
Page 5
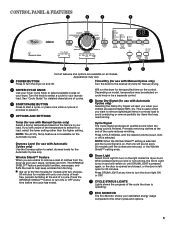
... load to avoid overdrying or remove partially dry items that may vary. 1 POWER BUTTON Press to select a cycle for manual drying. 2 DRYER CYCLE KNOB Use your Dryer Cycle Knob to pause it stops, wrinkles can form. Appearance may need ironing. If you are approximately 80% dry. Wrinkle Shield™... Feature When you are unsure of the cycle the dryer is finished. n Get up to select dryness levels for a load, select the lower setting rather than the higher setting. Depending on model, ...
... load to avoid overdrying or remove partially dry items that may vary. 1 POWER BUTTON Press to select a cycle for manual drying. 2 DRYER CYCLE KNOB Use your Dryer Cycle Knob to pause it stops, wrinkles can form. Appearance may need ironing. If you are approximately 80% dry. Wrinkle Shield™... Feature When you are unsure of the cycle the dryer is finished. n Get up to select dryness levels for a load, select the lower setting rather than the higher setting. Depending on model, ...
Owners Manual
Page 6
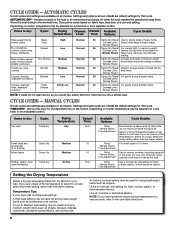
...temperature may be selected on the fabrics in your load. Wrinkle Shield 35 Damp Dry Signal For normal light- CYCLE GUIDE - Will run the dryer for that do not seem as dry as sheets, blouses, dresses, underwear, permanent press fabrics, and some knits. AUTOMATIC CYCLES Not all models...as you would like, select More Dry next time you have questions about drying temperatures for that cycle. Settings and options shown in the dryer too long. Drying time varies based on Wrinkle Shield fabric type, load size, and dryness setting. 38 Damp Dry Signal Average size ...
...temperature may be selected on the fabrics in your load. Wrinkle Shield 35 Damp Dry Signal For normal light- CYCLE GUIDE - Will run the dryer for that do not seem as dry as sheets, blouses, dresses, underwear, permanent press fabrics, and some knits. AUTOMATIC CYCLES Not all models...as you would like, select More Dry next time you have questions about drying temperatures for that cycle. Settings and options shown in the dryer too long. Drying time varies based on Wrinkle Shield fabric type, load size, and dryness setting. 38 Damp Dry Signal Average size ...
Owners Manual
Page 7
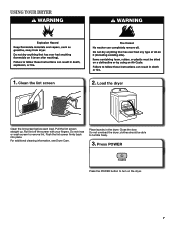
Roll lint off the screen with your fingers. Do not rinse or wash screen to turn on the dryer. 7 Close the door. Press POWER Press the POWER button to remove lint. USING YOUR DRYER 1. For additional cleaning information, see Dryer Care. Place laundry in the dryer. Do not overload the dryer; clothes should be able to tumble freely. 3. Push the lint screen firmly back into place. Load the dryer Clean the lint screen before each load. Clean the lint screen 2. Pull the lint screen straight up.
Roll lint off the screen with your fingers. Do not rinse or wash screen to turn on the dryer. 7 Close the door. Press POWER Press the POWER button to remove lint. USING YOUR DRYER 1. For additional cleaning information, see Dryer Care. Place laundry in the dryer. Do not overload the dryer; clothes should be able to tumble freely. 3. Push the lint screen firmly back into place. Load the dryer Clean the lint screen before each load. Clean the lint screen 2. Pull the lint screen straight up.
Owners Manual
Page 8
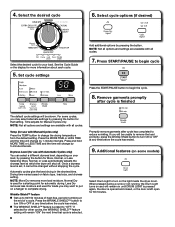
...NOTE: Not all options and settings are available with Automatic Cycles only) You can select a different dryness level, depending on the light inside the dryer drum. NOTE: Not all options and settings are available with Manual Cycles only) Press the TEMP button to turn ON or OFF at the end... the desired cycle 6. Select cycle options (if desired) Select the desired cycle for that cycle is preset to turn ON or OFF at which the dryer will remain on and will shut off. For some models) Select Drum Light to "OFF." Temp (for more load moisture. Selecting More, Normal,...
...NOTE: Not all options and settings are available with Automatic Cycles only) You can select a different dryness level, depending on the light inside the dryer drum. NOTE: Not all options and settings are available with Manual Cycles only) Press the TEMP button to turn ON or OFF at the end... the desired cycle 6. Select cycle options (if desired) Select the desired cycle for that cycle is preset to turn ON or OFF at which the dryer will remain on and will shut off. For some models) Select Drum Light to "OFF." Temp (for more load moisture. Selecting More, Normal,...
Owners Manual
Page 9
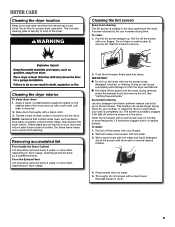
.... Doing so can increase drying time. Roll lint off the screen with a nylon brush every 6 months, or more often, depending on dryer usage. Rinse screen with the lint screen loose, damaged, blocked, or missing. Reinstall screen in front of clothes. See "Venting Requirements." ...Clean the lint screen with your fingers. 2. Wet both the dryer and fabrics. DRYER CARE Cleaning the dryer location Keep dryer area clear and free from items that contain loose dyes, such as denim blue jeans or brightly colored cotton items...
.... Doing so can increase drying time. Roll lint off the screen with a nylon brush every 6 months, or more often, depending on dryer usage. Rinse screen with the lint screen loose, damaged, blocked, or missing. Reinstall screen in front of clothes. See "Venting Requirements." ...Clean the lint screen with your fingers. 2. Wet both the dryer and fabrics. DRYER CARE Cleaning the dryer location Keep dryer area clear and free from items that contain loose dyes, such as denim blue jeans or brightly colored cotton items...
Owners Manual
Page 10
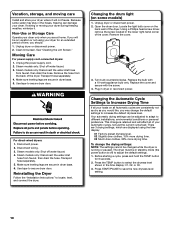
... cover. Disconnect power. 2. Disconnect wiring. 3. Make sure leveling legs are displayed using your dryer for 6 seconds. 2. Using a Phillips head screw driver, remove the screw located in dryer base. 6. Replace the cover and secure with a 10-watt appliance bulb only. Before starting... the drum light (on the back wall of the dryer. Turn bulb counterclockwise. Moving Care For power supply cord-connected dryers: 1. Use tape to save the new dryness level setting. 10 Reinstalling the Dryer Follow the "Installation Instructions" to different installations, environmental ...
... cover. Disconnect power. 2. Disconnect wiring. 3. Make sure leveling legs are displayed using your dryer for 6 seconds. 2. Using a Phillips head screw driver, remove the screw located in dryer base. 6. Replace the cover and secure with a 10-watt appliance bulb only. Before starting... the drum light (on the back wall of the dryer. Turn bulb counterclockwise. Moving Care For power supply cord-connected dryers: 1. Use tape to save the new dryness level setting. 10 Reinstalling the Dryer Follow the "Installation Instructions" to different installations, environmental ...
Owners Manual
Page 11
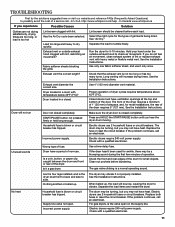
...load. Are the four legs installed, and is too hot Lint screen clogged with a qualified electrician. 11 Electric dryers require 240-volt power supply. In Canada www.whirlpool.ca If you may be turning, but you experience Possible Causes Solution Clothes are not drying satisfactorily, drying times are...'t been used for small objects. Supply line valve not open on the supply line. http://www.whirlpool.com/help - Exhaust vent diameter the correct size. The front of the dryer requires a minimum of 1" (25 mm) of airspace, and, for most installations, the rear of the drum for awhile...
...load. Are the four legs installed, and is too hot Lint screen clogged with a qualified electrician. 11 Electric dryers require 240-volt power supply. In Canada www.whirlpool.ca If you may be turning, but you experience Possible Causes Solution Clothes are not drying satisfactorily, drying times are...'t been used for small objects. Supply line valve not open on the supply line. http://www.whirlpool.com/help - Exhaust vent diameter the correct size. The front of the dryer requires a minimum of 1" (25 mm) of airspace, and, for most installations, the rear of the drum for awhile...
Owners Manual
Page 12
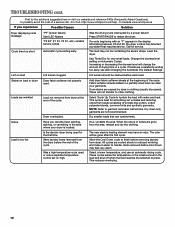
... is too hot Is the electric dryer being used . This reduces overdrying. 12 Call for very small loads. Fabric softener sheets added to handle. The new electric heating element may feel very warm. Items removed before each load. http://www.whirlpool.com/help - If so, ventilate the area. The load may not...
... is too hot Is the electric dryer being used . This reduces overdrying. 12 Call for very small loads. Fabric softener sheets added to handle. The new electric heating element may feel very warm. Items removed before each load. http://www.whirlpool.com/help - If so, ventilate the area. The load may not...


