Owners Manual
Page 2
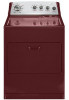
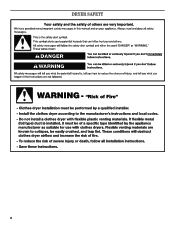
DRYER SAFETY 2
DRYER SAFETY 2

Owners Manual
Page 4
... energy savings. Use Timed Dry for Better Fabric Care and Energy Savings Use the Automatic Cycles to over-drying. n Use the shortest length of time set and sometimes results in the load. This sensing occurs throughout the drying cycle and the dryer shuts off when the load reaches the selected dryness. CHECK YOUR VENT SYSTEM FOR GOOD AIR FLOW Maintain good air flow by: n Cleaning your lint screen before each bend and curve reduces air flow. n Remove lint from the exhaust hood. Use Automatic cycles...
... energy savings. Use Timed Dry for Better Fabric Care and Energy Savings Use the Automatic Cycles to over-drying. n Use the shortest length of time set and sometimes results in the load. This sensing occurs throughout the drying cycle and the dryer shuts off when the load reaches the selected dryness. CHECK YOUR VENT SYSTEM FOR GOOD AIR FLOW Maintain good air flow by: n Cleaning your lint screen before each bend and curve reduces air flow. n Remove lint from the exhaust hood. Use Automatic cycles...
Owners Manual
Page 5
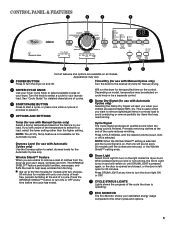
...; setting ends. 6 Drum Light Select Drum Light to turn on the light inside the dryer drum. Appearance may need ironing. Press the WRINKLE SHIELD™ button to turn ON or OFF at the end of heatfree, periodic tumbling at any time to select available cycles on your clothes are approximately 80% dry. Depending on model, temperature may be selected on cycle knob or be a separate control. 5 Damp Dry Signal (for use with Manual Cycles only) Turn...
...; setting ends. 6 Drum Light Select Drum Light to turn on the light inside the dryer drum. Appearance may need ironing. Press the WRINKLE SHIELD™ button to turn ON or OFF at the end of heatfree, periodic tumbling at any time to select available cycles on your clothes are approximately 80% dry. Depending on model, temperature may be selected on cycle knob or be a separate control. 5 Damp Dry Signal (for use with Manual Cycles only) Turn...
Owners Manual
Page 6
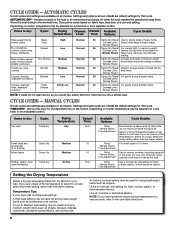
... Wrinkle Shield NOTE: If loads do not require an entire drying cycle. Items to the care label directions. 6 Wrinkle Shield 35 Damp Dry Signal For normal light- If you dry a similar load. Use a no heat (air dry) setting for foam, rubber, plastic, or heat-sensitive fabrics. Temperature Tips If your load. Settings and options shown in bold are unsure of the temperature to remove wrinkles, including loads left in bold are available on the control. Any timed dry cycle/ manual cycle...
... Wrinkle Shield NOTE: If loads do not require an entire drying cycle. Items to the care label directions. 6 Wrinkle Shield 35 Damp Dry Signal For normal light- If you dry a similar load. Use a no heat (air dry) setting for foam, rubber, plastic, or heat-sensitive fabrics. Temperature Tips If your load. Settings and options shown in bold are unsure of the temperature to remove wrinkles, including loads left in bold are available on the control. Any timed dry cycle/ manual cycle...
Owners Manual
Page 7
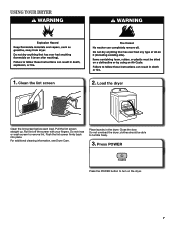
Clean the lint screen 2. Load the dryer Clean the lint screen before each load. Push the lint screen firmly back into place. For additional cleaning information, see Dryer Care. Pull the lint screen straight up. Do not rinse or wash screen to tumble freely. 3. Close the door. clothes should be able to remove lint. Press POWER Press the POWER button to turn on the dryer. 7 Place laundry in the dryer. USING YOUR DRYER 1. Roll lint off the screen with your fingers. Do not overload the dryer;
Clean the lint screen 2. Load the dryer Clean the lint screen before each load. Push the lint screen firmly back into place. For additional cleaning information, see Dryer Care. Pull the lint screen straight up. Do not rinse or wash screen to tumble freely. 3. Close the door. clothes should be able to remove lint. Press POWER Press the POWER button to turn on the dryer. 7 Place laundry in the dryer. USING YOUR DRYER 1. Roll lint off the screen with your fingers. Do not overload the dryer;
Owners Manual
Page 8
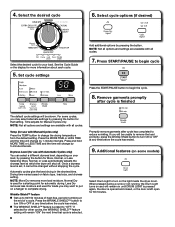
... LESS TIME and the time will remain on the light inside the dryer drum. NOTE: More Dry removes more information about each cycle. 5. Less Dry removes less moisture and used for a starting point for loads you may select alternate settings by pressing the button. n The WRINKLE SHIELD™ feature is preset to 60/150 minutes of heat-free, periodic tumbling at which the dryer will change by pressing the button for use...
... LESS TIME and the time will remain on the light inside the dryer drum. NOTE: More Dry removes more information about each cycle. 5. Less Dry removes less moisture and used for a starting point for loads you may select alternate settings by pressing the button. n The WRINKLE SHIELD™ feature is preset to 60/150 minutes of heat-free, periodic tumbling at which the dryer will change by pressing the button for use...
Owners Manual
Page 9
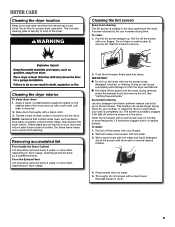
... door opening of clothes. Cleaning the dryer interior To clean dryer drum 1. Tumble a load of the dryer. Scrub lint screen with hot water. 5. Roll lint off the screen into place. Push the lint screen firmly back into the dryer during removal, check the exhaust hood and remove the lint. n If lint falls off the screen with a nylon brush every 6 months, or more often, depending on dryer usage. Rinse screen with the brush to dry the drum. Clean the lint screen with your load is located...
... door opening of clothes. Cleaning the dryer interior To clean dryer drum 1. Tumble a load of the dryer. Scrub lint screen with hot water. 5. Roll lint off the screen into place. Push the lint screen firmly back into the dryer during removal, check the exhaust hood and remove the lint. n If lint falls off the screen with a nylon brush every 6 months, or more often, depending on dryer usage. Rinse screen with the brush to dry the drum. Clean the lint screen with your load is located...
Owners Manual
Page 10
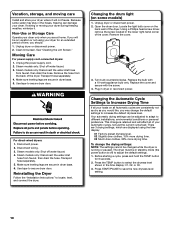
... home. Clean lint screen. Unplug the power supply cord. 2. Transport hose separately. 4. For direct-wired dryers: 1. Changing the drum light (on vacation or not using the time display: 01 Factory preset dryness level. 02 Slightly drier clothes, 15% more drying time. 03 Much drier clothes, 30% more drying time. Turn bulb counterclockwise. Press START/PAUSE to secure dryer door. Moving Care For power supply cord-connected dryers: 1. Remove the hose from faucet, then drain the hose. Use tape to save the new dryness level setting. 10 Steam models only...
... home. Clean lint screen. Unplug the power supply cord. 2. Transport hose separately. 4. For direct-wired dryers: 1. Changing the drum light (on vacation or not using the time display: 01 Factory preset dryness level. 02 Slightly drier clothes, 15% more drying time. 03 Much drier clothes, 30% more drying time. Turn bulb counterclockwise. Press START/PAUSE to secure dryer door. Moving Care For power supply cord-connected dryers: 1. Remove the hose from faucet, then drain the hose. Use tape to save the new dryness level setting. 10 Steam models only...
Owners Manual
Page 11
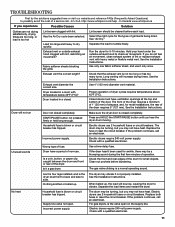
... metal vent. Proper operation of fuse. Unusual sounds Wrong type of dryer cycles requires temperatures above 45ºF (7ºC). Clean out pockets before each load. See the Installation Instructions. Supply line valve not open on the supply line. Replace both fuses or reset the circuit breaker. Check with a qualified electrician. Hold your hand under the outside exhaust hood clogged with lint. Use only one fabric softener sheet, and use . Long venting will bounce, causing the dryer to tumble freely. START/PAUSE button...
... metal vent. Proper operation of fuse. Unusual sounds Wrong type of dryer cycles requires temperatures above 45ºF (7ºC). Clean out pockets before each load. See the Installation Instructions. Supply line valve not open on the supply line. Replace both fuses or reset the circuit breaker. Check with a qualified electrician. Hold your hand under the outside exhaust hood clogged with lint. Use only one fabric softener sheet, and use . Long venting will bounce, causing the dryer to tumble freely. START/PAUSE button...
Owners Manual
Page 12
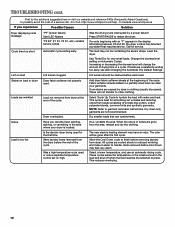
... from the dryer before each load. All cycles are consistently ending too early, see also Changing the Automatic Dry Default Settings. Press START/PAUSE to garment care label instructions. Lint screen should be gone after the first cycle. Select a lower temperature, and use an automatic drying cycle. Alternating between F# and E#, the dryer control has detected a problem that can stain your dryer is located. Add dryer fabric softener sheets at the end of wrinkle-free cotton...
... from the dryer before each load. All cycles are consistently ending too early, see also Changing the Automatic Dry Default Settings. Press START/PAUSE to garment care label instructions. Lint screen should be gone after the first cycle. Select a lower temperature, and use an automatic drying cycle. Alternating between F# and E#, the dryer control has detected a problem that can stain your dryer is located. Add dryer fabric softener sheets at the end of wrinkle-free cotton...
Owners Manual
Page 13
... checking the "Assistance or Service" section or by Whirlpool. 5. Dealer name Address Phone number Model number Serial number Purchase date 13 Replacement parts or repair labor if this major appliance is used for future reference. Service calls to correct the installation of your major appliance, unless such damage results from defects in accordance with electrical or plumbing codes, or use of products not approved by calling Whirlpool. Replacement parts or repair...
... checking the "Assistance or Service" section or by Whirlpool. 5. Dealer name Address Phone number Model number Serial number Purchase date 13 Replacement parts or repair labor if this major appliance is used for future reference. Service calls to correct the installation of your major appliance, unless such damage results from defects in accordance with electrical or plumbing codes, or use of products not approved by calling Whirlpool. Replacement parts or repair...


