

Installation Instructions
Page 3
...driver (recommended) Vent clamps Leveling legs (4) Parts package is located in ring terminals or spade terminals with clothes dryers. See "Venting Requirements." ■■ A separate 30 amp circuit. 3 Location Requirements Adjustable wrench that all parts are included. The wires that connect to...least 4 ft. (1.22 m) long. INSTALLATION REQUIREMENTS Tools and Parts Parts supplied: Gather the required tools and parts before purchasing parts. Check that opens to the dryer must end in dryer drum. Mobile home installations require metal exhaust system hardware, available for...
...driver (recommended) Vent clamps Leveling legs (4) Parts package is located in ring terminals or spade terminals with clothes dryers. See "Venting Requirements." ■■ A separate 30 amp circuit. 3 Location Requirements Adjustable wrench that all parts are included. The wires that connect to...least 4 ft. (1.22 m) long. INSTALLATION REQUIREMENTS Tools and Parts Parts supplied: Gather the required tools and parts before purchasing parts. Check that opens to the dryer must end in dryer drum. Mobile home installations require metal exhaust system hardware, available for...

Installation Instructions
Page 4
... ft. (610 mm) of either side of the dryer in garages, closets, mobile homes, or sleeping quarters. Large opening . The installation must conform to the Manufactured Home Construction and Safety Standard, Title 24 CFR, Part 3280 (formerly the Federal Standard for Mobile Home Construction ... an extension cord. ■■ If codes permit and a separate ground wire is greater than 1" [25 mm], install Extended Dryer Feet Kit, Part Number 279810.) If not level, clothes may not tumble properly and automatic sensor cycles may not operate correctly. Check code requirements. See...
... ft. (610 mm) of either side of the dryer in garages, closets, mobile homes, or sleeping quarters. Large opening . The installation must conform to the Manufactured Home Construction and Safety Standard, Title 24 CFR, Part 3280 (formerly the Federal Standard for Mobile Home Construction ... an extension cord. ■■ If codes permit and a separate ground wire is greater than 1" [25 mm], install Extended Dryer Feet Kit, Part Number 279810.) If not level, clothes may not tumble properly and automatic sensor cycles may not operate correctly. Check code requirements. See...
Installation Instructions
Page 14
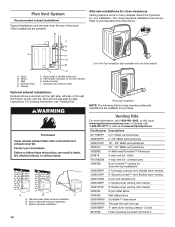
...E. For ordering information, see "Venting Kits". Periscope installation NOTE: The following kits for close -clearance installations are possible. Part Number Descriptions 8171587RP 0-5" Metal vent periscope 4396037RP 0"-18" Metal vent periscope 4396011RP 18" - 29" Metal vent periscope 4396014 .... Plan Vent System Recommended exhaust installations Typical installations vent the dryer from the rear of the dryer. B Alternate installations for close elbow 4396007RW Through-the-wall vent cap 4396008RP 4" steel dryer venting clamps - 2 pack 8212662 Flush mounting louvered vent hood...
...E. For ordering information, see "Venting Kits". Periscope installation NOTE: The following kits for close -clearance installations are possible. Part Number Descriptions 8171587RP 0-5" Metal vent periscope 4396037RP 0"-18" Metal vent periscope 4396011RP 18" - 29" Metal vent periscope 4396014 .... Plan Vent System Recommended exhaust installations Typical installations vent the dryer from the rear of the dryer. B Alternate installations for close elbow 4396007RW Through-the-wall vent cap 4396008RP 4" steel dryer venting clamps - 2 pack 8212662 Flush mounting louvered vent hood...

Installation Instructions
Page 16
...your tools. Repeat from side to final location 2. Not Level LEVEL Not Level If dryer is an extra part, go away. 16 q Read "Dryer Use" in place, remove corner posts and cardboard from under the dryer. NOTE: You may be level for the moisture sensing system to remove any tape ... Household fuse is intact and tight, or circuit breaker has not tripped. ■■ Dryer door is first heated. Check that both circuit breakers have all parts are set in a running for 5 minutes, open the dryer door and feel for 20 minutes and start , check the following : ■■ ...
...your tools. Repeat from side to final location 2. Not Level LEVEL Not Level If dryer is an extra part, go away. 16 q Read "Dryer Use" in place, remove corner posts and cardboard from under the dryer. NOTE: You may be level for the moisture sensing system to remove any tape ... Household fuse is intact and tight, or circuit breaker has not tripped. ■■ Dryer door is first heated. Check that both circuit breakers have all parts are set in a running for 5 minutes, open the dryer door and feel for 20 minutes and start , check the following : ■■ ...
Installation Instructions
Page 17
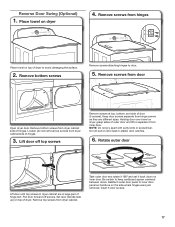
...º and set it from hinge screws as they are in dryer cabinet are different sizes. Holding door over towel on dryer, grasp sides of hinge slot. Rotate outer door Lift door until top screws in large part of outer door and lift to separate it back down on top...Insert 5 door screws. 17 Remove bottom screws from hinges Place towel on the side where hinges were just removed. Remove screws from dryer cabinet side of dryer to keep cardboard spacer centered between doors. Remove bottom screws Remove screws attaching hinges to inner door panel so handle is on top of...
...º and set it from hinge screws as they are in dryer cabinet are different sizes. Holding door over towel on dryer, grasp sides of hinge slot. Rotate outer door Lift door until top screws in large part of outer door and lift to separate it back down on top...Insert 5 door screws. 17 Remove bottom screws from hinges Place towel on the side where hinges were just removed. Remove screws from dryer cabinet side of dryer to keep cardboard spacer centered between doors. Remove bottom screws Remove screws attaching hinges to inner door panel so handle is on top of...


