
Dimension Guide
Page 1
... (25 mm) (686 mm) (25 mm) (25 mm) (743 mm) (140 mm) A B C A. Specifications subject to use plastic or metal foil vent. See "Venting Requirements" in the path of the line. Box hood 2½" (64 mm) Acceptable styles: C. To determine maximum exhaust length, add one 90° turn inside.... Do not have a 90° turn to the outside. 4" (102 mm) diameter vent is recommended. Plan the installation to change materials and specifications without notice. Because Whirlpool Corporation policy includes a continuous commitment to improve our products, we reserve the right to an ...
... (25 mm) (686 mm) (25 mm) (25 mm) (743 mm) (140 mm) A B C A. Specifications subject to use plastic or metal foil vent. See "Venting Requirements" in the path of the line. Box hood 2½" (64 mm) Acceptable styles: C. To determine maximum exhaust length, add one 90° turn inside.... Do not have a 90° turn to the outside. 4" (102 mm) diameter vent is recommended. Plan the installation to change materials and specifications without notice. Because Whirlpool Corporation policy includes a continuous commitment to improve our products, we reserve the right to an ...

Installation Instructions
Page 3
...mm) or hex-head socket wrench Utility knife Tape measure Level Pliers Caulking gun and compound (for installing new exhaust vent) You will need: ■■ A location allowing for proper exhaust installation. Check that opens to the dryer must end ...separate 30 amp circuit. 3 Parts needed : Flat-blade screwdriver #2 Phillips screwdriver Wire stripper (direct wire installations) Tin snips (new vent installations) 1/4" nut driver (recommended) Vent clamps Leveling legs (4) Parts package is located in ring terminals or spade terminals with upturned ends. ■■ A UL listed...
...mm) or hex-head socket wrench Utility knife Tape measure Level Pliers Caulking gun and compound (for installing new exhaust vent) You will need: ■■ A location allowing for proper exhaust installation. Check that opens to the dryer must end ...separate 30 amp circuit. 3 Parts needed : Flat-blade screwdriver #2 Phillips screwdriver Wire stripper (direct wire installations) Tin snips (new vent installations) 1/4" nut driver (recommended) Vent clamps Leveling legs (4) Parts package is located in ring terminals or spade terminals with upturned ends. ■■ A UL listed...

Installation Instructions
Page 4
...) 43 " (1092 mm) 13 ¾" (349 mm) *29 1/2" (749 mm) 27" (687 mm) A *29 1/2" (749 mm) 27" (687 mm) B A. See "Venting Requirements." Closet door with the National Electrical Code, ANSI/NFPA 70-latest edition and all mobile home installations. Connect to water and/or weather. The... installation The dimensions shown following are acceptable. ■■ Companion appliance spacing should also be extended. Minimum spacing for the exhaust vent with maximum slope of a companion appliance should also be sure that the ground path is used, it will be large enough to...
...) 43 " (1092 mm) 13 ¾" (349 mm) *29 1/2" (749 mm) 27" (687 mm) A *29 1/2" (749 mm) 27" (687 mm) B A. See "Venting Requirements." Closet door with the National Electrical Code, ANSI/NFPA 70-latest edition and all mobile home installations. Connect to water and/or weather. The... installation The dimensions shown following are acceptable. ■■ Companion appliance spacing should also be extended. Minimum spacing for the exhaust vent with maximum slope of a companion appliance should also be sure that the ground path is used, it will be large enough to...

Installation Instructions
Page 6
... until diamond marking is close to do so can result in leveling legs Excessive Weight Hazard Use two or more people to connect the exhaust vent. Now stand the dryer on cardboard. 6
... until diamond marking is close to do so can result in leveling legs Excessive Weight Hazard Use two or more people to connect the exhaust vent. Now stand the dryer on cardboard. 6
Installation Instructions
Page 7
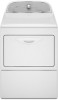
...do so can result in death, fire, or electrical shock. 2. Then go to Venting Requirements. Use a UL listed strain relief. Connect neutral wire (white or center wire) to Venting Requirements. A. Then go to Venting Requirements. 3-wire direct connection: Go to steps 1-2 on page 8 for power supply ...cord strain relief: then steps 3-6 for 3-wire Direct Wire Connection section. Then go to Venting Requirements. 4-wire direct connection: Go to steps 1-2 on page 10 for direct wire strain relief: then steps 3-7 for 4-wire Power Supply Cord ...
...do so can result in death, fire, or electrical shock. 2. Then go to Venting Requirements. Use a UL listed strain relief. Connect neutral wire (white or center wire) to Venting Requirements. A. Then go to Venting Requirements. 3-wire direct connection: Go to steps 1-2 on page 8 for power supply ...cord strain relief: then steps 3-6 for 3-wire Direct Wire Connection section. Then go to Venting Requirements. 4-wire direct connection: Go to steps 1-2 on page 10 for direct wire strain relief: then steps 3-7 for 4-wire Power Supply Cord ...
Installation Instructions
Page 9
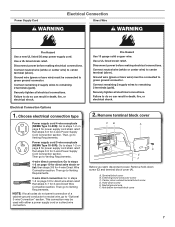
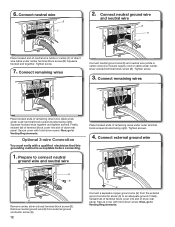
...Connect remaining wires to outer terminal block screws. Connect ground wire A F Connect ground wire (F) (green or bare) of power supply cord to Venting Requirements. 9 Now, go to center, silver-colored terminal block screw (B). Secure cover with upturned ends E. 3/4" (19 mm) UL listed ...block screws. 5. Connect remaining wires 3-wire Power Supply Cord Connection Use where local codes permit connecting cabinet-ground conductor to Venting Requirements. Neutral (white or center wire) 3. Tighten screws. Finally, reinsert tab of terminal block cover into slot of dryer...
...Connect remaining wires to outer terminal block screws. Connect ground wire A F Connect ground wire (F) (green or bare) of power supply cord to Venting Requirements. 9 Now, go to center, silver-colored terminal block screw (B). Secure cover with upturned ends E. 3/4" (19 mm) UL listed ...block screws. 5. Connect remaining wires 3-wire Power Supply Cord Connection Use where local codes permit connecting cabinet-ground conductor to Venting Requirements. Neutral (white or center wire) 3. Tighten screws. Finally, reinsert tab of terminal block cover into slot of dryer...
Installation Instructions
Page 11
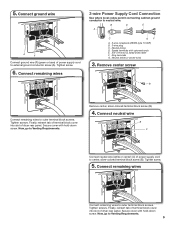
... slot of terminal block (B). Connect neutral ground wire and neutral wire B C E 3-wire Direct Wire Connection Use where local codes permit connecting cabinet-ground conductor to Venting Requirements. Remove center, silver-colored terminal block screw (B). 11 Strip 31/2" (89 mm) of outer covering from end of wire under outer terminal block screws...
... slot of terminal block (B). Connect neutral ground wire and neutral wire B C E 3-wire Direct Wire Connection Use where local codes permit connecting cabinet-ground conductor to Venting Requirements. Remove center, silver-colored terminal block screw (B). 11 Strip 31/2" (89 mm) of outer covering from end of wire under outer terminal block screws...
Installation Instructions
Page 12
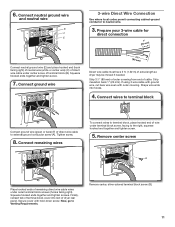
...from external ground conductor screw (A). 12 A G Connect a separate copper ground wire (G) from the external ground conductor screw (A) to Venting Requirements. Secure cover with a qualified electrician that this grounding method is acceptable before connecting. 1. Now, go to connect neutral ground wire...hooked end of neutral wire (white or cente) (C) of dryer rear panel. Squeeze hooked ends together and tighten screws. Prepare to Venting Requirements. Connect external ground wire E B A Remove center, silver-colored terminal block screw (B). Finally, reinsert tab of terminal block ...
...from external ground conductor screw (A). 12 A G Connect a separate copper ground wire (G) from the external ground conductor screw (A) to Venting Requirements. Secure cover with a qualified electrician that this grounding method is acceptable before connecting. 1. Now, go to connect neutral ground wire...hooked end of neutral wire (white or cente) (C) of dryer rear panel. Squeeze hooked ends together and tighten screws. Prepare to Venting Requirements. Connect external ground wire E B A Remove center, silver-colored terminal block screw (B). Finally, reinsert tab of terminal block ...

Installation Instructions
Page 13
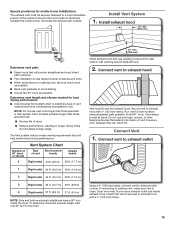
...to follow these instructions can cause moisture and lint to collect indoors, which may result in death or fire. Replace plastic or metal foil vents with screws or other fastening devices that extend into any object that may result in reduced airflow and poor performance. ■■ Do not... clamps to avoid sagging and kinking that may be used . ■■ Do not use plastic or metal foil vent. Louvered hood B. Do not use a metal foil vent. Do not use a plastic vent. Box hood 2½" (64 mm) Acceptable styles: C. Angled hood Elbows: ■■ 45° elbows ...
...to follow these instructions can cause moisture and lint to collect indoors, which may result in death or fire. Replace plastic or metal foil vents with screws or other fastening devices that extend into any object that may result in reduced airflow and poor performance. ■■ Do not... clamps to avoid sagging and kinking that may be used . ■■ Do not use plastic or metal foil vent. Louvered hood B. Do not use a metal foil vent. Do not use a plastic vent. Box hood 2½" (64 mm) Acceptable styles: C. Angled hood Elbows: ■■ 45° elbows ...
Installation Instructions
Page 14
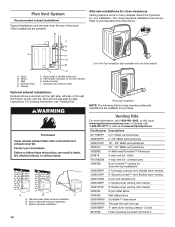
... clearance alternate installations are available for close elbow 4396007RW Through-the-wall vent cap 4396008RP 4" steel dryer venting clamps - 2 pack 8212662 Flush mounting louvered vent hood 4" Standard rear offset exhaust installation B. In Canada, call 1-... venting kit (over-the-top installation) 4396009RP 5' Universal connect vent, flexible dryer venting 4396010RP 6' SecureConnect™ vent, flexible dryer venting 4396013RB Dryer vent installer's kit 4396033RP 5' flexible dryer venting with clamps 4396727RP 8' flexible dryer venting with one offset elbow) B A. Vent ...
... clearance alternate installations are available for close elbow 4396007RW Through-the-wall vent cap 4396008RP 4" steel dryer venting clamps - 2 pack 8212662 Flush mounting louvered vent hood 4" Standard rear offset exhaust installation B. In Canada, call 1-... venting kit (over-the-top installation) 4396009RP 5' Universal connect vent, flexible dryer venting 4396010RP 6' SecureConnect™ vent, flexible dryer venting 4396013RB Dryer vent installer's kit 4396033RP 5' flexible dryer venting with clamps 4396727RP 8' flexible dryer venting with one offset elbow) B A. Vent ...
Installation Instructions
Page 15
...exhaust hood. Check that extend into interior of elbows and turns. ■■ When using straightest path possible. Terminate the exhaust vent outside. Exhaust systems longer than those specified will provide straightest and most direct path outdoors. ■■ Plan installation to use fewest... number of vent to secure vent, because they can catch lint. Vent System Chart Number of 90° turns or elbows Type of the mobile home structure and must not ...
...exhaust hood. Check that extend into interior of elbows and turns. ■■ When using straightest path possible. Terminate the exhaust vent outside. Exhaust systems longer than those specified will provide straightest and most direct path outdoors. ■■ Plan installation to use fewest... number of vent to secure vent, because they can catch lint. Vent System Chart Number of 90° turns or elbows Type of the mobile home structure and must not ...

Installation Instructions
Page 16
... are now installed. NOTE: The dryer must be 2 household fuses or circuit breakers for the moisture sensing system to see what was skipped. Be sure vent is still no heat, contact a qualified technician. q Set the dryer on a full heat cycle (not an air cycle) for heat. Tighten and adjust ...to final location. Complete Installation Checklist q Check that dryer is an extra part, go away. 16 If you have not tripped. Avoid crushing or kinking vent. If there is level. Once legs are level, make sure all parts are set in your tools. q Dispose of your Use and Care Guide....
... are now installed. NOTE: The dryer must be 2 household fuses or circuit breakers for the moisture sensing system to see what was skipped. Be sure vent is still no heat, contact a qualified technician. q Set the dryer on a full heat cycle (not an air cycle) for heat. Tighten and adjust ...to final location. Complete Installation Checklist q Check that dryer is an extra part, go away. 16 If you have not tripped. Avoid crushing or kinking vent. If there is level. Once legs are level, make sure all parts are set in your tools. q Dispose of your Use and Care Guide....
Owners Manual
Page 3
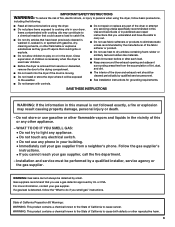
... used near children. ■ Before the dryer is removed from the accumulation of lint, dust, and dirt. ■ The interior of the dryer and exhaust vent should be performed by UL or CSA. For more information, contact your gas supplier. State of California Proposition 65 Warnings: WARNING: This product contains a chemical...
... used near children. ■ Before the dryer is removed from the accumulation of lint, dust, and dirt. ■ The interior of the dryer and exhaust vent should be performed by UL or CSA. For more information, contact your gas supplier. State of California Proposition 65 Warnings: WARNING: This product contains a chemical...
Owners Manual
Page 4
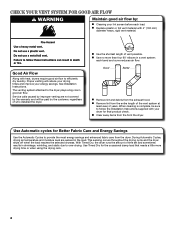
... drying times and improve your lint screen before each bend and curve reduces air flow. With Timed Dry, the dryer runs the amount of vent possible. Use Timed Dry for the occasional damp load that needs a little more than four 90° elbows in shrinkage, wrinkling, and ...n Clear away items from the dryer. Use Automatic cycles for final product check. The venting system attached to efficiently dry laundry. Service calls caused by improper venting are sensed in good air flow. CHECK YOUR VENT SYSTEM FOR GOOD AIR FLOW Maintain good air flow by: n Cleaning your energy savings....
... drying times and improve your lint screen before each bend and curve reduces air flow. With Timed Dry, the dryer runs the amount of vent possible. Use Timed Dry for the occasional damp load that needs a little more than four 90° elbows in shrinkage, wrinkling, and ...n Clear away items from the dryer. Use Automatic cycles for final product check. The venting system attached to efficiently dry laundry. Service calls caused by improper venting are sensed in good air flow. CHECK YOUR VENT SYSTEM FOR GOOD AIR FLOW Maintain good air flow by: n Cleaning your energy savings....

Owners Manual
Page 9
...if it becomes clogged due to dry the drum. Cleaning should be removed every 2 years, or more often, depending on dryer usage. From the Exhaust Vent Lint should be removed every 2 years, or more often, depending on the lint screen. n If lint falls off the screen with the lint screen... loose, damaged, blocked, or missing. See "Venting Requirements." The screen is probably clogged if lint falls off the screen with your fingers. Clean the lint screen with a soft cloth until stain is...
...if it becomes clogged due to dry the drum. Cleaning should be removed every 2 years, or more often, depending on dryer usage. From the Exhaust Vent Lint should be removed every 2 years, or more often, depending on the lint screen. n If lint falls off the screen with the lint screen... loose, damaged, blocked, or missing. See "Venting Requirements." The screen is probably clogged if lint falls off the screen with your fingers. Clean the lint screen with a soft cloth until stain is...
Owners Manual
Page 11
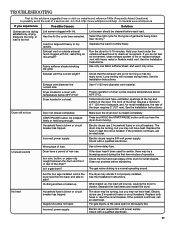
... continues, call an electrician. Separate the load items and restart the dryer. Replace both fuses or reset the circuit breaker. Exhaust vent or outside exhaust hood to vibrate. For gas dryers, is closed completely. Use only one fabric softener sheet, and use 2 household... of the dryer requires 5" (127 mm). If the problem continues, call an electrician. Dryer located in a closet. http://www.whirlpool.com/help - Electric dryers require 240-volt power supply. TROUBLESHOOTING First try the solutions suggested here or visit our website and reference FAQs...
... continues, call an electrician. Separate the load items and restart the dryer. Replace both fuses or reset the circuit breaker. Exhaust vent or outside exhaust hood to vibrate. For gas dryers, is closed completely. Use only one fabric softener sheet, and use 2 household... of the dryer requires 5" (127 mm). If the problem continues, call an electrician. Dryer located in a closet. http://www.whirlpool.com/help - Electric dryers require 240-volt power supply. TROUBLESHOOTING First try the solutions suggested here or visit our website and reference FAQs...
