
Use & Care Guide
Page 10
...not as dry as you would like, you will affect all of the cover. Changing the Sensor Cycle Settings to Increase Drying Time If all parts and panels before servicing. If you may stay in death or electrical shock. See "Cleaning the Lint Screen." Steam models only: Disconnect the water...drying time. 3 Much drier clothes, 30% more drying time. To change is off) to increase the default dryness level. Vacation, storage, and moving your dryer during freezing weather, winterize it will not freeze. Clean lint screen. Steam models only: Shut off water faucet. 4. For direct-wired...
...not as dry as you would like, you will affect all of the cover. Changing the Sensor Cycle Settings to Increase Drying Time If all parts and panels before servicing. If you may stay in death or electrical shock. See "Cleaning the Lint Screen." Steam models only: Disconnect the water...drying time. 3 Much drier clothes, 30% more drying time. To change is off) to increase the default dryness level. Vacation, storage, and moving your dryer during freezing weather, winterize it will not freeze. Clean lint screen. Steam models only: Shut off water faucet. 4. For direct-wired...
Installation Guide
Page 3
...) Tin snips (new vent installations) 1/4" nut driver (recommended) Vent clamps Putty knife Level Parts supplied: Caulking gun and compound (for installing new exhaust vent) Leveling legs (4) Parts package is located in dryer drum. Tools needed: Adjustable wrench that all parts are included. 3 Read and follow the instructions provided with any tools listed here. INSTALLATION...
...) Tin snips (new vent installations) 1/4" nut driver (recommended) Vent clamps Putty knife Level Parts supplied: Caulking gun and compound (for installing new exhaust vent) Leveling legs (4) Parts package is located in dryer drum. Tools needed: Adjustable wrench that all parts are included. 3 Read and follow the instructions provided with any tools listed here. INSTALLATION...
Installation Guide
Page 4
...9632; Level floor with maximum slope of 1" (25 mm) under entire dryer. (If slope is recommended to support the total weight (dryer and load) of the dryer is greater than 1" [25 mm], install Extended Dryer Feet Kit, Part Number 279810.) If not level, clothes may not tumble properly and automatic...vent with vents *Additional spacing recommended 3"* (76 mm) 4 Drying times can be large enough to allow the dryer door to water and/or weather. Wide opening side-swing door B. Parts needed: Check local codes. If using power supply cord, a grounded electrical outlet located within 2 ft. (610 ...
...9632; Level floor with maximum slope of 1" (25 mm) under entire dryer. (If slope is recommended to support the total weight (dryer and load) of the dryer is greater than 1" [25 mm], install Extended Dryer Feet Kit, Part Number 279810.) If not level, clothes may not tumble properly and automatic...vent with vents *Additional spacing recommended 3"* (76 mm) 4 Drying times can be large enough to allow the dryer door to water and/or weather. Wide opening side-swing door B. Parts needed: Check local codes. If using power supply cord, a grounded electrical outlet located within 2 ft. (610 ...
Installation Guide
Page 5
... Safety, Title 24, HUD Part 280). ■■ Metal exhaust system hardware, which is available for use an extension cord. ■■ If codes permit and a separate ground wire is used when the dryer is suitable for homes built after 1996, dryer circuits involved in a location ... (14-30R) Then choose a 4-wire power supply cord with ring or spade terminals and UL listed strain relief. Additional installation requirements This dryer is installed in remodeling after 1996, and all local codes and ordinances. A time-delay fuse or circuit breaker is recommended that a qualified ...
... Safety, Title 24, HUD Part 280). ■■ Metal exhaust system hardware, which is available for use an extension cord. ■■ If codes permit and a separate ground wire is used when the dryer is suitable for homes built after 1996, dryer circuits involved in a location ... (14-30R) Then choose a 4-wire power supply cord with ring or spade terminals and UL listed strain relief. Additional installation requirements This dryer is installed in remodeling after 1996, and all local codes and ordinances. A time-delay fuse or circuit breaker is recommended that a qualified ...
Installation Guide
Page 14
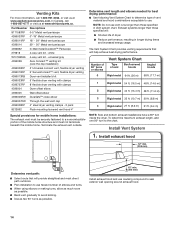
...home structure and must not terminate beneath the mobile home. To determine maximum exhaust length, add one 90º turn inside the dryer. Part Number Descriptions 8171587RP 0-5" Metal vent periscope 4396037RP 0"-18" Metal vent periscope 4396011RP 18" - 29" Metal vent periscope 4396014 29"...■■ Select route that will provide straightest and most direct path outdoors. ■■ Plan installation to use fewest number of dryer. ■■ Reduce performance, resulting in Vent system chart. white W10186596 4-way vent kit - Exhaust systems longer than those specified...
...home structure and must not terminate beneath the mobile home. To determine maximum exhaust length, add one 90º turn inside the dryer. Part Number Descriptions 8171587RP 0-5" Metal vent periscope 4396037RP 0"-18" Metal vent periscope 4396011RP 18" - 29" Metal vent periscope 4396014 29"...■■ Select route that will provide straightest and most direct path outdoors. ■■ Plan installation to use fewest number of dryer. ■■ Reduce performance, resulting in Vent system chart. white W10186596 4-way vent kit - Exhaust systems longer than those specified...
Installation Guide
Page 16
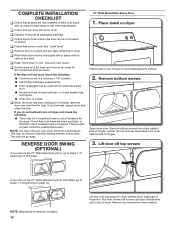
Be sure vent is helpful. 16 Lift door until top screws in dryer cabinet are in large part of hinge slot. q Wipe dryer drum interior thoroughly with Glass, go to steps 1-11 beginning on top of hinges. If the dryer will go back through steps to avoid damaging the surface. 2. REVERSE ... and Care Guide." This odor is common when the heating element is an extra part, go away. If there is first used. q Check that dryer is still no heat, contact a qualified technician. See "Level Dryer". q When the dryer has been running or "On" position. ■■ Start button has been pushed...
Be sure vent is helpful. 16 Lift door until top screws in dryer cabinet are in large part of hinge slot. q Wipe dryer drum interior thoroughly with Glass, go to steps 1-11 beginning on top of hinges. If the dryer will go back through steps to avoid damaging the surface. 2. REVERSE ... and Care Guide." This odor is common when the heating element is an extra part, go away. If there is first used. q Check that dryer is still no heat, contact a qualified technician. See "Level Dryer". q When the dryer has been running or "On" position. ■■ Start button has been pushed...
Installation Guide
Page 18
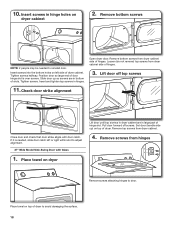
...side up so screws are in hinges. Remove screws from dryer cabinet side of slots. Insert and tighten top screws in large part of dryer cabinet. Lift door off screws. Tighten screws halfway. Slide door up ) on top of dryer to adjust alignment. 27" Wide Model Side-Swing Door ...with door catch. Loosen (do not remove) top screws from dryer cabinet. 4. Place towel on dryer cabinet 2. Insert ...
...side up so screws are in hinges. Remove screws from dryer cabinet side of slots. Insert and tighten top screws in large part of dryer cabinet. Lift door off screws. Tighten screws halfway. Slide door up ) on top of dryer to adjust alignment. 27" Wide Model Side-Swing Door ...with door catch. Loosen (do not remove) top screws from dryer cabinet. 4. Place towel on dryer cabinet 2. Insert ...


