
Dimension Guide
Page 2
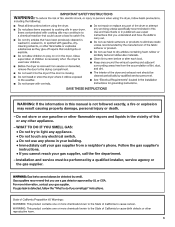
... Vent System Chart. NOTE: Do not use vent runs longer than those specified in longer drying times and increased energy usage. Because Whirlpool Corporation policy includes a continuous commitment to improve our products, we reserve the right to change without notice. Determine vent length and elbows needed for planning purposes only. Exhaust systems longer than those specified will: ■■ Shorten life of the exhaust. VENTING REQUIREMENTS Exhaust venting: Exhaust your dryer...
... Vent System Chart. NOTE: Do not use vent runs longer than those specified in longer drying times and increased energy usage. Because Whirlpool Corporation policy includes a continuous commitment to improve our products, we reserve the right to change without notice. Determine vent length and elbows needed for planning purposes only. Exhaust systems longer than those specified will: ■■ Shorten life of the exhaust. VENTING REQUIREMENTS Exhaust venting: Exhaust your dryer...

Warranty Information
Page 1
... service or repair of this major appliance other rights that is inconsistent to published user or operator instructions and/or installation instructions. 2. Dealer name Address Phone number Model number Serial number Purchase date 13 Proof of original purchase date is required to repair or replace appliance light bulbs, air filters, or water filters. If you want a longer or more comprehensive warranty than normal, single-family household use or when it . If you think you need...
... service or repair of this major appliance other rights that is inconsistent to published user or operator instructions and/or installation instructions. 2. Dealer name Address Phone number Model number Serial number Purchase date 13 Proof of original purchase date is required to repair or replace appliance light bulbs, air filters, or water filters. If you want a longer or more comprehensive warranty than normal, single-family household use or when it . If you think you need...
Use & Care Guide
Page 3
... be performed by a qualified installer, service agency or the gas supplier. 3 WHAT TO DO IF YOU SMELL GAS: • Do not try to light any appliance. • Do not touch any electrical switch. • Do not use gasoline or other appliance. - Follow the gas supplier's instructions. • If you cannot reach your gas supplier, call your building. • Immediately call the...
... be performed by a qualified installer, service agency or the gas supplier. 3 WHAT TO DO IF YOU SMELL GAS: • Do not try to light any appliance. • Do not touch any electrical switch. • Do not use gasoline or other appliance. - Follow the gas supplier's instructions. • If you cannot reach your gas supplier, call your building. • Immediately call the...
Use & Care Guide
Page 4
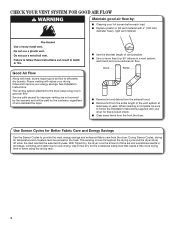
... efficiently dry laundry. Use Sensor Cycles for final product check. ■■ Clear away items from the dryer. See Installation Instructions. each load. ■■ Replace plastic or foil vent material with heat, dryers require good air flow to over-drying. This sensing occurs throughout the drying cycle and the dryer shuts off when the load reaches the selected dryness. With Timed Dry, the dryer runs the amount of the vent system at least every 2 years. Use Timed Dry for...
... efficiently dry laundry. Use Sensor Cycles for final product check. ■■ Clear away items from the dryer. See Installation Instructions. each load. ■■ Replace plastic or foil vent material with heat, dryers require good air flow to over-drying. This sensing occurs throughout the drying cycle and the dryer shuts off when the load reaches the selected dryness. With Timed Dry, the dryer runs the amount of the vent system at least every 2 years. Use Timed Dry for...
Use & Care Guide
Page 5
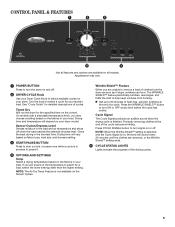
... heat-free, periodic tumbling at the end of clothes from forming. n Get up to select for the specified time on , the tone will vary based on fabric type, load size, and dryness setting. 3 START/PAUSE BUTTON Press to start a cycle, or press once while a cycle is on the control. Cycle Signal The Cycle Signal produces an audible sound when the drying cycle is not available on all models. Promptly removing clothes...
... heat-free, periodic tumbling at the end of clothes from forming. n Get up to select for the specified time on , the tone will vary based on fabric type, load size, and dryness setting. 3 START/PAUSE BUTTON Press to start a cycle, or press once while a cycle is on the control. Cycle Signal The Cycle Signal produces an audible sound when the drying cycle is not available on all models. Promptly removing clothes...

Use & Care Guide
Page 6
Senses moisture in your load. Items to dry: Cycle: Temp: Dryness Level: Available Options: Cycle Details: Jeans, heavy work clothes. ■■ A Low to Medium heat setting may be a separate control. TIMED DRY Not all cycles and settings are unsure of certain cycles to the care label directions. 6 Depending on model, temperature may be selected on all models. Use an air dry (no heat) setting for items that do not seem as dry as sheets, blouses, dresses...
Senses moisture in your load. Items to dry: Cycle: Temp: Dryness Level: Available Options: Cycle Details: Jeans, heavy work clothes. ■■ A Low to Medium heat setting may be a separate control. TIMED DRY Not all cycles and settings are unsure of certain cycles to the care label directions. 6 Depending on model, temperature may be selected on all models. Use an air dry (no heat) setting for items that do not seem as dry as sheets, blouses, dresses...
Use & Care Guide
Page 9
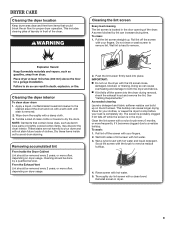
... that would block the air flow for your clothes, or cause the dryer to stop before your fingers. 2. Removing accumulated lint From Inside the Dryer Cabinet Lint should be removed every 2 years, or more often, depending on dryer usage. Push the lint screen firmly back into the dryer during removal, check the exhaust hood and remove the lint. n If lint falls off while the screen is located in dryer. 9 See "Venting Requirements." Clean the lint screen with hot water. 3. To...
... that would block the air flow for your clothes, or cause the dryer to stop before your fingers. 2. Removing accumulated lint From Inside the Dryer Cabinet Lint should be removed every 2 years, or more often, depending on dryer usage. Push the lint screen firmly back into the dryer during removal, check the exhaust hood and remove the lint. n If lint falls off while the screen is located in dryer. 9 See "Venting Requirements." Clean the lint screen with hot water. 3. To...
Use & Care Guide
Page 10
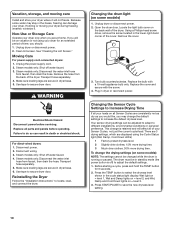
... all parts and panels before servicing. Because some water may change the default settings to Increase Drying Time If all your loads on vacation or not using the Cycle Status light (Wet, Damp, Cool Down LEDs) 1 Factory preset dryness level. 2 Slightly drier clothes, 15% more drying time. 3 Much drier clothes, 30% more drying time. Unplug dryer or disconnect power. 2. Unplug the power supply cord. 2. Steam models only: Shut off water faucet. 4. Remove the hose from the back of the cover. For direct-wired dryers: 1. Changing the drum light...
... all parts and panels before servicing. Because some water may change the default settings to Increase Drying Time If all your loads on vacation or not using the Cycle Status light (Wet, Damp, Cool Down LEDs) 1 Factory preset dryness level. 2 Slightly drier clothes, 15% more drying time. 3 Much drier clothes, 30% more drying time. Unplug dryer or disconnect power. 2. Unplug the power supply cord. 2. Steam models only: Shut off water faucet. 4. Remove the hose from the back of the cover. For direct-wired dryers: 1. Changing the drum light...
Use & Care Guide
Page 11
... softener sheet, and use 2 household fuses or circuit breakers. Dryer located in a closet. See the Installation Instructions. Press and HOLD the START/PAUSE button until you do not feel air movement, clean exhaust system of lint or replace exhaust vent with lint. Replace the fuse or reset the circuit breaker. Check with a qualified electrician. 11 Electric dryers use it only once. For gas dryers, is closed completely. Incorrect power supply. Run the dryer for small objects. Closet doors must have heat. Electric dryers use . Clothing...
... softener sheet, and use 2 household fuses or circuit breakers. Dryer located in a closet. See the Installation Instructions. Press and HOLD the START/PAUSE button until you do not feel air movement, clean exhaust system of lint or replace exhaust vent with lint. Replace the fuse or reset the circuit breaker. Check with a qualified electrician. 11 Electric dryers use it only once. For gas dryers, is closed completely. Incorrect power supply. Run the dryer for small objects. Closet doors must have heat. Electric dryers use . Clothing...

Use & Care Guide
Page 12
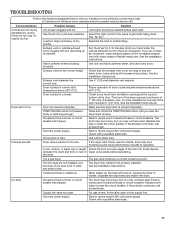
... cycle. Drum stains are consistently ending too early, see also Changing the Sensor Cycle Default Settings. Loads are wrinkled Load not removed from dryer at www.whirlpool.com/product_help In Canada www.whirlpool.ca for assistance and to possibly avoid a service call. The electric dryer is located. Load is too hot Laundry items removed from the area, rewash and dry the clothing. A high temperature cycle was used or the Temp was set on load Lint screen clogged. Lint screen should be cleaned...
... cycle. Drum stains are consistently ending too early, see also Changing the Sensor Cycle Default Settings. Loads are wrinkled Load not removed from dryer at www.whirlpool.com/product_help In Canada www.whirlpool.ca for assistance and to possibly avoid a service call. The electric dryer is located. Load is too hot Laundry items removed from the area, rewash and dry the clothing. A high temperature cycle was used or the Temp was set on load Lint screen clogged. Lint screen should be cleaned...

Use & Care Guide
Page 13
... user or operator instructions and/or installation instructions. 2. Consumable parts are unable to resolve the problem after checking "Troubleshooting," additional help you obtain assistance or service if you also may have other than normal, single-family household use or when it is installed in an inaccessible location or is not installed in accordance with electrical or plumbing codes, or use your authorized Whirlpool dealer to determine if another warranty...
... user or operator instructions and/or installation instructions. 2. Consumable parts are unable to resolve the problem after checking "Troubleshooting," additional help you obtain assistance or service if you also may have other than normal, single-family household use or when it is installed in an inaccessible location or is not installed in accordance with electrical or plumbing codes, or use your authorized Whirlpool dealer to determine if another warranty...
Installation Guide
Page 3
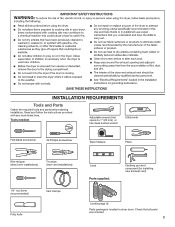
.... 3 Check that opens to 1" (25 mm) or hex-head socket wrench Utility knife Flat-blade screwdriver #2 Phillips screwdriver Tape measure Pliers Wire stripper (direct wire installations) Tin snips (new vent installations) 1/4" nut driver (recommended) Vent clamps Putty knife Level Parts supplied: Caulking gun and compound (for installing new exhaust vent) Leveling legs (4) Parts package is located in dryer drum. Read and follow the instructions provided with any tools listed here. INSTALLATION REQUIREMENTS...
.... 3 Check that opens to 1" (25 mm) or hex-head socket wrench Utility knife Flat-blade screwdriver #2 Phillips screwdriver Tape measure Pliers Wire stripper (direct wire installations) Tin snips (new vent installations) 1/4" nut driver (recommended) Vent clamps Putty knife Level Parts supplied: Caulking gun and compound (for installing new exhaust vent) Leveling legs (4) Parts package is located in dryer drum. Read and follow the instructions provided with any tools listed here. INSTALLATION REQUIREMENTS...
Installation Guide
Page 4
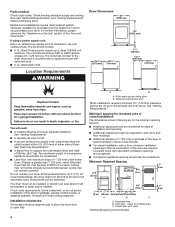
... temperatures below 45°F (7°C). Do not operate your local building inspector. Drying times can be considered. ■■ Level floor with maximum slope of dryer. Check code requirements. Some codes limit, or do not permit, installation of 200 lbs. (90.7 kg). Louvered doors with vents *Additional spacing recommended 3"* (76 mm) 4 Side view - Closet door with equivalent ventilation openings are using a power supply cord: Use a UL listed power supply cord kit marked for use...
... temperatures below 45°F (7°C). Do not operate your local building inspector. Drying times can be considered. ■■ Level floor with maximum slope of dryer. Check code requirements. Some codes limit, or do not permit, installation of 200 lbs. (90.7 kg). Louvered doors with vents *Additional spacing recommended 3"* (76 mm) 4 Side view - Closet door with equivalent ventilation openings are using a power supply cord: Use a UL listed power supply cord kit marked for use...
Installation Guide
Page 5
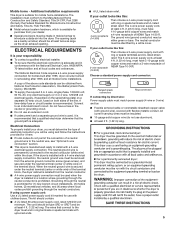
... opening . The National Electrical Code requires a 4-wire power supply connection for use aluminum). ■■ At least 5 ft. (1.52 m) long. 5 Electrical Connection To properly install your dryer, you must be either green or bare. If the dryer is prohibited. If using and follow the instructions provided for purchase from the neutral conductor. ■■ A 4-wire power supply connection must end in the neutral or grounding circuit. ■■ Do not use...
... opening . The National Electrical Code requires a 4-wire power supply connection for use aluminum). ■■ At least 5 ft. (1.52 m) long. 5 Electrical Connection To properly install your dryer, you must be either green or bare. If the dryer is prohibited. If using and follow the instructions provided for purchase from the neutral conductor. ■■ A 4-wire power supply connection must end in the neutral or grounding circuit. ■■ Do not use...
Installation Guide
Page 6
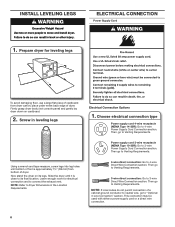
... mm) from dryer carton; NOTE: If local codes do not permit connection of dryer. Leave enough room for leveling legs To avoid damaging floor, use a large flat piece of dryer. This connection may be used with either a power supply cord or a direct wire connection. 6 Then go to Venting Requirements. Electrical Connection Options 1. Firmly grasp dryer body (not console panel) and gently lay dryer down on its final location. INSTALL LEVELING LEGS ELECTRICAL CONNECTION Power Supply Cord 1.
... mm) from dryer carton; NOTE: If local codes do not permit connection of dryer. Leave enough room for leveling legs To avoid damaging floor, use a large flat piece of dryer. This connection may be used with either a power supply cord or a direct wire connection. 6 Then go to Venting Requirements. Electrical Connection Options 1. Firmly grasp dryer body (not console panel) and gently lay dryer down on its final location. INSTALL LEVELING LEGS ELECTRICAL CONNECTION Power Supply Cord 1.
Installation Guide
Page 8
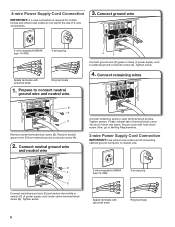
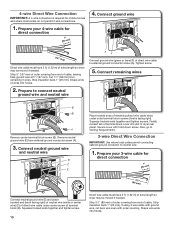
... Ring terminals Remove neutral ground wire (E) from external ground conductor screw (A). 2. 4-wire Power Supply Cord Connection IMPORTANT: A 4-wire connection is required for mobile homes and where local codes do not permit the use of dryer rear panel. Tighten screw. 8 3-wire receptacle (NEMA type 10-30R) 3-prong plug Spade terminals with upturned ends Ring terminals 1. Tighten screws. Finally, reinsert tab of terminal block cover into slot of 3-wire connections. 3. Now, go to Venting Requirements. 3-wire Power Supply Cord Connection IMPORTANT: Use where local codes permit...
... Ring terminals Remove neutral ground wire (E) from external ground conductor screw (A). 2. 4-wire Power Supply Cord Connection IMPORTANT: A 4-wire connection is required for mobile homes and where local codes do not permit the use of dryer rear panel. Tighten screw. 8 3-wire receptacle (NEMA type 10-30R) 3-prong plug Spade terminals with upturned ends Ring terminals 1. Tighten screws. Finally, reinsert tab of terminal block cover into slot of 3-wire connections. 3. Now, go to Venting Requirements. 3-wire Power Supply Cord Connection IMPORTANT: Use where local codes permit...
Installation Guide
Page 10
... of dryer rear panel. Strip insulation back 1" (25 mm). Tighten screw. 5. Now, go to Venting Requirements. 3-wire Direct Wire Connection IMPORTANT: Use where local codes permit connecting cabinet-ground conductor to connect neutral ground wire and neutral wire AF Connect ground wire (green or bare) (F) of terminal block (B). Prepare your 3-wire cable for direct connection (251"mm) (893m½m" ) Connect neutral ground wire (E) and place hooked end (hook facing right) of neutral wire (white or center wire) (C) of direct wire cable...
... of dryer rear panel. Strip insulation back 1" (25 mm). Tighten screw. 5. Now, go to Venting Requirements. 3-wire Direct Wire Connection IMPORTANT: Use where local codes permit connecting cabinet-ground conductor to connect neutral ground wire and neutral wire AF Connect ground wire (green or bare) (F) of terminal block (B). Prepare your 3-wire cable for direct connection (251"mm) (893m½m" ) Connect neutral ground wire (E) and place hooked end (hook facing right) of neutral wire (white or center wire) (C) of direct wire cable...
Installation Guide
Page 12
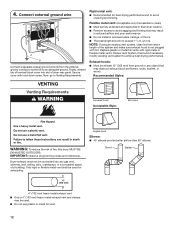
... not install in final dryer location. ■■ Remove excess to avoid crushing and kinking. Replace plastic or metal foil vents with rigid metal or flexible metal vents. Exhaust hoods: ■■ Must be at least 12" (305 mm) from entire length of fire, this dryer MUST BE EXHAUSTED OUTDOORS. Flexible metal vent: (Acceptable only if accessible to clean) ■■ Must be connected into...
... not install in final dryer location. ■■ Remove excess to avoid crushing and kinking. Replace plastic or metal foil vents with rigid metal or flexible metal vents. Exhaust hoods: ■■ Must be at least 12" (305 mm) from entire length of fire, this dryer MUST BE EXHAUSTED OUTDOORS. Flexible metal vent: (Acceptable only if accessible to clean) ■■ Must be connected into...
Installation Guide
Page 14
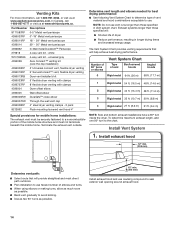
..., or visit us at www.applianceaccessories.com. To determine maximum exhaust length, add one 90º turn inside the dryer. NOTE: Side and bottom exhaust installations have a 90º turn to use vent runs longer than those specified in longer drying times and increased energy usage. Vent System Chart Number of 90° turns or elbows Type of vent Box/louvered hoods Angled hoods 0 Rigid metal 64 ft...
..., or visit us at www.applianceaccessories.com. To determine maximum exhaust length, add one 90º turn inside the dryer. NOTE: Side and bottom exhaust installations have a 90º turn to use vent runs longer than those specified in longer drying times and increased energy usage. Vent System Chart Number of 90° turns or elbows Type of vent Box/louvered hoods Angled hoods 0 Rigid metal 64 ft...
Installation Guide
Page 16
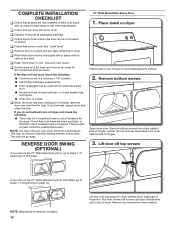
q Check dryer's final location. q Set the dryer on a full heat cycle (not an air cycle) for heat. The odor will not start the dryer. Remove bottom screws Open dryer door. Lift door off dryer, and check the following : ■■ Controls are in large part of hinges. Remove top screws from dryer cabinet side of hinge slot. q Wipe dryer drum interior thoroughly with Glass, go away. q When the dryer has been running or "On" position. ■■ Start button has...
q Check dryer's final location. q Set the dryer on a full heat cycle (not an air cycle) for heat. The odor will not start the dryer. Remove bottom screws Open dryer door. Lift door off dryer, and check the following : ■■ Controls are in large part of hinges. Remove top screws from dryer cabinet side of hinge slot. q Wipe dryer drum interior thoroughly with Glass, go away. q When the dryer has been running or "On" position. ■■ Start button has...


