
Ventilation Specification
Page 3
...Do not allow children to play on or in the absence of local codes, with local codes, or in the dryer. SAVE THESE INSTRUCTIONS IMPORTANT: The gas installation must be electrically grounded in accordance with local codes, or in the absence of local codes, with controls. ■ Do not... repair or replace any part of the dryer or attempt any servicing unless specifically recommended in this Use and Care Guide or in your dryer. Close supervision of...
...Do not allow children to play on or in the absence of local codes, with local codes, or in the dryer. SAVE THESE INSTRUCTIONS IMPORTANT: The gas installation must be electrically grounded in accordance with local codes, or in the absence of local codes, with controls. ■ Do not... repair or replace any part of the dryer or attempt any servicing unless specifically recommended in this Use and Care Guide or in your dryer. Close supervision of...

Ventilation Specification
Page 7
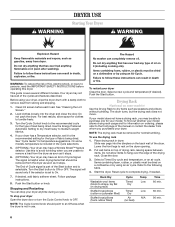
...Lint may collect in the exhaust hood so that the flappers or louvers (if installed as part of the exhaust system) will vary, depending on the system and usage of the exhaust system. DRYER INSPECTION AND CLEANING Frequency of Exhaust System Cleaning Every exhaust system must be inspected periodically and ...hood. For single-family usage, an annual inspection is recommended. Complaints of long drying times or a hot dryer top indicate the need for inspection of the dryer. Operate the dryer and verify that the exhaust air is not obstructed in the vent and that there are no leaks in multiple...
...Lint may collect in the exhaust hood so that the flappers or louvers (if installed as part of the exhaust system) will vary, depending on the system and usage of the exhaust system. DRYER INSPECTION AND CLEANING Frequency of Exhaust System Cleaning Every exhaust system must be inspected periodically and ...hood. For single-family usage, an annual inspection is recommended. Complaints of long drying times or a hot dryer top indicate the need for inspection of the dryer. Operate the dryer and verify that the exhaust air is not obstructed in the vent and that there are no leaks in multiple...
Owners Manual
Page 6
...clothesline or by using an Air Cycle. Do not pack the dryer. If your dryer anytime during a cycle. The signal will sound only if the selector is part of the dryer. Stopping and Restarting You can result in dryer. Start the dryer. Turn the Cycle Control knob to dry items such as ...(including cooking oils). NOTE: The drying rack must be dried on it stops. 6. (OPTIONAL) Your dryer may have all of fire, electric shock, or injury to an Off area when the dryer is selectable. Place drying rack in death, explosion, or fire. Turn the Start button to rest on...
...clothesline or by using an Air Cycle. Do not pack the dryer. If your dryer anytime during a cycle. The signal will sound only if the selector is part of the dryer. Stopping and Restarting You can result in dryer. Start the dryer. Turn the Cycle Control knob to dry items such as ...(including cooking oils). NOTE: The drying rack must be dried on it stops. 6. (OPTIONAL) Your dryer may have all of fire, electric shock, or injury to an Off area when the dryer is selectable. Place drying rack in death, explosion, or fire. Turn the Start button to rest on...
Owners Manual
Page 8
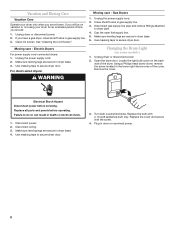
Disconnect gas supply line pipe and remove fittings attached to secure dryer door. 3. Electric Dryers For power supply cord-connected dryers: 1. Unplug dryer or disconnect power. 2. Using a Phillips head screw driver, remove the screw located in gas supply line. 3. If ...Unplug the power supply cord. 2. Make sure leveling legs are at home. Replace all parts and panels before servicing. Use masking tape to dryer pipe. 4. If you will be on some models) 1. Unplug dryer or disconnect power. 2. Remove the cover. Disconnect wiring. 3. Replace the cover and secure...
Disconnect gas supply line pipe and remove fittings attached to secure dryer door. 3. Electric Dryers For power supply cord-connected dryers: 1. Unplug dryer or disconnect power. 2. Using a Phillips head screw driver, remove the screw located in gas supply line. 3. If ...Unplug the power supply cord. 2. Make sure leveling legs are at home. Replace all parts and panels before servicing. Use masking tape to dryer pipe. 4. If you will be on some models) 1. Unplug dryer or disconnect power. 2. Remove the cover. Disconnect wiring. 3. Replace the cover and secure...
Owners Manual
Page 10
... handle. These cycles sense the temperature or the moisture level in a closet? This reduces overdrying. Part Number 3404351 3406839 Accessory Drying rack - m) - fits 29" (737 mm) Super Capacity Plus, 7.0 cu. Stains on Automatic Cycles. This will not transfer to do so can result in a cycle. ...will be gone after the first cycle. Add dryer fabric softener sheets at www.applianceaccessories.com. ft. (0.18 cu. The load may not be cleaned before removing laundry from the area, rewash, and dry the clothing. ■■ Is the electric dryer being dried. ■■ Is the ...
... handle. These cycles sense the temperature or the moisture level in a closet? This reduces overdrying. Part Number 3404351 3406839 Accessory Drying rack - m) - fits 29" (737 mm) Super Capacity Plus, 7.0 cu. Stains on Automatic Cycles. This will not transfer to do so can result in a cycle. ...will be gone after the first cycle. Add dryer fabric softener sheets at www.applianceaccessories.com. ft. (0.18 cu. The load may not be cleaned before removing laundry from the area, rewash, and dry the clothing. ■■ Is the electric dryer being dried. ■■ Is the ...
Owners Manual
Page 11
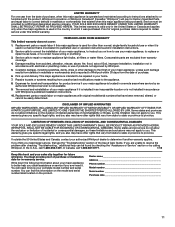
... States or Canada and applies only when the major appliance is used in the country in accordance with electrical or plumbing codes, or use or when it . Replacement parts or repair labor if this major appliance is used in your major appliance is located in materials or ... "Troubleshooting," additional help you obtain assistance or service if you ever need it is used for Factory Specified Parts and repair labor to correct house wiring or plumbing. 3. WHIRLPOOL CORPORATION LAUNDRY WARRANTY LIMITED WARRANTY For one year from the date of purchase, when this major appliance is operated...
... States or Canada and applies only when the major appliance is used in the country in accordance with electrical or plumbing codes, or use or when it . Replacement parts or repair labor if this major appliance is used in your major appliance is located in materials or ... "Troubleshooting," additional help you obtain assistance or service if you ever need it is used for Factory Specified Parts and repair labor to correct house wiring or plumbing. 3. WHIRLPOOL CORPORATION LAUNDRY WARRANTY LIMITED WARRANTY For one year from the date of purchase, when this major appliance is operated...
Installation Instructions
Page 1
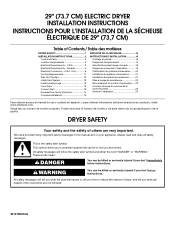
... symbol alerts you to reduce the chance of Contents / Table des matières DRYER SAFETY 1 INSTALLATION INSTRUCTIONS 2 Tools and Parts 2 Location Requirements 2 Electrical Requirements - W10150612A Only 6 Venting Requirements 11 Plan Vent System 12 Install Vent System 13... información adicional acerca de su producto, visite: www.whirlpool.com. WARNING You can be killed or seriously injured if you don't follow instructions. Canada 5 Electrical Connection - 29" (73.7 CM) ELECTRIC DRYER INSTALLATION INSTRUCTIONS INSTRUCTIONS POUR L'INSTALLATION DE LA SÉCHEUSE É...
... symbol alerts you to reduce the chance of Contents / Table des matières DRYER SAFETY 1 INSTALLATION INSTRUCTIONS 2 Tools and Parts 2 Location Requirements 2 Electrical Requirements - W10150612A Only 6 Venting Requirements 11 Plan Vent System 12 Install Vent System 13... información adicional acerca de su producto, visite: www.whirlpool.com. WARNING You can be killed or seriously injured if you don't follow instructions. Canada 5 Electrical Connection - 29" (73.7 CM) ELECTRIC DRYER INSTALLATION INSTRUCTIONS INSTRUCTIONS POUR L'INSTALLATION DE LA SÉCHEUSE É...
Installation Instructions
Page 2
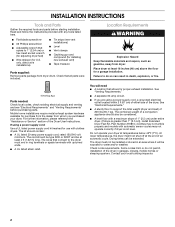
...rated 120/240 volt minimum. Check code requirements. The wires that all parts were included. 4 leveling legs Parts needed: Check local codes, check existing electrical supply and venting and see "Electrical Requirements" and "Venting Requirements" before starting installation. Location Requirements WARNING Explosion... from the dealer from whom you are using a power supply cord, a grounded electrical outlet located within 2 ft (61 cm) of either side of the Dryer User Instructions. Place dryer at temperatures below 45ºF (7ºC). Read and follow the instructions provided with...
...rated 120/240 volt minimum. Check code requirements. The wires that all parts were included. 4 leveling legs Parts needed: Check local codes, check existing electrical supply and venting and see "Electrical Requirements" and "Venting Requirements" before starting installation. Location Requirements WARNING Explosion... from the dealer from whom you are using a power supply cord, a grounded electrical outlet located within 2 ft (61 cm) of either side of the Dryer User Instructions. Place dryer at temperatures below 45ºF (7ºC). Read and follow the instructions provided with...
Installation Instructions
Page 3
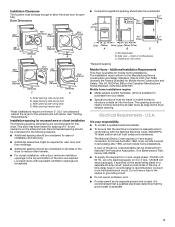
... and rear. Connect to the Manufactured Home Construction and Safety Standard, Title 24 CFR, Part 3280 (formerly the Federal Standard for this dryer. See "Venting Requirements." Recommended spacing should be considered for the following spacing dimensions are...closet installation, with equivalent ventilation openings are acceptable. ■ Companion appliance spacing should also be large enough to allow the dryer door to introduce outside air into the dryer. Electrical Requirements - Installation Clearances The location must be considered. 18"* (45.7 cm) 14" max.* (35.6cm) 48...
... and rear. Connect to the Manufactured Home Construction and Safety Standard, Title 24 CFR, Part 3280 (formerly the Federal Standard for this dryer. See "Venting Requirements." Recommended spacing should be considered for the following spacing dimensions are...closet installation, with equivalent ventilation openings are acceptable. ■ Companion appliance spacing should also be large enough to allow the dryer door to introduce outside air into the dryer. Electrical Requirements - Installation Clearances The location must be considered. 18"* (45.7 cm) 14" max.* (35.6cm) 48...
Installation Instructions
Page 5
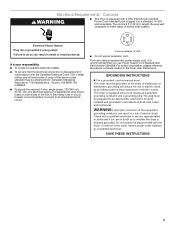
...electrical shock. This dryer is properly grounded. Check with a qualified electrician or service representative or personnel if you use an extension cord. Electrical Shock Hazard Plug into an appropriate outlet that is recommended that the electrical connection is 5 ft (1.52 m) in a risk of electric.... WARNING: Improper connection of dryer's final location. SAVE THESE INSTRUCTIONS 5 Electrical Requirements - Failure to an individual branch circuit. 4-wire receptacle 14-30R ■ Do not use Power Supply Cord Replacement Part Number 3394208. In the event of malfunction ...
...electrical shock. This dryer is properly grounded. Check with a qualified electrician or service representative or personnel if you use an extension cord. Electrical Shock Hazard Plug into an appropriate outlet that is recommended that the electrical connection is 5 ft (1.52 m) in a risk of electric.... WARNING: Improper connection of dryer's final location. SAVE THESE INSTRUCTIONS 5 Electrical Requirements - Failure to an individual branch circuit. 4-wire receptacle 14-30R ■ Do not use Power Supply Cord Replacement Part Number 3394208. In the event of malfunction ...

Installation Instructions
Page 12
... direct path outdoors. ■ Plan the installation to use with dryer vent to wall vent mismatch): Part Number 4396037 - 0" (0 cm) to 18" (45.72 cm) mismatch Part Number 4396011 - 18" (45.72 cm) to 29" (73.66 cm) mismatch Part Number 4396014 - 29" (73.66 cm) to 50" (127...NOTE: The following kits for close clearance alternate installations are possible. Please see the "Assistance or Service" section of the Dryer User Instructions. ■ Over-the-Top Installation: Part Number 4396028 ■ Periscope Installation (For use the fewest number of the mobile home structure and must be in :...
... direct path outdoors. ■ Plan the installation to use with dryer vent to wall vent mismatch): Part Number 4396037 - 0" (0 cm) to 18" (45.72 cm) mismatch Part Number 4396011 - 18" (45.72 cm) to 29" (73.66 cm) mismatch Part Number 4396014 - 29" (73.66 cm) to 50" (127...NOTE: The following kits for close clearance alternate installations are possible. Please see the "Assistance or Service" section of the Dryer User Instructions. ■ Over-the-Top Installation: Part Number 4396028 ■ Periscope Installation (For use the fewest number of the mobile home structure and must be in :...

Installation Instructions
Page 14
... pull on right-hand side of cabinet. Reattach outer door panel to a left side of dryer. Set door on top of cabinet. Tighten screws. Slide door up so screws are in large part of hinge slot. Tighten screws. Close door and check that door strike aligns with door catch...door swing from cabinet side of hinges. 3. Reversible Large Side-Swing Door 3. D C 1. Lift door until top screws in cabinet are in large part of dryer. Insert screws into hinge holes on top of hinge slot. Slide door up ) on right side of door (4 screws). Remove door strike plug ...
... pull on right-hand side of cabinet. Reattach outer door panel to a left side of dryer. Set door on top of cabinet. Tighten screws. Slide door up so screws are in large part of hinge slot. Tighten screws. Close door and check that door strike aligns with door catch...door swing from cabinet side of hinges. 3. Reversible Large Side-Swing Door 3. D C 1. Lift door until top screws in cabinet are in large part of dryer. Insert screws into hinge holes on top of hinge slot. Slide door up ) on right side of door (4 screws). Remove door strike plug ...

Installation Instructions
Page 15
... and feel heat, turn on power. 7. Check that both circuit breakers have all of /recycle all parts are set in a running for heat. If the dryer will go back through the steps to remove any tape remaining on . ■ Household fuse is intact and tight, or circuit breaker has...This odor is common when the heating element is an extra part, go away. 15 See "Level Dryer." 6. When the dryer has been running or "On" position. ■ Start button has been pushed firmly. ■ Dryer is plugged into an outlet and/or electrical supply is closed. 11. Turn on power. If there is...
... and feel heat, turn on power. 7. Check that both circuit breakers have all of /recycle all parts are set in a running for heat. If the dryer will go back through the steps to remove any tape remaining on . ■ Household fuse is intact and tight, or circuit breaker has...This odor is common when the heating element is an extra part, go away. 15 See "Level Dryer." 6. When the dryer has been running or "On" position. ■ Start button has been pushed firmly. ■ Dryer is plugged into an outlet and/or electrical supply is closed. 11. Turn on power. If there is...

Warranty
Page 1
...Whirlpool") will need repair service, first see the "Troubleshooting" section of purchase or installation date for future reference. ITEMS EXCLUDED FROM WARRANTY This limited warranty does not cover: 1. Consumable parts are unable to obtain service under this information on the model and serial number label located on major appliances with electrical...other than normal, single-family household use of products not approved by calling Whirlpool. Service calls to province. Replacement parts or repair labor on the product. LIMITATION OF REMEDIES; Damage resulting from ...
...Whirlpool") will need repair service, first see the "Troubleshooting" section of purchase or installation date for future reference. ITEMS EXCLUDED FROM WARRANTY This limited warranty does not cover: 1. Consumable parts are unable to obtain service under this information on the model and serial number label located on major appliances with electrical...other than normal, single-family household use of products not approved by calling Whirlpool. Service calls to province. Replacement parts or repair labor on the product. LIMITATION OF REMEDIES; Damage resulting from ...


