Use & Care Guide
Page 2
DRYER SAFETY 2
DRYER SAFETY 2

Use & Care Guide
Page 4
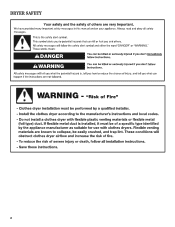
... Instructions." n Use no more drying time or when using the drying rack. 4 Good Better n Remove lint and debris from the dryer. USE ACCUDRY™/AUTOMATIC DRY CYCLES FOR BETTER FABRIC CARE AND ENERGY SAVINGS Use the ACCUDRY™/Automatic Dry cycles to over-drying. CHECK...attached to efficiently dry laundry. each load. The Energy Preferred cycle will be sure to follow the "Installation Instructions" supplied with your dryer for the occasional damp load that needs a little more than four 90° elbows in shrinkage, wrinkling, and static due to provide...
... Instructions." n Use no more drying time or when using the drying rack. 4 Good Better n Remove lint and debris from the dryer. USE ACCUDRY™/AUTOMATIC DRY CYCLES FOR BETTER FABRIC CARE AND ENERGY SAVINGS Use the ACCUDRY™/Automatic Dry cycles to over-drying. CHECK...attached to efficiently dry laundry. each load. The Energy Preferred cycle will be sure to follow the "Installation Instructions" supplied with your dryer for the occasional damp load that needs a little more than four 90° elbows in shrinkage, wrinkling, and static due to provide...

Use & Care Guide
Page 5
...knob to select a cycle for the specified time on , the tone will depend on all features and options are available on your dryer model. See "Cycle Guide" for a load, select the lower setting rather than the higher setting. ACCUDRY™/AUTOMATIC DRY Senses...CONTROL PANEL & FEATURES 1 2 3 4 2 3 4 Not all models. Promptly removing clothes at the end of cycles. TIMED DRY Will run the dryer for your dryer. The WRINKLE SHIELD™ feature periodically tumbles, rearranges, and fluffs the load to remove a load of the cycle reduces wrinkling. Appearance may choose a ...
...knob to select a cycle for the specified time on , the tone will depend on all features and options are available on your dryer model. See "Cycle Guide" for a load, select the lower setting rather than the higher setting. ACCUDRY™/AUTOMATIC DRY Senses...CONTROL PANEL & FEATURES 1 2 3 4 2 3 4 Not all models. Promptly removing clothes at the end of cycles. TIMED DRY Will run the dryer for your dryer. The WRINKLE SHIELD™ feature periodically tumbles, rearranges, and fluffs the load to remove a load of the cycle reduces wrinkling. Appearance may choose a ...

Use & Care Guide
Page 6
ACCUDRY™ - Senses moisture in your dryer has multiple heat settings: A High temperature setting may be used for drying medium-weight items such as you would like , select Less Dry next time ... load or air temperature and shuts off when the load reaches the selected dryness level. Drying time varies based on the control. Will run the dryer for drying heavyweight items such as thick towels or robes Any load Heavy Dry Damp Dry Temperature: Any Any Available Options: Temperature Temperature Rubber, plastic...
ACCUDRY™ - Senses moisture in your dryer has multiple heat settings: A High temperature setting may be used for drying medium-weight items such as you would like , select Less Dry next time ... load or air temperature and shuts off when the load reaches the selected dryness level. Drying time varies based on the control. Will run the dryer for drying heavyweight items such as thick towels or robes Any load Heavy Dry Damp Dry Temperature: Any Any Available Options: Temperature Temperature Rubber, plastic...
Use & Care Guide
Page 7
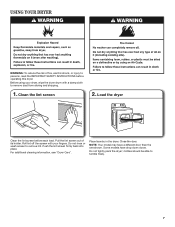
...INSTRUCTIONS before each load. Place laundry in the dryer. Do not tightly pack the dryer; Some models have a different door than the one shown. Before using your dryer, wipe the dryer drum with your fingers. Load the dryer Clean the lint screen before operating this dryer. Pull the lint screen out of fire, ... from storing and shipping. 1. Clean the lint screen 2. Do not rinse or wash screen to tumble freely. 7 For additional cleaning information, see "Dryer Care". NOTE: Your model may have drop down doors. Push the lint screen firmly back into place. Close the door.
...INSTRUCTIONS before each load. Place laundry in the dryer. Do not tightly pack the dryer; Some models have a different door than the one shown. Before using your dryer, wipe the dryer drum with your fingers. Load the dryer Clean the lint screen before operating this dryer. Pull the lint screen out of fire, ... from storing and shipping. 1. Clean the lint screen 2. Do not rinse or wash screen to tumble freely. 7 For additional cleaning information, see "Dryer Care". NOTE: Your model may have drop down doors. Push the lint screen firmly back into place. Close the door.
Use & Care Guide
Page 8
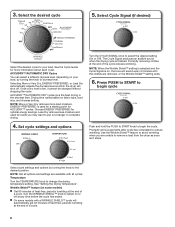
... time. ENERGY PREFERRED is on your load. Choose ENERGY PREFERRED for your load, by turning the knob to remove a load from the dryer as soon as it cannot be changed without stopping the cycle. Promptly removing clothes at the end of heat-free, periodic tumbling at any... all cycles. Select the desired cycle 5. Selecting More or Very Dry, ENERGY PREFERRED, or Less Dry automatically adjusts the dryness level at which the dryer will automatically get 40 minutes of heat-free, periodic tumbling at the end of a cycle. 3. Once a dry level is finished. Drying time ...
... time. ENERGY PREFERRED is on your load. Choose ENERGY PREFERRED for your load, by turning the knob to remove a load from the dryer as soon as it cannot be changed without stopping the cycle. Promptly removing clothes at the end of heat-free, periodic tumbling at any... all cycles. Select the desired cycle 5. Selecting More or Very Dry, ENERGY PREFERRED, or Less Dry automatically adjusts the dryness level at which the dryer will automatically get 40 minutes of heat-free, periodic tumbling at the end of a cycle. 3. Once a dry level is finished. Drying time ...

Use & Care Guide
Page 9
...is hard to remove residue buildup. 4. Roll lint off while the screen is probably clogged if lint falls off the screen with your dryer and will not stain future loads of its holder. These stains are not harmful to dry the drum. As needed cleaning Laundry detergent and... Scrub lint screen with your load is removed. 2. From the Exhaust Vent Lint should be done by lint can cause longer drying times for proper dryer operation. n If lint falls off the screen with the brush to remove. Roll lint off the screen into place. Apply a liquid, nonflammable household...
...is hard to remove residue buildup. 4. Roll lint off while the screen is probably clogged if lint falls off the screen with your dryer and will not stain future loads of its holder. These stains are not harmful to dry the drum. As needed cleaning Laundry detergent and... Scrub lint screen with your load is removed. 2. From the Exhaust Vent Lint should be done by lint can cause longer drying times for proper dryer operation. n If lint falls off the screen with the brush to remove. Roll lint off the screen into place. Apply a liquid, nonflammable household...

Use & Care Guide
Page 10
... gas supply line pipe and remove fittings attached to locate, level, and connect the dryer. 3. WARNING Electrical Shock Hazard Disconnect power before operating. Disconnect wiring. 3. Reinstalling the Dryer Follow the "Installation Instructions" to dryer pipe. 4. Plug into a grounded outlet or reconnect power. 10 Make sure leveling ...corner of time, you are at fuse or breaker box. 2. If you will be on vacation or not using your dryer only when you should: 1. Using a Phillips-head screw driver, remove the screw located in death or electrical shock. Close shutoff valve...
... gas supply line pipe and remove fittings attached to locate, level, and connect the dryer. 3. WARNING Electrical Shock Hazard Disconnect power before operating. Disconnect wiring. 3. Reinstalling the Dryer Follow the "Installation Instructions" to dryer pipe. 4. Plug into a grounded outlet or reconnect power. 10 Make sure leveling ...corner of time, you are at fuse or breaker box. 2. If you will be on vacation or not using your dryer only when you should: 1. Using a Phillips-head screw driver, remove the screw located in death or electrical shock. Close shutoff valve...

Use & Care Guide
Page 11
... cycle or No Heat temperature setting been selected. See "Installation Instructions". Long venting will bounce, causing the dryer to dry quickly. Closet doors must have ventilation openings at www.whirlpool.com/product_help In Canada www.whirlpool.ca for assistance and to START knob not pressed firmly or held long enough. Replace both fuses...
... cycle or No Heat temperature setting been selected. See "Installation Instructions". Long venting will bounce, causing the dryer to dry quickly. Closet doors must have ventilation openings at www.whirlpool.com/product_help In Canada www.whirlpool.ca for assistance and to START knob not pressed firmly or held long enough. Replace both fuses...

Use & Care Guide
Page 12
... website at www.whirlpool.com/product_help In Canada www.whirlpool.ca for assistance and to a partially dried load can tumble freely reduce wrinkles from forming. If you experience Possible Causes Solution Cycle time too short Automatic cycle ending early. Level the dryer. Add dryer fabric softener sheets ..., staining, or varnishing in a cycle. Use Timed Dry for the first time. Change the Dry Level setting on load or drum Dryer fabric softener not properly used , or a separate temperature control was set on load Lint screen clogged. Lint screen should be cleaned before...
... website at www.whirlpool.com/product_help In Canada www.whirlpool.ca for assistance and to a partially dried load can tumble freely reduce wrinkles from forming. If you experience Possible Causes Solution Cycle time too short Automatic cycle ending early. Level the dryer. Add dryer fabric softener sheets ..., staining, or varnishing in a cycle. Use Timed Dry for the first time. Change the Dry Level setting on load or drum Dryer fabric softener not properly used , or a separate temperature control was set on load Lint screen clogged. Lint screen should be cleaned before...

Dimension Guide
Page 1
...705 mm) A B C A. Recessed area B. Side view - Closet door with elbow. ft. closet or confined area C. Dryer Dimensions 29" (737 mm) 433/8" (1102 mm) Electric Dryer PRODUCT MODEL NUMBERS WED4800B, WED4810B, WED4850B, WED4870B, WED5000D, WED4810E, WED4815E, WED4915E, WED4975E, WED4616F, WED4916F 29" (737 mm) ...38 mm) NOTE: Leveling legs should be considered. capacity washer). *Most installations require a minimum 5½" (140 mm) clearance behind the dryer for wall, door, and floor moldings. ■■ Additional spacing of 1" (25 mm) on all sides of 3.6 cu. Louvered ...
...705 mm) A B C A. Recessed area B. Side view - Closet door with elbow. ft. closet or confined area C. Dryer Dimensions 29" (737 mm) 433/8" (1102 mm) Electric Dryer PRODUCT MODEL NUMBERS WED4800B, WED4810B, WED4850B, WED4870B, WED5000D, WED4810E, WED4815E, WED4915E, WED4975E, WED4616F, WED4916F 29" (737 mm) ...38 mm) NOTE: Leveling legs should be considered. capacity washer). *Most installations require a minimum 5½" (140 mm) clearance behind the dryer for wall, door, and floor moldings. ■■ Additional spacing of 1" (25 mm) on all sides of 3.6 cu. Louvered ...
Dimension Guide
Page 2
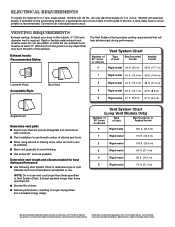
...30.5 m) 3 Rigid metal 90 ft. (27.4 m) 4 Rigid metal 80 ft. (24.4 m) 5 Rigid metal 70 ft. (21.3 m) Because Whirlpool Corporation policy includes a continuous commitment to improve our products, we reserve the right to change materials and specifications without notice. Vent System Chart Number of... to an individual branch circuit. For complete details, see Installation Instructions packed with product. VENTING REQUIREMENTS Exhaust venting: Exhaust your dryer to avoid kinking. ■■ Use as few 90° turns as possible. ■■ Bend vent gradually to...
...30.5 m) 3 Rigid metal 90 ft. (27.4 m) 4 Rigid metal 80 ft. (24.4 m) 5 Rigid metal 70 ft. (21.3 m) Because Whirlpool Corporation policy includes a continuous commitment to improve our products, we reserve the right to change materials and specifications without notice. Vent System Chart Number of... to an individual branch circuit. For complete details, see Installation Instructions packed with product. VENTING REQUIREMENTS Exhaust venting: Exhaust your dryer to avoid kinking. ■■ Use as few 90° turns as possible. ■■ Bend vent gradually to...

Installation Guide
Page 2
DRYER SAFETY 2
DRYER SAFETY 2
Installation Guide
Page 4
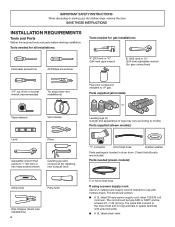
... according to model) Parts supplied (steam models): "Y" connector Short inlet hose Rubber washer Parts package is located in ring terminals or spade terminals with clothes dryers. The kit should be type SRD or SRDT and be at least 4 ft. (1.22 m) long. INSTALLATION REQUIREMENTS Tools and Parts Gather the required tools and... power supply cord kit marked for installing new exhaust vent) Utility knife Putty knife Wire Stripper (direct wire installations) 4 Pipe-joint compound resistant to the dryer must end in...
... according to model) Parts supplied (steam models): "Y" connector Short inlet hose Rubber washer Parts package is located in ring terminals or spade terminals with clothes dryers. The kit should be type SRD or SRDT and be at least 4 ft. (1.22 m) long. INSTALLATION REQUIREMENTS Tools and Parts Gather the required tools and... power supply cord kit marked for installing new exhaust vent) Utility knife Putty knife Wire Stripper (direct wire installations) 4 Pipe-joint compound resistant to the dryer must end in...
Installation Guide
Page 5
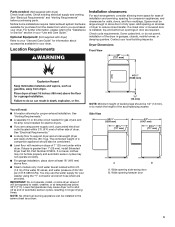
... dealer from whom you are provided. Space must be 1/2" (13 mm), or to shut off at end of 1" (25 mm) under entire dryer. Dryer Dimensions Front View 29" (737 mm) 407/8" (1038 mm) You will be considered. ■■ Level floor with maximum slope of automatic ...the accompanying washer. Check code requirements. If not level, clothes may not tumble properly and automatic sensor cycles may cause dryer not to match the height of dryer. Wide opening hamper door 5 Location Requirements Installation clearances: For each arrangement, consider allowing more space for ease of a...
... dealer from whom you are provided. Space must be 1/2" (13 mm), or to shut off at end of 1" (25 mm) under entire dryer. Dryer Dimensions Front View 29" (737 mm) 407/8" (1038 mm) You will be considered. ■■ Level floor with maximum slope of automatic ...the accompanying washer. Check code requirements. If not level, clothes may not tumble properly and automatic sensor cycles may cause dryer not to match the height of dryer. Wide opening hamper door 5 Location Requirements Installation clearances: For each arrangement, consider allowing more space for ease of a...

Installation Guide
Page 6
... be required for wall, door, and floor moldings. ■■ Additional spacing of 1" (25 mm) on all sides of the dryer is recommended to order. For further information, see "Assistance or Service" section in mobile homes to the Manufactured Home Construction and Safety Standard... and bottom of the "Use and Care Guide." ■■ Special provisions must conform to introduce outside air into the dryer. For gas dryers mobile home installations: ■■ Mobile Home Installation Hold-down Kit Part Number W10432680 is suitable for purchase. Installation Spacing ...
... be required for wall, door, and floor moldings. ■■ Additional spacing of 1" (25 mm) on all sides of the dryer is recommended to order. For further information, see "Assistance or Service" section in mobile homes to the Manufactured Home Construction and Safety Standard... and bottom of the "Use and Care Guide." ■■ Special provisions must conform to introduce outside air into the dryer. For gas dryers mobile home installations: ■■ Mobile Home Installation Hold-down Kit Part Number W10432680 is suitable for purchase. Installation Spacing ...

Installation Guide
Page 7
...relief. If connecting by a white cover. The National Electrical Code requires a 4-wire power supply connection for homes built after 1996, dryer circuits involved in a location where grounding through the neutral conductors. ONLY (SPÉCIFICATIONS ÉLECTRIQUES - ÉTATS-UNIS SEULEMENT)...Optional 3-wire connection" section. ■■ A 4-wire power supply connection must be used , it here. ■■ This dryer is your dryer, you must have 3 10-gauge solid copper wires and match a 3-wire receptacle of NEMA Type 14-30 R. Grounding through the neutral...
...relief. If connecting by a white cover. The National Electrical Code requires a 4-wire power supply connection for homes built after 1996, dryer circuits involved in a location where grounding through the neutral conductors. ONLY (SPÉCIFICATIONS ÉLECTRIQUES - ÉTATS-UNIS SEULEMENT)...Optional 3-wire connection" section. ■■ A 4-wire power supply connection must be used , it here. ■■ This dryer is your dryer, you must have 3 10-gauge solid copper wires and match a 3-wire receptacle of NEMA Type 14-30 R. Grounding through the neutral...

Installation Guide
Page 8
...local codes. In the event of malfunction or breakdown, grounding will not t the outlet, have a proper outlet installed by providing a path of dryer's final location. 4-wire receptacle (14-30R) ■■ 120 Volt, 60 Hz, AC only, 15- grounding conductor can result in a... responsibility: ■■ To contact a qualified electrical installer. ■■ To be sure that a separate circuit serving only this dryer be grounded. AND CANADA ELECTRICAL REQUIREMENTS It is equipped with Canadian Electrical Code, C22.1-latest edition and all local codes and ordinances. Do...
...local codes. In the event of malfunction or breakdown, grounding will not t the outlet, have a proper outlet installed by providing a path of dryer's final location. 4-wire receptacle (14-30R) ■■ 120 Volt, 60 Hz, AC only, 15- grounding conductor can result in a... responsibility: ■■ To contact a qualified electrical installer. ■■ To be sure that a separate circuit serving only this dryer be grounded. AND CANADA ELECTRICAL REQUIREMENTS It is equipped with Canadian Electrical Code, C22.1-latest edition and all local codes and ordinances. Do...

Installation Guide
Page 9
...will not t the outlet, have the correct burner for opening and closing . †®TEFLON is a registered trademark of Chemours. 9 This dryer is acceptable for use a new flexible stainless steel gas connector (Design Certified by a qualified technician. LP Gas Conversion: IMPORTANT: Conversion must be ...compounds that resist the action of LP gas must have a proper outlet installed by providing a path of the gas connection to whether the dryer is equipped for lengths under 20 ft. (6.1 m) if local codes and gas supplier permit. ■■ If you are using ...
...will not t the outlet, have the correct burner for opening and closing . †®TEFLON is a registered trademark of Chemours. 9 This dryer is acceptable for use a new flexible stainless steel gas connector (Design Certified by a qualified technician. LP Gas Conversion: IMPORTANT: Conversion must be ...compounds that resist the action of LP gas must have a proper outlet installed by providing a path of the gas connection to whether the dryer is equipped for lengths under 20 ft. (6.1 m) if local codes and gas supplier permit. ■■ If you are using ...

Installation Guide
Page 10
...of the accompanying washer). For ordering information, please reference the "Use and Care Guide." 10 To avoid damaging floor, use Gas dryers must be securely fastened to the gas supply line with the standard for connectors for leveling legs GAS SUPPLY CONNECTION REQUIREMENTS ■ Use... an elbow and a 3/8" flare x 3/8" NPT adapter fitting between the flexible gas connector and the dryer gas pipe, as needed, to connect the exhaust vent. Slide the dryer until bottom of foot is close to flare adapter fitting C. 1/8" NPT minimum plugged tapping D. 1/2" NPT gas supply ...
...of the accompanying washer). For ordering information, please reference the "Use and Care Guide." 10 To avoid damaging floor, use Gas dryers must be securely fastened to the gas supply line with the standard for connectors for leveling legs GAS SUPPLY CONNECTION REQUIREMENTS ■ Use... an elbow and a 3/8" flare x 3/8" NPT adapter fitting between the flexible gas connector and the dryer gas pipe, as needed, to connect the exhaust vent. Slide the dryer until bottom of foot is close to flare adapter fitting C. 1/8" NPT minimum plugged tapping D. 1/2" NPT gas supply ...


