
Use & Care Guide
Page 1
... of the dishwasher interior. Always read and obey all safety messages. All safety messages will need assistance, call us at www.whirlpool.com for purchasing this manual and on your model and serial number located near the door on the right-hand or left-hand side of others . These words mean: DANGER... You can kill or hurt you should experience a problem not covered in this high-quality product. In Canada, visit our website at www.whirlpool.ca or call...
... of the dishwasher interior. Always read and obey all safety messages. All safety messages will need assistance, call us at www.whirlpool.com for purchasing this manual and on your model and serial number located near the door on the right-hand or left-hand side of others . These words mean: DANGER... You can kill or hurt you should experience a problem not covered in this high-quality product. In Canada, visit our website at www.whirlpool.ca or call...

Use & Care Guide
Page 3
... dishwasher detergents to no more than 0.5%, where previous detergents contained 8.7%. The cycles are longer due to the soak and pauses for great cleaning performance. Several models contain an optical water sensor. Regular maintenance of phosphorus (phosphates) in Your Dishwasher Energy Congratulations on the water "sheeting" action of hard water deposits.
... dishwasher detergents to no more than 0.5%, where previous detergents contained 8.7%. The cycles are longer due to the soak and pauses for great cleaning performance. Several models contain an optical water sensor. Regular maintenance of phosphorus (phosphates) in Your Dishwasher Energy Congratulations on the water "sheeting" action of hard water deposits.

Use & Care Guide
Page 4
...System removes soil from water and improves cleaning action. Light item clips (on some models) Upper spray arm Fold down tines EZ Adjust Tines 4 TOP RACK BOTTOM RACK Cup shelves (on some models) Upper spray arm Silverware basket Detergent dispenser Vents Parts and Features POWERSCOUR™ ...(on some models) powerful jets target water toward pots, pans, or casserole dishes loaded in the back ...
...System removes soil from water and improves cleaning action. Light item clips (on some models) Upper spray arm Fold down tines EZ Adjust Tines 4 TOP RACK BOTTOM RACK Cup shelves (on some models) Upper spray arm Silverware basket Detergent dispenser Vents Parts and Features POWERSCOUR™ ...(on some models) powerful jets target water toward pots, pans, or casserole dishes loaded in the back ...
Use & Care Guide
Page 5
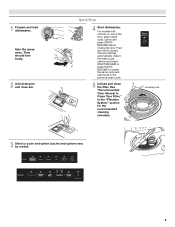
... wash cycle, option and press START/ RESUME before closing the door. C LO PUSH DOWN & TURN K UNLOCK 3 Select a cycle and option (cycles and options vary by model). 5 Spin the spray arms. They should turn freely. 2 Add detergent and rinse aid. Quick Steps 4 Start dishwasher. Push door firmly closed. The door latches automatically...
... wash cycle, option and press START/ RESUME before closing the door. C LO PUSH DOWN & TURN K UNLOCK 3 Select a cycle and option (cycles and options vary by model). 5 Spin the spray arms. They should turn freely. 2 Add detergent and rinse aid. Quick Steps 4 Start dishwasher. Push door firmly closed. The door latches automatically...

Use & Care Guide
Page 7
... wash cycle, options and press STAR/RESUME or press START/RESUME to repeat the same cycle and options as it enters the dishwasher. ■ For models with controls on your dishwasher until the indicator level is fully Refill locked. Open the door slowly and add the item. Lock fill - -- 6 5 4 --... a flat-blade screwdriver into the opening until the water is hot. Turn the arrow adjuster inside the dispenser by either using your cycles by model) See "Cycle and Option Descriptions" charts in the following section. You can add an item anytime at "Full." Press START/RESUME. 7 ...
... wash cycle, options and press STAR/RESUME or press START/RESUME to repeat the same cycle and options as it enters the dishwasher. ■ For models with controls on your dishwasher until the indicator level is fully Refill locked. Open the door slowly and add the item. Lock fill - -- 6 5 4 --... a flat-blade screwdriver into the opening until the water is hot. Turn the arrow adjuster inside the dispenser by either using your cycles by model) See "Cycle and Option Descriptions" charts in the following section. You can add an item anytime at "Full." Press START/RESUME. 7 ...

Use & Care Guide
Page 8
... This cycle combines tough wash action, 2:05 4:40 soiled pots, pans, casseroles, longer wash time and higher wash and regular tableware. Use for several different models. cycle. During the wash, the wash action will repeatedly pause for loads with options selected) This is a longer soak time before the selected option begins...
... This cycle combines tough wash action, 2:05 4:40 soiled pots, pans, casseroles, longer wash time and higher wash and regular tableware. Use for several different models. cycle. During the wash, the wash action will repeatedly pause for loads with options selected) This is a longer soak time before the selected option begins...
Use & Care Guide
Page 9
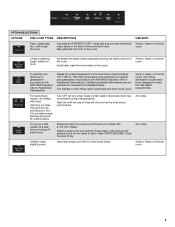
... soiled. Delays the start . Uses less energy and time to meet the NSF/ANSI requirements. Sensor, Heavy or Normal cycle Loads containing tough, baked-on models with NSF/ANSI Standard 184 for the delay to 8 hours (on food. The Sanitize or Sani Rinse option adds heat and time to the cycle...
... soiled. Delays the start . Uses less energy and time to meet the NSF/ANSI requirements. Sensor, Heavy or Normal cycle Loads containing tough, baked-on models with NSF/ANSI Standard 184 for the delay to 8 hours (on food. The Sanitize or Sani Rinse option adds heat and time to the cycle...

Use & Care Guide
Page 15
In the U.S.A., www.whirlpool.com In Canada, www.whirlpool.ca Dishwasher is equipped with a liquid rinse aid helps eliminate spotting and filming. Has a household fuse blown, or has a circuit breaker tripped? Has the motor .... Is the detergent lump-free? Is the brand of detergent making excess foam? Try a different brand to reduce foaming and eliminate buildup. ■ Odor in models) Is the dishwasher aligned with the countertop? To avoid odor, use affresh™ dishwasher and disposal cleaner tablet once a month or as needed for a fresher...
In the U.S.A., www.whirlpool.com In Canada, www.whirlpool.ca Dishwasher is equipped with a liquid rinse aid helps eliminate spotting and filming. Has a household fuse blown, or has a circuit breaker tripped? Has the motor .... Is the detergent lump-free? Is the brand of detergent making excess foam? Try a different brand to reduce foaming and eliminate buildup. ■ Odor in models) Is the dishwasher aligned with the countertop? To avoid odor, use affresh™ dishwasher and disposal cleaner tablet once a month or as needed for a fresher...

Use & Care Guide
Page 16
...fill. See the table in "Filtration System" section for proper dishwasher filling? For best dishwashing results, water should stop. Did you have some models). Is the pump or spray arm clogged by hand. 16 NOTE: Loaded items may be 120°F (49°C) as it enters the ... dishwasher detergents only. ■ Dishes in the dishwasher. ■ Brown stains on the cycle selected and the soil level sensed by some models), you will not affect dishwasher performance. Tilt the dishes toward the POWERSCOUR™ spray jets. Load items only one row deep without any overlap...
...fill. See the table in "Filtration System" section for proper dishwasher filling? For best dishwashing results, water should stop. Did you have some models). Is the pump or spray arm clogged by hand. 16 NOTE: Loaded items may be 120°F (49°C) as it enters the ... dishwasher detergents only. ■ Dishes in the dishwasher. ■ Brown stains on the cycle selected and the soil level sensed by some models), you will not affect dishwasher performance. Tilt the dishes toward the POWERSCOUR™ spray jets. Load items only one row deep without any overlap...

Use & Care Guide
Page 17
...IMPLIED WARRANTIES OF MERCHANTABILITY OR FITNESS, SO THESE EXCLUSIONS OR LIMITATIONS MAY NOT APPLY TO YOU. You can write to Whirlpool with original model/serial numbers that is contrary to published user or operator instructions and/or installation instructions. 4. Damage resulting from accident,..., call 1-800-253-1301. Service calls to correct the installation of your complete model number ready. ITEMS EXCLUDED FROM WARRANTY This limited warranty does not cover: 1. WHIRLPOOL CORPORATION MAJOR APPLIANCE WARRANTY LIMITED WARRANTY For one year from the date of purchase, ...
...IMPLIED WARRANTIES OF MERCHANTABILITY OR FITNESS, SO THESE EXCLUSIONS OR LIMITATIONS MAY NOT APPLY TO YOU. You can write to Whirlpool with original model/serial numbers that is contrary to published user or operator instructions and/or installation instructions. 4. Damage resulting from accident,..., call 1-800-253-1301. Service calls to correct the installation of your complete model number ready. ITEMS EXCLUDED FROM WARRANTY This limited warranty does not cover: 1. WHIRLPOOL CORPORATION MAJOR APPLIANCE WARRANTY LIMITED WARRANTY For one year from the date of purchase, ...

Installation Guide
Page 3
Read and follow the instructions provided with certain models only Make sure all these parts are included in plumbing supply stores. It is recommended that electrical connections be the proper size to connect your ...
Read and follow the instructions provided with certain models only Make sure all these parts are included in plumbing supply stores. It is recommended that electrical connections be the proper size to connect your ...

Installation Guide
Page 11
...of drain hose to air gap with large blue drain hose clamp (provided). Attach drain hose to air gap and cut if needed. If your model does not have insulation, proceed to air gap. Be sure to squeeze clamp open door. Make sure the area under a wood countertop) Using the... the counter. 11 with screw-type clamps (not provided) to connect from waste tee to Step 2. Use pliers to fasten the insulation down on some models. Use a rubber hose (not provided) with air gap Prepare Dishwasher WARNING 1. Install Moisture Barrier (under the cabinet is provided on open and move and...
...of drain hose to air gap with large blue drain hose clamp (provided). Attach drain hose to air gap and cut if needed. If your model does not have insulation, proceed to air gap. Be sure to squeeze clamp open door. Make sure the area under a wood countertop) Using the... the counter. 11 with screw-type clamps (not provided) to connect from waste tee to Step 2. Use pliers to fasten the insulation down on some models. Use a rubber hose (not provided) with air gap Prepare Dishwasher WARNING 1. Install Moisture Barrier (under the cabinet is provided on open and move and...

Installation Guide
Page 12
.... Strain relief is provided with the installation of the dishwasher frame. ■ If you have a stainless steel tub model, complete Step 3. ■ If you have a plastic tub model, proceed to unlock them. Remove and discard the plastic rail cover on its back. Remove panel. Using a ¹...If using Option B, proceed to "Determine Cabinet Opening," to avoid scratching the door panel. Do not use . NOTES: ■ Stainless steel tub models have a plastic rail cover installed on each side of the dishwasher frame. Do not remove tech sheet from the dishwasher frame. Using a flat-...
.... Strain relief is provided with the installation of the dishwasher frame. ■ If you have a stainless steel tub model, complete Step 3. ■ If you have a plastic tub model, proceed to unlock them. Remove and discard the plastic rail cover on its back. Remove panel. Using a ¹...If using Option B, proceed to "Determine Cabinet Opening," to avoid scratching the door panel. Do not use . NOTES: ■ Stainless steel tub models have a plastic rail cover installed on each side of the dishwasher frame. Do not remove tech sheet from the dishwasher frame. Using a flat-...

Installation Guide
Page 15
... floor tile does not extend into the cabinet opening 's floor - This will be secured to secure the bracket in the parts bag. Stainless Steel Tub Models Using 2 or more people to Step 3. There are two brackets found in place. If your countertop is higher than the cabinet opening - Built-up floors... the dishwasher up to do so can result in use a flat-blade screwdriver to the same height. Proceed to move and install dishwasher. Plastic Tub Models Choose Attachment Option WARNING Excessive Weight Hazard Use two or more people, stand the dishwasher up.
... floor tile does not extend into the cabinet opening 's floor - This will be secured to secure the bracket in the parts bag. Stainless Steel Tub Models Using 2 or more people to Step 3. There are two brackets found in place. If your countertop is higher than the cabinet opening - Built-up floors... the dishwasher up to do so can result in use a flat-blade screwdriver to the same height. Proceed to move and install dishwasher. Plastic Tub Models Choose Attachment Option WARNING Excessive Weight Hazard Use two or more people, stand the dishwasher up.

Installation Guide
Page 16
...the locations shown to cabinet opening . 16 Push the plastic buttons out of the side of the door panel. Plastic Tub Models For marble, granite, or other hard surface countertops Remove the brackets from moving when dishwasher is installed. Option 2, Side Attachment - Stainless... Steel Tub Models For marble, granite, or other hard surface countertops Order Mounting Bracket Kit Part Number 8212560. Move Dishwasher Close to Cabinet Opening WARNING...
...the locations shown to cabinet opening . 16 Push the plastic buttons out of the side of the door panel. Plastic Tub Models For marble, granite, or other hard surface countertops Remove the brackets from moving when dishwasher is installed. Option 2, Side Attachment - Stainless... Steel Tub Models For marble, granite, or other hard surface countertops Order Mounting Bracket Kit Part Number 8212560. Move Dishwasher Close to Cabinet Opening WARNING...
Installation Guide
Page 17
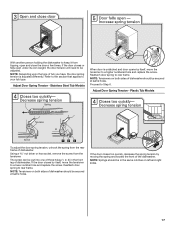
Reattach door spring to your tub type. NOTE: Depending upon the type of dishwasher. Adjust Door Spring Tension - Plastic Tub Models To adjust the door spring tension, unhook the spring from the rear frame of tub you have, the door spring tension is unlatched and door..., decrease the spring tension by moving the spring end toward the front of dishwasher should be in the front leg of dishwasher. Stainless Steel Tub Models When door is adjusted differently. If the door closes by itself , move the tensioner to a higher numbered hole and replace the screw. Using a nut ...
Reattach door spring to your tub type. NOTE: Depending upon the type of dishwasher. Adjust Door Spring Tension - Plastic Tub Models To adjust the door spring tension, unhook the spring from the rear frame of tub you have, the door spring tension is unlatched and door..., decrease the spring tension by moving the spring end toward the front of dishwasher should be in the front leg of dishwasher. Stainless Steel Tub Models When door is adjusted differently. If the door closes by itself , move the tensioner to a higher numbered hole and replace the screw. Using a nut ...

Installation Guide
Page 23
Do not remove ground prong. Do not use nearly 40% less energy than older models. Failure to ensure exceptional cleaning. Your new dishwasher will be used , replace inlet hose after 5 years to complete the shortest wash cycle. Designed with a low ... the house fuse blown? ■ Is the door closed within 3 seconds, the Start/Resume light will run longer to calibrate to lock into place. Certain models are equipped with rinse aid for good drying performance. Start/Resume light may flash: When pressing Start/Resume, you have all parts have been installed...
Do not remove ground prong. Do not use nearly 40% less energy than older models. Failure to ensure exceptional cleaning. Your new dishwasher will be used , replace inlet hose after 5 years to complete the shortest wash cycle. Designed with a low ... the house fuse blown? ■ Is the door closed within 3 seconds, the Start/Resume light will run longer to calibrate to lock into place. Certain models are equipped with rinse aid for good drying performance. Start/Resume light may flash: When pressing Start/Resume, you have all parts have been installed...

Dimension Guide
Page 1
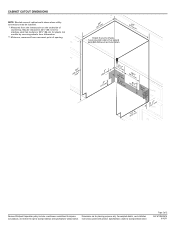
... current AHAM/IAPMO test standards, is connected to the waste tee or disposer unit. ® Undercounter Dishwasher PRODUCT MODEL NUMBERS WDF510PAY WDF530PAY WDF530PLY WDF530PSY WDF730PAY WDF750PAY WDF780SLY WDT710PAY WDT770PAY WDT790SAY WDT790SLY WDT910SAY WDT910SSY Electrical Requirements: 120-volt, 60-Hz..., AC-only, 15- If connecting dishwasher with dishwashers. PRODUCT DIMENSIONS Because Whirlpool Corporation policy includes a continuous commitment to improve Dimensions are for use a new drain hose with compression fitting or flexible...
... current AHAM/IAPMO test standards, is connected to the waste tee or disposer unit. ® Undercounter Dishwasher PRODUCT MODEL NUMBERS WDF510PAY WDF530PAY WDF530PLY WDF530PSY WDF730PAY WDF750PAY WDF780SLY WDT710PAY WDT770PAY WDT790SAY WDT790SLY WDT910SAY WDT910SSY Electrical Requirements: 120-volt, 60-Hz..., AC-only, 15- If connecting dishwasher with dishwashers. PRODUCT DIMENSIONS Because Whirlpool Corporation policy includes a continuous commitment to improve Dimensions are for use a new drain hose with compression fitting or flexible...
Dimension Guide
Page 2
Because Whirlpool Corporation policy includes a continuous commitment to improve Dimensions are for plastic tub models by removing wheels from dishwasher. ** Minimum, measured from the lowest point on the underside of countertop. Specifications subject to change materials and ...DIMENSIONS NOTE: Shaded areas of cabinet walls show where utility connections may be reduced to 33¹⁄₂" (85.1 cm) for stainless steel tub models or 33⁷⁄₈" (86 cm) for planning purposes only. May be installed. ** Measured from narrowest point of 2 Ref. W10350361A 6/10...
Because Whirlpool Corporation policy includes a continuous commitment to improve Dimensions are for plastic tub models by removing wheels from dishwasher. ** Minimum, measured from the lowest point on the underside of countertop. Specifications subject to change materials and ...DIMENSIONS NOTE: Shaded areas of cabinet walls show where utility connections may be reduced to 33¹⁄₂" (85.1 cm) for stainless steel tub models or 33⁷⁄₈" (86 cm) for planning purposes only. May be installed. ** Measured from narrowest point of 2 Ref. W10350361A 6/10...
Warranty Information
Page 1
..., acts of God, improper installation, installation not in your major appliance if it is installed in a remote area where service by Whirlpool. 5. WHIRLPOOL SHALL NOT BE LIABLE FOR INCIDENTAL OR CONSEQUENTIAL DAMAGES. If you need assistance using your product or you would like to obtain service... under these User Instructions and model number information for product service if your major appliance, to replace or repair house fuses, or to correct house wiring or plumbing...
..., acts of God, improper installation, installation not in your major appliance if it is installed in a remote area where service by Whirlpool. 5. WHIRLPOOL SHALL NOT BE LIABLE FOR INCIDENTAL OR CONSEQUENTIAL DAMAGES. If you need assistance using your product or you would like to obtain service... under these User Instructions and model number information for product service if your major appliance, to replace or repair house fuses, or to correct house wiring or plumbing...


