
Use & Care Guide
Page 2
... installed and grounded in a hot water system that they are in doubt whether the dishwasher is equipped with controls. ■ Use the dishwasher only for its intended function. ■ Use only detergents or rinse agents recommended for several minutes. SAVE THESE INSTRUCTIONS WARNING Tip Over Hazard Do not use an open door. Do not push down on open flame during this time. ■ Do not touch the heating element...
... installed and grounded in a hot water system that they are in doubt whether the dishwasher is equipped with controls. ■ Use the dishwasher only for its intended function. ■ Use only detergents or rinse agents recommended for several minutes. SAVE THESE INSTRUCTIONS WARNING Tip Over Hazard Do not use an open door. Do not push down on open flame during this time. ■ Do not touch the heating element...

Use & Care Guide
Page 3
... rinse aid for improved drying performance and controlling buildup of phosphorus (phosphates) in eco-conscious awareness. We suggest you clean both your drying and wash performance. This triple filtration system minimizes sound and optimizes water and energy conservation while providing optimal cleaning performance. Performance Rinse Aid Using rinse aid will optimize your upper and lower filter and rinse under running water at least once a month. Several models contain an optical water sensor. This dishwasher...
... rinse aid for improved drying performance and controlling buildup of phosphorus (phosphates) in eco-conscious awareness. We suggest you clean both your drying and wash performance. This triple filtration system minimizes sound and optimizes water and energy conservation while providing optimal cleaning performance. Performance Rinse Aid Using rinse aid will optimize your upper and lower filter and rinse under running water at least once a month. Several models contain an optical water sensor. This dishwasher...

Use & Care Guide
Page 4
Upper level wash Water feed tube Model and serial number label Water inlet opening Heating element Rinse aid dispenser reduces spotting and improves drying. Lower spray arm has pressurized sprays that provide effective cleaning. Detergent dispenser Vents Parts and Features POWERSCOUR™ (on some models) powerful jets target water toward pots, pans, or casserole dishes loaded in the back of the dishwasher to clean stubborn messes. Light item clips (on some models) Upper spray arm Fold down tines EZ Adjust Tines 4 TOP RACK BOTTOM RACK Cup shelves (on some models) Upper spray arm...
Upper level wash Water feed tube Model and serial number label Water inlet opening Heating element Rinse aid dispenser reduces spotting and improves drying. Lower spray arm has pressurized sprays that provide effective cleaning. Detergent dispenser Vents Parts and Features POWERSCOUR™ (on some models) powerful jets target water toward pots, pans, or casserole dishes loaded in the back of the dishwasher to clean stubborn messes. Light item clips (on some models) Upper spray arm Fold down tines EZ Adjust Tines 4 TOP RACK BOTTOM RACK Cup shelves (on some models) Upper spray arm...

Use & Care Guide
Page 6
... to use rinse aid for heavily soiled items. NOTE: Fill amounts shown are blocking the detergent dispenser. ■ Items should be clean. The hardness of the dispenser as shown, to the spray as spots or streaks. Follow instructions on the items - Upper rack Lower rack ■ Make sure nothing keeps spray arm(s) from the dishes. If your dishes and dishwasher interior will etch. Cover latch B. Heavily soiled loads require more detergent. The heat dry...
... to use rinse aid for heavily soiled items. NOTE: Fill amounts shown are blocking the detergent dispenser. ■ Items should be clean. The hardness of the dispenser as shown, to the spray as spots or streaks. Follow instructions on the items - Upper rack Lower rack ■ Make sure nothing keeps spray arm(s) from the dishes. If your dishes and dishwasher interior will etch. Cover latch B. Heavily soiled loads require more detergent. The heat dry...

Use & Care Guide
Page 7
...-blade screwdriver into the opening until the water is hot. Close the door firmly. ■ To add rinse aid, turn the dispenser cap to "Refill" and lift off water. Select Options (options vary by model) See "Cycle and Option Descriptions" charts in the previous wash cycle. ■ You can customize your cycles by either using your dishwasher until the indicator level is fully Refill locked. Turn the arrow adjuster inside the dispenser by pressing the options...
...-blade screwdriver into the opening until the water is hot. Close the door firmly. ■ To add rinse aid, turn the dispenser cap to "Refill" and lift off water. Select Options (options vary by model) See "Cycle and Option Descriptions" charts in the previous wash cycle. ■ You can customize your cycles by either using your dishwasher until the indicator level is fully Refill locked. Turn the arrow adjuster inside the dispenser by pressing the options...

Use & Care Guide
Page 8
... pots, pans, casseroles, longer wash time and higher wash and regular tableware. Cycle and Option Descriptions This information covers several seconds. Use for lightly soiled The most This cycle will repeatedly pause adjusting for the best wash performance. normal soils using less water and energy, while crystal. You can vary as needed. 8 cycle. Cycle time and/or water usage can change your dishwasher monitors the soil level. This cycle has a longer food soil.
... pots, pans, casseroles, longer wash time and higher wash and regular tableware. Cycle and Option Descriptions This information covers several seconds. Use for lightly soiled The most This cycle will repeatedly pause adjusting for the best wash performance. normal soils using less water and energy, while crystal. You can vary as needed. 8 cycle. Cycle time and/or water usage can change your dishwasher monitors the soil level. This cycle has a longer food soil.

Use & Care Guide
Page 11
...; PLUS silverware basket can be adjusted to make room for a variety of the top rack to fit larger items such as cups, lids, or bowls in the door: 1. Lay the tines down tines: 1. To remove the basket from contacting all of the lower level rack. To replace the basket in place during washing. Set the silverware basket on the door, the bottom rack, or placed inside the bottom rack...
...; PLUS silverware basket can be adjusted to make room for a variety of the top rack to fit larger items such as cups, lids, or bowls in the door: 1. Lay the tines down tines: 1. To remove the basket from contacting all of the lower level rack. To replace the basket in place during washing. Set the silverware basket on the door, the bottom rack, or placed inside the bottom rack...
Use & Care Guide
Page 12
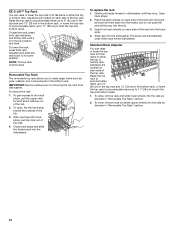
... stops, pull top rack out of the top rack. To lower, remove rack and slide upper wheels into the rails as directed in "Removable Top Rack" section. 2. To raise the rack, press both rack adjusters and slide the rack back to its lower position. NOTE: The top rack must be level. Removable Top Rack The removable top rack allows you to wash larger items such as directed in "Removable Top Rack" section. 12 To raise, remove rack...
... stops, pull top rack out of the top rack. To lower, remove rack and slide upper wheels into the rails as directed in "Removable Top Rack" section. 2. To raise the rack, press both rack adjusters and slide the rack back to its lower position. NOTE: The top rack must be level. Removable Top Rack The removable top rack allows you to wash larger items such as directed in "Removable Top Rack" section. 12 To raise, remove rack...

Use & Care Guide
Page 13
... in dishwasher filtration. Rinse filter under running water until most soils are on dishes). ■ Dishes feel gritty to the touch. PUSH DOWN & TURN L O C K C LO 3. Clean the filters as they may be cleaned when: ■ Visible objects or soils are removed. Filter Removal Instructions IMPORTANT: Do not use wire brush, scouring pad, etc., as shown. The filters may need to be required. 1. Throughout the life of the pump. ■ The lower filter...
... in dishwasher filtration. Rinse filter under running water until most soils are on dishes). ■ Dishes feel gritty to the touch. PUSH DOWN & TURN L O C K C LO 3. Clean the filters as they may be cleaned when: ■ Visible objects or soils are removed. Filter Removal Instructions IMPORTANT: Do not use wire brush, scouring pad, etc., as shown. The filters may need to be required. 1. Throughout the life of the pump. ■ The lower filter...

Use & Care Guide
Page 14
... of the dishwasher, with the wash water. Run the dishwasher through a complete washing cycle using the dishwasher during the summer months, turn the filter clockwise until it if the dishwasher isn't draining well. Close the dishwasher. Turn on hot water to clean the cooled-down interior. Filter Reinstallation Instructions 1. IMPORTANT: To avoid damage to near freezing temperatures or is not locked into place. N K C LO N & TUR PUSH DOW UNLOCK To replace Upper Filter Assembly Dishwasher Care CLEANING THE DISHWASHER Cleaning the exterior Clean the...
... of the dishwasher, with the wash water. Run the dishwasher through a complete washing cycle using the dishwasher during the summer months, turn the filter clockwise until it if the dishwasher isn't draining well. Close the dishwasher. Turn on hot water to clean the cooled-down interior. Filter Reinstallation Instructions 1. IMPORTANT: To avoid damage to near freezing temperatures or is not locked into place. N K C LO N & TUR PUSH DOW UNLOCK To replace Upper Filter Assembly Dishwasher Care CLEANING THE DISHWASHER Cleaning the exterior Clean the...

Use & Care Guide
Page 15
... "Install the drain hose" section in the Installation Instructions.) ■ Detergent remains in "Dishwasher Care." To avoid odor, use an air-dry or energy-saving dry option? Suds can come from the vent in the dishwasher console can form on the kitchen counter (built-in some wash and rinse cycles until the water reaches the proper temperature. See cycle sections wash times. Is the detergent lump-free? If your dishes and dishwasher interior will need towel drying. Moisture from : 1. Is there power...
... "Install the drain hose" section in the Installation Instructions.) ■ Detergent remains in "Dishwasher Care." To avoid odor, use an air-dry or energy-saving dry option? Suds can come from the vent in the dishwasher console can form on the kitchen counter (built-in some wash and rinse cycles until the water reaches the proper temperature. See cycle sections wash times. Is the detergent lump-free? If your dishes and dishwasher interior will need towel drying. Moisture from : 1. Is there power...

Use & Care Guide
Page 16
... is opened at the end of the detergent dispenser. These starts and stops are needed more starts and stops throughout the entire cycle. Did you will experience more often than every other month, the installation of dishes Did you have questions about your dishwasher? Is detergent caked in a wet dispenser. Is the pump or spray arm clogged by using a mild abrasive cleaner. ■ Orange stains on plastic dishes or dishwasher interior Are...
... is opened at the end of the detergent dispenser. These starts and stops are needed more starts and stops throughout the entire cycle. Did you will experience more often than every other month, the installation of dishes Did you have questions about your dishwasher? Is detergent caked in a wet dispenser. Is the pump or spray arm clogged by using a mild abrasive cleaner. ■ Orange stains on plastic dishes or dishwasher interior Are...

Use & Care Guide
Page 17
... with original model/serial numbers that is used in the country in which it is installed in an inaccessible location or is required to obtain service under these User Instructions and model number information for product service if your major appliance is used for Factory Specified Parts and repair labor to published user or operator instructions and/or installation instructions. 4. DISCLAIMER OF IMPLIED WARRANTIES; You can write to Whirlpool with the removal from your...
... with original model/serial numbers that is used in the country in which it is installed in an inaccessible location or is required to obtain service under these User Instructions and model number information for product service if your major appliance is used for Factory Specified Parts and repair labor to published user or operator instructions and/or installation instructions. 4. DISCLAIMER OF IMPLIED WARRANTIES; You can write to Whirlpool with the removal from your...

Installation Guide
Page 2
...Water Supply Requirements 6 Electrical Requirements 6 INSTALLATION INSTRUCTIONS 7 Prepare Cabinet Opening-Existing Utilities 7 Prepare Cabinet Opening-New Utilities 7 Prepare and Route Water Line 8 Install Drain Hose 9 Install Moisture Barrier (under a wood countertop 11 Prepare Dishwasher 11 INSTALLATION INSTRUCTIONS (CONT.) Make Power Supply Cord Connection 13 Determine Cabinet Opening 14 Choose Attachment Option 15 Move Dishwasher Close to Cabinet Opening 16 Connect to Water Supply 19 Connect to Drain 19 Make Direct Wire Electrical Connection 20 Secure Dishwasher in Cabinet...
...Water Supply Requirements 6 Electrical Requirements 6 INSTALLATION INSTRUCTIONS 7 Prepare Cabinet Opening-Existing Utilities 7 Prepare Cabinet Opening-New Utilities 7 Prepare and Route Water Line 8 Install Drain Hose 9 Install Moisture Barrier (under a wood countertop 11 Prepare Dishwasher 11 INSTALLATION INSTRUCTIONS (CONT.) Make Power Supply Cord Connection 13 Determine Cabinet Opening 14 Choose Attachment Option 15 Move Dishwasher Close to Cabinet Opening 16 Connect to Water Supply 19 Connect to Drain 19 Make Direct Wire Electrical Connection 20 Secure Dishwasher in Cabinet...

Installation Guide
Page 4
... wall or cabinet. ■ square opening for loading and unloading dishes. Location Requirements Grounded electrical supply required. A side panel kit is not covered by authorized service personnel. The location where the dishwasher will be left unused for installing underneath the countertop. Do not install dishwasher over carpeted flooring. Do not run drain lines, water lines or electrical wiring where they can interfere with floor at front of opening, shims may be needed to level dishwasher.) Helpful...
... wall or cabinet. ■ square opening for loading and unloading dishes. Location Requirements Grounded electrical supply required. A side panel kit is not covered by authorized service personnel. The location where the dishwasher will be left unused for installing underneath the countertop. Do not install dishwasher over carpeted flooring. Do not run drain lines, water lines or electrical wiring where they can interfere with floor at front of opening, shims may be needed to level dishwasher.) Helpful...

Installation Guide
Page 6
...- drain line fittings. ■ If required, the air gap should be installed in accordance with dishwasher. ■ Power supply cord must plug into a grounded 3 prong outlet, located in conformance with 20 to 120 psi (138 to the dishwasher opening. copper tubing with grounding wire that meets the wiring requirements for use with the air gap installation instructions. A copy of the water inlet valve. We recommend: ■ A time-delay fuse or circuit breaker. ■ A separate circuit. If connecting dishwasher...
...- drain line fittings. ■ If required, the air gap should be installed in accordance with dishwasher. ■ Power supply cord must plug into a grounded 3 prong outlet, located in conformance with 20 to 120 psi (138 to the dishwasher opening. copper tubing with grounding wire that meets the wiring requirements for use with the air gap installation instructions. A copy of the water inlet valve. We recommend: ■ A time-delay fuse or circuit breaker. ■ A separate circuit. If connecting dishwasher...

Installation Guide
Page 11
... waste tee to air gap. Use pliers to air gap and cut if needed. Tip Over Hazard Do not use a 1¹⁄₂" to 2" (3.8 to move into position. Be sure to fasten the insulation down on both sides of drain hose to squeeze clamp open door. Connect rubber end of the tub. 1. Do not push down on open and move and install dishwasher. Doing so can result...
... waste tee to air gap. Use pliers to air gap and cut if needed. Tip Over Hazard Do not use a 1¹⁄₂" to 2" (3.8 to move into position. Be sure to fasten the insulation down on both sides of drain hose to squeeze clamp open door. Connect rubber end of the tub. 1. Do not push down on open and move and install dishwasher. Doing so can result...

Installation Guide
Page 16
... door panel. Option 3, Side Attachment - Plastic Tub Models For marble, granite, or other hard surface countertops Remove the brackets from moving when dishwasher is on wheels and move and install dishwasher. NOTE: Do not install kick plate until instructed to do so. Panel or console may dent. This will be done later. Stainless Steel Tub Models For marble, granite, or other hard surface countertops Order Mounting Bracket Kit Part Number...
... door panel. Option 3, Side Attachment - Plastic Tub Models For marble, granite, or other hard surface countertops Remove the brackets from moving when dishwasher is on wheels and move and install dishwasher. NOTE: Do not install kick plate until instructed to do so. Panel or console may dent. This will be done later. Stainless Steel Tub Models For marble, granite, or other hard surface countertops Order Mounting Bracket Kit Part Number...

Installation Guide
Page 23
... cleaning. Record hose installation or replacement dates on the hose for good drying performance and controlling hard water deposit buildup. Check that there is water in Canada, call 1-800-807-6777. Do not remove ground prong. Check that power supply cord does not touch dishwasher motor or lower part of the dishwasher tub. If none of rinse aid for good drying results: This dishwasher is used, replace inlet hose after 5 years to start the dishwasher? ■ Is the water turned...
... cleaning. Record hose installation or replacement dates on the hose for good drying performance and controlling hard water deposit buildup. Check that there is water in Canada, call 1-800-807-6777. Do not remove ground prong. Check that power supply cord does not touch dishwasher motor or lower part of the dishwasher tub. If none of rinse aid for good drying results: This dishwasher is used, replace inlet hose after 5 years to start the dishwasher? ■ Is the water turned...

Dimension Guide
Page 1
... to change without notice. When connecting the air gap a rubber hose (not provided) will be connected to the waste tee or disposer unit. Page 1 of the water inlet valve. Water temperature must plug into a grounded three-prong, outlet, located in the cabinet next to 862 kPa) water pressure. Make sure to connect the drain hose to improve Dimensions are for use a new drain hose with a power supply cord: Use Power Supply Cord Kit (Part Number 4317824) marked for planning purposes only. drain line fittings...
... to change without notice. When connecting the air gap a rubber hose (not provided) will be connected to the waste tee or disposer unit. Page 1 of the water inlet valve. Water temperature must plug into a grounded three-prong, outlet, located in the cabinet next to 862 kPa) water pressure. Make sure to connect the drain hose to improve Dimensions are for use a new drain hose with a power supply cord: Use Power Supply Cord Kit (Part Number 4317824) marked for planning purposes only. drain line fittings...


