
Use & Care Guide
Page 2
... and obey all safety messages. TABLE OF CONTENTS RANGE HOOD SAFETY 2 INSTALLATION REQUIREMENTS 3 Tools and Parts 3 Location Requirements 4 Venting Requirements 5 Electrical Requirements 6 INSTALLATION INSTRUCTIONS 7 Prepare Location 7 Install Range Hood 9 Complete Installation 10 RANGE HOOD USE 10 Range Hood Controls 11 RANGE HOOD CARE 11 Cleaning 11 WIRING DIAGRAM 12 ASSISTANCE OR...MA DE CÂBLAGE 26 ASSISTANCE OU SERVICE 27 Au Canada 27 Accessoires 27 GARANTIE 27 RANGE HOOD SAFETY Your safety and the safety of injury, and tell you and others are not followed. 2
... and obey all safety messages. TABLE OF CONTENTS RANGE HOOD SAFETY 2 INSTALLATION REQUIREMENTS 3 Tools and Parts 3 Location Requirements 4 Venting Requirements 5 Electrical Requirements 6 INSTALLATION INSTRUCTIONS 7 Prepare Location 7 Install Range Hood 9 Complete Installation 10 RANGE HOOD USE 10 Range Hood Controls 11 RANGE HOOD CARE 11 Cleaning 11 WIRING DIAGRAM 12 ASSISTANCE OR...MA DE CÂBLAGE 26 ASSISTANCE OU SERVICE 27 Au Canada 27 Accessoires 27 GARANTIE 27 RANGE HOOD SAFETY Your safety and the safety of injury, and tell you and others are not followed. 2
Use & Care Guide
Page 3
... means cannot be locked, securely fasten a prominent warning device, such as those published by the manufacturer. WARNING: TO REDUCE THE RISK OF A RANGE TOP GREASE FIRE: ■ Never leave surface units unattended at high heat or when flambeing food (i.e. Heat oils slowly on "Kitchen Fire Safety ... and standards, including fire-rated construction. ■ Do not operate any fan with a close fitting lid, cookie sheet, or metal tray, then turn hood ON when cooking at high settings. The fire is needed ■ Drill ■ 1¹⁄₄" (3.0 cm) drill bit 3.0 mm) drill ...
... means cannot be locked, securely fasten a prominent warning device, such as those published by the manufacturer. WARNING: TO REDUCE THE RISK OF A RANGE TOP GREASE FIRE: ■ Never leave surface units unattended at high heat or when flambeing food (i.e. Heat oils slowly on "Kitchen Fire Safety ... and standards, including fire-rated construction. ■ Do not operate any fan with a close fitting lid, cookie sheet, or metal tray, then turn hood ON when cooking at high settings. The fire is needed ■ Drill ■ 1¹⁄₄" (3.0 cm) drill bit 3.0 mm) drill ...

Use & Care Guide
Page 4
... nonvented (recirculating) installations, the Recirculation Kit is required. upper cabinet to order replacement filters. For Mobile Home Installations The installation of range hood to 6" (15.2 cm) or larger diameter transition piece if using 6" (15.2 cm) or larger diameter round vent system. See... the "Assistance or Service" section to countertop B. 24" (61.0 cm) min. See "Electrical Requirements" section. ■ The hood is located inside the range hood on the model/serial rating plate. ■ 4 - 5 x 45 mm screws ■ 4 - 8 x 40 mm wall anchors ■...
... nonvented (recirculating) installations, the Recirculation Kit is required. upper cabinet to order replacement filters. For Mobile Home Installations The installation of range hood to 6" (15.2 cm) or larger diameter transition piece if using 6" (15.2 cm) or larger diameter round vent system. See... the "Assistance or Service" section to countertop B. 24" (61.0 cm) min. See "Electrical Requirements" section. ■ The hood is located inside the range hood on the model/serial rating plate. ■ 4 - 5 x 45 mm screws ■ 4 - 8 x 40 mm wall anchors ■...

Use & Care Guide
Page 5
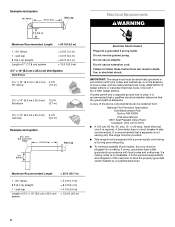
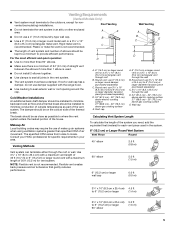
... part of 50 ft (15.2 m) for nonvented (recirculating) installations. Round vent: use of 35 ft (10.7 m) or 6" (15.2 cm) or larger round vent with the range hood. ■ Use caulking to seal all joints in the system. 6" (15.2 cm) or Larger Round Vent System Vent Piece Round 45° elbow 2.5 ft (0.8 m) Vent...
... part of 50 ft (15.2 m) for nonvented (recirculating) installations. Round vent: use of 35 ft (10.7 m) or 6" (15.2 cm) or larger round vent with the range hood. ■ Use caulking to seal all joints in the system. 6" (15.2 cm) or Larger Round Vent System Vent Piece Round 45° elbow 2.5 ft (0.8 m) Vent...
Use & Care Guide
Page 6
...remove ground prong. Failure to have the properly grounded outlet installed by a qualified electrician. 6 IMPORTANT: The range hood must be obtained from: National Fire Protection Association One Batterymarch Park Quincy, MA 02269 CSA International 8501 East Pleasant... use an extension cord. If a mating outlet is not available, it is recommended that a qualified electrical installer determine that a separate circuit serving only this range hood be electrically grounded in accordance with local codes and ordinances, or in the absence of 7" (17.8 cm) system = 5.0 ft (1.5 m) = 0.0...
...remove ground prong. Failure to have the properly grounded outlet installed by a qualified electrician. 6 IMPORTANT: The range hood must be obtained from: National Fire Protection Association One Batterymarch Park Quincy, MA 02269 CSA International 8501 East Pleasant... use an extension cord. If a mating outlet is not available, it is recommended that a qualified electrical installer determine that a separate circuit serving only this range hood be electrically grounded in accordance with local codes and ordinances, or in the absence of 7" (17.8 cm) system = 5.0 ft (1.5 m) = 0.0...

Use & Care Guide
Page 7
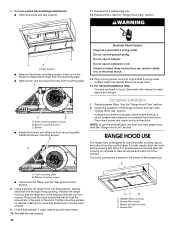
...wall, not cabinet frame Centerline A. 12" (30.5 cm) for 30" (76.2 cm) models 12¼" (31.1 cm) for assembling the range hood. This range hood is properly grounded. WARNING: Improper grounding can result in the area the vent opening will be plugged into an outlet that is 2" (5.0 cm) from...the underside of the centerline on each side. See illustration. 33 85 cm) GROUNDING INSTRUCTIONS ■ For a grounded, cord-connected range hood: This range hood must be made. In the event of an electrical short circuit, grounding reduces the risk of electric shock. Install screws to do so...
...wall, not cabinet frame Centerline A. 12" (30.5 cm) for 30" (76.2 cm) models 12¼" (31.1 cm) for assembling the range hood. This range hood is properly grounded. WARNING: Improper grounding can result in the area the vent opening will be plugged into an outlet that is 2" (5.0 cm) from...the underside of the centerline on each side. See illustration. 33 85 cm) GROUNDING INSTRUCTIONS ■ For a grounded, cord-connected range hood: This range hood must be made. In the event of an electrical short circuit, grounding reduces the risk of electric shock. Install screws to do so...

Use & Care Guide
Page 9
...the underside of cabinet the location of the 4 keyhole mounting slots on your installation, remove either side of the hood center to top/back edge of range hood is nearest to accommodate off-center ductwork. Mounting screws 3. If using sheet metal screws. Keyhole slot 5. Use &#...Drill pilot hole 6. Hinge pin D. NOTE: The exhaust adaptor/damper can be non-venting (recirculating). ■ Make sure damper pivot is to slide range hood into place. ¹⁄₄" (6.4 mm) 9 Remove the grease filters. Horizontal vent ■ If using round vent, attach vent transition piece ...
...the underside of cabinet the location of the 4 keyhole mounting slots on your installation, remove either side of the hood center to top/back edge of range hood is nearest to accommodate off-center ductwork. Mounting screws 3. If using sheet metal screws. Keyhole slot 5. Use &#...Drill pilot hole 6. Hinge pin D. NOTE: The exhaust adaptor/damper can be non-venting (recirculating). ■ Make sure damper pivot is to slide range hood into place. ¹⁄₄" (6.4 mm) 9 Remove the grease filters. Horizontal vent ■ If using round vent, attach vent transition piece ...
Use & Care Guide
Page 10
... cord into a grounded 3 prong outlet. NOTE: To get the most efficient use an adapter. The hood controls are in narrow neck of the range hood fan and light. See the "Range Hood Care" section. 8. Reinstall the rear support. 10 DC B A. Grease filter Replace filters. Rear support... from the mounting plate. ■ Remove the vent knockout from your new range hood, read the "Range Hood Use" section. B A Complete Installation 1. Check the operation of slots. 9. Front mounting plate B. See "Range Hood Use" section. Push up and down freely. 10. Do not use from...
... cord into a grounded 3 prong outlet. NOTE: To get the most efficient use an adapter. The hood controls are in narrow neck of the range hood fan and light. See the "Range Hood Care" section. 8. Reinstall the rear support. 10 DC B A. Grease filter Replace filters. Rear support... from the mounting plate. ■ Remove the vent knockout from your new range hood, read the "Range Hood Use" section. B A Complete Installation 1. Check the operation of slots. 9. Front mounting plate B. See "Range Hood Use" section. Push up and down freely. 10. Do not use from...

Use & Care Guide
Page 11
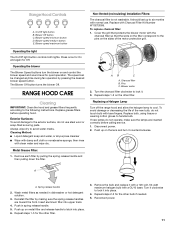
... changed anytime during fan operation by pressing the desired blower speed button. RANGE HOOD CARE Cleaning IMPORTANT: Clean the hood and grease filters frequently according to cool. Range Hood Controls A B C D E A. A A. Push in dishwasher or hot detergent solution. 3. Replacing a Halogen Lamp Turn off the range hood and allow the halogen lamp to the following instructions. Blower speed medium...
... changed anytime during fan operation by pressing the desired blower speed button. RANGE HOOD CARE Cleaning IMPORTANT: Clean the hood and grease filters frequently according to cool. Range Hood Controls A B C D E A. A A. Push in dishwasher or hot detergent solution. 3. Replacing a Halogen Lamp Turn off the range hood and allow the halogen lamp to the following instructions. Blower speed medium...

Installation Guide
Page 2
...'t immediately follow instructions. TABLE OF CONTENTS RANGE HOOD SAFETY 2 INSTALLATION REQUIREMENTS 3 Tools and Parts 3 Location Requirements 4 Venting Requirements 5 Electrical Requirements 6 INSTALLATION INSTRUCTIONS 7 Prepare Location 7 Install Range Hood 9 Complete Installation 10 RANGE HOOD USE 10 Range Hood Controls 11 RANGE HOOD CARE 11 Cleaning 11 WIRING DIAGRAM 12 ... CÂBLAGE 26 ASSISTANCE OU SERVICE 27 Au Canada 27 Accessoires 27 GARANTIE 27 RANGE HOOD SAFETY Your safety and the safety of injury, and tell you what the potential hazard is the safety alert ...
...'t immediately follow instructions. TABLE OF CONTENTS RANGE HOOD SAFETY 2 INSTALLATION REQUIREMENTS 3 Tools and Parts 3 Location Requirements 4 Venting Requirements 5 Electrical Requirements 6 INSTALLATION INSTRUCTIONS 7 Prepare Location 7 Install Range Hood 9 Complete Installation 10 RANGE HOOD USE 10 Range Hood Controls 11 RANGE HOOD CARE 11 Cleaning 11 WIRING DIAGRAM 12 ... CÂBLAGE 26 ASSISTANCE OU SERVICE 27 Au Canada 27 Accessoires 27 GARANTIE 27 RANGE HOOD SAFETY Your safety and the safety of injury, and tell you what the potential hazard is the safety alert ...

Installation Guide
Page 3
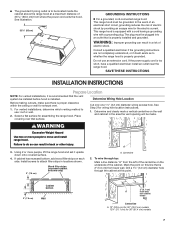
...and to operate it started. - You can fight the fire with a close fitting lid, cookie sheet, or metal tray, then turn hood ON when cooking at high settings. READ AND SAVE THESE INSTRUCTIONS INSTALLATION REQUIREMENTS Tools and Parts Gather the required tools and parts before starting installation...), and the local code authorities. ■ When cutting or drilling into crawl spaces, or garages. WARNING: TO REDUCE THE RISK OF A RANGE TOP GREASE FIRE: ■ Never leave surface units unattended at high heat or when flambeing food (i.e. Discard fan or return to exhaust hazardous or...
...and to operate it started. - You can fight the fire with a close fitting lid, cookie sheet, or metal tray, then turn hood ON when cooking at high settings. READ AND SAVE THESE INSTRUCTIONS INSTALLATION REQUIREMENTS Tools and Parts Gather the required tools and parts before starting installation...), and the local code authorities. ■ When cutting or drilling into crawl spaces, or garages. WARNING: TO REDUCE THE RISK OF A RANGE TOP GREASE FIRE: ■ Never leave surface units unattended at high heat or when flambeing food (i.e. Discard fan or return to exhaust hazardous or...
Installation Guide
Page 4
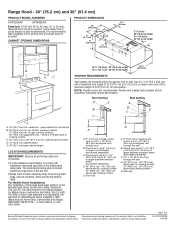
...plate is not applicable, the standard for Mobile Home Construction and Safety, title 24, HUD, Part 280) or when such standard is located inside the range hood on the model/serial rating plate. Parts needed For vented installations: ■ 3¹⁄₄" x 10" (8.3 x 25.4 cm) or 6"... Home Sites, Communities and Setups) ANSI A225.1/NFPA 501A*, or latest edition, or with installation clearances specified on the left wall. ■ Range hood location should be away from strong draft areas, such as windows, doors and strong heating vents. ■ Cabinet opening width D. 13" (...
...plate is not applicable, the standard for Mobile Home Construction and Safety, title 24, HUD, Part 280) or when such standard is located inside the range hood on the model/serial rating plate. Parts needed For vented installations: ■ 3¹⁄₄" x 10" (8.3 x 25.4 cm) or 6"... Home Sites, Communities and Setups) ANSI A225.1/NFPA 501A*, or latest edition, or with installation clearances specified on the left wall. ■ Range hood location should be away from strong draft areas, such as windows, doors and strong heating vents. ■ Cabinet opening width D. 13" (...
Installation Guide
Page 5
... wall. Use 3¹⁄₄" x 10" (8.3 x 25.4 cm) with a maximum vent length of 35 ft (10.7 m) or 6" (15.2 cm) or larger round vent with the range hood. ■ Use caulking to 6" (15.2 cm) or larger diameter transition piece (purchased separately) D. 24" (61.0 cm) - 30" (76.2 cm) above electric cooking surface 27" (68...
... wall. Use 3¹⁄₄" x 10" (8.3 x 25.4 cm) with a maximum vent length of 35 ft (10.7 m) or 6" (15.2 cm) or larger round vent with the range hood. ■ Use caulking to 6" (15.2 cm) or larger diameter transition piece (purchased separately) D. 24" (61.0 cm) - 30" (76.2 cm) above electric cooking surface 27" (68...

Installation Guide
Page 6
...- 90° elbow 1 - Failure to have the properly grounded outlet installed by a qualified electrician. 6 IMPORTANT: The range hood must be electrically grounded in accordance with local codes and ordinances, or in the absence of the above code standards can result... and ordinances. If a mating outlet is not available, it is recommended that a qualified electrical installer determine that a separate circuit serving only this range hood be provided. ■ This range hood is adequate. wall cap Length of 7" (17.8 cm) system = 5.0 ft (1.5 m) = 0.0 ft (0.0 m) = 8.0 ft (2.4 ...
...- 90° elbow 1 - Failure to have the properly grounded outlet installed by a qualified electrician. 6 IMPORTANT: The range hood must be electrically grounded in accordance with local codes and ordinances, or in the absence of the above code standards can result... and ordinances. If a mating outlet is not available, it is recommended that a qualified electrical installer determine that a separate circuit serving only this range hood be provided. ■ This range hood is adequate. wall cap Length of 7" (17.8 cm) system = 5.0 ft (1.5 m) = 0.0 ft (0.0 m) = 8.0 ft (2.4 ...
Installation Guide
Page 7
... installations, it upside down onto covered surface. 4. See illustration. 33 85 cm) GROUNDING INSTRUCTIONS ■ For a grounded, cord-connected range hood: This range hood must be plugged into an outlet that surface. If the power supply cord is equipped with a cord having a grounding wire with a ... Consult a qualified electrician if the grounding instructions are not completely understood, or if doubt exists as to move and install range hood. Place covering over that is properly grounded. In the event of an electrical short circuit, grounding reduces the risk of ...
... installations, it upside down onto covered surface. 4. See illustration. 33 85 cm) GROUNDING INSTRUCTIONS ■ For a grounded, cord-connected range hood: This range hood must be plugged into an outlet that surface. If the power supply cord is equipped with a cord having a grounding wire with a ... Consult a qualified electrician if the grounding instructions are not completely understood, or if doubt exists as to move and install range hood. Place covering over that is properly grounded. In the event of an electrical short circuit, grounding reduces the risk of ...
Installation Guide
Page 9
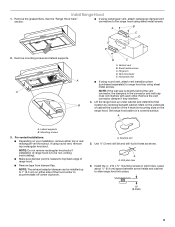
...; Depending on your installation, remove either side of the 4 keyhole mounting slots on the underside of cabinet the location of the hood center to range hood top using sheet metal screws. Keyhole slot 5. Leave about ¹⁄₄" (6.4 cm) space between screw heads and cabinet to...section. ■ If using rectangular vent, attach rectangular damper/vent connectors to top/back edge of range hood. ■ Remove tape from damper flap. Lift the range hood up to slide range hood into place. ¹⁄₄" (6.4 mm) 9 NOTE: The exhaust adaptor/damper can be non...
...; Depending on your installation, remove either side of the 4 keyhole mounting slots on the underside of cabinet the location of the hood center to range hood top using sheet metal screws. Keyhole slot 5. Leave about ¹⁄₄" (6.4 cm) space between screw heads and cabinet to...section. ■ If using rectangular vent, attach rectangular damper/vent connectors to top/back edge of range hood. ■ Remove tape from damper flap. Lift the range hood up to slide range hood into place. ¹⁄₄" (6.4 mm) 9 NOTE: The exhaust adaptor/damper can be non...

Installation Guide
Page 10
...extension cord. Blower mounting screws C. Blower ■ Rotate the blower and attach to make secure and airtight. See the "Range Hood Care" section. 2. If range hood does not operate, check to follow these instructions can result in death, fire, or electrical shock. 13. Disconnect power ...down freely. 10. Do not use an adapter. NOTE: To get the most efficient use from the cooktop area. Using 2 people, lift range hood into final position, feeding electrical wire through wiring opening. Halogen lamp housings B. C B A. Replace grease filters. Blower mounting screws ■ ...
...extension cord. Blower mounting screws C. Blower ■ Rotate the blower and attach to make secure and airtight. See the "Range Hood Care" section. 2. If range hood does not operate, check to follow these instructions can result in death, fire, or electrical shock. 13. Disconnect power ...down freely. 10. Do not use an adapter. NOTE: To get the most efficient use from the cooktop area. Using 2 people, lift range hood into final position, feeding electrical wire through wiring opening. Halogen lamp housings B. C B A. Replace grease filters. Blower mounting screws ■ ...
Installation Guide
Page 11
...changed anytime during fan operation by pressing the desired blower speed button. A A. Reconnect power. 11 Replacing a Halogen Lamp Turn off the range hood and allow the halogen lamp to the pins on metal filter and release handle to lock it with a 120-volt, 50-watt maximum ...-Vented (recirculating) Installation Filters: The charcoal filter is not washable. Cover the grill that protects the blower motor with a GU10 base. Range Hood Controls A B C D E A. To avoid damage or decreasing the life of the motor protection grill. Push in dishwasher or hot detergent solution. 3. ...
...changed anytime during fan operation by pressing the desired blower speed button. A A. Reconnect power. 11 Replacing a Halogen Lamp Turn off the range hood and allow the halogen lamp to the pins on metal filter and release handle to lock it with a 120-volt, 50-watt maximum ...-Vented (recirculating) Installation Filters: The charcoal filter is not washable. Cover the grill that protects the blower motor with a GU10 base. Range Hood Controls A B C D E A. To avoid damage or decreasing the life of the motor protection grill. Push in dishwasher or hot detergent solution. 3. ...
Dimension Guide
Page 1
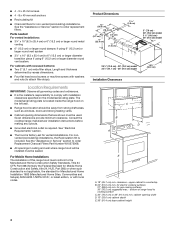
... PRODUCT MODEL NUMBERS UXT5530AA UXT5536AA Electrical: A 120 volt, 60 Hz, AC only, 15- It is recommended that gently reduce performance. Flexible vent creates back pressure and air turbulence that a separate circuit serving only this range hood must conform to the ... applicable, the standard for planning purposes only. q Range hood location should be provided. Round vent: use 3¹⁄₄" x 10" (8.3 x 25.4 cm) to change materials and specifications without notice. Wall cap Because Whirlpool Corporation policy includes a continuous commitment to countertop B. 24...
... PRODUCT MODEL NUMBERS UXT5530AA UXT5536AA Electrical: A 120 volt, 60 Hz, AC only, 15- It is recommended that gently reduce performance. Flexible vent creates back pressure and air turbulence that a separate circuit serving only this range hood must conform to the ... applicable, the standard for planning purposes only. q Range hood location should be provided. Round vent: use 3¹⁄₄" x 10" (8.3 x 25.4 cm) to change materials and specifications without notice. Wall cap Because Whirlpool Corporation policy includes a continuous commitment to countertop B. 24...


