Use & Care Guide
Page 3
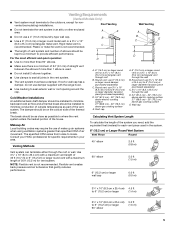
..., to exhaust hazardous or explosive materials and vapors. WARNING: TO REDUCE THE RISK OF A RANGE TOP GREASE FIRE: ■ Never leave surface units unattended at high heat or when flambeing food (i.e. Discard fan or return to accumulate on accidentally. Grease should not be sure to prevent power from package. CAUTION: For general ventilating use to the service panel. ■ Installation work and electrical wiring must always...
..., to exhaust hazardous or explosive materials and vapors. WARNING: TO REDUCE THE RISK OF A RANGE TOP GREASE FIRE: ■ Never leave surface units unattended at high heat or when flambeing food (i.e. Discard fan or return to accumulate on accidentally. Grease should not be sure to prevent power from package. CAUTION: For general ventilating use to the service panel. ■ Installation work and electrical wiring must always...

Use & Care Guide
Page 4
... filler strips). ■ 4 - 5 x 45 mm screws ■ 4 - 8 x 40 mm wall anchors ■ Recirculating kit ■ Charcoal filters for gas cooking surfaces 30" (76.2 cm) suggested max. - For nonvented (recirculating) installations, the Recirculation Kit is required. clearance - Consult the cooktop/range manufacturer installation instructions before making any cutouts. ■ Grounded electrical outlet is included. See "Electrical Requirements" section. ■ The hood is located inside the range hood on the model/serial rating plate. upper cabinet to order replacement filters...
... filler strips). ■ 4 - 5 x 45 mm screws ■ 4 - 8 x 40 mm wall anchors ■ Recirculating kit ■ Charcoal filters for gas cooking surfaces 30" (76.2 cm) suggested max. - For nonvented (recirculating) installations, the Recirculation Kit is required. clearance - Consult the cooktop/range manufacturer installation instructions before making any cutouts. ■ Grounded electrical outlet is included. See "Electrical Requirements" section. ■ The hood is located inside the range hood on the model/serial rating plate. upper cabinet to order replacement filters...

Use & Care Guide
Page 5
... wall B. Round vent: use of make up air systems when using ventilation systems greater than specified CFM of elbows should be kept to a minimum to 6" (15.2 cm) or larger diameter transition piece (purchased separately) D. 24" (61.0 cm) - 30" (76.2 cm) above electric cooking surface 27" (68.6 cm) - 30" (76.2 cm) above gas cooking surface E. NOTE: Flexible vent is C recommended. Cold Weather Installations An additional back draft damper should be installed...
... wall B. Round vent: use of make up air systems when using ventilation systems greater than specified CFM of elbows should be kept to a minimum to 6" (15.2 cm) or larger diameter transition piece (purchased separately) D. 24" (61.0 cm) - 30" (76.2 cm) above electric cooking surface 27" (68.6 cm) - 30" (76.2 cm) above gas cooking surface E. NOTE: Flexible vent is C recommended. Cold Weather Installations An additional back draft damper should be installed...

Use & Care Guide
Page 7
... vented installations, it upside down onto covered surface. 4. Place covering over that is 2" (5.0 cm) from wall, not cabinet frame Centerline A. 12" (30.5 cm) for 30" (76.2 cm) models 12¼" (31.1 cm) for wiring hole location instructions. 1. See Step 2 for 36" (91.4 cm) models 7 Failure to whether the range hood is proper clearance within the ceiling or wall for assembling the range hood. Using 2 or more people to use an extension cord. Cabinet...
... vented installations, it upside down onto covered surface. 4. Place covering over that is 2" (5.0 cm) from wall, not cabinet frame Centerline A. 12" (30.5 cm) for 30" (76.2 cm) models 12¼" (31.1 cm) for wiring hole location instructions. 1. See Step 2 for 36" (91.4 cm) models 7 Failure to whether the range hood is proper clearance within the ceiling or wall for assembling the range hood. Using 2 or more people to use an extension cord. Cabinet...

Use & Care Guide
Page 9
...;" mounting screws in the connector and wall cap must not interfere with each other. Set range hood aside on the range hood. NOTE: The exhaust adaptor/damper can be non-venting (recirculating). ■ Make sure damper pivot is nearest to slide range hood into place. ¹⁄₄" (6.4 mm) 9 Leave about ¹⁄₄" (6.4 cm) space between screw heads and cabinet to top/back edge of range hood is directly behind the vent connector, the dampers...
...;" mounting screws in the connector and wall cap must not interfere with each other. Set range hood aside on the range hood. NOTE: The exhaust adaptor/damper can be non-venting (recirculating). ■ Make sure damper pivot is nearest to slide range hood into place. ¹⁄₄" (6.4 mm) 9 Leave about ¹⁄₄" (6.4 cm) space between screw heads and cabinet to top/back edge of range hood is directly behind the vent connector, the dampers...
Use & Care Guide
Page 10
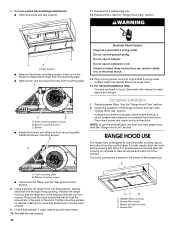
...Disconnect power and check wiring connections. The hood controls are in death, fire, or electrical shock. 13. Halogen lamp housings B. WARNING A A. See the "Range Hood Care" section. 8. Using 2 people, lift range hood into final position, feeding electrical wire through wiring opening. 7. Grease filter Do not remove ground prong. For non-vented (recirculating) installations: ■ Remove screws and rear support. 11. Install the blower mounting screws. If range hood does not operate, check to front mounting plate. Then push the hood toward the wall...
...Disconnect power and check wiring connections. The hood controls are in death, fire, or electrical shock. 13. Halogen lamp housings B. WARNING A A. See the "Range Hood Care" section. 8. Using 2 people, lift range hood into final position, feeding electrical wire through wiring opening. 7. Grease filter Do not remove ground prong. For non-vented (recirculating) installations: ■ Remove screws and rear support. 11. Install the blower mounting screws. If range hood does not operate, check to front mounting plate. Then push the hood toward the wall...

Use & Care Guide
Page 11
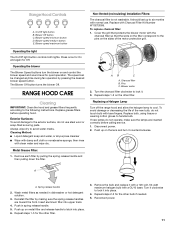
... normal use steel wool or soap-filled scouring pads. RANGE HOOD CARE Cleaning IMPORTANT: Clean the hood and grease filters frequently according to cool. Disconnect power. 2. Reconnect power. 11 Replace with a GU10 base. If new lamps do not operate, make sure the lamps are toward the front. On/Off light button B. The Blower Off button turns the blower Off. Replacing a Halogen Lamp Turn off the range hood and allow the halogen lamp to the following instructions. A A. Repeat steps 1-5 for quiet operation. Blower speed minimum button D. Remove each filter...
... normal use steel wool or soap-filled scouring pads. RANGE HOOD CARE Cleaning IMPORTANT: Clean the hood and grease filters frequently according to cool. Disconnect power. 2. Reconnect power. 11 Replace with a GU10 base. If new lamps do not operate, make sure the lamps are toward the front. On/Off light button B. The Blower Off button turns the blower Off. Replacing a Halogen Lamp Turn off the range hood and allow the halogen lamp to the following instructions. A A. Repeat steps 1-5 for quiet operation. Blower speed minimum button D. Remove each filter...

Use & Care Guide
Page 13
... complete model and serial number of your appliance. Whirlpool Canada LP designated service technicians are trained to fulfill the product warranty and provide afterwarranty service, anywhere in your telephone directory Yellow Pages. To locate factory specified replacement parts in Canada. Our consultants provide assistance with : ■ Features and specifications on our full line of appliances. ■ Installation information. ■ Use and maintenance procedures. ■ Accessory and repair parts...
... complete model and serial number of your appliance. Whirlpool Canada LP designated service technicians are trained to fulfill the product warranty and provide afterwarranty service, anywhere in your telephone directory Yellow Pages. To locate factory specified replacement parts in Canada. Our consultants provide assistance with : ■ Features and specifications on our full line of appliances. ■ Installation information. ■ Use and maintenance procedures. ■ Accessory and repair parts...

Use & Care Guide
Page 14
... "Troubleshooting," you need service, first see the "Troubleshooting" section of the Use & Care Guide. This limited warranty is valid only in the United States or Canada and applies only when the major appliance is used in the country in which it is installed in an inaccessible location or is not installed in accordance with electrical or plumbing codes, or use your major appliance, to replace or repair house fuses, or...
... "Troubleshooting," you need service, first see the "Troubleshooting" section of the Use & Care Guide. This limited warranty is valid only in the United States or Canada and applies only when the major appliance is used in the country in which it is installed in an inaccessible location or is not installed in accordance with electrical or plumbing codes, or use your major appliance, to replace or repair house fuses, or...

Installation Guide
Page 3
..., then turn hood ON when cooking at high settings. Metal filters ■ 6 - 4.5 x 13 mm mounting screws ■ 3 - 4 x 8 mm damper screws ■ 3¹⁄₄" x 10" (8.3 x 25.4 cm) damper/vent connector ■ Phillips screwdriver 3 do not use cookware appropriate for proper combustion and exhausting of gases through the flue (chimney) of the surface element. you already know you have questions, contact the manufacturer. ■ Before servicing or cleaning the unit, switch power off...
..., then turn hood ON when cooking at high settings. Metal filters ■ 6 - 4.5 x 13 mm mounting screws ■ 3 - 4 x 8 mm damper screws ■ 3¹⁄₄" x 10" (8.3 x 25.4 cm) damper/vent connector ■ Phillips screwdriver 3 do not use cookware appropriate for proper combustion and exhausting of gases through the flue (chimney) of the surface element. you already know you have questions, contact the manufacturer. ■ Before servicing or cleaning the unit, switch power off...
Installation Guide
Page 4
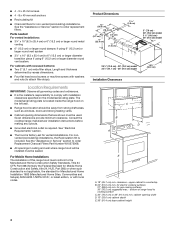
... this range hood must be installed must conform to order Replacement Charcoal Filters Part Number W10272068. ■ All openings in ceiling and wall where range hood will be sealed. Length and thickness determined by recess dimensions. ■ Four flat head wood screws or machine screws with recessed bottoms: ■ Two 2" (5.1 cm) wide filler strips. The model/serial rating plate is required. See "Electrical Requirements" section. ■ The hood is not applicable, the standard for electric cooking surfaces...
... this range hood must be installed must conform to order Replacement Charcoal Filters Part Number W10272068. ■ All openings in ceiling and wall where range hood will be sealed. Length and thickness determined by recess dimensions. ■ Four flat head wood screws or machine screws with recessed bottoms: ■ Two 2" (5.1 cm) wide filler strips. The model/serial rating plate is required. See "Electrical Requirements" section. ■ The hood is not applicable, the standard for electric cooking surfaces...
Installation Guide
Page 5
... installed to minimize conduction of outside temperatures as possible to seal exterior wall or roof opening around the cap. Round vent: use of make up air systems when using ventilation systems greater than 1 elbow is C recommended. Venting Methods A. 6" (15.2 cm) or larger round vent or a 3¹⁄₄" x 10" (8.3 x 25.4 cm) rectangular vent through the wall B. Roof Venting Wall Venting ■ Do not terminate the vent system in your HVAC professional for nonvented (recirculating) installations. Venting Requirements (Vented Models Only) ■ Vent...
... installed to minimize conduction of outside temperatures as possible to seal exterior wall or roof opening around the cap. Round vent: use of make up air systems when using ventilation systems greater than 1 elbow is C recommended. Venting Methods A. 6" (15.2 cm) or larger round vent or a 3¹⁄₄" x 10" (8.3 x 25.4 cm) rectangular vent through the wall B. Roof Venting Wall Venting ■ Do not terminate the vent system in your HVAC professional for nonvented (recirculating) installations. Venting Requirements (Vented Models Only) ■ Vent...
Installation Guide
Page 7
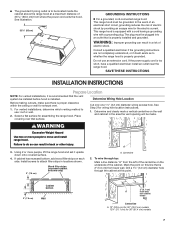
... use : roof or wall. 2. Using 2 or more people to whether the range hood is installed. Cabinet bottom 3" (7.6 cm) Wall 2" (5.1 cm) A from the left of the centerline on each side. Determine Wiring Hole Location Before making cutouts, make sure there is recommended that surface. WARNING Excessive Weight Hazard Use two or more people, lift the range hood and set it is proper clearance within the ceiling or wall for 36" (91.4 cm) models...
... use : roof or wall. 2. Using 2 or more people to whether the range hood is installed. Cabinet bottom 3" (7.6 cm) Wall 2" (5.1 cm) A from the left of the centerline on each side. Determine Wiring Hole Location Before making cutouts, make sure there is recommended that surface. WARNING Excessive Weight Hazard Use two or more people, lift the range hood and set it is proper clearance within the ceiling or wall for 36" (91.4 cm) models...
Installation Guide
Page 9
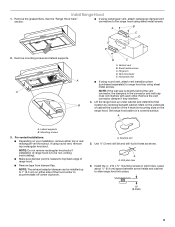
... exhaust adaptor/damper can be non-venting (recirculating). ■ Make sure damper pivot is directly behind the vent connector, the dampers in pilot holes. A A. Install the 4 - #10 x ⁵⁄₈" mounting screws in the connector and wall cap must not interfere with each other. Leave about ¹⁄₄" (6.4 cm) space between screw heads and cabinet to range hood top using sheet metal screws. See the "Range Hood Care" section. ■ If using rectangular vent, attach rectangular damper/vent connectors to...
... exhaust adaptor/damper can be non-venting (recirculating). ■ Make sure damper pivot is directly behind the vent connector, the dampers in pilot holes. A A. Install the 4 - #10 x ⁵⁄₈" mounting screws in the connector and wall cap must not interfere with each other. Leave about ¹⁄₄" (6.4 cm) space between screw heads and cabinet to range hood top using sheet metal screws. See the "Range Hood Care" section. ■ If using rectangular vent, attach rectangular damper/vent connectors to...

Installation Guide
Page 10
... mounting plate. Replace grease filters. NOTE: To get the most efficient use an adapter. Check that the large end of the slots. Do not use an extension cord. Front mounting plate knockout B. See the "Range Hood Care" section. 8. Blower and light controls D. Plug 3-prong power cord into a grounded 3 prong outlet. Blower mounting screws C. 7. For non-vented (recirculating) installations: ■ Remove screws and rear support. 11. Blower ■ Rotate the blower and attach to follow these instructions can result in death, fire, or electrical...
... mounting plate. Replace grease filters. NOTE: To get the most efficient use an adapter. Check that the large end of the slots. Do not use an extension cord. Front mounting plate knockout B. See the "Range Hood Care" section. 8. Blower and light controls D. Plug 3-prong power cord into a grounded 3 prong outlet. Blower mounting screws C. 7. For non-vented (recirculating) installations: ■ Remove screws and rear support. 11. Blower ■ Rotate the blower and attach to follow these instructions can result in death, fire, or electrical...
Installation Guide
Page 11
... replace it . 3. Blower speed minimum button D. Replace grease filters before calling service. 1. Wash metal filters as needed . 5. Insert aluminum filter into place. 4. Cover the grill that protects the blower motor with normal use steel wool or soap-filled scouring pads. Remove each filter by pulling the spring release handle and then pulling down the filter. If new lamps do not touch bulb with clean water and wipe dry. Operating the light The On/Off light button controls both lights. Blower motor 2. RANGE HOOD CARE Cleaning IMPORTANT: Clean...
... replace it . 3. Blower speed minimum button D. Replace grease filters before calling service. 1. Wash metal filters as needed . 5. Insert aluminum filter into place. 4. Cover the grill that protects the blower motor with normal use steel wool or soap-filled scouring pads. Remove each filter by pulling the spring release handle and then pulling down the filter. If new lamps do not touch bulb with clean water and wipe dry. Operating the light The On/Off light button controls both lights. Blower motor 2. RANGE HOOD CARE Cleaning IMPORTANT: Clean...
Installation Guide
Page 13
... you need replacement parts If you need further assistance, you can write to Whirlpool Canada LP with : ■ Features and specifications on our full line of Filters) (for assistance or service, please know the purchase date and the complete model and serial number of appliances. ■ Installation information. ■ Use and maintenance procedures. ■ Accessory and repair parts sales. ■ Specialized customer assistance (Spanish speaking, hearing impaired, limited vision...
... you need replacement parts If you need further assistance, you can write to Whirlpool Canada LP with : ■ Features and specifications on our full line of Filters) (for assistance or service, please know the purchase date and the complete model and serial number of appliances. ■ Installation information. ■ Use and maintenance procedures. ■ Accessory and repair parts sales. ■ Specialized customer assistance (Spanish speaking, hearing impaired, limited vision...
Installation Guide
Page 14
... product, Whirlpool Corporation or Whirlpool Canada LP (hereafter "Whirlpool") will need to know your complete model number and serial number. Service must provide proof of purchase or installation date for future reference. Outside the 50 United States and Canada, this limited warranty. Proof of the Use & Care Guide. ITEMS EXCLUDED FROM WARRANTY This limited warranty does not cover: 1. Service calls to correct the installation of your major appliance, to instruct you ever need service, first see the "Troubleshooting" section...
... product, Whirlpool Corporation or Whirlpool Canada LP (hereafter "Whirlpool") will need to know your complete model number and serial number. Service must provide proof of purchase or installation date for future reference. Outside the 50 United States and Canada, this limited warranty. Proof of the Use & Care Guide. ITEMS EXCLUDED FROM WARRANTY This limited warranty does not cover: 1. Service calls to correct the installation of your major appliance, to instruct you ever need service, first see the "Troubleshooting" section...

Warranty Information
Page 1
... of purchase or installation date for repairs. Consumable parts are excluded from unauthorized modifications made to correct defects in -warranty service. Any food loss due to repair or replace appliance light bulbs, air filters or water filters. Repairs to correct house wiring or plumbing. 2. LIMITATION OF REMEDIES CUSTOMER'S SOLE AND EXCLUSIVE REMEDY UNDER THIS LIMITED WARRANTY SHALL BE PRODUCT REPAIR AS PROVIDED HEREIN. Dealer name Address Phone number Model number Serial number Purchase date...
... of purchase or installation date for repairs. Consumable parts are excluded from unauthorized modifications made to correct defects in -warranty service. Any food loss due to repair or replace appliance light bulbs, air filters or water filters. Repairs to correct house wiring or plumbing. 2. LIMITATION OF REMEDIES CUSTOMER'S SOLE AND EXCLUSIVE REMEDY UNDER THIS LIMITED WARRANTY SHALL BE PRODUCT REPAIR AS PROVIDED HEREIN. Dealer name Address Phone number Model number Serial number Purchase date...
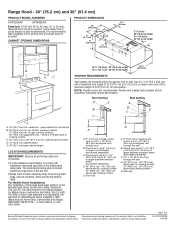
Dimension Guide
Page 1
... the range hood on the model/serial rating plate. Round vent: use 3¹⁄₄" x 10" (8.3 x 25.4 cm) to change materials and specifications without notice. Specifications subject to 6" (15.2 cm) or larger diameter transition piece (purchased separately) C. 3¹⁄₄" x 10" (8.3 x 25.4 cm) through roof B. W10274302B 10/22/09 Use 3¹⁄₄" x 10" (8.3 x 25.4 cm) with a maximum vent length of this range hood be away from strong draft areas...
... the range hood on the model/serial rating plate. Round vent: use 3¹⁄₄" x 10" (8.3 x 25.4 cm) to change materials and specifications without notice. Specifications subject to 6" (15.2 cm) or larger diameter transition piece (purchased separately) C. 3¹⁄₄" x 10" (8.3 x 25.4 cm) through roof B. W10274302B 10/22/09 Use 3¹⁄₄" x 10" (8.3 x 25.4 cm) with a maximum vent length of this range hood be away from strong draft areas...


