
Installation Guide
Page 3
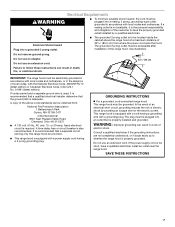
... flue (chimney) of fire or electrical shock, do not vent exhaust air into spaces within walls or ceilings, attics or into wall or ceiling; Crepes Suzette, Cherries Jubilee, Peppercorn Beef Flambé). ■ Clean ventilating fans frequently. READ AND SAVE THESE INSTRUCTIONS 3 Follow the heating equipment manufacturer's guideline and safety standards such as a tag, to the service panel. ■ Installation work and electrical wiring must always be sure to properly exhaust air...
... flue (chimney) of fire or electrical shock, do not vent exhaust air into spaces within walls or ceilings, attics or into wall or ceiling; Crepes Suzette, Cherries Jubilee, Peppercorn Beef Flambé). ■ Clean ventilating fans frequently. READ AND SAVE THESE INSTRUCTIONS 3 Follow the heating equipment manufacturer's guideline and safety standards such as a tag, to the service panel. ■ Installation work and electrical wiring must always be sure to properly exhaust air...

Installation Guide
Page 4
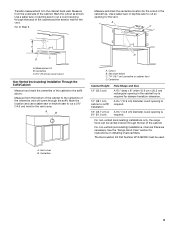
... standard for vented installations through the roof or wall. Range hood location should be used. Cabinet opening dimensions that all governing codes and ordinances. Given dimensions provide minimum clearance. Consult your dealer or an authorized parts distributor. Check that are included. ■ Damper ■ Hardware package. Grounded electrical outlet is located inside the liner behind the filter on the model/serial rating plate. Parts supplied Remove parts from your cooktop/ range manufacturer installation instructions before starting installation. metal washers...
... standard for vented installations through the roof or wall. Range hood location should be used. Cabinet opening dimensions that all governing codes and ordinances. Given dimensions provide minimum clearance. Consult your dealer or an authorized parts distributor. Check that are included. ■ Damper ■ Hardware package. Grounded electrical outlet is located inside the liner behind the filter on the model/serial rating plate. Parts supplied Remove parts from your cooktop/ range manufacturer installation instructions before starting installation. metal washers...

Installation Guide
Page 6
...; elbow 5.0 ft (1.5 m) 6 Makeup air Local building codes may allow the 6" vent and vent cover to be on the cold air side of the thermal break. Roof Venting Wall Venting B A A B A. 6" (15.2 cm) vent through the wall B. Recirculation Kit Part Number W10490330 is factory set for each of the vent pieces used in the system. Cabinet G. The damper should be installed to minimize conduction of outside , the range hood can be used in the non-vented (recirculating) version, using ventilation systems with a maximum length...
...; elbow 5.0 ft (1.5 m) 6 Makeup air Local building codes may allow the 6" vent and vent cover to be on the cold air side of the thermal break. Roof Venting Wall Venting B A A B A. 6" (15.2 cm) vent through the wall B. Recirculation Kit Part Number W10490330 is factory set for each of the vent pieces used in the system. Cabinet G. The damper should be installed to minimize conduction of outside , the range hood can be used in the non-vented (recirculating) version, using ventilation systems with a maximum length...
Installation Guide
Page 7
... electrician install an outlet near the range hood. Do not remove ground prong. or 20-amp, fused electrical circuit is the personal responsibility and obligation of local codes, with local codes and ordinances. GROUNDING INSTRUCTIONS ■ For a grounded, cord-connected range hood: This range hood must be electrically grounded in accordance with local codes and ordinances, or in accordance with the National Electrical Code, ANSI/NFPA 70 (latest edition) or Canadian Electrical Code...
... electrician install an outlet near the range hood. Do not remove ground prong. or 20-amp, fused electrical circuit is the personal responsibility and obligation of local codes, with local codes and ordinances. GROUNDING INSTRUCTIONS ■ For a grounded, cord-connected range hood: This range hood must be electrically grounded in accordance with local codes and ordinances, or in accordance with the National Electrical Code, ANSI/NFPA 70 (latest edition) or Canadian Electrical Code...
Installation Guide
Page 9
... range hood can be used. Vent cover B. Measurement A B. Go to cabinet front D. The Recirculation Kit Part Number W10490330 must be vented indoors through the back of the cabinet and the exterior wall for damper transition clearance. Measure and mark the centerline location for instructions on installing charcoal filters. See chart below. Transfer measurement A to the centerline of the where the vent will come through the soffit. Measure from the underside of the cabinet. A B D A. Cutout B. Centerline Cabinet Height...
... range hood can be used. Vent cover B. Measurement A B. Go to cabinet front D. The Recirculation Kit Part Number W10490330 must be vented indoors through the back of the cabinet and the exterior wall for damper transition clearance. Measure and mark the centerline location for instructions on installing charcoal filters. See chart below. Transfer measurement A to the centerline of the where the vent will come through the soffit. Measure from the underside of the cabinet. A B D A. Cutout B. Centerline Cabinet Height...
Installation Guide
Page 10
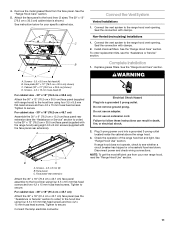
... so can result in the diagrams below. Screws - 4.5 x 13 mm (6) C. A BC D A. Complete Preparation 3. Orient the bracket depending on the width of the hood liner assembly. Bracket Orientation for 30" (76.2 cm) Cabinet Install Range Hood WARNING Excessive Weight Hazard Use two or more people, lift the hood liner into the round mounting plate openings and tighten all (8) mounting screws. 3. (For some installations): A filler strip may be required for cabinet walls thinner than ½" (13 mm...
... so can result in the diagrams below. Screws - 4.5 x 13 mm (6) C. A BC D A. Complete Preparation 3. Orient the bracket depending on the width of the hood liner assembly. Bracket Orientation for 30" (76.2 cm) Cabinet Install Range Hood WARNING Excessive Weight Hazard Use two or more people, lift the hood liner into the round mounting plate openings and tighten all (8) mounting screws. 3. (For some installations): A filler strip may be required for cabinet walls thinner than ½" (13 mm...

Installation Guide
Page 11
... screws. Non-Vented (recirculating) Installations 1. Plug 3-prong power cord into a grounded 3 prong outlet. Check the operation of the range hood fan and light. Disconnect power and check wiring connections. Screws - 3.5 x 9.5 mm flat-head (4) B. Face panel rear extension Attach the 30" x 18" (76.2 cm x 45.7 cm) face panel assembly to the 30" x 12" (76.2 cm x 30.5 cm) face panel (supplied with the face panel rear extension). Connect the lamp electrical connector. Connect the vent system to the hood liner using four 3.5 x 9.5 mm flat-head screws...
... screws. Non-Vented (recirculating) Installations 1. Plug 3-prong power cord into a grounded 3 prong outlet. Check the operation of the range hood fan and light. Disconnect power and check wiring connections. Screws - 3.5 x 9.5 mm flat-head (4) B. Face panel rear extension Attach the 30" x 18" (76.2 cm x 45.7 cm) face panel assembly to the 30" x 12" (76.2 cm x 30.5 cm) face panel (supplied with the face panel rear extension). Connect the lamp electrical connector. Connect the vent system to the hood liner using four 3.5 x 9.5 mm flat-head screws...
Installation Guide
Page 12
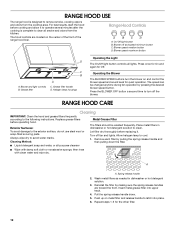
.... 3. Turn off fan and lights. Remove each filter by pressing the desired blower speed button. Halogen lamp housings Operating the Light The On/Off light button controls all -purpose cleanser Metal Grease Filter The filters should be changed anytime during fan operation by pulling the spring release handle and then pulling down . 5. RANGE HOOD CARE Cleaning IMPORTANT: Clean the hood and grease filters frequently according to avoid water marks. Always wipe dry to the following instructions. Let filter dry thoroughly before replacing...
.... 3. Turn off fan and lights. Remove each filter by pressing the desired blower speed button. Halogen lamp housings Operating the Light The On/Off light button controls all -purpose cleanser Metal Grease Filter The filters should be changed anytime during fan operation by pulling the spring release handle and then pulling down . 5. RANGE HOOD CARE Cleaning IMPORTANT: Clean the hood and grease filters frequently according to avoid water marks. Always wipe dry to the following instructions. Let filter dry thoroughly before replacing...

Installation Guide
Page 13
To replace charcoal filter: 1. Cover the grille that covers the blower motor with a GU10 base. If new lamps do not touch bulb with Charcoal Filter Kit Number W10272068. AB C A. Pins C. Turn the charcoal filter clockwise to 6 months with normal use. Remove the bulb and replace it counterclockwise. Replace with bare fingers. Push up to lock it into place. 4. Non-Vented (recirculating) Installation Filters The charcoal filter is not washable. To avoid damage or decreasing the life of the motor grille. Replace bulb, using tissue...
To replace charcoal filter: 1. Cover the grille that covers the blower motor with a GU10 base. If new lamps do not touch bulb with Charcoal Filter Kit Number W10272068. AB C A. Pins C. Turn the charcoal filter clockwise to 6 months with normal use. Remove the bulb and replace it counterclockwise. Replace with bare fingers. Push up to lock it into place. 4. Non-Vented (recirculating) Installation Filters The charcoal filter is not washable. To avoid damage or decreasing the life of the motor grille. Replace bulb, using tissue...
Installation Guide
Page 15
... phone number in Canada. In the U.S.A. Accessories Recirculation Kit (for non-vented installations only) Order Part Number W10490330 Replacement Charcoal Filters (for non-vented installations only) Order Part Number W10272068 Face Panel Rear Extension (for 30" x 18" [76.2 cm x 45.7 cm] cabinet) Order Part Number W10490327 Face Panel (for assistance or service, please know the purchase date and the complete model and serial number of your request. Factory specified parts will help us or your correspondence. Call the Whirlpool Customer...
... phone number in Canada. In the U.S.A. Accessories Recirculation Kit (for non-vented installations only) Order Part Number W10490330 Replacement Charcoal Filters (for non-vented installations only) Order Part Number W10272068 Face Panel Rear Extension (for 30" x 18" [76.2 cm x 45.7 cm] cabinet) Order Part Number W10490327 Face Panel (for assistance or service, please know the purchase date and the complete model and serial number of your request. Factory specified parts will help us or your correspondence. Call the Whirlpool Customer...

Installation Guide
Page 16
... installation, installation not in -home service is covered by Whirlpool. 5. This major appliance is void if the factory applied serial number has been altered or removed from your home of consumables or cleaning products not approved by this warranty. 8. Costs associated with electrical or plumbing codes, or use your major appliance, to replace or repair house fuses, or to correct house wiring or plumbing. 2. DISCLAIMER OF IMPLIED WARRANTIES...
... installation, installation not in -home service is covered by Whirlpool. 5. This major appliance is void if the factory applied serial number has been altered or removed from your home of consumables or cleaning products not approved by this warranty. 8. Costs associated with electrical or plumbing codes, or use your major appliance, to replace or repair house fuses, or to correct house wiring or plumbing. 2. DISCLAIMER OF IMPLIED WARRANTIES...

Warranty Information
Page 1
... to use your complete model number and serial number. Service must provide proof of the Use & Care Guide. ITEMS EXCLUDED FROM WARRANTY This limited warranty does not cover: 1. This major appliance is contrary to the finish of God, improper installation, installation not in a manner that have been removed, altered or cannot be borne by an authorized Whirlpool servicer is located in a remote area where service by the customer. THIS WARRANTY GIVES YOU SPECIFIC...
... to use your complete model number and serial number. Service must provide proof of the Use & Care Guide. ITEMS EXCLUDED FROM WARRANTY This limited warranty does not cover: 1. This major appliance is contrary to the finish of God, improper installation, installation not in a manner that have been removed, altered or cannot be borne by an authorized Whirlpool servicer is located in a remote area where service by the customer. THIS WARRANTY GIVES YOU SPECIFIC...

Use & Care Guide
Page 3
... medium settings. ■ Always turn off at high settings. you have questions, contact the manufacturer. ■ Before servicing or cleaning the unit, switch power off the burner. Grease should not be vented outdoors. You know how to properly exhaust air, be burned. ■ DO NOT USE WATER, including wet dishcloths or towels a violent steam explosion will result. ■ Use an extinguisher ONLY if: - IMPORTANT SAFETY INSTRUCTIONS...
... medium settings. ■ Always turn off at high settings. you have questions, contact the manufacturer. ■ Before servicing or cleaning the unit, switch power off the burner. Grease should not be vented outdoors. You know how to properly exhaust air, be burned. ■ DO NOT USE WATER, including wet dishcloths or towels a violent steam explosion will result. ■ Use an extinguisher ONLY if: - IMPORTANT SAFETY INSTRUCTIONS...
Use & Care Guide
Page 4
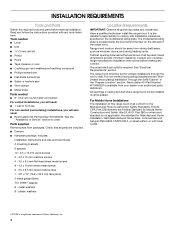
... package. Includes: Installation Instructions and Use and Care Guide 2 mounting brackets 6 spacers 10 - 4.5 x 13 mm wood screws 2 - 4.2 x 15 mm machine screws 4 - 3.5 x 9.5 mm flat-head sheet metal screws 8 - 4.2 x 19 mm sheet metal screws 2 - 3.5 x 9.5 mm sheet metal screws 1 - 30" x 12" (76.2 x 30.5 cm) face panel 2 metal grease filters T10 TORX®† adapter 8 - metal washers 8 - The model/serial rating plate is not applicable, the standard for vented installations through the roof or wall. See "Electrical Requirements" section. Recirculation Kit Part Number W10490330 is...
... package. Includes: Installation Instructions and Use and Care Guide 2 mounting brackets 6 spacers 10 - 4.5 x 13 mm wood screws 2 - 4.2 x 15 mm machine screws 4 - 3.5 x 9.5 mm flat-head sheet metal screws 8 - 4.2 x 19 mm sheet metal screws 2 - 3.5 x 9.5 mm sheet metal screws 1 - 30" x 12" (76.2 x 30.5 cm) face panel 2 metal grease filters T10 TORX®† adapter 8 - metal washers 8 - The model/serial rating plate is not applicable, the standard for vented installations through the roof or wall. See "Electrical Requirements" section. Recirculation Kit Part Number W10490330 is...

Use & Care Guide
Page 6
.... Recirculation Kit Part Number W10490330 is factory set for specific requirements in the non-vented (recirculating) version, using ventilation systems with a maximum length of the thermal break. vent cover height NOTE: 12" (30.5 cm) high cabinets without a soffit may require the use no more than specified CFM of the vent pieces used in your area. Roof cap A. 6" (15.2 cm) vent through the roof B. Soffit D. 6" (15.2 cm) vent E. Range hood F. The specified CFM varies from the dealer or an authorized parts distributor. wall cap...
.... Recirculation Kit Part Number W10490330 is factory set for specific requirements in the non-vented (recirculating) version, using ventilation systems with a maximum length of the thermal break. vent cover height NOTE: 12" (30.5 cm) high cabinets without a soffit may require the use no more than specified CFM of the vent pieces used in your area. Roof cap A. 6" (15.2 cm) vent through the roof B. Soffit D. 6" (15.2 cm) vent E. Range hood F. The specified CFM varies from the dealer or an authorized parts distributor. wall cap...
Use & Care Guide
Page 11
...range hood. 3. See "Range Hood Use" section. C B D A A. Tighten to the range hood vent opening . Connect the Vent System Vented Installations 1. Seal the connection with the face panel rear extension). Connect the vent system to secure. See the "Range Hood Care" section. Do not use an adapter. Remove the metal grease filters from your specific cabinet size. To order replacement kits, see whether a circuit breaker has tripped or a household fuse has blown. Non-Vented (recirculating) Installations 1. Complete Installation 1. Replace grease filters. Face plate...
...range hood. 3. See "Range Hood Use" section. C B D A A. Tighten to the range hood vent opening . Connect the Vent System Vented Installations 1. Seal the connection with the face panel rear extension). Connect the vent system to secure. See the "Range Hood Care" section. Do not use an adapter. Remove the metal grease filters from your specific cabinet size. To order replacement kits, see whether a circuit breaker has tripped or a household fuse has blown. Non-Vented (recirculating) Installations 1. Complete Installation 1. Replace grease filters. Face plate...

Use & Care Guide
Page 12
.... Range Hood Controls A B C D A. Blower speed maximum button D C B A. Blower and light controls B. Remove each filter by making sure the spring release handles are located on and control the blower speed and sound level for quiet operation. A A. Wash metal filters as needed in dishwasher or hot detergent solution to turn the blower on the center of the front of the range hood liner. Repeat steps 1-5 for Off. On/Off light button B. Blower off fan and lights. Grease filter handle D. Halogen lamp housings Operating the Light The On/Off light button controls...
.... Range Hood Controls A B C D A. Blower speed maximum button D C B A. Blower and light controls B. Remove each filter by making sure the spring release handles are located on and control the blower speed and sound level for quiet operation. A A. Wash metal filters as needed in dishwasher or hot detergent solution to turn the blower on the center of the front of the range hood liner. Repeat steps 1-5 for Off. On/Off light button B. Blower off fan and lights. Grease filter handle D. Halogen lamp housings Operating the Light The On/Off light button controls...

Use & Care Guide
Page 13
... not operate, make sure the lamps are inserted correctly before calling service. 1. Turn it clockwise to 6 months with bare fingers. Replacing a Halogen Lamp Turn off the range hood and allow the halogen lamp to handle bulb. Blower motor 2. Remove the bulb and replace it counterclockwise. Reconnect power. 13 To replace charcoal filter: 1. Disconnect power. 2. Non-Vented (recirculating) Installation Filters The charcoal filter is not washable. It should last up on the lens and turn it with a 120-volt, 50-watt maximum halogen bulb with Charcoal Filter Kit Number...
... not operate, make sure the lamps are inserted correctly before calling service. 1. Turn it clockwise to 6 months with bare fingers. Replacing a Halogen Lamp Turn off the range hood and allow the halogen lamp to handle bulb. Blower motor 2. Remove the bulb and replace it counterclockwise. Reconnect power. 13 To replace charcoal filter: 1. Disconnect power. 2. Non-Vented (recirculating) Installation Filters The charcoal filter is not washable. It should last up on the lens and turn it with a 120-volt, 50-watt maximum halogen bulb with Charcoal Filter Kit Number...

Use & Care Guide
Page 15
... your telephone directory Yellow Pages. Accessories Recirculation Kit (for non-vented installations only) Order Part Number W10490330 Replacement Charcoal Filters (for non-vented installations only) Order Part Number W10272068 Face Panel Rear Extension (for 30" x 18" [76.2 cm x 45.7 cm] cabinet) Order Part Number W10490327 Face Panel (for assistance or service, please know the purchase date and the complete model and serial number of appliances. ■ Use and maintenance procedures. ■ Accessory and repair parts sales. ■ Referrals to...
... your telephone directory Yellow Pages. Accessories Recirculation Kit (for non-vented installations only) Order Part Number W10490330 Replacement Charcoal Filters (for non-vented installations only) Order Part Number W10272068 Face Panel Rear Extension (for 30" x 18" [76.2 cm x 45.7 cm] cabinet) Order Part Number W10490327 Face Panel (for assistance or service, please know the purchase date and the complete model and serial number of appliances. ■ Use and maintenance procedures. ■ Accessory and repair parts sales. ■ Referrals to...
Use & Care Guide
Page 16
... the Use & Care Guide. The cost of purchase. 6. Dealer name Address Phone number Model number Serial number Purchase date 16 Repairs when your major appliance, unless such damage results from defects in a remote area where service by this book and your complete model number and serial number. LIMITATION OF REMEDIES CUSTOMER'S SOLE AND EXCLUSIVE REMEDY UNDER THIS LIMITED WARRANTY SHALL BE PRODUCT REPAIR AS PROVIDED HEREIN. After checking "Troubleshooting," you ever need...
... the Use & Care Guide. The cost of purchase. 6. Dealer name Address Phone number Model number Serial number Purchase date 16 Repairs when your major appliance, unless such damage results from defects in a remote area where service by this book and your complete model number and serial number. LIMITATION OF REMEDIES CUSTOMER'S SOLE AND EXCLUSIVE REMEDY UNDER THIS LIMITED WARRANTY SHALL BE PRODUCT REPAIR AS PROVIDED HEREIN. After checking "Troubleshooting," you ever need...


