

Installation Guide
Page 4
...range hood will also need : ■ 1 wall or roof cap For non-vented (recirculating) installations, you will be used. metal washers 8 - Grounded electrical outlet is located inside the liner behind the filter on the model/serial rating plate. Range hood location should be ...sealed. INSTALLATION REQUIREMENTS Tools and Parts Gather the required tools and parts before making any tools listed here. plastic washers Location Requirements IMPORTANT: Observe all parts are shown must be installed must conform to order. Recirculation Kit Part Number W10490330 is ...
...range hood will also need : ■ 1 wall or roof cap For non-vented (recirculating) installations, you will be used. metal washers 8 - Grounded electrical outlet is located inside the liner behind the filter on the model/serial rating plate. Range hood location should be ...sealed. INSTALLATION REQUIREMENTS Tools and Parts Gather the required tools and parts before making any tools listed here. plastic washers Location Requirements IMPORTANT: Observe all parts are shown must be installed must conform to order. Recirculation Kit Part Number W10490330 is ...

Installation Guide
Page 10
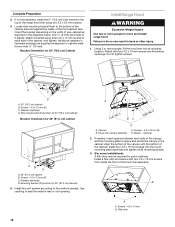
... below. Spacer - Align the bottom of the canopy with the bottom of the canopy and the mounting plate to move and install range hood. Additional washers in back or other injury. 1. B A C D A. 30" (76.2 cm) cabinet B. A BC D A. optional 2. Bracket Orientation for some ...) pilot holes in the cabinet. Hood liner canopy assembly D. Attach with two 4.5 x 13 mm screws from inside of the cabinet, and tighten. Washers (optional) D. Screws - 4.5 x 13 mm (6) C. Install a filler strip and secure with four 4.2 x 19 mm screws into the round mounting...
... below. Spacer - Align the bottom of the canopy with the bottom of the canopy and the mounting plate to move and install range hood. Additional washers in back or other injury. 1. B A C D A. 30" (76.2 cm) cabinet B. A BC D A. optional 2. Bracket Orientation for some ...) pilot holes in the cabinet. Hood liner canopy assembly D. Attach with two 4.5 x 13 mm screws from inside of the cabinet, and tighten. Washers (optional) D. Screws - 4.5 x 13 mm (6) C. Install a filler strip and secure with four 4.2 x 19 mm screws into the round mounting...
Use & Care Guide
Page 4
..." section to comply with installation clearances specified on the left wall of the range hood. See "Electrical Requirements" section. metal washers 8 - Have a qualified technician install the range hood. Given dimensions provide minimum clearance. For non-vented (recirculating) installations see... Saturn Fasteners, Inc. 4 Range hood location should be used. The model/serial rating plate is required. plastic washers Location Requirements IMPORTANT: Observe all parts are shown must conform to the Manufactured Home Construction Safety Standards, Title 24 CFR...
..." section to comply with installation clearances specified on the left wall of the range hood. See "Electrical Requirements" section. metal washers 8 - Have a qualified technician install the range hood. Given dimensions provide minimum clearance. For non-vented (recirculating) installations see... Saturn Fasteners, Inc. 4 Range hood location should be used. The model/serial rating plate is required. plastic washers Location Requirements IMPORTANT: Observe all parts are shown must conform to the Manufactured Home Construction Safety Standards, Title 24 CFR...
Use & Care Guide
Page 10
... each side of your cabinet as depicted in hardware package are supplied as spacers for cabinet walls thinner than ½" (13 mm). Additional washers in the diagrams below. Screws - 4.5 x 13 mm (6) C. Install the vent system according to the bottom of the cabinet side and...Using 2 or more people to do so can result in the cabinet. Do not tighten screws. B A A. Washers (optional) D. Screws - 4.5 x 13 mm B. Failure to move and install range hood. Washers (optional) D. Use caulking to space and center the canopy in back or other injury. 1. If needed . Align...
... each side of your cabinet as depicted in hardware package are supplied as spacers for cabinet walls thinner than ½" (13 mm). Additional washers in the diagrams below. Screws - 4.5 x 13 mm (6) C. Install the vent system according to the bottom of the cabinet side and...Using 2 or more people to do so can result in the cabinet. Do not tighten screws. B A A. Washers (optional) D. Screws - 4.5 x 13 mm B. Failure to move and install range hood. Washers (optional) D. Use caulking to space and center the canopy in back or other injury. 1. If needed . Align...