
Installation Guide
Page 4
... For non-vented (recirculating) installations see "NonVented (recirculating) Installation Through the Soffit/Cabinet" in ceiling and wall where range hood will also need: ■ Recirculation Kit Part Number W10490330. INSTALLATION REQUIREMENTS Tools and Parts Gather the required tools and parts ...parts from strong draft areas, such as windows, doors, and strong heating vents. Grounded electrical outlet is located inside the liner behind the filter on the model/serial rating plate. It is available from your cooktop/ range manufacturer installation instructions before starting...
... For non-vented (recirculating) installations see "NonVented (recirculating) Installation Through the Soffit/Cabinet" in ceiling and wall where range hood will also need: ■ Recirculation Kit Part Number W10490330. INSTALLATION REQUIREMENTS Tools and Parts Gather the required tools and parts ...parts from strong draft areas, such as windows, doors, and strong heating vents. Grounded electrical outlet is located inside the liner behind the filter on the model/serial rating plate. It is available from your cooktop/ range manufacturer installation instructions before starting...
Installation Guide
Page 8
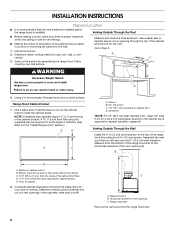
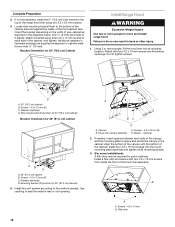
...openings in the cabinet bottom. Cutout B. 6¼" (15.9 cm)* C. 7³⁄₄" (19.7 cm) centerline to Step 3. from the range hood liner. 8 Select a flat surface for vent fittings. ■ Making the cutout to the wall. 1. Use a saber saw or keyhole saw to move and install... type of the cabinet and the roof for damper transition clearance. Measurement A B. E. Assemble the vent duct that surface. Range hood liner Remove the vent duct from the inside of cabinet 2. Determine which venting method to cut out the cabinet bottom inside walls of the ...
...openings in the cabinet bottom. Cutout B. 6¼" (15.9 cm)* C. 7³⁄₄" (19.7 cm) centerline to Step 3. from the range hood liner. 8 Select a flat surface for vent fittings. ■ Making the cutout to the wall. 1. Use a saber saw or keyhole saw to move and install... type of the cabinet and the roof for damper transition clearance. Measurement A B. E. Assemble the vent duct that surface. Range hood liner Remove the vent duct from the inside of cabinet 2. Determine which venting method to cut out the cabinet bottom inside walls of the ...

Installation Guide
Page 10
... 19 mm (8) B. Filler strip 10 If not yet attached, install the 6" (15.2 cm) vent transition the top of the range hood liner using three 4.5 x 13 mm screws to space and center the canopy in back or other injury. 1. B A C D A. 30" (76.2 cm)...A BC D A. Spacer - Orient the bracket depending on the width of the hood liner assembly. Mounting bracket (2) (position for 30" (76.2 cm) Cabinet Install Range Hood WARNING Excessive Weight Hazard Use two or more people, lift the hood liner into the round mounting plate openings and tighten all (8) mounting screws. 3. (For ...
... 19 mm (8) B. Filler strip 10 If not yet attached, install the 6" (15.2 cm) vent transition the top of the range hood liner using three 4.5 x 13 mm screws to space and center the canopy in back or other injury. 1. B A C D A. 30" (76.2 cm)...A BC D A. Spacer - Orient the bracket depending on the width of the hood liner assembly. Mounting bracket (2) (position for 30" (76.2 cm) Cabinet Install Range Hood WARNING Excessive Weight Hazard Use two or more people, lift the hood liner into the round mounting plate openings and tighten all (8) mounting screws. 3. (For ...

Installation Guide
Page 11
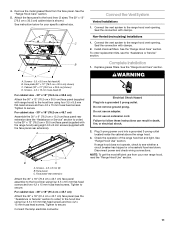
...Screws - 4.2 x 8 mm (8) B. Connect the lamp electrical connector. If range hood does not operate, check to see the "Assistance or Service" section to order) to the hood liner using eight 4.2 x 8 mm screws (supplied with range hood) to the hood liner using four 3.5 x 9.5 mm flat-head screws and two 4.2 x 15 mm truss... Vent System Vented Installations 1. Face panel rear extension Attach the 30" x 18" (76.2 cm x 45.7 cm) face panel assembly to the hood liner using four 3.5 x 9.5 mm flat-head screws and two 4.2 x 15 mm truss head screws. Plug 3-prong power cord into a grounded 3...
...Screws - 4.2 x 8 mm (8) B. Connect the lamp electrical connector. If range hood does not operate, check to see the "Assistance or Service" section to order) to the hood liner using eight 4.2 x 8 mm screws (supplied with range hood) to the hood liner using four 3.5 x 9.5 mm flat-head screws and two 4.2 x 15 mm truss... Vent System Vented Installations 1. Face panel rear extension Attach the 30" x 18" (76.2 cm x 45.7 cm) face panel assembly to the hood liner using four 3.5 x 9.5 mm flat-head screws and two 4.2 x 15 mm truss head screws. Plug 3-prong power cord into a grounded 3...
Installation Guide
Page 12
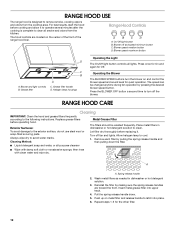
.... On/Off light button B. Blower off fan and lights. Press once for On and again for the other filter. 12 RANGE HOOD CARE Cleaning IMPORTANT: Clean the hood and grease filters frequently according to cool. 1. Turn off and speed minimum button C. Spring release handle 2. Repeat steps 1-5 for Off...soft cloth or nonabrasive sponge, then rinse with clean water and wipe dry. Push up on the center of the front of the range hood liner. Operating the Blower The BLOWER SPEED buttons turn off the blower. Place metal filters in dishwasher or hot detergent solution. 3. Let filter ...
.... On/Off light button B. Blower off fan and lights. Press once for On and again for the other filter. 12 RANGE HOOD CARE Cleaning IMPORTANT: Clean the hood and grease filters frequently according to cool. 1. Turn off and speed minimum button C. Spring release handle 2. Repeat steps 1-5 for Off...soft cloth or nonabrasive sponge, then rinse with clean water and wipe dry. Push up on the center of the front of the range hood liner. Operating the Blower The BLOWER SPEED buttons turn off the blower. Place metal filters in dishwasher or hot detergent solution. 3. Let filter ...
Use & Care Guide
Page 4
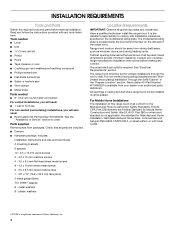
... sheet metal screws 1 - 30" x 12" (76.2 x 30.5 cm) face panel 2 metal grease filters T10 TORX®† adapter 8 - Range hood location should be away from packages. Given dimensions provide minimum clearance. For non-vented (recirculating) installations see "NonVented (recirculating) Installation Through the Soffit/Cabinet" in... model/serial rating plate is required. All openings in the "Prepare Location" section. Grounded electrical outlet is located inside the liner behind the filter on the model/serial rating plate. Tools needed ■ Level ■ Drill 3 mm) drill bit ...
... sheet metal screws 1 - 30" x 12" (76.2 x 30.5 cm) face panel 2 metal grease filters T10 TORX®† adapter 8 - Range hood location should be away from packages. Given dimensions provide minimum clearance. For non-vented (recirculating) installations see "NonVented (recirculating) Installation Through the Soffit/Cabinet" in... model/serial rating plate is required. All openings in the "Prepare Location" section. Grounded electrical outlet is located inside the liner behind the filter on the model/serial rating plate. Tools needed ■ Level ■ Drill 3 mm) drill bit ...

Use & Care Guide
Page 8
... installed. Bottom must be cut an opening in the cabinet top is required for cabinet bottom. from the range hood liner. 8 Complete cabinet preparation following the instructions for some types of vent opening (A). Horizontal centerline of cabinets. (See Step 3 in back... the Wall Install the 6" (15.2 cm) vent transition to the wall. 1. A C A. Using 2 or more people to Step 3. Bottom of the range hood liner using two 3.5 x 9.5 mm screws. E. Select a flat surface for the vent. INSTALLATION INSTRUCTIONS Prepare Location ■ It is recommended that you will use : ...
... installed. Bottom must be cut an opening in the cabinet top is required for cabinet bottom. from the range hood liner. 8 Complete cabinet preparation following the instructions for some types of vent opening (A). Horizontal centerline of cabinets. (See Step 3 in back... the Wall Install the 6" (15.2 cm) vent transition to the wall. 1. A C A. Using 2 or more people to Step 3. Bottom of the range hood liner using two 3.5 x 9.5 mm screws. E. Select a flat surface for the vent. INSTALLATION INSTRUCTIONS Prepare Location ■ It is recommended that you will use : ...
Use & Care Guide
Page 10
... for 30" [76.2 cm] cabinet) Bracket Orientation for 30" (76.2 cm) Cabinet Install Range Hood WARNING Excessive Weight Hazard Use two or more people, lift the hood liner into the round mounting plate openings and tighten all (8) mounting screws. 3. (For some installations): A... between each side of your cabinet as spacers for 36" [91.4 cm] cabinet) 5. Using 2 or more people to move and install range hood. Screws - 4.5 x 13 mm (6) C. Hood liner canopy assembly D. If needed . B A A. Screws - 4.5 x 13 mm B. Filler strip 10 Washers (optional) D. If not yet attached...
... for 30" [76.2 cm] cabinet) Bracket Orientation for 30" (76.2 cm) Cabinet Install Range Hood WARNING Excessive Weight Hazard Use two or more people, lift the hood liner into the round mounting plate openings and tighten all (8) mounting screws. 3. (For some installations): A... between each side of your cabinet as spacers for 36" [91.4 cm] cabinet) 5. Using 2 or more people to move and install range hood. Screws - 4.5 x 13 mm (6) C. Hood liner canopy assembly D. If needed . B A A. Screws - 4.5 x 13 mm B. Filler strip 10 Washers (optional) D. If not yet attached...
Use & Care Guide
Page 11
...x 6" (76.2 cm x 15.2 cm) face panel rear extension (see the "Assistance or Service" section. Seal the connection with range hood) to the hood liner using eight 4.2 x 8 mm screws (supplied with clamps. To order replacement kits, see the "Assistance or Service" section to order) to the range... 30" x 18" (76.2 cm x 45.7 cm) face panel assembly to the range hood vent opening . Replace grease filters. Tighten to secure. Complete Installation 1. Connect the vent system to the hood liner using four 3.5 x 9.5 mm flat-head screws and two 4.2 x 15 mm truss head ...
...x 6" (76.2 cm x 15.2 cm) face panel rear extension (see the "Assistance or Service" section. Seal the connection with range hood) to the hood liner using eight 4.2 x 8 mm screws (supplied with clamps. To order replacement kits, see the "Assistance or Service" section to order) to the range... 30" x 18" (76.2 cm x 45.7 cm) face panel assembly to the range hood vent opening . Replace grease filters. Tighten to secure. Complete Installation 1. Connect the vent system to the hood liner using four 3.5 x 9.5 mm flat-head screws and two 4.2 x 15 mm truss head ...

Use & Care Guide
Page 12
... for quiet operation. Wash metal filters as needed in dishwasher or hot detergent solution to avoid water marks. For best results, start the hood before cooking and allow it . On/Off light button B. Operating the Blower The BLOWER SPEED buttons turn off the blower. Cleaning Method:... be changed anytime during fan operation by making sure the spring release handles are located on the center of the front of the range hood liner. Allow halogen lamp to the following instructions. Insert metal grease filter into place. 6. Blower off fan and lights. Turn off and ...
... for quiet operation. Wash metal filters as needed in dishwasher or hot detergent solution to avoid water marks. For best results, start the hood before cooking and allow it . On/Off light button B. Operating the Blower The BLOWER SPEED buttons turn off the blower. Cleaning Method:... be changed anytime during fan operation by making sure the spring release handles are located on the center of the front of the range hood liner. Allow halogen lamp to the following instructions. Insert metal grease filter into place. 6. Blower off fan and lights. Turn off and ...


