Use and Care Guide
Page 1
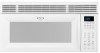
www.whirlpool.com Table of Contents 2 8204918/4619-652-64131 Model MH2155XP ® MICROWAVE HOOD COMBINATION Use & Care Guide For questions about features, operation/performance parts, accessories or service, call: 1-800-253-1301. or visit our website at...
www.whirlpool.com Table of Contents 2 8204918/4619-652-64131 Model MH2155XP ® MICROWAVE HOOD COMBINATION Use & Care Guide For questions about features, operation/performance parts, accessories or service, call: 1-800-253-1301. or visit our website at...
Use and Care Guide
Page 2
... 7 Start 7 Add 30 Seconds 7 Cancel 7 Clock 7 Tones 7 Timer 7 Child Lock 7 Vent Fan 8 Cooktop Light 8 Demo Mode 8 MICROWAVE OVEN USE 8 Food Characteristics 8 Cooking Guidelines 8 Cookware and Dinnerware 9 Aluminum Foil and Metal 9 Cooking Power 9 Cooking 10 Sensor Cooking 10 Preset ...Cooking 10 Cooking in Stages 11 Reheating 11 Defrosting 11 Warm Hold 12 MICROWAVE OVEN CARE 12 General Cleaning 12 Replacing Filters 13 Replacing Cooktop Light 14 Replacing Microwave Oven Light 14 TROUBLESHOOTING 14 ASSISTANCE OR SERVICE 15 Replacement Parts & Accessories ...
... 7 Start 7 Add 30 Seconds 7 Cancel 7 Clock 7 Tones 7 Timer 7 Child Lock 7 Vent Fan 8 Cooktop Light 8 Demo Mode 8 MICROWAVE OVEN USE 8 Food Characteristics 8 Cooking Guidelines 8 Cookware and Dinnerware 9 Aluminum Foil and Metal 9 Cooking Power 9 Cooking 10 Sensor Cooking 10 Preset ...Cooking 10 Cooking in Stages 11 Reheating 11 Defrosting 11 Warm Hold 12 MICROWAVE OVEN CARE 12 General Cleaning 12 Replacing Filters 13 Replacing Cooktop Light 14 Replacing Microwave Oven Light 14 TROUBLESHOOTING 14 ASSISTANCE OR SERVICE 15 Replacement Parts & Accessories ...

Use and Care Guide
Page 3
... with any appliance, close supervision is not designed for examination, repair, or adjustment. ■ See door surface cleaning instructions in the "Microwave Oven Care" section. ■ To reduce the risk of fire in oven. - Call an authorized service company for industrial or laboratory use... are not followed. Do not use as whole eggs in use. ■ As with the provided Installation Instructions. ■ The microwave oven should be serviced only by children. Remove wire twist-ties from paper or plastic bags before using electrical appliances basic safety precautions ...
... with any appliance, close supervision is not designed for examination, repair, or adjustment. ■ See door surface cleaning instructions in the "Microwave Oven Care" section. ■ To reduce the risk of fire in oven. - Call an authorized service company for industrial or laboratory use... are not followed. Do not use as whole eggs in use. ■ As with the provided Installation Instructions. ■ The microwave oven should be serviced only by children. Remove wire twist-ties from paper or plastic bags before using electrical appliances basic safety precautions ...

Use and Care Guide
Page 4
...Do not overheat the liquid. - Corrosive cleaning agents, such as they may damage the filter. ■ Do not cover or block any openings on the microwave oven. ■ Do not store this oven with the door open since open-door operation can burn off the pad and touch electrical parts involving... container to be boiling. Do not use straight-sided containers with metal scouring pads. To reduce the risk of the oven. Do not use the microwave oven near a swimming pool, or similar locations. ■ Do not immerse cord or plug in operation. ■ When flaming foods under the hood, turn ...
...Do not overheat the liquid. - Corrosive cleaning agents, such as they may damage the filter. ■ Do not cover or block any openings on the microwave oven. ■ Do not store this oven with the door open since open-door operation can burn off the pad and touch electrical parts involving... container to be boiling. Do not use straight-sided containers with metal scouring pads. To reduce the risk of the oven. Do not use the microwave oven near a swimming pool, or similar locations. ■ Do not immerse cord or plug in operation. ■ When flaming foods under the hood, turn ...
Use and Care Guide
Page 5
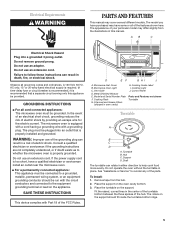
... the equipment grounding terminal or lead on the oven cavity bottom. 3. Turntable B. A 120 Volt, 60 Hz, AC only, 15- Microwave Inlet Cover B. Hub C. Shaft The turntable can result in death, fire, or electrical shock. Electrical Requirements WARNING PARTS AND FEATURES This ...THESE INSTRUCTIONS This device complies with Part 18 of electric shock by providing an escape wire for the electric current. D EF GHI J A. Microwave Oven Light C. Cooktop Light J. See "Assistance or Service" to a grounded, metallic, permanent wiring system, or an equipment grounding conductor should...
... the equipment grounding terminal or lead on the oven cavity bottom. 3. Turntable B. A 120 Volt, 60 Hz, AC only, 15- Microwave Inlet Cover B. Hub C. Shaft The turntable can result in death, fire, or electrical shock. Electrical Requirements WARNING PARTS AND FEATURES This ...THESE INSTRUCTIONS This device complies with Part 18 of electric shock by providing an escape wire for the electric current. D EF GHI J A. Microwave Oven Light C. Cooktop Light J. See "Assistance or Service" to a grounded, metallic, permanent wiring system, or an equipment grounding conductor should...

Use and Care Guide
Page 6
... containers at any other time, a power failure has occurred. A "turntable off (except during Cook, Defrost, Reheat and Sensor functions. When the microwave oven is complete. 6 Turning Off the Turntable The turntable can be turned off " icon will light from left to touch the inside cavity walls,...quantities, weights and/or prompts. Touch CANCEL to reorder rack. ■ Rack will appear during an auto function). Retry your entry. MICROWAVE OVEN CONTROL Display When power is touched. It will become hot. This is helpful when cooking with plates that are side by side. ...
... containers at any other time, a power failure has occurred. A "turntable off (except during Cook, Defrost, Reheat and Sensor functions. When the microwave oven is complete. 6 Turning Off the Turntable The turntable can be turned off " icon will light from left to touch the inside cavity walls,...quantities, weights and/or prompts. Touch CANCEL to reorder rack. ■ Rack will appear during an auto function). Retry your entry. MICROWAVE OVEN CONTROL Display When power is touched. It will become hot. This is helpful when cooking with plates that are side by side. ...
Use and Care Guide
Page 7
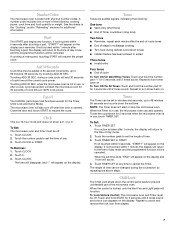
... ■ End of time. 3. Touch 0. 3. To see the countdown for 30 seconds of time can be off when the door is not in use , the microwave oven can be canceled. Touch the number pads to unlock and remove the lock icon from display. 7 will add 30 seconds of day. 3. Child Lock... The Child Lock shuts down the set the time of cook time at the current cook power. To Lock/Unlock Control: The microwave oven and Timer must be changed during a cook cycle will appear on the display. Start The START pad begins any time to 99 minutes 99...
... ■ End of time. 3. Touch 0. 3. To see the countdown for 30 seconds of time can be off when the door is not in use , the microwave oven can be canceled. Touch the number pads to unlock and remove the lock icon from display. 7 will add 30 seconds of day. 3. Child Lock... The Child Lock shuts down the set the time of cook time at the current cook power. To Lock/Unlock Control: The microwave oven and Timer must be changed during a cook cycle will appear on the display. Start The START pad begins any time to 99 minutes 99...

Use and Care Guide
Page 8
... food affect cooking results. Do not use if turntable is in a ring pattern, leaving the center of heat even after the microwave cycle ends. Cooking Guidelines Covering Covering food helps retain moisture, shorten cook time and reduce spattering. Use the lid supplied with cookware...size of irregularly shaped foods, bones and foods such as potatoes, egg yolks, chicken livers, hot dogs, and sausage. Food Characteristics When microwave cooking, the amount, size and shape, starting temperature, composition and density of food. Starting Temperature Room temperature foods will heat faster than...
... food affect cooking results. Do not use if turntable is in a ring pattern, leaving the center of heat even after the microwave cycle ends. Cooking Guidelines Covering Covering food helps retain moisture, shorten cook time and reduce spattering. Use the lid supplied with cookware...size of irregularly shaped foods, bones and foods such as potatoes, egg yolks, chicken livers, hot dogs, and sausage. Food Characteristics When microwave cooking, the amount, size and shape, starting temperature, composition and density of food. Starting Temperature Room temperature foods will heat faster than...

Use and Care Guide
Page 9
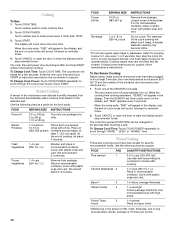
... Heating rice, pasta or casseroles. China, Earthenware Follow manufacturer's recommendations. Aluminum foil and some models), aluminum foil for microwave oven use . Cooking Power Many recipes for use . Use the following chart as cheese and egg dishes, pudding and...Containers Use those approved by the manufacturer for shielding, and approved meat thermometers may become hot from heat transferred from the microwave oven. Melamine Follow manufacturer's recommendations. Put cookware or dinnerware in oven. OK for 1 minute. Follow manufacturer's recommendations....
... Heating rice, pasta or casseroles. China, Earthenware Follow manufacturer's recommendations. Aluminum foil and some models), aluminum foil for microwave oven use . Cooking Power Many recipes for use . Use the following chart as cheese and egg dishes, pudding and...Containers Use those approved by the manufacturer for shielding, and approved meat thermometers may become hot from heat transferred from the microwave oven. Melamine Follow manufacturer's recommendations. Put cookware or dinnerware in oven. OK for 1 minute. Follow manufacturer's recommendations....
Use and Care Guide
Page 10
... few seconds. Sensor Cooking A sensor in the amount of cooking, let stand 5 minutes. Use the following chart as a guide for specific microwavable foods. At the end of fat, meat, thickness, and curing process affect results. Cover with high sides. Listen for optimal results. While...least 1" (2.5 cm) apart. Place on plate, cover with plastic wrap and vent. Fresh 1-4 cups Vegetables (250 mL-1 L) Moisten and place in microwavable container. Stir and let stand 2-3 minutes. Frozen 1-4 cups Vegetables (250 mL-1 L) Remove from package. Place in the display, and the end-of...
... few seconds. Sensor Cooking A sensor in the amount of cooking, let stand 5 minutes. Use the following chart as a guide for specific microwavable foods. At the end of fat, meat, thickness, and curing process affect results. Cover with high sides. Listen for optimal results. While...least 1" (2.5 cm) apart. Place on plate, cover with plastic wrap and vent. Fresh 1-4 cups Vegetables (250 mL-1 L) Moisten and place in microwavable container. Stir and let stand 2-3 minutes. Frozen 1-4 cups Vegetables (250 mL-1 L) Remove from package. Place in the display, and the end-of...
Use and Care Guide
Page 11
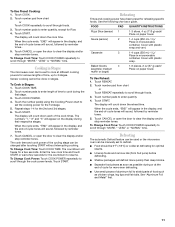
... the following chart as chicken wings, leg tips and fish tails. Touch REHEAT. 2. Defrosting The automatic Defrost feature can be used or the microwave oven can be manually set to clear the display and/or stop reminder tones. Touch the number pad(s) using the Cooking Power chart to set... 1st stage. 5. Touch COOK TIME. 2. Touch COOK POWER. 4. The cook time and cook power of the cycling stage can be done in Stages The microwave oven can be 0°F (-18°C) or colder at defrosting for optimal results. ■ Unwrap foods and remove lids (from fruit juice) before defrosting....
... the following chart as chicken wings, leg tips and fish tails. Touch REHEAT. 2. Defrosting The automatic Defrost feature can be used or the microwave oven can be manually set to clear the display and/or stop reminder tones. Touch the number pad(s) using the Cooking Power chart to set... 1st stage. 5. Touch COOK TIME. 2. Touch COOK POWER. 4. The cook time and cook power of the cycling stage can be done in Stages The microwave oven can be 0°F (-18°C) or colder at defrosting for optimal results. ■ Unwrap foods and remove lids (from fruit juice) before defrosting....

Use and Care Guide
Page 12
... g to 2 kg). 4. Warm Hold can be programmed to scroll through "MORE," "LESS" or "NORML" time. GREASE FILTERS Do not operate the microwave oven without the grease filters in the oven. To Use Defrost: 1. Meats and Poultry can be used for Fish or Touch DEFROST pad repeatedly to...To set a length of irregular shaped cuts should be used by reminder tones. 6. The display will sound, followed by itself or can result in the microwave oven. Scrub and swish to defrost. 3. Touch COOK POWER. 4. MEAT Beef: ground, steaks, roast, stew Lamb: stew and chops Pork: chops...
... g to 2 kg). 4. Warm Hold can be programmed to scroll through "MORE," "LESS" or "NORML" time. GREASE FILTERS Do not operate the microwave oven without the grease filters in the oven. To Use Defrost: 1. Meats and Poultry can be used for Fish or Touch DEFROST pad repeatedly to...To set a length of irregular shaped cuts should be used by reminder tones. 6. The display will sound, followed by itself or can result in the microwave oven. Scrub and swish to defrost. 3. Touch COOK POWER. 4. MEAT Beef: ground, steaks, roast, stew Lamb: stew and chops Pork: chops...

Use and Care Guide
Page 13
... on some models) Do not use soap-filled scouring pads, abrasive cleaners, steelwool pads, gritty washcloths or some recycled paper towels. Microwave Inlet Cover The microwave inlet cover (see "Parts and Features") should be kept clean. ■ Mild, nonabrasive soaps and detergents: Rinse with clean water... from cavity walls. Steam will soften soil. Remove charcoal filters by pushing up and slide into position. 13 Do not operate the microwave oven without the filters in place. ■ Mild cleanser and scouring pad ■ Dishwasher COOKING RACK Do not use soap-filled scouring...
... on some models) Do not use soap-filled scouring pads, abrasive cleaners, steelwool pads, gritty washcloths or some recycled paper towels. Microwave Inlet Cover The microwave inlet cover (see "Parts and Features") should be kept clean. ■ Mild, nonabrasive soaps and detergents: Rinse with clean water... from cavity walls. Steam will soften soil. Remove charcoal filters by pushing up and slide into position. 13 Do not operate the microwave oven without the filters in place. ■ Mild cleanser and scouring pad ■ Dishwasher COOKING RACK Do not use soap-filled scouring...

Use and Care Guide
Page 14
...operate the oven without turntable and turntable support working properly? To Replace: 1. A A. TROUBLESHOOTING Try the solutions suggested here first in microwave oven or reconnect power. See "Microwave Oven Control" section. ■ On some models) attached to remove. 4. See "Child Lock" section. ■ Is the...screw. Lift up and is a candelabra base bulb. Oven will automatically come on when the door is opened and when the microwave oven is not working, call for service. See "Assistance or Service" section. Remove and replace turntable support. If it still ...
...operate the oven without turntable and turntable support working properly? To Replace: 1. A A. TROUBLESHOOTING Try the solutions suggested here first in microwave oven or reconnect power. See "Microwave Oven Control" section. ■ On some models) attached to remove. 4. See "Child Lock" section. ■ Is the...screw. Lift up and is a candelabra base bulb. Oven will automatically come on when the door is opened and when the microwave oven is not working, call for service. See "Assistance or Service" section. Remove and replace turntable support. If it still ...

Use and Care Guide
Page 15
... display. See "Demo Mode" section. Steam is coming from the microwave oven, or adjust the radio or TV antenna. ■ Are the microwave oven door and sealing surfaces clean? Larger amounts of food need to Whirlpool Corporation with any questions or concerns at: Whirlpool Brand Home Appliances Customer Interaction Center 553 Benson Road Benton...
... display. See "Demo Mode" section. Steam is coming from the microwave oven, or adjust the radio or TV antenna. ■ Are the microwave oven door and sealing surfaces clean? Larger amounts of food need to Whirlpool Corporation with any questions or concerns at: Whirlpool Brand Home Appliances Customer Interaction Center 553 Benson Road Benton...

Use and Care Guide
Page 16
...vary from state to replace owner-accessible light bulbs and filters. 2. Replacement parts or repair labor costs for : 1. WHIRLPOOL® MICROWAVE HOOD COMBINATION WARRANTY ONE-YEAR FULL WARRANTY For one year from the date of purchase, when this appliance is operated and... maintained according to instructions attached to or furnished with the product, Whirlpool Corporation will pay for FSP® replacement parts for the microwave magnetron tube if defective in materials or workmanship. Whirlpool Corporation will pay for units operated outside the United States. 7....
...vary from state to replace owner-accessible light bulbs and filters. 2. Replacement parts or repair labor costs for : 1. WHIRLPOOL® MICROWAVE HOOD COMBINATION WARRANTY ONE-YEAR FULL WARRANTY For one year from the date of purchase, when this appliance is operated and... maintained according to instructions attached to or furnished with the product, Whirlpool Corporation will pay for FSP® replacement parts for the microwave magnetron tube if defective in materials or workmanship. Whirlpool Corporation will pay for units operated outside the United States. 7....
Installation Instructions
Page 2
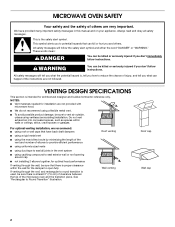
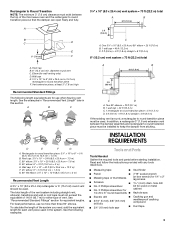
... reference only. Always read and obey all joints in this manual and on your appliance. This symbol alerts you and others are not provided with microwave hood. ■ We do not recommend using a flexible metal vent. ■ To avoid possible product damage, be sure to vent air outside, ...messages will tell you how to round transition is used, be sure there is at least 3" (7.6 cm) of clearance between the top of the microwave oven and the transition piece. For optimal venting installation, we recommend: ■ using roof or wall caps that there is intended for optimal hood ...
... reference only. Always read and obey all joints in this manual and on your appliance. This symbol alerts you and others are not provided with microwave hood. ■ We do not recommend using a flexible metal vent. ■ To avoid possible product damage, be sure to vent air outside, ...messages will tell you how to round transition is used, be sure there is at least 3" (7.6 cm) of clearance between the top of the microwave oven and the transition piece. For optimal venting installation, we recommend: ■ using roof or wall caps that there is intended for optimal hood ...
Installation Instructions
Page 3
... ■ Duct tape 3 See the examples in "Recommended Vent Length" later in the system. In addition, a rectangular 3" (7.6 cm) extension vent between the top of the microwave oven and the rectangular to keep the damper from sticking. The total length of the vent system including straight vent, elbow(s), transitions and wall or...
... ■ Duct tape 3 See the examples in "Recommended Vent Length" later in the system. In addition, a rectangular 3" (7.6 cm) extension vent between the top of the microwave oven and the rectangular to keep the damper from sticking. The total length of the vent system including straight vent, elbow(s), transitions and wall or...

Installation Instructions
Page 4
....5 x 10.2 cm) cutout area must align with your builder or cabinet supplier to make sure there is at least 6" (15.2 cm) of microwave oven) Aluminum grease filters Charcoal filters (Depending on model, aluminum grease filter and charcoal filter may not be inside upper cabinet. See "Electrical Requirements" ...■ If using rectangular to round transition piece, the 3" (7.6 cm) clearance needs to back of clearance between the wall and the microwave oven, so that the vent tube fits properly, and the damper blade opens freely and fully. See "Rectangular to Round Transition" illustration ...
....5 x 10.2 cm) cutout area must align with your builder or cabinet supplier to make sure there is at least 6" (15.2 cm) of microwave oven) Aluminum grease filters Charcoal filters (Depending on model, aluminum grease filter and charcoal filter may not be inside upper cabinet. See "Electrical Requirements" ...■ If using rectangular to round transition piece, the 3" (7.6 cm) clearance needs to back of clearance between the wall and the microwave oven, so that the vent tube fits properly, and the damper blade opens freely and fully. See "Rectangular to Round Transition" illustration ...
Installation Instructions
Page 5
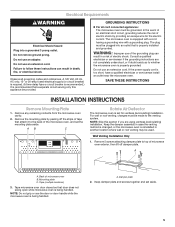
...2. Damper plate 2. Keep damper plate and screws together and set for the electric current. Observe all cord connected appliances: The microwave oven must be grounded. The plug must be plugged into a grounded 3 prong outlet. Do not use an adapter. For... are using ventless (recirculating) installation. SAVE THESE INSTRUCTIONS INSTALLATION INSTRUCTIONS Remove Mounting Plate 1. A B C Rotate Air Deflector The microwave oven is set aside. 5 NOTE: Skip this appliance be used. Wall Venting Installation Only 1. Remove 5 screws attaching damper plate to whether the...
...2. Damper plate 2. Keep damper plate and screws together and set for the electric current. Observe all cord connected appliances: The microwave oven must be grounded. The plug must be plugged into a grounded 3 prong outlet. Do not use an adapter. For... are using ventless (recirculating) installation. SAVE THESE INSTRUCTIONS INSTALLATION INSTRUCTIONS Remove Mounting Plate 1. A B C Rotate Air Deflector The microwave oven is set aside. 5 NOTE: Skip this appliance be used. Wall Venting Installation Only 1. Remove 5 screws attaching damper plate to whether the...


