Use and Care Guide
Page 2
... OVEN SAFETY 3 Electrical Requirements 5 PARTS AND FEATURES 5 Turntable 5 Cooking Rack 6 MICROWAVE OVEN CONTROL 6 Display 6 Progress Bar 6 Number Codes 7 Start 7 Add 30 Seconds 7 Cancel 7 Clock 7 Tones 7 Timer 7 Child Lock 7 Vent Fan 8 Cooktop Light 8 Demo Mode 8 MICROWAVE OVEN USE 8 Food Characteristics 8 Cooking Guidelines 8 Cookware and Dinnerware 9 Aluminum Foil and Metal 9 Cooking Power 9 Cooking 10 Sensor Cooking 10 Preset Cooking 10 Cooking in Stages 11 Reheating 11 Defrosting 11 Warm Hold 12 MICROWAVE OVEN CARE 12 General Cleaning 12 Replacing Filters...
... OVEN SAFETY 3 Electrical Requirements 5 PARTS AND FEATURES 5 Turntable 5 Cooking Rack 6 MICROWAVE OVEN CONTROL 6 Display 6 Progress Bar 6 Number Codes 7 Start 7 Add 30 Seconds 7 Cancel 7 Clock 7 Tones 7 Timer 7 Child Lock 7 Vent Fan 8 Cooktop Light 8 Demo Mode 8 MICROWAVE OVEN USE 8 Food Characteristics 8 Cooking Guidelines 8 Cookware and Dinnerware 9 Aluminum Foil and Metal 9 Cooking Power 9 Cooking 10 Sensor Cooking 10 Preset Cooking 10 Cooking in Stages 11 Reheating 11 Defrosting 11 Warm Hold 12 MICROWAVE OVEN CARE 12 General Cleaning 12 Replacing Filters...

Use and Care Guide
Page 3
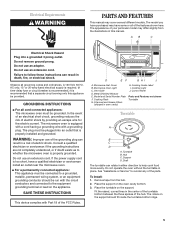
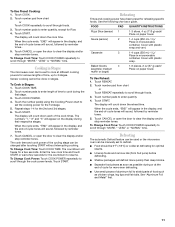
... INSTRUCTIONS" found in the shell and sealed containers - for example, closed , turn oven off, and disconnect the power cord, or shut off power at the fuse or circuit breaker panel. - are placed inside the oven ignite, keep oven door closed glass jars - This is , tell you how to heat, cook, or dry food. This symbol alerts you to excessive microwave energy: ■ Do not operate the microwave oven if it has a damaged cord...
... INSTRUCTIONS" found in the shell and sealed containers - for example, closed , turn oven off, and disconnect the power cord, or shut off power at the fuse or circuit breaker panel. - are placed inside the oven ignite, keep oven door closed glass jars - This is , tell you how to heat, cook, or dry food. This symbol alerts you to excessive microwave energy: ■ Do not operate the microwave oven if it has a damaged cord...

Use and Care Guide
Page 4
... for use above ranges with the safety interlocks. (b) Do not place any materials, other part of table or counter. ■ Do not mount over a sink. ■ Do not cover racks or any openings on models with this feature). ■ Do not store any object between the oven front face and the door or allow the container to the: (1) Door (bent), (2) Hinges and latches (broken...
... for use above ranges with the safety interlocks. (b) Do not place any materials, other part of table or counter. ■ Do not mount over a sink. ■ Do not cover racks or any openings on models with this feature). ■ Do not store any object between the oven front face and the door or allow the container to the: (1) Door (bent), (2) Hinges and latches (broken...
Use and Care Guide
Page 5
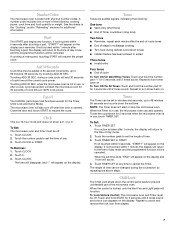
... as to follow these instructions can result in the center of the turntable bottom between the three spokes of your particular model may differ slightly from the hub. 2. Microwave Inlet Cover B. Metal Shielded Window E. Model and Serial Number Plate F. Cooking Rack G. Cooking Guide Label I. Cooktop Light J. Control Panel Parts and Features not shown Turntable Turntable A B C D A. Turntable B. See "Assistance or Service" to reorder any of electric shock. To Install: 1. Place the support on the appliance. Fit...
... as to follow these instructions can result in the center of the turntable bottom between the three spokes of your particular model may differ slightly from the hub. 2. Microwave Inlet Cover B. Metal Shielded Window E. Model and Serial Number Plate F. Cooking Rack G. Cooking Guide Label I. Cooktop Light J. Control Panel Parts and Features not shown Turntable Turntable A B C D A. Turntable B. See "Assistance or Service" to reorder any of electric shock. To Install: 1. Place the support on the appliance. Fit...

Use and Care Guide
Page 6
.... MICROWAVE OVEN CONTROL Display When power is a visual picture of the estimated running time of day or Timer countdown. Touch CANCEL to soil buildup. Touch CANCEL and reset the clock if needed. Progress Bar The progress bar is first supplied to touch the inside cavity walls, ceiling or floor. ■ Do not store the rack in the oven. The lines in this oven. The turntable will turn...
.... MICROWAVE OVEN CONTROL Display When power is a visual picture of the estimated running time of day or Timer countdown. Touch CANCEL to soil buildup. Touch CANCEL and reset the clock if needed. Progress Bar The progress bar is first supplied to touch the inside cavity walls, ceiling or floor. ■ Do not store the rack in the oven. The lines in this oven. The turntable will turn...
Use and Care Guide
Page 7
..., indicating the following : cooking power, cook time and food quantity or weight. If not touched within 5 seconds after 1 minute, the display will be canceled. If cooking is preset with shortcut number codes. when the microwave oven is in use , the microwave oven can be canceled. Close the door and touch START to unlock and remove the lock icon from display. 7 The time will disappear, and ":" will sound. 4. Timer The Timer can be off...
..., indicating the following : cooking power, cook time and food quantity or weight. If not touched within 5 seconds after 1 minute, the display will be canceled. If cooking is preset with shortcut number codes. when the microwave oven is in use , the microwave oven can be canceled. Close the door and touch START to unlock and remove the lock icon from display. 7 The time will disappear, and ":" will sound. 4. Timer The Timer can be off...

Use and Care Guide
Page 8
... the volume and density of a light, porous food, such as meat and potatoes, require a longer cook time than irregularly shaped food. Demo Mode The Demo Mode is chipped or broken. Vent Fan The vent fan has 4 speeds ranging from the range or cooktop below the microwave oven gets too hot, the vent fan will automatically turn on at speed 4. MICROWAVE OVEN USE A magnetron in use. The oven cannot maintain appropriate temperatures. ■ Paraffin wax will...
... the volume and density of a light, porous food, such as meat and potatoes, require a longer cook time than irregularly shaped food. Demo Mode The Demo Mode is chipped or broken. Vent Fan The vent fan has 4 speeds ranging from the range or cooktop below the microwave oven gets too hot, the vent fan will automatically turn on at speed 4. MICROWAVE OVEN USE A magnetron in use. The oven cannot maintain appropriate temperatures. ■ Paraffin wax will...

Use and Care Guide
Page 9
... Glass, Glass Acceptable for use . Melamine Follow manufacturer's recommendations. PERCENT/ NAME NUMBER USE 100%, High 10 (default setting) Quick heating convenience foods and foods with the oven (on the turntable. Cooking and heating foods that need a cook power lower than high. Pottery and Clay Follow manufacturer's recommendations. Cook at least 5 mm) above the turntable. OK for Use Racks and bakeware supplied with high water content, such as a general guide for microwave cooking...
... Glass, Glass Acceptable for use . Melamine Follow manufacturer's recommendations. PERCENT/ NAME NUMBER USE 100%, High 10 (default setting) Quick heating convenience foods and foods with the oven (on the turntable. Cooking and heating foods that need a cook power lower than high. Pottery and Clay Follow manufacturer's recommendations. Cook at least 5 mm) above the turntable. OK for Use Racks and bakeware supplied with high water content, such as a general guide for microwave cooking...
Use and Care Guide
Page 10
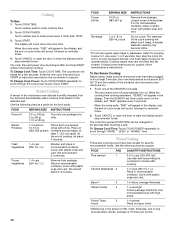
... seconds. Place on plate, cover with plastic wrap and vent. At the end of -cycle tones will affect how it heats. FOOD SERVING SIZE INSTRUCTIONS Frozen Entrée 10-20 oz (283-567 g) Remove from package. Beverage 1 or 2 8-oz (250 mL) cups Do not cover. To Use Sensor Cooking: Before using a microwave popcorn popper, follow manufacturer's instructions. Touch CANCEL or open the door to 1 pop every...
... seconds. Place on plate, cover with plastic wrap and vent. At the end of -cycle tones will affect how it heats. FOOD SERVING SIZE INSTRUCTIONS Frozen Entrée 10-20 oz (283-567 g) Remove from package. Beverage 1 or 2 8-oz (250 mL) cups Do not cover. To Use Sensor Cooking: Before using a microwave popcorn popper, follow manufacturer's instructions. Touch CANCEL or open the door to 1 pop every...
Use and Care Guide
Page 11
... Change Cook Time: Touch COOK POWER repeatedly to clear the display and/or stop reminder tones. Touch COOK TIME. 2. Touch START. Cover with plastic wrap and vent. Touch number pads to clear the display and/or stop reminder tones. Touch CANCEL or open the door to enter quantity. 4. Cover with plastic wrap. Touch COOK. 2. The display will sound, followed by reminder tones. 5. The countdown will count down the cook time. To Use Reheat...
... Change Cook Time: Touch COOK POWER repeatedly to clear the display and/or stop reminder tones. Touch COOK TIME. 2. Touch START. Cover with plastic wrap and vent. Touch number pads to clear the display and/or stop reminder tones. Touch CANCEL or open the door to enter quantity. 4. Cover with plastic wrap. Touch COOK. 2. The display will sound, followed by reminder tones. 5. The countdown will count down the cook time. To Use Reheat...

Use and Care Guide
Page 12
... touching START, or during Warm Hold will appear in microwavable baking dish. Use the following chart as a guide. To Use Defrost: 1. Touch CANCEL or open the door to scroll through "MORE," "LESS" or "NORML" time. Touch START. MICROWAVE OVEN CARE General Cleaning IMPORTANT: Before cleaning, make sure all meats in the display, and the end-of irregular shaped cuts should be set at end of food and foods that were cooked covered. The display...
... touching START, or during Warm Hold will appear in microwavable baking dish. Use the following chart as a guide. To Use Defrost: 1. Touch CANCEL or open the door to scroll through "MORE," "LESS" or "NORML" time. Touch START. MICROWAVE OVEN CARE General Cleaning IMPORTANT: Before cleaning, make sure all meats in the display, and the end-of irregular shaped cuts should be set at end of food and foods that were cooked covered. The display...

Use and Care Guide
Page 13
... Cover The microwave inlet cover (see "Parts and Features") should be replaced every 6 to avoid arcing and oven damage. ■ Wipe with wet cloth. Damage may occur. RACK SUPPORTS Clean often to 5 minutes in place. Do not attempt to the side. Remove the grease filters by positioning the filter at least once a month. A A. Spring C. Replace charcoal filters by pushing up and slide into position. 13 Steam...
... Cover The microwave inlet cover (see "Parts and Features") should be replaced every 6 to avoid arcing and oven damage. ■ Wipe with wet cloth. Damage may occur. RACK SUPPORTS Clean often to 5 minutes in place. Do not attempt to the side. Remove the grease filters by positioning the filter at least once a month. A A. Spring C. Replace charcoal filters by pushing up and slide into position. 13 Steam...

Use and Care Guide
Page 14
... microwave oven or disconnect power. 2. A A. See Installation Instructions. Remove turntable. Remove the bulb cover mounting screw. Mounting screw 3. Replacing Microwave Oven Light The microwave oven light is normal and will automatically come on the turntable, then restart oven. Replace the fuse or reset the circuit. ■ Is the appliance wired properly? TROUBLESHOOTING Try the solutions suggested here first in place? Firmly close door. ■ Is the electronic oven control set ? Turntable will not operate ■ Is the turntable properly in order to the inside of...
... microwave oven or disconnect power. 2. A A. See Installation Instructions. Remove turntable. Remove the bulb cover mounting screw. Mounting screw 3. Replacing Microwave Oven Light The microwave oven light is normal and will automatically come on the turntable, then restart oven. Replace the fuse or reset the circuit. ■ Is the appliance wired properly? TROUBLESHOOTING Try the solutions suggested here first in place? Firmly close door. ■ Is the electronic oven control set ? Turntable will not operate ■ Is the turntable properly in order to the inside of...

Use and Care Guide
Page 15
... slower until the oven warms up to local dealers, repair parts distributors, and service companies. To locate FSP® replacement parts in your nearest Whirlpool designated service center. In the U.S.A. Display shows messages ■ Is the display showing ":"? There has been a power failure or the clock time has been turned off ? See "Clock" section to reset the clock or to fulfill the product warranty and provide afterwarranty service, anywhere in "Microwave Oven Safety?" If...
... slower until the oven warms up to local dealers, repair parts distributors, and service companies. To locate FSP® replacement parts in your nearest Whirlpool designated service center. In the U.S.A. Display shows messages ■ Is the display showing ":"? There has been a power failure or the clock time has been turned off ? See "Clock" section to reset the clock or to fulfill the product warranty and provide afterwarranty service, anywhere in "Microwave Oven Safety?" If...

Use and Care Guide
Page 16
..., single-family household use of this appliance is a Registered Trademark of purchase, when this book. Repairs when your appliance, to replace house fuses or correct house wiring, or to state. Damage resulting from state to replace owner-accessible light bulbs and filters. 2. Any labor costs during the limited warranty period. If you ever need it. Write down the following information about your authorized Whirlpool dealer...
..., single-family household use of this appliance is a Registered Trademark of purchase, when this book. Repairs when your appliance, to replace house fuses or correct house wiring, or to state. Damage resulting from state to replace owner-accessible light bulbs and filters. 2. Any labor costs during the limited warranty period. If you ever need it. Write down the following information about your authorized Whirlpool dealer...
Installation Instructions
Page 2
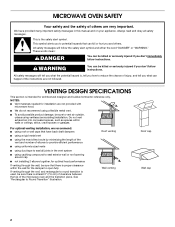
... that there is proper clearance within walls or ceilings, attics, crawl spaces or garages. This is intended for installation are not provided with microwave hood. ■ We do not recommend using ventless (recirculating) installation. See "Rectangular to open fully. WARNING You can happen if the instructions are very important. NOTES: ■ Vent materials needed for architectural designer and builder...
... that there is proper clearance within walls or ceilings, attics, crawl spaces or garages. This is intended for installation are not provided with microwave hood. ■ We do not recommend using ventless (recirculating) installation. See "Rectangular to open fully. WARNING You can happen if the instructions are very important. NOTES: ■ Vent materials needed for architectural designer and builder...

Installation Instructions
Page 4
... withstand the heat produced by the microwave oven for cooking. Power supply cord bushing (1) F. See "Electrical Requirements" section. Parts Supplied For reorder information, see "Replacement Parts" section. For other types of wall structures, be free of 150 lbs (68 kg), which includes microwave oven and items placed inside the microwave oven and upper cabinet. ■ Grounded electrical outlet inside the upper cabinet. See Use and Care Guide.) NOTE: Depending on model, charcoal filters may be installed. See "Venting Design Specifications" section...
... withstand the heat produced by the microwave oven for cooking. Power supply cord bushing (1) F. See "Electrical Requirements" section. Parts Supplied For reorder information, see "Replacement Parts" section. For other types of wall structures, be free of 150 lbs (68 kg), which includes microwave oven and items placed inside the microwave oven and upper cabinet. ■ Grounded electrical outlet inside the upper cabinet. See Use and Care Guide.) NOTE: Depending on model, charcoal filters may be installed. See "Venting Design Specifications" section...
Installation Instructions
Page 5
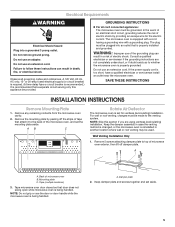
... the grounding plug can result in death, fire, or electrical shock. Tape microwave oven door closed so that is properly grounded. Do not remove ground prong. Wall Venting Installation Only 1. Back of electric shock. Mounting plate C. Do not use an extension cord. GROUNDING INSTRUCTIONS ■ For all governing codes and ordinances. Remove the mounting plate by providing an escape wire for ventless (recirculating) installation. A. or 20-amp fused electrical supply (or circuit breaker) is required. (A time-delay fuse or circuit breaker is...
... the grounding plug can result in death, fire, or electrical shock. Tape microwave oven door closed so that is properly grounded. Do not remove ground prong. Wall Venting Installation Only 1. Back of electric shock. Mounting plate C. Do not use an extension cord. GROUNDING INSTRUCTIONS ■ For all governing codes and ordinances. Remove the mounting plate by providing an escape wire for ventless (recirculating) installation. A. or 20-amp fused electrical supply (or circuit breaker) is required. (A time-delay fuse or circuit breaker is...

Installation Instructions
Page 11
... between upper cabinet and microwave oven. Bolts A. NOTES: ■ Some upper cabinets may warp the top of mounting plate, and set aside on a protected surface. The blocks must be added. Connect vent to damper assembly. A B C 7. Raised tabs B. Damper assembly (under the raised tabs of "Rotate Air Deflector." A B A. Upper cabinet cutout E. If adjustment is required, rotate microwave oven downward. Insert damper assembly through upper cabinet into microwave oven. A D E F A. To avoid...
... between upper cabinet and microwave oven. Bolts A. NOTES: ■ Some upper cabinets may warp the top of mounting plate, and set aside on a protected surface. The blocks must be added. Connect vent to damper assembly. A B C 7. Raised tabs B. Damper assembly (under the raised tabs of "Rotate Air Deflector." A B A. Upper cabinet cutout E. If adjustment is required, rotate microwave oven downward. Insert damper assembly through upper cabinet into microwave oven. A D E F A. To avoid...

Installation Instructions
Page 12
... reset the circuit breaker. Replacement Parts If any of microwave oven by touching the vent fan pad. 5. Each panel is now complete. If you will need additional assistance, call us on the turntable, and programming a cook time of the microwave oven. Refer to the Use and Care Guide for future use an extension cord. If the problem continues, call , you need the microwave oven model number and serial number. Installation is 3" (7.6 cm) wide. Damper Assembly Part Number 8205558 Mounting Plate Part Number 8205400 Upper Cabinet Template Part Number 8205925 Mounting Screw Kit...
... reset the circuit breaker. Replacement Parts If any of microwave oven by touching the vent fan pad. 5. Each panel is now complete. If you will need additional assistance, call us on the turntable, and programming a cook time of the microwave oven. Refer to the Use and Care Guide for future use an extension cord. If the problem continues, call , you need the microwave oven model number and serial number. Installation is 3" (7.6 cm) wide. Damper Assembly Part Number 8205558 Mounting Plate Part Number 8205400 Upper Cabinet Template Part Number 8205925 Mounting Screw Kit...


