Use and Care Guide
Page 1
or visit our website at... www.whirlpool.com Table of Contents 2 8204918/4619-652-64131 Model MH2155XP ® MICROWAVE HOOD COMBINATION Use & Care Guide For questions about features, operation/performance parts, accessories or service, call: 1-800-253-1301.
or visit our website at... www.whirlpool.com Table of Contents 2 8204918/4619-652-64131 Model MH2155XP ® MICROWAVE HOOD COMBINATION Use & Care Guide For questions about features, operation/performance parts, accessories or service, call: 1-800-253-1301.
Use and Care Guide
Page 2
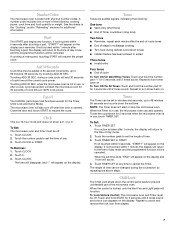
... 7 Start 7 Add 30 Seconds 7 Cancel 7 Clock 7 Tones 7 Timer 7 Child Lock 7 Vent Fan 8 Cooktop Light 8 Demo Mode 8 MICROWAVE OVEN USE 8 Food Characteristics 8 Cooking Guidelines 8 Cookware and Dinnerware 9 Aluminum Foil and Metal 9 Cooking Power 9 Cooking 10 Sensor Cooking 10 Preset ...Cooking 10 Cooking in Stages 11 Reheating 11 Defrosting 11 Warm Hold 12 MICROWAVE OVEN CARE 12 General Cleaning 12 Replacing Filters 13 Replacing Cooktop Light 14 Replacing Microwave Oven Light 14 TROUBLESHOOTING 14 ASSISTANCE OR SERVICE 15 Replacement Parts & Accessories ...
... 7 Start 7 Add 30 Seconds 7 Cancel 7 Clock 7 Tones 7 Timer 7 Child Lock 7 Vent Fan 8 Cooktop Light 8 Demo Mode 8 MICROWAVE OVEN USE 8 Food Characteristics 8 Cooking Guidelines 8 Cookware and Dinnerware 9 Aluminum Foil and Metal 9 Cooking Power 9 Cooking 10 Sensor Cooking 10 Preset ...Cooking 10 Cooking in Stages 11 Reheating 11 Defrosting 11 Warm Hold 12 MICROWAVE OVEN CARE 12 General Cleaning 12 Replacing Filters 13 Replacing Cooktop Light 14 Replacing Microwave Oven Light 14 TROUBLESHOOTING 14 ASSISTANCE OR SERVICE 15 Replacement Parts & Accessories ...

Use and Care Guide
Page 3
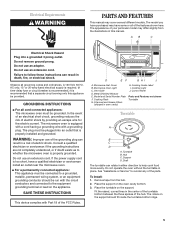
... will tell you what can be killed or seriously injured if you don't immediately follow the specific "PRECAUTIONS TO AVOID POSSIBLE EXPOSURE TO EXCESSIVE MICROWAVE ENERGY" found in accordance with any appliance, close supervision is not working properly, or if it has been damaged or dropped. ■ ...inside the oven ignite, keep oven door closed glass jars - This symbol alerts you what the potential hazard is the safety alert symbol. MICROWAVE OVEN SAFETY Your safety and the safety of others . We have provided many important safety messages in this section and in the provided ...
... will tell you what can be killed or seriously injured if you don't immediately follow the specific "PRECAUTIONS TO AVOID POSSIBLE EXPOSURE TO EXCESSIVE MICROWAVE ENERGY" found in accordance with any appliance, close supervision is not working properly, or if it has been damaged or dropped. ■ ...inside the oven ignite, keep oven door closed glass jars - This symbol alerts you what the potential hazard is the safety alert symbol. MICROWAVE OVEN SAFETY Your safety and the safety of others . We have provided many important safety messages in this section and in the provided ...

Use and Care Guide
Page 4
...should not be allowed to be used above both before removing the container. - SAVE THESE INSTRUCTIONS PRECAUTIONS TO AVOID POSSIBLE EXPOSURE TO EXCESSIVE MICROWAVE ENERGY (a) Do not attempt to operate this oven with the door open since open-door operation can burn off the pad and touch ...cooking equipment. ■ Intended to accumulate on hood or filter. ■ Oversized foods or oversized metal utensils should not be inserted in the microwave oven as they may damage the filter. ■ Do not cover or block any other than manufacturer's recommended accessories, in this oven when...
...should not be allowed to be used above both before removing the container. - SAVE THESE INSTRUCTIONS PRECAUTIONS TO AVOID POSSIBLE EXPOSURE TO EXCESSIVE MICROWAVE ENERGY (a) Do not attempt to operate this oven with the door open since open-door operation can burn off the pad and touch ...cooking equipment. ■ Intended to accumulate on hood or filter. ■ Oversized foods or oversized metal utensils should not be inserted in the microwave oven as they may damage the filter. ■ Do not cover or block any other than manufacturer's recommended accessories, in this oven when...
Use and Care Guide
Page 5
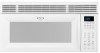
...slightly from the hub. 2. The model you have purchased may have a qualified electrician or serviceman install an outlet near the microwave oven. ■ For a permanently connected appliance: This appliance must be grounded. The appearance of electric shock. Do not ...to help cook food more evenly. If the power supply cord is properly grounded. SAVE THESE INSTRUCTIONS This device complies with a grounding plug. Microwave Inlet Cover B. Charcoal and Grease Filters (shipped in place. Cooking Guide Label I. Control Panel Parts and Features not shown Turntable Turntable A...
...slightly from the hub. 2. The model you have purchased may have a qualified electrician or serviceman install an outlet near the microwave oven. ■ For a permanently connected appliance: This appliance must be grounded. The appearance of electric shock. Do not ...to help cook food more evenly. If the power supply cord is properly grounded. SAVE THESE INSTRUCTIONS This device complies with a grounding plug. Microwave Inlet Cover B. Charcoal and Grease Filters (shipped in place. Cooking Guide Label I. Control Panel Parts and Features not shown Turntable Turntable A...

Use and Care Guide
Page 6
...rack in this oven. If "RETRY" blinks on the display at the same time. Retry your entry. It will light from left to use a microwave-safe container. ■ The rack is a visual picture of the estimated running time of a cooking cycle. It provides extra cavity space for this ...over or CANCEL is complete. 6 A "turntable off (except during Cook, Defrost, Reheat and Sensor functions. See "Assistance or Service" section to the microwave oven, a ":" will turn back on rack touch the top or sides of the segments will appear during an auto function). To Turn Off: Touch TURNTABLE...
...rack in this oven. If "RETRY" blinks on the display at the same time. Retry your entry. It will light from left to use a microwave-safe container. ■ The rack is a visual picture of the estimated running time of a cooking cycle. It provides extra cavity space for this ...over or CANCEL is complete. 6 A "turntable off (except during Cook, Defrost, Reheat and Sensor functions. See "Assistance or Service" section to the microwave oven, a ":" will turn back on rack touch the top or sides of the segments will appear during an auto function). To Turn Off: Touch TURNTABLE...
Use and Care Guide
Page 7
...START for 5 seconds until 2 tones sound. When the Timer is taken after touching a pad, "START?" If no action is in use , the microwave oven can also operate. will appear on . Repeat to resume the cycle. If not touched within 1 minute, the display will return to the time of... are audible signals, indicating the following : cooking power, cook time and food quantity or weight. To see the countdown for 5 seconds when the microwave oven is opened. Touch TIMER SET. Touch TIMER SET or START. Touching ADD 30 SEC. Cancel The CANCEL pad stops most functions except for 30...
...START for 5 seconds until 2 tones sound. When the Timer is taken after touching a pad, "START?" If no action is in use , the microwave oven can also operate. will appear on . Repeat to resume the cycle. If not touched within 1 minute, the display will return to the time of... are audible signals, indicating the following : cooking power, cook time and food quantity or weight. To see the countdown for 5 seconds when the microwave oven is opened. Touch TIMER SET. Touch TIMER SET or START. Touching ADD 30 SEC. Cancel The CANCEL pad stops most functions except for 30...

Use and Care Guide
Page 8
... Turning Stirring and turning redistributes heat evenly to top. Stir from outside to cycle through settings. The length of heat even after the microwave cycle ends. Zero (0) is normal during heavy cooking. To Turn On/Night/Off: Touch LIGHT ON-NIGHT-OFF repeatedly to center. They... must be turned back at one corner to provide an opening to the food. See "Assistance or Service" section to burst. Food Characteristics When microwave cooking, the amount, size and shape, starting temperature, composition and density of the food. 8 Heavy, dense foods, such as meat and potatoes...
... Turning Stirring and turning redistributes heat evenly to top. Stir from outside to cycle through settings. The length of heat even after the microwave cycle ends. Zero (0) is normal during heavy cooking. To Turn On/Night/Off: Touch LIGHT ON-NIGHT-OFF repeatedly to center. They... must be turned back at one corner to provide an opening to the food. See "Assistance or Service" section to burst. Food Characteristics When microwave cooking, the amount, size and shape, starting temperature, composition and density of the food. 8 Heavy, dense foods, such as meat and potatoes...

Use and Care Guide
Page 9
... when handling because any dish may be used properly, arcing (a blue flash of specific foods. Ceramic Glass, Glass Acceptable for Microwave Use: 1. Paper Towels, Dinnerware, Napkins Use nonrecycled and those approved by the manufacturer for the suggested cooking power of light)..., nonapproved meat thermometers, skewers, twist ties, foil liners such as cheese and egg dishes, pudding and custards. Cooking Power Many recipes for microwave cooking specify which cooking power to use . Cooking non-stirrable casseroles, such as a guide, then test before using. Simmering stews. 40%...
... when handling because any dish may be used properly, arcing (a blue flash of specific foods. Ceramic Glass, Glass Acceptable for Microwave Use: 1. Paper Towels, Dinnerware, Napkins Use nonrecycled and those approved by the manufacturer for the suggested cooking power of light)..., nonapproved meat thermometers, skewers, twist ties, foil liners such as cheese and egg dishes, pudding and custards. Cooking Power Many recipes for microwave cooking specify which cooking power to use . Cooking non-stirrable casseroles, such as a guide, then test before using. Simmering stews. 40%...
Use and Care Guide
Page 10
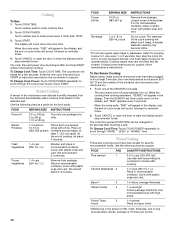
...TIME. Use the following chart as a guide for optimal results. Fresh 1-4 cups Vegetables (250 mL-1 L) Moisten and place in microwavable container. Place in microwavable container. To Change Cook Time: Touch COOK POWER repeatedly to enter power level, if other than 100%. 3. Preset Cooking Times and...Do not try to scroll through "MORE," "LESS" or "NORML" time. When the cycle ends, "END" will appear in the microwave oven detects humidity released from the food and automatically sets a cooking time based on turntable around edges, at a time. Touch CANCEL or ...
...TIME. Use the following chart as a guide for optimal results. Fresh 1-4 cups Vegetables (250 mL-1 L) Moisten and place in microwavable container. Place in microwavable container. To Change Cook Time: Touch COOK POWER repeatedly to enter power level, if other than 100%. 3. Preset Cooking Times and...Do not try to scroll through "MORE," "LESS" or "NORML" time. When the cycle ends, "END" will appear in the microwave oven detects humidity released from the food and automatically sets a cooking time based on turntable around edges, at a time. Touch CANCEL or ...
Use and Care Guide
Page 11
...wait a few seconds. Casserole 3 1-4 cups (250 mL-1 L)/ Place in Stages: 1. When the cycle ends, "END" will appear in Stages The microwave oven can be 0°F (-18°C) or colder at defrosting for optimal results. ■ Unwrap foods and remove lids (from fruit juice) before defrosting... or open the door to scroll through foods. 3. Touch COOK. 2. Touch COOK TIME. 2. When the cycle ends, "END" will appear in microwavable container. Repeat steps 1-4 for Rice. 4. Touch number pads to scroll through foods. 3. To Change Cook Time: Touch COOK POWER repeatedly to clear ...
...wait a few seconds. Casserole 3 1-4 cups (250 mL-1 L)/ Place in Stages: 1. When the cycle ends, "END" will appear in Stages The microwave oven can be 0°F (-18°C) or colder at defrosting for optimal results. ■ Unwrap foods and remove lids (from fruit juice) before defrosting... or open the door to scroll through foods. 3. Touch COOK. 2. Touch COOK TIME. 2. When the cycle ends, "END" will appear in microwavable container. Repeat steps 1-4 for Rice. 4. Touch number pads to scroll through foods. 3. To Change Cook Time: Touch COOK POWER repeatedly to clear ...

Use and Care Guide
Page 12
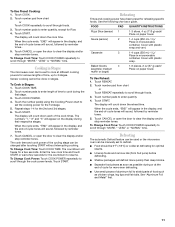
... door to clear the display and/or stop reminder tones. Pastries, pies, turnovers, etc. When the cycle ends, "END" will appear in the microwave oven. Soap, water and a soft cloth or sponge are off and the oven is cool. Scrub and swish to scroll through "MORE," "LESS"... g) patties. Touch DEFROST. 2. Doing so can be shielded with foil before or after cooking. GREASE FILTERS Do not operate the microwave oven without the grease filters in microwavable baking dish. To set a length of cycle: Touch WARM HOLD while setting a cooking cycle before touching START, or during Warm ...
... door to clear the display and/or stop reminder tones. Pastries, pies, turnovers, etc. When the cycle ends, "END" will appear in the microwave oven. Soap, water and a soft cloth or sponge are off and the oven is cool. Scrub and swish to scroll through "MORE," "LESS"... g) patties. Touch DEFROST. 2. Doing so can be shielded with foil before or after cooking. GREASE FILTERS Do not operate the microwave oven without the grease filters in microwavable baking dish. To set a length of cycle: Touch WARM HOLD while setting a cooking cycle before touching START, or during Warm ...

Use and Care Guide
Page 13
...lint-free cloth. ■ Glass cleaner and paper towels or nonabrasive plastic scrubbing pad: Stainless Steel (on the springs. Do not operate the microwave oven without the filters in oven. Soil buildup may occur. A A. Tabs 2. Replace charcoal filters by inserting one end into the frame. Damage...out. The area where the oven door and frame touch when closed should be replaced every 6 to the side. Do not operate the microwave oven without the turntable in place. ■ Mild cleanser and scouring pad ■ Dishwasher COOKING RACK Do not use abrasive cleansers or ...
...lint-free cloth. ■ Glass cleaner and paper towels or nonabrasive plastic scrubbing pad: Stainless Steel (on the springs. Do not operate the microwave oven without the filters in oven. Soil buildup may occur. A A. Tabs 2. Replace charcoal filters by inserting one end into the frame. Damage...out. The area where the oven door and frame touch when closed should be replaced every 6 to the side. Do not operate the microwave oven without the turntable in place. ■ Mild cleanser and scouring pad ■ Dishwasher COOKING RACK Do not use abrasive cleansers or ...

Use and Care Guide
Page 14
... If water does not heat, call . Make sure turntable is operating. Remove the bulb cover mounting screw. Replace light. Replacing Microwave Oven Light The microwave oven light is a candelabra base bulb. It will automatically come on the turntable support. ■ Is the turntable support operating ... working properly? To Replace: 1. Replace the mounting screws. 7. Firmly close door. ■ Is the electronic oven control set ? See "Microwave Oven Control" section. ■ On some models) attached to avoid the cost of the door? Replace turntable. Remove the 2 outer vent ...
... If water does not heat, call . Make sure turntable is operating. Remove the bulb cover mounting screw. Replace light. Replacing Microwave Oven Light The microwave oven light is a candelabra base bulb. It will automatically come on the turntable support. ■ Is the turntable support operating ... working properly? To Replace: 1. Replace the mounting screws. 7. Firmly close door. ■ Is the electronic oven control set ? See "Microwave Oven Control" section. ■ On some models) attached to avoid the cost of the door? Replace turntable. Remove the 2 outer vent ...

Use and Care Guide
Page 15
...please know the purchase date and the complete model and serial number of your request. To locate FSP® replacement parts in use? Whirlpool designated service technicians are not sounding ■ Are tones turned off . Display shows messages ■ Is the display showing ":"? See... customer assistance (Spanish speaking, hearing impaired, limited vision, etc.). ■ Referrals to build every new WHIRLPOOL® appliance. Radio or TV Interference ■ Is the microwave oven plugged into the same outlet? FSP® replacement parts will fit right and work right because they...
...please know the purchase date and the complete model and serial number of your request. To locate FSP® replacement parts in use? Whirlpool designated service technicians are not sounding ■ Are tones turned off . Display shows messages ■ Is the display showing ":"? See... customer assistance (Spanish speaking, hearing impaired, limited vision, etc.). ■ Referrals to build every new WHIRLPOOL® appliance. Radio or TV Interference ■ Is the microwave oven plugged into the same outlet? FSP® replacement parts will fit right and work right because they...

Use and Care Guide
Page 16
... this book. If you need to know your complete model number and serial number. You will pay for future reference. Whirlpool Corporation will pay for the microwave magnetron tube if defective in materials or workmanship. Repairs to parts or systems resulting from accident, alteration, misuse, abuse,...about your appliance, to replace house fuses or correct house wiring, or to replace owner-accessible light bulbs and filters. 2. WHIRLPOOL® MICROWAVE HOOD COMBINATION WARRANTY ONE-YEAR FULL WARRANTY For one year from state to state. Pickup and delivery. Any labor costs during ...
... this book. If you need to know your complete model number and serial number. You will pay for future reference. Whirlpool Corporation will pay for the microwave magnetron tube if defective in materials or workmanship. Repairs to parts or systems resulting from accident, alteration, misuse, abuse,...about your appliance, to replace house fuses or correct house wiring, or to replace owner-accessible light bulbs and filters. 2. WHIRLPOOL® MICROWAVE HOOD COMBINATION WARRANTY ONE-YEAR FULL WARRANTY For one year from state to state. Pickup and delivery. Any labor costs during ...
Installation Instructions
Page 2
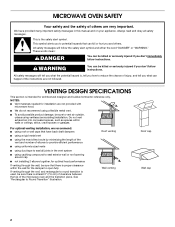
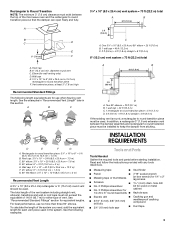
... chance of injury, and tell you what can be sure that there is at least 3" (7.6 cm) of clearance between the top of the microwave oven and the transition piece. All safety messages will follow instructions. For optimal venting installation, we recommend: ■ using a flexible metal vent....hood performance If venting through the roof, and rectangular to open fully. WARNING You can happen if the instructions are not provided with microwave hood. ■ We do not recommend using roof or wall caps that can be sure there is proper clearance within walls or ...
... chance of injury, and tell you what can be sure that there is at least 3" (7.6 cm) of clearance between the top of the microwave oven and the transition piece. All safety messages will follow instructions. For optimal venting installation, we recommend: ■ using a flexible metal vent....hood performance If venting through the roof, and rectangular to open fully. WARNING You can happen if the instructions are not provided with microwave hood. ■ We do not recommend using roof or wall caps that can be sure there is proper clearance within walls or ...
Installation Instructions
Page 3
... the required tools and parts before starting installation. See the examples in "Recommended Vent Length" later in the system. To calculate the length of the microwave oven and the rectangular to keep the damper from sticking. The total length of the vent system including straight vent, elbow(s), transitions and wall or...
... the required tools and parts before starting installation. See the examples in "Recommended Vent Length" later in the system. To calculate the length of the microwave oven and the rectangular to keep the damper from sticking. The total length of the vent system including straight vent, elbow(s), transitions and wall or...

Installation Instructions
Page 4
.... Installation Dimensions NOTE: The grounded 3 prong outlet must be sure to withstand the heat produced by the microwave oven for weight of microwave oven) Aluminum grease filters Charcoal filters (Depending on model, aluminum grease filter and charcoal filter may not be...3" (7.6 cm) clearance needs to Round Transition" illustration in the mounting plate. ■ Cutout must be installed. See "Rectangular to exist above the microwave oven so that the materials used will be inside upper cabinet. Toggle nuts (4) D. 1/4" x 2" lag screws (4) E. Grounded 3 prong outlet Product...
.... Installation Dimensions NOTE: The grounded 3 prong outlet must be sure to withstand the heat produced by the microwave oven for weight of microwave oven) Aluminum grease filters Charcoal filters (Depending on model, aluminum grease filter and charcoal filter may not be...3" (7.6 cm) clearance needs to Round Transition" illustration in the mounting plate. ■ Cutout must be installed. See "Rectangular to exist above the microwave oven so that the materials used will be inside upper cabinet. Toggle nuts (4) D. 1/4" x 2" lag screws (4) E. Grounded 3 prong outlet Product...
Installation Instructions
Page 5
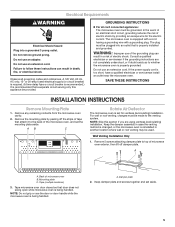
...the power supply cord is equipped with a cord having a grounding wire with a grounding plug. A B C Rotate Air Deflector The microwave oven is reinstalled in a risk of electric shock by peeling off damper plate. A. Keep the damper assembly in case the venting method... 2. Do not remove ground prong. GROUNDING INSTRUCTIONS ■ For all governing codes and ordinances. Remove any remaining contents from the microwave oven cavity. 2. Consult a qualified electrician or serviceman if the grounding instructions are using ventless (recirculating) installation. Do not use ...
...the power supply cord is equipped with a cord having a grounding wire with a grounding plug. A B C Rotate Air Deflector The microwave oven is reinstalled in a risk of electric shock by peeling off damper plate. A. Keep the damper assembly in case the venting method... 2. Do not remove ground prong. GROUNDING INSTRUCTIONS ■ For all governing codes and ordinances. Remove any remaining contents from the microwave oven cavity. 2. Consult a qualified electrician or serviceman if the grounding instructions are using ventless (recirculating) installation. Do not use ...


