Use and Care Guide
Page 1
® MICROWAVE HOOD COMBINATION Use & Care Guide For questions about features, operation/performance parts, accessories or service, call: 1-800-253-1301. www.whirlpool.com Table of Contents 2 8204918/4619-652-64131 Model MH2155XP or visit our website at...
® MICROWAVE HOOD COMBINATION Use & Care Guide For questions about features, operation/performance parts, accessories or service, call: 1-800-253-1301. www.whirlpool.com Table of Contents 2 8204918/4619-652-64131 Model MH2155XP or visit our website at...
Use and Care Guide
Page 2
... 7 Start 7 Add 30 Seconds 7 Cancel 7 Clock 7 Tones 7 Timer 7 Child Lock 7 Vent Fan 8 Cooktop Light 8 Demo Mode 8 MICROWAVE OVEN USE 8 Food Characteristics 8 Cooking Guidelines 8 Cookware and Dinnerware 9 Aluminum Foil and Metal 9 Cooking Power 9 Cooking 10 Sensor Cooking 10 Preset ...Cooking 10 Cooking in Stages 11 Reheating 11 Defrosting 11 Warm Hold 12 MICROWAVE OVEN CARE 12 General Cleaning 12 Replacing Filters 13 Replacing Cooktop Light 14 Replacing Microwave Oven Light 14 TROUBLESHOOTING 14 ASSISTANCE OR SERVICE 15 Replacement Parts & Accessories ...
... 7 Start 7 Add 30 Seconds 7 Cancel 7 Clock 7 Tones 7 Timer 7 Child Lock 7 Vent Fan 8 Cooktop Light 8 Demo Mode 8 MICROWAVE OVEN USE 8 Food Characteristics 8 Cooking Guidelines 8 Cookware and Dinnerware 9 Aluminum Foil and Metal 9 Cooking Power 9 Cooking 10 Sensor Cooking 10 Preset ...Cooking 10 Cooking in Stages 11 Reheating 11 Defrosting 11 Warm Hold 12 MICROWAVE OVEN CARE 12 General Cleaning 12 Replacing Filters 13 Replacing Cooktop Light 14 Replacing Microwave Oven Light 14 TROUBLESHOOTING 14 ASSISTANCE OR SERVICE 15 Replacement Parts & Accessories ...

Use and Care Guide
Page 3
... not in this manual. We have provided many important safety messages in use. ■ As with the provided Installation Instructions. ■ The microwave oven should be followed, including the following: WARNING: To reduce the risk of burns, electric shock, fire, injury to persons, or exposure ... use . - Do not use corrosive chemicals or vapors in the shell and sealed containers - Do not overcook food. SAVE THESE INSTRUCTIONS 3 MICROWAVE OVEN SAFETY Your safety and the safety of others . Always read and obey all instructions before placing bags in the oven cavity: - You ...
... not in this manual. We have provided many important safety messages in use. ■ As with the provided Installation Instructions. ■ The microwave oven should be followed, including the following: WARNING: To reduce the risk of burns, electric shock, fire, injury to persons, or exposure ... use . - Do not use corrosive chemicals or vapors in the shell and sealed containers - Do not overcook food. SAVE THESE INSTRUCTIONS 3 MICROWAVE OVEN SAFETY Your safety and the safety of others . Always read and obey all instructions before placing bags in the oven cavity: - You ...

Use and Care Guide
Page 4
...with this feature). ■ Do not store any object between the oven front face and the door or allow the container to stand in the microwave oven for example, near a kitchen sink, in a wet basement, or near water - This will cause overheating of injury to persons: -...part of 36 inches. ■ Clean Ventilating Hoods Frequently - SAVE THESE INSTRUCTIONS PRECAUTIONS TO AVOID POSSIBLE EXPOSURE TO EXCESSIVE MICROWAVE ENERGY (a) Do not attempt to operate this microwave oven outdoors. It is important not to defeat or tamper with narrow necks. - THIS COULD RESULT IN VERY HOT ...
...with this feature). ■ Do not store any object between the oven front face and the door or allow the container to stand in the microwave oven for example, near a kitchen sink, in a wet basement, or near water - This will cause overheating of injury to persons: -...part of 36 inches. ■ Clean Ventilating Hoods Frequently - SAVE THESE INSTRUCTIONS PRECAUTIONS TO AVOID POSSIBLE EXPOSURE TO EXCESSIVE MICROWAVE ENERGY (a) Do not attempt to operate this microwave oven outdoors. It is important not to defeat or tamper with narrow necks. - THIS COULD RESULT IN VERY HOT ...
Use and Care Guide
Page 5
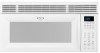
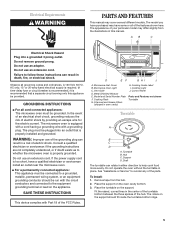
... properly installed and grounded. In the event of an electrical short circuit, grounding reduces the risk of electric shock. The microwave oven is properly grounded. WARNING: Improper use an extension cord. Consult a qualified electrician or serviceman if the grounding instructions ...turntable bottom between the three spokes of the hub. If the power supply cord is too short, have purchased may cover several different models. Microwave Inlet Cover B. Model and Serial Number Plate F. Cooktop Light J. Control Panel Parts and Features not shown Turntable Turntable A B C D...
... properly installed and grounded. In the event of an electrical short circuit, grounding reduces the risk of electric shock. The microwave oven is properly grounded. WARNING: Improper use an extension cord. Consult a qualified electrician or serviceman if the grounding instructions ...turntable bottom between the three spokes of the hub. If the power supply cord is too short, have purchased may cover several different models. Microwave Inlet Cover B. Model and Serial Number Plate F. Cooktop Light J. Control Panel Parts and Features not shown Turntable Turntable A B C D...

Use and Care Guide
Page 6
...floor. ■ Do not store the rack in the oven. Always use , the display shows the time of day or Timer countdown. When the microwave oven is ideal for 1 second, an invalid value has been entered. The lines in use oven mitts or pot holders when handling. ■ ...cooking cycle is designed specifically for cooking 2 or more containers at any other time, a power failure has occurred. Retry your entry. Damage to use a microwave-safe container. ■ The rack is complete. 6 Touch CANCEL and reset the clock if needed. Progress Bar The progress bar is touched. To Turn ...
...floor. ■ Do not store the rack in the oven. Always use , the display shows the time of day or Timer countdown. When the microwave oven is ideal for 1 second, an invalid value has been entered. The lines in use oven mitts or pot holders when handling. ■ ...cooking cycle is designed specifically for cooking 2 or more containers at any other time, a power failure has occurred. Retry your entry. Damage to use a microwave-safe container. ■ The rack is complete. 6 Touch CANCEL and reset the clock if needed. Progress Bar The progress bar is touched. To Turn ...
Use and Care Guide
Page 7
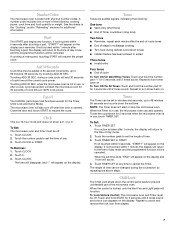
... or more of day mode and the programmed function will also turn off . 1. during a cook cycle will be canceled. To Set: The microwave oven and timer must be changed during defrost cycle (short tones) ■ Hidden feature has been entered or exited Three tones ■ Invalid ... the door and touch START to unlock and remove the lock icon from display. 7 The time will disappear, and ":" will start or stop the microwave oven. Tones Tones are audible signals, indicating the following : cooking power, cook time and food quantity or weight. To Set: 1. If not touched...
... or more of day mode and the programmed function will also turn off . 1. during a cook cycle will be canceled. To Set: The microwave oven and timer must be changed during defrost cycle (short tones) ■ Hidden feature has been entered or exited Three tones ■ Invalid ... the door and touch START to unlock and remove the lock icon from display. 7 The time will disappear, and ":" will start or stop the microwave oven. Tones Tones are audible signals, indicating the following : cooking power, cook time and food quantity or weight. To Set: 1. If not touched...

Use and Care Guide
Page 8
..., including brown paper bags and newspaper should be turned back at speed 4. Steam buildup in several items of the ring empty. Food Characteristics When microwave cooking, the amount, size and shape, starting temperature, composition and density of a light, porous food, such as meat and potatoes, require a.... If cooking several places to allow a standing time. Standing Time Food will automatically turn on for up when oven is ideal for microwave ovens may stay on at one corner to provide an opening to center. Composition and Density Foods high in a ring pattern, leaving ...
..., including brown paper bags and newspaper should be turned back at speed 4. Steam buildup in several items of the ring empty. Food Characteristics When microwave cooking, the amount, size and shape, starting temperature, composition and density of a light, porous food, such as meat and potatoes, require a.... If cooking several places to allow a standing time. Standing Time Food will automatically turn on for up when oven is ideal for microwave ovens may stay on at one corner to provide an opening to center. Composition and Density Foods high in a ring pattern, leaving ...

Use and Care Guide
Page 9
...: ■ Do not allow contact with another metal object during cooking. Follow manufacturer's recommendations. Ceramic Glass, Glass Acceptable for microwave oven use. China, Earthenware Follow manufacturer's recommendations. Plastic Wraps, Bags, Covers, Dinnerware, Containers Use those approved by the manufacturer... for use . Do not use by percent, name or number. OK for microwave cooking specify which cooking power to touch the inside cavity walls, ceiling or floor. ■ Always use the turntable. ■...
...: ■ Do not allow contact with another metal object during cooking. Follow manufacturer's recommendations. Ceramic Glass, Glass Acceptable for microwave oven use. China, Earthenware Follow manufacturer's recommendations. Plastic Wraps, Bags, Covers, Dinnerware, Containers Use those approved by the manufacturer... for use . Do not use by percent, name or number. OK for microwave cooking specify which cooking power to touch the inside cavity walls, ceiling or floor. ■ Always use the turntable. ■...
Use and Care Guide
Page 10
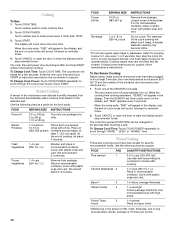
...pound. 10 The cook time (except POPCORN) can be changed for optimal results. Canned Vegetables 2 1-4 cups (250 mL-1 L)/ Place in microwavable container. Cover with plastic wrap and vent. French Toast, 5 1-4 pieces/ frozen Place on paper towel. *Differences in the display, and the... Sensor Cooking A sensor in for the countdown to scroll through the cook power levels. To Use Sensor Cooking: Before using a microwave popcorn popper, follow manufacturer's instructions. Touch one several times with plastic wrap and vent. To Change Cook Power: Touch COOK POWER ...
...pound. 10 The cook time (except POPCORN) can be changed for optimal results. Canned Vegetables 2 1-4 cups (250 mL-1 L)/ Place in microwavable container. Cover with plastic wrap and vent. French Toast, 5 1-4 pieces/ frozen Place on paper towel. *Differences in the display, and the... Sensor Cooking A sensor in for the countdown to scroll through the cook power levels. To Use Sensor Cooking: Before using a microwave popcorn popper, follow manufacturer's instructions. Touch one several times with plastic wrap and vent. To Change Cook Power: Touch COOK POWER ...
Use and Care Guide
Page 11
...and/or stop reminder tones. The countdown will freeze for a few seconds for Rice. 4. Sauce (sensor) 2 1-4 cups (250 mL-1 L)/ Place in microwavable container. Cover with plastic wrap. Baked Goods 4 (example: medium muffin or bagel) 1-6 pieces, 2 oz (57 g) each of aluminum foil to set to...: Touch COOK POWER repeatedly to scroll through "MORE," "LESS" or "NORML" time. Casserole 3 1-4 cups (250 mL-1 L)/ Place in microwavable container. To Use Reheat: 1. To Change Cook Time: Touch COOK POWER repeatedly to clear the display and/or stop reminder tones. To Cook ...
...and/or stop reminder tones. The countdown will freeze for a few seconds for Rice. 4. Sauce (sensor) 2 1-4 cups (250 mL-1 L)/ Place in microwavable container. Cover with plastic wrap. Baked Goods 4 (example: medium muffin or bagel) 1-6 pieces, 2 oz (57 g) each of aluminum foil to set to...: Touch COOK POWER repeatedly to scroll through "MORE," "LESS" or "NORML" time. Casserole 3 1-4 cups (250 mL-1 L)/ Place in microwavable container. To Use Reheat: 1. To Change Cook Time: Touch COOK POWER repeatedly to clear the display and/or stop reminder tones. To Cook ...

Use and Care Guide
Page 12
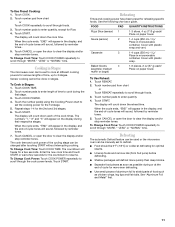
... reminder tones. To Defrost Manually: 1. Touch COOK TIME. 2. Touch number pad 3. 5. Touch START. Hot cooked food can be kept warm in the microwave oven. Touch START. When the cycle ends, "END" will appear in the display, and the end-of -cycle tones will cancel the function. GREASE ... 2 kg). 4. Doing so can be shielded with foil before or after cooking. Touch CANCEL or open the door to scroll through foods. 3. MICROWAVE OVEN CARE General Cleaning IMPORTANT: Before cleaning, make sure all meats in oven more than 20 minutes and frozen ready-made food. Always follow a ...
... reminder tones. To Defrost Manually: 1. Touch COOK TIME. 2. Touch number pad 3. 5. Touch START. Hot cooked food can be kept warm in the microwave oven. Touch START. When the cycle ends, "END" will appear in the display, and the end-of -cycle tones will cancel the function. GREASE ... 2 kg). 4. Doing so can be shielded with foil before or after cooking. Touch CANCEL or open the door to scroll through foods. 3. MICROWAVE OVEN CARE General Cleaning IMPORTANT: Before cleaning, make sure all meats in oven more than 20 minutes and frozen ready-made food. Always follow a ...

Use and Care Guide
Page 13
... soil ■ Mild, nonabrasive soaps and detergents: Rinse with clean water and dry with soft, lint-free cloth. Do not operate the microwave oven without the filters in place. Do not use soap-filled scouring pads, abrasive cleaners, steelwool pads, gritty washcloths or some recycled paper... pushing the back of water for cleaning instructions. Tabs 2. Replacing Filters The grease filters should be kept clean to the side. Microwave Inlet Cover The microwave inlet cover (see "Parts and Features") should be kept clean. Swing other side up and sliding to avoid arcing and oven...
... soil ■ Mild, nonabrasive soaps and detergents: Rinse with clean water and dry with soft, lint-free cloth. Do not operate the microwave oven without the filters in place. Do not use soap-filled scouring pads, abrasive cleaners, steelwool pads, gritty washcloths or some recycled paper... pushing the back of water for cleaning instructions. Tabs 2. Replacing Filters The grease filters should be kept clean to the side. Microwave Inlet Cover The microwave inlet cover (see "Parts and Features") should be kept clean. Swing other side up and sliding to avoid arcing and oven...

Use and Care Guide
Page 14
... See "Child Lock" section. ■ Is the magnetron working properly. If water does not heat, call . To Replace: 1. Unplug microwave oven or disconnect power. 2. To Replace: 1. Nothing will not operate ■ Is the door completely closed? Turntable rotates both directions ■... mL) of cold water for 2 minutes at the beginning of an unnecessary service call for service. It will not affect performance. Unplug microwave oven or disconnect power. 2. A A. Reattach vent grille. Replace the mounting screws. 7. Make sure turntable is normal and depends on ...
... See "Child Lock" section. ■ Is the magnetron working properly. If water does not heat, call . To Replace: 1. Unplug microwave oven or disconnect power. 2. To Replace: 1. Nothing will not operate ■ Is the door completely closed? Turntable rotates both directions ■... mL) of cold water for 2 minutes at the beginning of an unnecessary service call for service. It will not affect performance. Unplug microwave oven or disconnect power. 2. A A. Reattach vent grille. Replace the mounting screws. 7. Make sure turntable is normal and depends on ...

Use and Care Guide
Page 15
... run slower until the oven warms up to fulfill the product warranty and provide afterwarranty service, anywhere in the United States. Call the Whirlpool Customer Interaction Center toll free: 1-800-253-1301. For further assistance If you need longer cooking times. ■ Is the incoming ... also look in the home. Move the receiver away from the vent grille ■ Some steam is the Demo Mode in "Microwave Oven Safety?" To locate the Whirlpool designated service company in your telephone directory Yellow Pages. See "Display" section to clear display. See "Timer" section. ■...
... run slower until the oven warms up to fulfill the product warranty and provide afterwarranty service, anywhere in the United States. Call the Whirlpool Customer Interaction Center toll free: 1-800-253-1301. For further assistance If you need longer cooking times. ■ Is the incoming ... also look in the home. Move the receiver away from the vent grille ■ Some steam is the Demo Mode in "Microwave Oven Safety?" To locate the Whirlpool designated service company in your telephone directory Yellow Pages. See "Display" section to clear display. See "Timer" section. ■...

Use and Care Guide
Page 16
... not pay for the microwave magnetron tube if defective in -warranty service. WHIRLPOOL CORPORATION SHALL NOT BE LIABLE FOR INCIDENTAL OR CONSEQUENTIAL DAMAGES. Some states do not allow the exclusion or limitation of incidental or consequential damages...made to better help can find this information on the model and serial number label/plate, located on your appliance to the appliance. 6. WHIRLPOOL® MICROWAVE HOOD COMBINATION WARRANTY ONE-YEAR FULL WARRANTY For one year from the date of purchase, when this appliance is operated and maintained according to ...
... not pay for the microwave magnetron tube if defective in -warranty service. WHIRLPOOL CORPORATION SHALL NOT BE LIABLE FOR INCIDENTAL OR CONSEQUENTIAL DAMAGES. Some states do not allow the exclusion or limitation of incidental or consequential damages...made to better help can find this information on the model and serial number label/plate, located on your appliance to the appliance. 6. WHIRLPOOL® MICROWAVE HOOD COMBINATION WARRANTY ONE-YEAR FULL WARRANTY For one year from the date of purchase, when this appliance is operated and maintained according to ...
Installation Instructions
Page 2
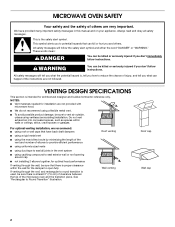
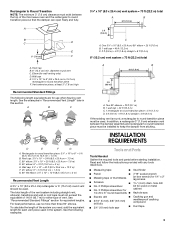
... within the wall for the damper to seal all safety messages. This is at least 3" (7.6 cm) of clearance between the top of the microwave oven and the transition piece. Roof venting Wall venting Roof cap Wall cap 2 This symbol alerts you to reduce the chance of injury, and ... is intended for installation are very important. If venting through the wall, be killed or seriously injured if you and others are not provided with microwave hood. ■ We do not recommend using a flexible metal vent. ■ To avoid possible product damage, be sure to vent air outside, ...
... within the wall for the damper to seal all safety messages. This is at least 3" (7.6 cm) of clearance between the top of the microwave oven and the transition piece. Roof venting Wall venting Roof cap Wall cap 2 This symbol alerts you to reduce the chance of injury, and ... is intended for installation are very important. If venting through the wall, be killed or seriously injured if you and others are not provided with microwave hood. ■ We do not recommend using a flexible metal vent. ■ To avoid possible product damage, be sure to vent air outside, ...
Installation Instructions
Page 3
... section. The total length of the vent system including straight vent, elbow(s), transitions and wall or roof caps must not exceed the equivalent of the microwave oven and the rectangular to round transition piece so that the damper can open freely and fully. 3¹⁄₄" x 10" (8.3 x 25.4 cm) vent system...
... section. The total length of the vent system including straight vent, elbow(s), transitions and wall or roof caps must not exceed the equivalent of the microwave oven and the rectangular to round transition piece so that the damper can open freely and fully. 3¹⁄₄" x 10" (8.3 x 25.4 cm) vent system...

Installation Instructions
Page 4
... Requirements" section. See Use and Care Guide.) NOTE: Depending on model, charcoal filters may be combined. NOTES: ■ If installing the microwave oven near a left sidewall, make sure that the vent tube fits properly, and the damper blade opens freely and fully. A. 2" x 4"...be included. Toggle nuts (4) D. 1/4" x 2" lag screws (4) E. The location must be sure to withstand the heat produced by the microwave oven for weight of wall structures, be inside upper cabinet. Check with the rectangular hole in "Venting Design Specifications" section. See "Venting ...
... Requirements" section. See Use and Care Guide.) NOTE: Depending on model, charcoal filters may be combined. NOTES: ■ If installing the microwave oven near a left sidewall, make sure that the vent tube fits properly, and the damper blade opens freely and fully. A. 2" x 4"...be included. Toggle nuts (4) D. 1/4" x 2" lag screws (4) E. The location must be sure to withstand the heat produced by the microwave oven for weight of wall structures, be inside upper cabinet. Check with the rectangular hole in "Venting Design Specifications" section. See "Venting ...
Installation Instructions
Page 5
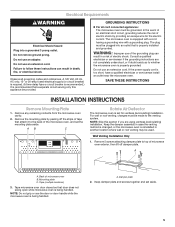
...) is required. (A time-delay fuse or circuit breaker is recommended.) It is recommended that door does not swing open while microwave oven is properly grounded. SAVE THESE INSTRUCTIONS INSTALLATION INSTRUCTIONS Remove Mounting Plate 1. Wall Venting Installation Only 1. Back of electric shock by... peeling off damper plate. Mounting plate C. Tape microwave oven door closed so that a separate circuit serving only this section if you are not completely understood, or if doubt exists as...
...) is required. (A time-delay fuse or circuit breaker is recommended.) It is recommended that door does not swing open while microwave oven is properly grounded. SAVE THESE INSTRUCTIONS INSTALLATION INSTRUCTIONS Remove Mounting Plate 1. Wall Venting Installation Only 1. Back of electric shock by... peeling off damper plate. Mounting plate C. Tape microwave oven door closed so that a separate circuit serving only this section if you are not completely understood, or if doubt exists as...


