
Use and Care Guide
Page 2
...6 Clock 6 Tones 6 Timer 6 Control Lock 6 Vent Fan 6 Cooktop Light 7 Demo Mode 7 MICROWAVE OVEN USE 7 Food Characteristics 7 Cooking Guidelines 7 Cookware and Dinnerware 8 Aluminum Foil and Metal 8 Microwave Cooking Power 8 Manual Cooking 9 Cooking in Stages (or steps 9 Popcorn 9 Baked Potato 10 Pizza ...10 Doneness 10 Preset Cooking 10 Reheating 11 Defrosting 11 MICROWAVE OVEN CARE 12 General Cleaning 12 Replacing Filters 12 Replacing Cooktop Light 13 Replacing Microwave Oven Light 13 TROUBLESHOOTING 14 ASSISTANCE OR SERVICE 15 Replacement Parts 15...
...6 Clock 6 Tones 6 Timer 6 Control Lock 6 Vent Fan 6 Cooktop Light 7 Demo Mode 7 MICROWAVE OVEN USE 7 Food Characteristics 7 Cooking Guidelines 7 Cookware and Dinnerware 8 Aluminum Foil and Metal 8 Microwave Cooking Power 8 Manual Cooking 9 Cooking in Stages (or steps 9 Popcorn 9 Baked Potato 10 Pizza ...10 Doneness 10 Preset Cooking 10 Reheating 11 Defrosting 11 MICROWAVE OVEN CARE 12 General Cleaning 12 Replacing Filters 12 Replacing Cooktop Light 13 Replacing Microwave Oven Light 13 TROUBLESHOOTING 14 ASSISTANCE OR SERVICE 15 Replacement Parts 15...

Use and Care Guide
Page 3
... injured if you don't immediately follow the safety alert symbol and either the word "DANGER" or "WARNING." IMPORTANT SAFETY INSTRUCTIONS When using the microwave oven. [] Read and follow instructions. Connect only to heat, cook, or dry food. for example, closed , turn oven off, and disconnect.... - Do not overheat the liquid. - After heating, allow the container to be serviced only by children. [] Do not operate the microwave oven if it has a damaged cord or plug, if it is specifically designed to properly grounded outlet. All safety messages will follow instructions....
... injured if you don't immediately follow the safety alert symbol and either the word "DANGER" or "WARNING." IMPORTANT SAFETY INSTRUCTIONS When using the microwave oven. [] Read and follow instructions. Connect only to heat, cook, or dry food. for example, closed , turn oven off, and disconnect.... - Do not overheat the liquid. - After heating, allow the container to be serviced only by children. [] Do not operate the microwave oven if it has a damaged cord or plug, if it is specifically designed to properly grounded outlet. All safety messages will follow instructions....

Use and Care Guide
Page 4
... or loosened), (3) Door seals and sealing surfaces. (d) The oven should not be plugged into a grounded 3 prong outlet. Observe all cord connected appliances: The microwave oven must be allowed to accumulate on . [] Do not let cord hang over edge of table or counter. [] Do not mount over a sink. [] ... or allow soil or cleaner residue to accumulate on hood or filter. [] Do not use the microwave oven near the microwave oven. If the power supply cord is important not to whether the microwave oven is damaged. i Corrosive cleaning agents, such as to defeat or tamper with a fuse or...
... or loosened), (3) Door seals and sealing surfaces. (d) The oven should not be plugged into a grounded 3 prong outlet. Observe all cord connected appliances: The microwave oven must be allowed to accumulate on . [] Do not let cord hang over edge of table or counter. [] Do not mount over a sink. [] ... or allow soil or cleaner residue to accumulate on hood or filter. [] Do not use the microwave oven near the microwave oven. If the power supply cord is important not to whether the microwave oven is damaged. i Corrosive cleaning agents, such as to defeat or tamper with a fuse or...

Use and Care Guide
Page 5
...grille B. Metal shielded window G. Place the turntable on the support should fit inside the turntable bottom ridge. When power is first supplied to the microwave oven, a ":" will reappear in the display. The speed of your entry. Door lock system F. Cooking guide label H. Grease filters (shipped ... A. If the ":" blinks in use (standby mode), the display shows the time of the hub. To Adjust Scroll Speed: 1. When the microwave oven is not in either direction to reorder any other time, a power failure has occurred. The model you have some or all of the...
...grille B. Metal shielded window G. Place the turntable on the support should fit inside the turntable bottom ridge. When power is first supplied to the microwave oven, a ":" will reappear in the display. The speed of your entry. Door lock system F. Cooking guide label H. Grease filters (shipped ... A. If the ":" blinks in use (standby mode), the display shows the time of the hub. To Adjust Scroll Speed: 1. When the microwave oven is not in either direction to reorder any other time, a power failure has occurred. The model you have some or all of the...
Use and Care Guide
Page 6
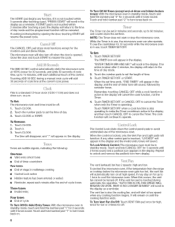
...Touch the number pads to set the time of cycle To Turn Off/On Valid Entry Tones: With the microwave oven in standby mode, touch and hold the number pad ' TheSTARpTadbeginasnyfunctionIf.itis nottouchewdithin 5secondasftetrouchinagpad", PRESSSTARTw"illscrolilnthe displaaysaremindeIfrS. ... CLOCK. 2. ClosethedoorandtouchSTARtTo resumtehecycle. Touch CLOCK or START. The time will disappear, and ":" will appear on the display. rp.m. ToSet: The microwave oven and timer must be off. 1. Tones are audible signals, indicating the following: One tone • Valid entry (short tone) •...
...Touch the number pads to set the time of cycle To Turn Off/On Valid Entry Tones: With the microwave oven in standby mode, touch and hold the number pad ' TheSTARpTadbeginasnyfunctionIf.itis nottouchewdithin 5secondasftetrouchinagpad", PRESSSTARTw"illscrolilnthe displaaysaremindeIfrS. ... CLOCK. 2. ClosethedoorandtouchSTARtTo resumtehecycle. Touch CLOCK or START. The time will disappear, and ":" will appear on the display. rp.m. ToSet: The microwave oven and timer must be off. 1. Tones are audible signals, indicating the following: One tone • Valid entry (short tone) •...

Use and Care Guide
Page 7
...and shape, starting temperature, composition and density of a light, porous food, such as chicken wings, leg tips and fish tail. Stir from microwave oven. • Do not overcook potatoes. Arranging If heating irregularly shaped or different sized foods, arrange the thinner parts and smaller sized items ... Covering food helps retain moisture, shorten cook time and reduce spattering. Use the lid supplied with cookware. They will not melt in the microwave oven because it is empty. • The turntable must be slightly firm. Check for 5 minutes. Standing Time Food will heat faster ...
...and shape, starting temperature, composition and density of a light, porous food, such as chicken wings, leg tips and fish tail. Stir from microwave oven. • Do not overcook potatoes. Arranging If heating irregularly shaped or different sized foods, arrange the thinner parts and smaller sized items ... Covering food helps retain moisture, shorten cook time and reduce spattering. Use the lid supplied with cookware. They will not melt in the microwave oven because it is empty. • The turntable must be slightly firm. Check for 5 minutes. Standing Time Food will heat faster ...

Use and Care Guide
Page 8
... beside it becomes hot and the water stays cool. Browning Dish Bottom must be used in the microwave oven. Ceramic Glass, Glass Acceptable for use . Plastic: Wraps, Bags, Covers, Dinnerware, Containers Use... supplied with high water content, such as cheese and egg dishes, pudding and custards. OK for Microwave Use: 1. i._.__s_--.__:I J_ CookwaarenddinnerwamreusftitontheturntableA.lwayusse ovenmittsorpotholderws henhandlinbgecausaenydishmay becomheotfromheatransferrefrdomthefood.Donotuse cookwaraenddinnerwawreithgoldorsilvetrrim.Usethe followincgharat saguidet,hentestbeforuesing....
... beside it becomes hot and the water stays cool. Browning Dish Bottom must be used in the microwave oven. Ceramic Glass, Glass Acceptable for use . Plastic: Wraps, Bags, Covers, Dinnerware, Containers Use... supplied with high water content, such as cheese and egg dishes, pudding and custards. OK for Microwave Use: 1. i._.__s_--.__:I J_ CookwaarenddinnerwamreusftitontheturntableA.lwayusse ovenmittsorpotholderws henhandlinbgecausaenydishmay becomheotfromheatransferrefrdomthefood.Donotuse cookwaraenddinnerwawreithgoldorsilvetrrim.Usethe followincgharat saguidet,hentestbeforuesing....

Use and Care Guide
Page 9
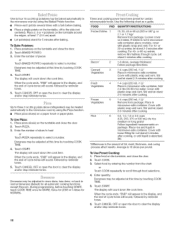
...in the display, and the end-of-cycle tones will not be changed after touching START without interrupting cooking. Place food on commercially packaged microwave popcorn. When the cycle ends, "END" will appear in ounces, using the number pads (invalid numbers will sound, followed by reminder ...on the turntable and close the door. 2. Touch CANCEL OFF or open the door to scroll through the bag size selections. 5. See "Microwave Cooking Power" chart. 4. The cook time and power may vary by reminder tones. 6. To Change Cook Power: Touch COOK POWER repeatedly ...
...in the display, and the end-of-cycle tones will not be changed after touching START without interrupting cooking. Place food on commercially packaged microwave popcorn. When the cycle ends, "END" will appear in ounces, using the number pads (invalid numbers will sound, followed by reminder ...on the turntable and close the door. 2. Touch CANCEL OFF or open the door to scroll through the bag size selections. 5. See "Microwave Cooking Power" chart. 4. The cook time and power may vary by reminder tones. 6. To Change Cook Power: Touch COOK POWER repeatedly ...
Use and Care Guide
Page 10
...6. During programming, before touching START, touch COOK TIME once for MORE, twice for LESS or 3 times for certain microwavable foods. Enter quantity. Uptothree3 oz(85g)pizzaslices(refrigeratemda) ybeheated automaticainllythemicrowavoevenbyusingthePizzafunction. • Placepizzaslice(so)na papetroweol rpapepr late. Enter... the following chart as a guide. Loosen cover on 3 sides. Cover with plastic wrap and vent. Place in microwave-safe container. or 60-oz entree, remove film halfway through food selections. Average is absorbed. Touch START. TouchSTART....
...6. During programming, before touching START, touch COOK TIME once for MORE, twice for LESS or 3 times for certain microwavable foods. Enter quantity. Uptothree3 oz(85g)pizzaslices(refrigeratemda) ybeheated automaticainllythemicrowavoevenbyusingthePizzafunction. • Placepizzaslice(so)na papetroweol rpapepr late. Enter... the following chart as a guide. Loosen cover on 3 sides. Cover with plastic wrap and vent. Place in microwave-safe container. or 60-oz entree, remove film halfway through food selections. Average is absorbed. Touch START. TouchSTART....
Use and Care Guide
Page 11
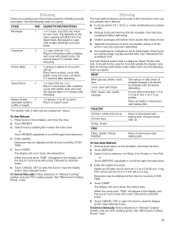
..." section, and use 70% cooking power. The display will count down the defrost time. When the cycle ends, "END" will appear in microwave-safe container, and cover with foil before defrosting. The diameter of cycle for optimal results. Shallow packages will sound, followed by entering 1 for...display, and the end-of food such as chicken wings, leg tips and fish tails. When the cycle ends, "END" will appear in microwave-safe container. Touch DEFROST. 3. Touch START. Touch START. Use the following chart as a guide. FOOD PAD QUANTITY/INSTRUCTION S Beverage 1 Casserole...
..." section, and use 70% cooking power. The display will count down the defrost time. When the cycle ends, "END" will appear in microwave-safe container, and cover with foil before defrosting. The diameter of cycle for optimal results. Shallow packages will sound, followed by entering 1 for...display, and the end-of food such as chicken wings, leg tips and fish tails. When the cycle ends, "END" will appear in microwave-safe container. Touch DEFROST. 3. Touch START. Touch START. Use the following chart as a guide. FOOD PAD QUANTITY/INSTRUCTION S Beverage 1 Casserole...

Use and Care Guide
Page 12
...) of grain. • Stainless Steel Cleaner & Polish (not included): See "Assistance or Service" section to 12 months. Do not operate the microwave oven without the grease filters in direction of either lemon juice or vinegar for 2 to the end. See "General Cleaning" for hard water spots ...abrasive cleaners, steel-wool pads, gritty washcloths or some recycled paper towels. Always follow label instructions on some models) To avoid damage to microwave oven door and exterior, do not use ammonia or corrosive cleaning agents such as lyebased oven cleaners. • Hot water and mild ...
...) of grain. • Stainless Steel Cleaner & Polish (not included): See "Assistance or Service" section to 12 months. Do not operate the microwave oven without the grease filters in direction of either lemon juice or vinegar for 2 to the end. See "General Cleaning" for hard water spots ...abrasive cleaners, steel-wool pads, gritty washcloths or some recycled paper towels. Always follow label instructions on some models) To avoid damage to microwave oven door and exterior, do not use ammonia or corrosive cleaning agents such as lyebased oven cleaners. • Hot water and mild ...
Use and Care Guide
Page 13
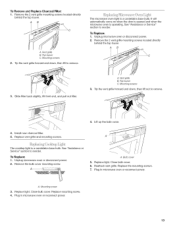
...top louver. See "Assistance or Service" section to reorder. Mounting screws 3. Install new charcoal filter. 5. To Replace: 1. A. Mounting screw 3. Unplug microwave oven or disconnect power. 2. Bulb cover 5. Close bulb cover. 6. Replace mounting screw. 4. Vent grille B. See "Assistance or Service" section to ... and down , then lift to remove. 4. Mounting screws 2. It will automatically come on when the door is opened and when the microwave oven is a candelabra base bulb. Top louver C. AB C A. Top louver C. To Replace: 1. Slide filter back slightly, lift ...
...top louver. See "Assistance or Service" section to reorder. Mounting screws 3. Install new charcoal filter. 5. To Replace: 1. A. Mounting screw 3. Unplug microwave oven or disconnect power. 2. Bulb cover 5. Close bulb cover. 6. Replace mounting screw. 4. Vent grille B. See "Assistance or Service" section to ... and down , then lift to remove. 4. Mounting screws 2. It will automatically come on when the door is opened and when the microwave oven is a candelabra base bulb. Top louver C. AB C A. Top louver C. To Replace: 1. Slide filter back slightly, lift ...

Use and Care Guide
Page 14
... the tape been removed from the vent grille • Some steam is not working, call for service. See "Assistance or Service" section. Microwave oven makes humming noise • This is coming from turntable hub? Is the turntable support operating properly? See "Assistance or Service" section....the turntable support. See "Demo Mode" section. Replace the fuse or reset the circuit breaker. Firmly close door. • Is the electronic microwave oven control set ? If water does not heat, call an electrician. • Is the appliance wired properly? Is the turntable properly in...
... the tape been removed from the vent grille • Some steam is not working, call for service. See "Assistance or Service" section. Microwave oven makes humming noise • This is coming from turntable hub? Is the turntable support operating properly? See "Assistance or Service" section....the turntable support. See "Demo Mode" section. Replace the fuse or reset the circuit breaker. Firmly close door. • Is the electronic microwave oven control set ? If water does not heat, call an electrician. • Is the appliance wired properly? Is the turntable properly in...

Use and Care Guide
Page 15
...To locate FSP_ replacement parts in the United States. Whirlpool designated service technicians are trained to cool the microwave oven if the temperature from the microwave oven, or adjust the radio or TV antenna. • Are the microwave oven door and sealing surfaces clean? Is the incoming ...cordless phone or avoid using these areas are made with the same precision used to build every new WHIRLPOOL ® appliance. It may experience static or noise while the microwave oven is normal. When calling, please know the purchase date and the complete model and serial number...
...To locate FSP_ replacement parts in the United States. Whirlpool designated service technicians are trained to cool the microwave oven if the temperature from the microwave oven, or adjust the radio or TV antenna. • Are the microwave oven door and sealing surfaces clean? Is the incoming ...cordless phone or avoid using these areas are made with the same precision used to build every new WHIRLPOOL ® appliance. It may experience static or noise while the microwave oven is normal. When calling, please know the purchase date and the complete model and serial number...
Installation Instructions
Page 1
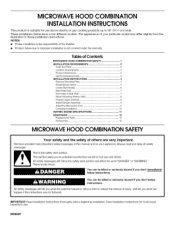
...not followed. Mark RearWall 7.. Complete Installation 1.0 VENTING DESIGN SPECIFICATIONS 11 ASSISTANCE 1..2 Replacement Par_s 1..2 Accessories 1..2 MICROWAVE HOOD COMBINATION SAFETY Your safety and the safety of your appliance. Table of the installer. • Product...Holes in these installation instructions. NOTES: • Proper installation is the responsibility of Contents MICROWAVE HOOD COMBINATION SAFETY J INSTALLATIONREQUIREMENTS 2. MICROWAVE HOOD COMBINATION INSTALLATION INSTRUCTIONS This product is suitable for local house inspector's use above electric ...
...not followed. Mark RearWall 7.. Complete Installation 1.0 VENTING DESIGN SPECIFICATIONS 11 ASSISTANCE 1..2 Replacement Par_s 1..2 Accessories 1..2 MICROWAVE HOOD COMBINATION SAFETY Your safety and the safety of your appliance. Table of the installer. • Product...Holes in these installation instructions. NOTES: • Proper installation is the responsibility of Contents MICROWAVE HOOD COMBINATION SAFETY J INSTALLATIONREQUIREMENTS 2. MICROWAVE HOOD COMBINATION INSTALLATION INSTRUCTIONS This product is suitable for local house inspector's use above electric ...

Installation Instructions
Page 2
...-head bolts (2) C. Power supply cord bushing (1) H. Materials needed • Standard fittings for weight of clearance between the wall and the microwave oven, so that the vent tube fits properly, and the damper blade opens freely and fully. For other damages. Special Requirements For Wall ... 2" x 4" (50.8 x 101.6 mm) wood wall stud and minimum 3/8" (9.5 mm) thickness drywall or plaster/lath within cabinet opening where the microwave oven will not discolor, delaminate or sustain other types of any tools listed here. • Measuring tape • Stud finder • Pencil •...
...-head bolts (2) C. Power supply cord bushing (1) H. Materials needed • Standard fittings for weight of clearance between the wall and the microwave oven, so that the vent tube fits properly, and the damper blade opens freely and fully. For other damages. Special Requirements For Wall ... 2" x 4" (50.8 x 101.6 mm) wood wall stud and minimum 3/8" (9.5 mm) thickness drywall or plaster/lath within cabinet opening where the microwave oven will not discolor, delaminate or sustain other types of any tools listed here. • Measuring tape • Stud finder • Pencil •...
Installation Instructions
Page 3
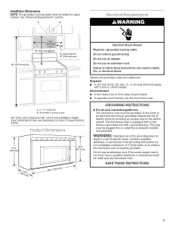
Installation Dimensions NOTE: The grounded 3 prong outlet must be inside the upper cabinet. A B 66" (167.6 cm) min. 30" (76.2 cm) typical* 12" (30.5 cm) min. 14" (35.6 cm) max. @@ @@ See "Electrical Requirements" section.
Installation Dimensions NOTE: The grounded 3 prong outlet must be inside the upper cabinet. A B 66" (167.6 cm) min. 30" (76.2 cm) typical* 12" (30.5 cm) min. 14" (35.6 cm) max. @@ @@ See "Electrical Requirements" section.

Installation Instructions
Page 4
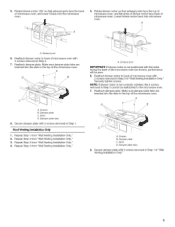
Remove the mounting plate by peeling off the strips of tape that door does not swing open while the microwave oven is being handled. Wall Venting Installation Only 1. I I I I I A. A Screws B. Remove 2 screws attaching blower motor to the work ...set for recirculation installation. Remove screws attaching damper plate to the back of the microwave oven, and set aside. 3. Back of microwave oven. A A. A. Tape (multiple locations) 3. Lift blower motor out of microwave oven C. NOTE: Skip this section if you are using recirculation installation. Screws...
Remove the mounting plate by peeling off the strips of tape that door does not swing open while the microwave oven is being handled. Wall Venting Installation Only 1. I I I I I A. A Screws B. Remove 2 screws attaching blower motor to the work ...set for recirculation installation. Remove screws attaching damper plate to the back of the microwave oven, and set aside. 3. Back of microwave oven. A A. A. Tape (multiple locations) 3. Lift blower motor out of microwave oven C. NOTE: Skip this section if you are using recirculation installation. Screws...
Installation Instructions
Page 5
... 5= Rotate blower motor 180 ° so that exhaust ports face the top of microwave oven, and flat sides of blower motor face back of microwave oven. Make sure damper plate tabs are inserted into microwave oven. Roof Venting Installation Only 1. Repeat Step 4 from "Wall Venting Installation Only... B. Slots D. Make sure damper plate tabs are inserted into the microwave oven. 5= Rotate blower motor so that exhaust ports face the back of microwave oven, and lower it back into the slots in the top of the microwave oven. Lower blower motor back into the slots in Step 1. A...
... 5= Rotate blower motor 180 ° so that exhaust ports face the top of microwave oven, and flat sides of blower motor face back of microwave oven. Make sure damper plate tabs are inserted into microwave oven. Roof Venting Installation Only 1. Repeat Step 4 from "Wall Venting Installation Only... B. Slots D. Make sure damper plate tabs are inserted into the microwave oven. 5= Rotate blower motor so that exhaust ports face the back of microwave oven, and lower it back into the slots in the top of the microwave oven. Lower blower motor back into the slots in Step 1. A...

Installation Instructions
Page 6
... of the wall stud(s) within the opening. 2. Wall stud centerllnes D. Lx}c@e NOTE: If no wall studs exist within the cabinet opening, do not install the microwave oven, See illustrations in "Possible Wall Stud Configurations." Possible Wall Stud Configurations These depictions show examples of the vertical centerline (see "Mark Rear Wall" section...
... of the wall stud(s) within the opening. 2. Wall stud centerllnes D. Lx}c@e NOTE: If no wall studs exist within the cabinet opening, do not install the microwave oven, See illustrations in "Possible Wall Stud Configurations." Possible Wall Stud Configurations These depictions show examples of the vertical centerline (see "Mark Rear Wall" section...


