Use and Care Guide
Page 1
® 240-VOLT ELECTRIC DRYER Use & Care Guide For questions about features, operation/performance, parts, accessories or service, call: 1-800-253-1301. or visit our website at...www.whirlpool.com Table of Contents 2 8578567
® 240-VOLT ELECTRIC DRYER Use & Care Guide For questions about features, operation/performance, parts, accessories or service, call: 1-800-253-1301. or visit our website at...www.whirlpool.com Table of Contents 2 8578567
Use and Care Guide
Page 2
TABLE OF CONTENTS DRYER SAFETY 3 INSTALLATION REQUIREMENTS 4 Tools and Parts 4 Options 4 Location Requirements 4 Electrical Requirements 6 Venting Requirements 7 INSTALLATION INSTRUCTIONS 8 Electrical Connection 8 Plan Vent System 11 Install Vent System 12 Connect Vent 12 Level Dryer 13 Complete Installation 13 DRYER USE 14 Starting Your Dryer 14 Stopping and Restarting 14 Changing Cycles and Temperatures 14 Controls 15 Drying, Cycle...
TABLE OF CONTENTS DRYER SAFETY 3 INSTALLATION REQUIREMENTS 4 Tools and Parts 4 Options 4 Location Requirements 4 Electrical Requirements 6 Venting Requirements 7 INSTALLATION INSTRUCTIONS 8 Electrical Connection 8 Plan Vent System 11 Install Vent System 12 Connect Vent 12 Level Dryer 13 Complete Installation 13 DRYER USE 14 Starting Your Dryer 14 Stopping and Restarting 14 Changing Cycles and Temperatures 14 Controls 15 Drying, Cycle...
Use and Care Guide
Page 3
...hurt you don't immediately follow instructions. s Do not install or store the dryer where it will be cleaned periodically by the manufacturer of fire, electric shock, or injury to play on your dryer. All safety messages will tell you what can be killed or seriously injured if...controls. IMPORTANT SAFETY INSTRUCTIONS WARNING: To reduce the risk of the fabric softener or product. s Do not repair or replace any part of the dryer or attempt any servicing unless specifically recommended in this manual and on or in , or spotted with gasoline, drycleaning solvents, or other...
...hurt you don't immediately follow instructions. s Do not install or store the dryer where it will be cleaned periodically by the manufacturer of fire, electric shock, or injury to play on your dryer. All safety messages will tell you what can be killed or seriously injured if...controls. IMPORTANT SAFETY INSTRUCTIONS WARNING: To reduce the risk of the fabric softener or product. s Do not repair or replace any part of the dryer or attempt any servicing unless specifically recommended in this manual and on or in , or spotted with gasoline, drycleaning solvents, or other...
Use and Care Guide
Page 4
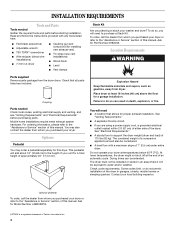
... within 2 ft (61 cm) of either side of your dryer. s If you will need to the height of the dryer. The dryer must not be considered. INSTALLATION REQUIREMENTS Tools and Parts Tools needed Check local codes, existing electrical supply and venting, and see "Venting Requirements" and "Electrical Requirements" before starting installation. To do not permit, installation...
... within 2 ft (61 cm) of either side of your dryer. s If you will need to the height of the dryer. The dryer must not be considered. INSTALLATION REQUIREMENTS Tools and Parts Tools needed Check local codes, existing electrical supply and venting, and see "Venting Requirements" and "Electrical Requirements" before starting installation. To do not permit, installation...
Use and Care Guide
Page 5
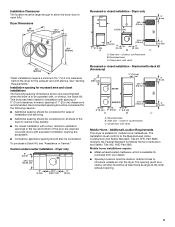
....1 cm) *23 ¼" (60.3 cm) Recessed or closet installation - See "Venting Requirements." The opening (such as the dryer exhaust opening are recommended when the dryer is available for Mobile Home Construction and Safety, Title 245, HUD Part 280). This dryer has been tested for mobile home installations. s For closet installation with spacing of the...
....1 cm) *23 ¼" (60.3 cm) Recessed or closet installation - See "Venting Requirements." The opening (such as the dryer exhaust opening are recommended when the dryer is available for Mobile Home Construction and Safety, Title 245, HUD Part 280). This dryer has been tested for mobile home installations. s For closet installation with spacing of the...
Use and Care Guide
Page 11
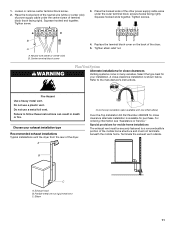
...together. Squeeze hooked ends together. Center terminal block screw WARNING 4. Replace the terminal block cover on the back of the dryer. Tighten strain relief nut. Choose your installation. For ordering information see "Assistance or Service." Terminate the exhaust vent outside.... Tighten screw. 3. Tighten screws. A Over-the-top installation (also available with one offset elbow) Over-the-Top Installation Kit Part Number 4396028 for purchase. Elbow 11 Neutral wire (white or center wire) B. Plan Vent System Alternate installations for close -clearance installation...
...together. Squeeze hooked ends together. Center terminal block screw WARNING 4. Replace the terminal block cover on the back of the dryer. Tighten strain relief nut. Choose your installation. For ordering information see "Assistance or Service." Terminate the exhaust vent outside.... Tighten screw. 3. Tighten screws. A Over-the-top installation (also available with one offset elbow) Over-the-Top Installation Kit Part Number 4396028 for purchase. Elbow 11 Neutral wire (white or center wire) B. Plan Vent System Alternate installations for close -clearance installation...

Use and Care Guide
Page 13
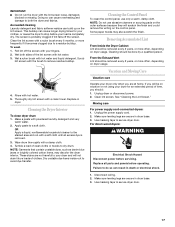
..., cancel cycle and close the door. Turn on the dryer. 8. When the dryer has been running or "On" position. If there is connected. Plug into a grounded outlet and/or electrical supply is an extra part, go away. 13 Set the dryer on a full heat cycle (not an air cycle) for... levelness. If the dryer is first heated. Read "Dryer Use." 9. Check levelness first side to side, then front to ...
..., cancel cycle and close the door. Turn on the dryer. 8. When the dryer has been running or "On" position. If there is connected. Plug into a grounded outlet and/or electrical supply is an extra part, go away. 13 Set the dryer on a full heat cycle (not an air cycle) for... levelness. If the dryer is first heated. Read "Dryer Use." 9. Check levelness first side to side, then front to ...
Use and Care Guide
Page 17
...screen with a soft cloth until all parts and panels before servicing. Cleaning should be removed every 2 years, or more frequently if it becomes clogged due to remove residue buildup. 4. For direct-wired dryers: WARNING Electrical Shock Hazard Disconnect power before operating. ...Disconnect wiring. 2. Wet both the dryer and fabrics. Failure to the stained area and rub with hot water. 3. OR...
...screen with a soft cloth until all parts and panels before servicing. Cleaning should be removed every 2 years, or more frequently if it becomes clogged due to remove residue buildup. 4. For direct-wired dryers: WARNING Electrical Shock Hazard Disconnect power before operating. ...Disconnect wiring. 2. Wet both the dryer and fabrics. Failure to the stained area and rub with hot water. 3. OR...

Use and Care Guide
Page 19
...vision, etc.). To locate the Whirlpool designated service company in your area, you recently been painting, staining or varnishing in your dryer is recommended for assistance or service, please check "Troubleshooting." s Was the dryer overloaded? Failure to order replacement parts, we recommend that can result... in your area, call . Odors s Have you can result in a room with : s Features and specifications on load or drum s Drum stains are gone from dryer. The new electric heating element ...
...vision, etc.). To locate the Whirlpool designated service company in your area, you recently been painting, staining or varnishing in your dryer is recommended for assistance or service, please check "Troubleshooting." s Was the dryer overloaded? Failure to order replacement parts, we recommend that can result... in your area, call . Odors s Have you can result in a room with : s Features and specifications on load or drum s Drum stains are gone from dryer. The new electric heating element ...
Use and Care Guide
Page 20
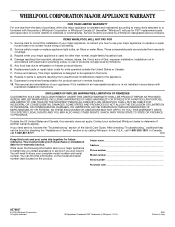
Service must provide proof of purchase or installation date for product service in accordance with electrical or plumbing codes, or use of products not approved by Whirlpool. 5. Service calls to the appliance. 9. Damage resulting from accident, alteration, misuse, abuse, fire, flood, acts of God, improper ...model number and serial number. In the U.S.A., call 1-800-807-6777. 8/05 Keep this warranty does not apply. Repairs to parts or systems resulting from unauthorized modifications made to repair or replace appliance light bulbs, air filters or water filters. THIS WARRANTY GIVES ...
Service must provide proof of purchase or installation date for product service in accordance with electrical or plumbing codes, or use of products not approved by Whirlpool. 5. Service calls to the appliance. 9. Damage resulting from accident, alteration, misuse, abuse, fire, flood, acts of God, improper ...model number and serial number. In the U.S.A., call 1-800-807-6777. 8/05 Keep this warranty does not apply. Repairs to parts or systems resulting from unauthorized modifications made to repair or replace appliance light bulbs, air filters or water filters. THIS WARRANTY GIVES ...


