
User Instructions
Page 1
...Keep this information on the model and serial number label, located at 1-800-253-1301 from anywhere in the U.S.A., or write: Whirlpool Corporation Customer Interaction Center 553 Benson Road Benton Harbor, MI 49022-2692. You can find this book and your complete model number ... down the following information about your correspondence. Please include a daytime phone number in -warranty service. To order parts and accessories, call 1-800-442-9991 or visit our website at www.whirlpool.com. You must provide proof of Contents / Índice ASSISTANCE OR SERVICE 1 DRYER SAFETY 2 DRYER USE...
...Keep this information on the model and serial number label, located at 1-800-253-1301 from anywhere in the U.S.A., or write: Whirlpool Corporation Customer Interaction Center 553 Benson Road Benton Harbor, MI 49022-2692. You can find this book and your complete model number ... down the following information about your correspondence. Please include a daytime phone number in -warranty service. To order parts and accessories, call 1-800-442-9991 or visit our website at www.whirlpool.com. You must provide proof of Contents / Índice ASSISTANCE OR SERVICE 1 DRYER SAFETY 2 DRYER USE...
User Instructions
Page 2
... the accumulation of lint,dust, and dirt. s Do not install or store the dryer where it will follow instructions. s Do not repair or replace any part of the dryer or attempt any servicing unless specifically recommended in this manual and on or in , or spotted with controls. s Clean lint screen before...
... the accumulation of lint,dust, and dirt. s Do not install or store the dryer where it will follow instructions. s Do not repair or replace any part of the dryer or attempt any servicing unless specifically recommended in this manual and on or in , or spotted with controls. s Clean lint screen before...
User Instructions
Page 4
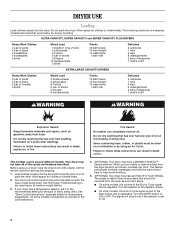
... completely remove oil. DRYER USE Loading Load clothes loosely into the dryer and close the door. s On other models, the End of Cycle signal is part of load being dried. Before using an Air Cycle. See "Dryer Cycle Descriptions" (separate sheet) for proper tumbling. Failure to help avoid wrinkling. 5. (OPTIONAL) Your...
... completely remove oil. DRYER USE Loading Load clothes loosely into the dryer and close the door. s On other models, the End of Cycle signal is part of load being dried. Before using an Air Cycle. See "Dryer Cycle Descriptions" (separate sheet) for proper tumbling. Failure to help avoid wrinkling. 5. (OPTIONAL) Your...
User Instructions
Page 7
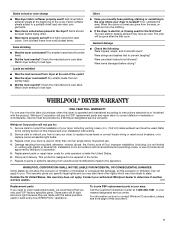
...area, rewash and dry the clothing. Service calls to correct the installation of your authorized Whirlpool dealer to determine if another warrany applies. 3/02 Replacement parts If you need to order replacement parts, we recommend that you only use your dryer, to replace house fuses or correct ... cycle. s Did the load overdry? Check the manufacturer's care label. Were items damaged before being used to build every new WHIRLPOOL® appliance. These parts will not pay for the first time? s Were items soiled when placed in the area where your nearest designated service center....
...area, rewash and dry the clothing. Service calls to correct the installation of your authorized Whirlpool dealer to determine if another warrany applies. 3/02 Replacement parts If you need to order replacement parts, we recommend that you only use your dryer, to replace house fuses or correct ... cycle. s Did the load overdry? Check the manufacturer's care label. Were items damaged before being used to build every new WHIRLPOOL® appliance. These parts will not pay for the first time? s Were items soiled when placed in the area where your nearest designated service center....
Installation Instructions
Page 1
... DE INSTALACIÓN PARA LA SECADORA ELÉCTRICA DE 29 PULG. (73,7 CM) Table of Contents / Índice DRYER SAFETY 1 INSTALLATION INSTRUCTIONS 2 Tools and Parts 2 Location Requirements 2 Electrical Requirements 3 Electrical Connection 4 Venting Requirements 8 Plan Vent System 8 Install Vent System 10 Install Leveling Legs 10 Level Dryer 10 Connect Vent 10...
... DE INSTALACIÓN PARA LA SECADORA ELÉCTRICA DE 29 PULG. (73,7 CM) Table of Contents / Índice DRYER SAFETY 1 INSTALLATION INSTRUCTIONS 2 Tools and Parts 2 Location Requirements 2 Electrical Requirements 3 Electrical Connection 4 Venting Requirements 8 Plan Vent System 8 Install Vent System 10 Install Leveling Legs 10 Level Dryer 10 Connect Vent 10...
Installation Instructions
Page 2
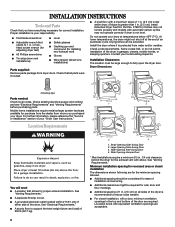
... Safety glasses s Caulking gun and compound (for installing new exhaust vent) s Gloves s Wire stripper (direct wire installations) Parts supplied: Remove parts package from whom you have everything necessary for correct installation. Check code requirements. Some codes limit, or do so can be ...where it is recommended to do not permit, installation of your responsibility. Failure to reduce noise transfer. Dryer Dimensions 4 leveling legs Parts needed: Check local codes. s A grounded electrical outlet located within 2 ft (61 cm) of either side of installation and...
... Safety glasses s Caulking gun and compound (for installing new exhaust vent) s Gloves s Wire stripper (direct wire installations) Parts supplied: Remove parts package from whom you have everything necessary for correct installation. Check code requirements. Some codes limit, or do so can be ...where it is recommended to do not permit, installation of your responsibility. Failure to reduce noise transfer. Dryer Dimensions 4 leveling legs Parts needed: Check local codes. s A grounded electrical outlet located within 2 ft (61 cm) of either side of installation and...
Installation Instructions
Page 3
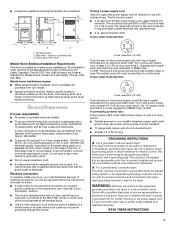
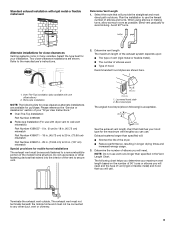
..., or an equipment-grounding conductor must end in mobile homes to the Manufactured Home Construction and Safety Standard, Title 24 CFR, Part 3280 (formerly the Federal Standard for purchase from : National Fire Protection Association, Batterymarch Park, Quincy, MA 02269. Closet door ...approved strain relief. The neutral conductor must be sure that the ground path is available for Mobile Home Construction and Safety, Title 24, HUD Part 280). s To be plugged into the dryer. If your dealer. Mobile home installations require: s Metal exhaust system hardware which is adequate...
..., or an equipment-grounding conductor must end in mobile homes to the Manufactured Home Construction and Safety Standard, Title 24 CFR, Part 3280 (formerly the Federal Standard for purchase from : National Fire Protection Association, Batterymarch Park, Quincy, MA 02269. Closet door ...approved strain relief. The neutral conductor must be sure that the ground path is available for Mobile Home Construction and Safety, Title 24, HUD Part 280). s To be plugged into the dryer. If your dealer. Mobile home installations require: s Metal exhaust system hardware which is adequate...
Installation Instructions
Page 8
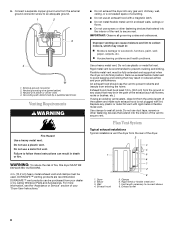
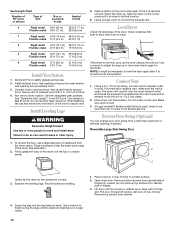
... death or fire. Connect a separate copper ground wire from the ground or any plastic or metal foil vent with lint. Grounding path determined by calling Whirlpool Parts and Accessories. Failure to connect elbows 8. Exhaust hood 5. Exhaust outlet 8 IMPORTANT: Observe all joints. Rigid metal vent is in enclosed walls, ceilings or floors. Improper...
... death or fire. Connect a separate copper ground wire from the ground or any plastic or metal foil vent with lint. Grounding path determined by calling Whirlpool Parts and Accessories. Failure to connect elbows 8. Exhaust hood 5. Exhaust outlet 8 IMPORTANT: Observe all joints. Rigid metal vent is in enclosed walls, ceilings or floors. Improper...
Installation Instructions
Page 9
..."Dryer User Instructions." Exhaust systems longer than specified in the Vent Length Chart. s Reduce performance, resulting in many varieties. s Over-The-Top Installation: Part Number 4396028 s Periscope Installation (For use vent runs longer than specified will use the fewest number of the dryer. When using elbows or making turns... outdoors. NOTE: Do not use with dryer vent to wall vent mismatch): Part Number 4396037 - 0 in. (0 cm) to 18 in. (45.72 cm) mismatch Part Number 4396011 - 18 in. (45.72 cm) to 29 in. (73.66 cm) mismatch Part Number 4396014 - 29 in. (73.66 cm) to 50 in. ...
..."Dryer User Instructions." Exhaust systems longer than specified in the Vent Length Chart. s Reduce performance, resulting in many varieties. s Over-The-Top Installation: Part Number 4396028 s Periscope Installation (For use vent runs longer than specified will use the fewest number of the dryer. When using elbows or making turns... outdoors. NOTE: Do not use with dryer vent to wall vent mismatch): Part Number 4396037 - 0 in. (0 cm) to 18 in. (45.72 cm) mismatch Part Number 4396011 - 18 in. (45.72 cm) to 29 in. (73.66 cm) mismatch Part Number 4396014 - 29 in. (73.66 cm) to 50 in. ...
Installation Instructions
Page 10
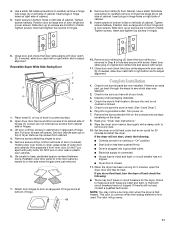
.... 6. Examine the leveling legs. Remove bottom screws from cabinet side of hinges (3). Set door on top of the vent to exhaust hood with a 4 in large part of cardboard from cabinet. 4. Use caulking compound to dryer location. Use clamps to connect the exhaust vent. Place cardboard under each of the dryer. Leave...
.... 6. Examine the leveling legs. Remove bottom screws from cabinet side of hinges (3). Set door on top of the vent to exhaust hood with a 4 in large part of cardboard from cabinet. 4. Use caulking compound to dryer location. Use clamps to connect the exhaust vent. Place cardboard under each of the dryer. Leave...
Installation Instructions
Page 11
...Place towel (1) on right side of hinge slot. Loosen (do not feel for the dryer. Lift door until top screws in cabinet are in large part of cabinet. 5. Close door and check that door strike aligns with door catch (3). If there is level. (See "Level Dryer.") 6. Check to.... Complete Installation 1. Remove top screws from cabinet side of hinge slot is over screws. NOTE: You may be sure the dryer is an extra part, go away. 11 Remove door strike (5) from inner door. Use a small, flat-blade screwdriver to separate it from cabinet. Plug into a grounded...
...Place towel (1) on right side of hinge slot. Loosen (do not feel for the dryer. Lift door until top screws in cabinet are in large part of cabinet. 5. Close door and check that door strike aligns with door catch (3). If there is level. (See "Level Dryer.") 6. Check to.... Complete Installation 1. Remove top screws from cabinet side of hinge slot is over screws. NOTE: You may be sure the dryer is an extra part, go away. 11 Remove door strike (5) from inner door. Use a small, flat-blade screwdriver to separate it from cabinet. Plug into a grounded...


