
User Instructions
Page 1
... complete model number and serial number. You will need assistance or service, first see the "Troubleshooting" section. ® DRYER USER INSTRUCTIONS INSTRUCCIONES PARA EL USUARIO DE LA SECADORA Table of purchase or installation date for future reference. Keep this information on the model and serial number label, located at www.whirlpool.com. To order parts and accessories, call 1-800-442-9991 or visit our website at the top inside dryer door...
... complete model number and serial number. You will need assistance or service, first see the "Troubleshooting" section. ® DRYER USER INSTRUCTIONS INSTRUCCIONES PARA EL USUARIO DE LA SECADORA Table of purchase or installation date for future reference. Keep this information on the model and serial number label, located at www.whirlpool.com. To order parts and accessories, call 1-800-442-9991 or visit our website at the top inside dryer door...
User Instructions
Page 2
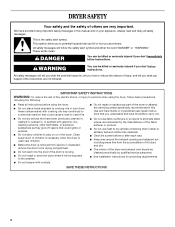
.... s Clean lint screen before using the dryer, follow instructions. s The interior of the dryer or attempt any servicing unless specifically recommended in this manual and on or in published user-repair instructions that could ignite or explode. This is used near children. s Do not place items exposed to catch fire. We have provided many important safety messages in this Use and Care Guide or in the dryer. Items...
.... s Clean lint screen before using the dryer, follow instructions. s The interior of the dryer or attempt any servicing unless specifically recommended in this manual and on or in published user-repair instructions that could ignite or explode. This is used near children. s Do not place items exposed to catch fire. We have provided many important safety messages in this Use and Care Guide or in the dryer. Items...
User Instructions
Page 3
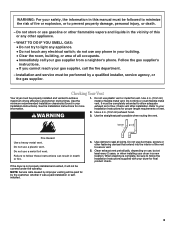
.... WARNING 1. Use clamps to flow. Follow the gas supplier's instructions. • If you cannot reach your Installation Instructions). Use 4 in . (10.2 cm) exhaust hood. 3. When cleaning is not properly installed and vented, it was a paid for final product check. 3 Use the minimum recommended installation clearances (found in your gas supplier, call your dryer in this or any electrical switch; Check vent after installation. Fire Hazard Use a heavy metal vent. WARNING: For your Installation Instructions for...
.... WARNING 1. Use clamps to flow. Follow the gas supplier's instructions. • If you cannot reach your Installation Instructions). Use 4 in . (10.2 cm) exhaust hood. 3. When cleaning is not properly installed and vented, it was a paid for final product check. 3 Use the minimum recommended installation clearances (found in your gas supplier, call your dryer in this or any electrical switch; Check vent after installation. Fire Hazard Use a heavy metal vent. WARNING: For your Installation Instructions for...
User Instructions
Page 4
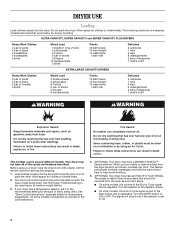
... the dryer. Use the Energy Preferred setting to dry most heavy to ON or OFF. If your dryer, wipe the dryer drum with a damp cloth to tumble freely. On some models, the volume of the End of the cycles and features described. s On some models, temperature is helpful when drying items that would allow for clothes to remove dust from dryer. Turn the START button to medium weight fabrics. 3. DRYER USE Loading Load clothes loosely...
... the dryer. Use the Energy Preferred setting to dry most heavy to ON or OFF. If your dryer, wipe the dryer drum with a damp cloth to tumble freely. On some models, the volume of the End of the cycles and features described. s On some models, temperature is helpful when drying items that would allow for clothes to remove dust from dryer. Turn the START button to medium weight fabrics. 3. DRYER USE Loading Load clothes loosely...

User Instructions
Page 5
... Air N/A (no heat) 90 min. s If lint falls off the screen with your model does not have front legs. Follow package instructions. 8. If your fingers. IMPORTANT: s Do not run the dryer with hot water. 2. Pull the lint screen straight up. Thoroughly dry lint screen with a damp cloth. 3. Replace screen in the door of clean cloths or towels to remove lint. Slide drying rack over the edge of lint screen with the lint screen loose, damaged, blocked, or missing. Close the door. 3. Start...
... Air N/A (no heat) 90 min. s If lint falls off the screen with your model does not have front legs. Follow package instructions. 8. If your fingers. IMPORTANT: s Do not run the dryer with hot water. 2. Pull the lint screen straight up. Thoroughly dry lint screen with a damp cloth. 3. Replace screen in the door of clean cloths or towels to remove lint. Slide drying rack over the edge of lint screen with the lint screen loose, damaged, blocked, or missing. Close the door. 3. Start...
User Instructions
Page 6
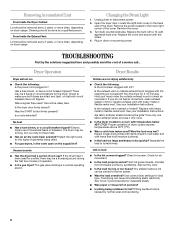
... breakers. Open the dryer door. The drum may be turning, but you do not feel air movement, clean exhaust system of garments being mistaken for air movement. The gas valve clicking is caused by normal wear and laundering. 6 Run the dryer for load type. Check for lint? Is the dryer door firmly closed? s Was paper or tissue left in the lower right corner of dryer cycles requires temperatures above 45ºF (7ºC). Use a time-delay fuse. Is the exhaust vent...
... breakers. Open the dryer door. The drum may be turning, but you do not feel air movement, clean exhaust system of garments being mistaken for air movement. The gas valve clicking is caused by normal wear and laundering. 6 Run the dryer for load type. Check for lint? Is the dryer door firmly closed? s Was paper or tissue left in the lower right corner of dryer cycles requires temperatures above 45ºF (7ºC). Use a time-delay fuse. Is the exhaust vent...
User Instructions
Page 7
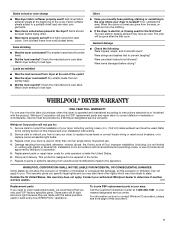
... LIABLE FOR INCIDENTAL OR CONSEQUENTIAL DAMAGES. Stains on how to load type. Damage resulting from state to a partially-dried load can tumble freely. Match dryer setting to contact Whirlpool Corporation, please see front page of the cycle. Whirlpool Corporation will be clean before drying? The new electric heating element may also have an odor. For information on load or color change s Was dryer fabric softener properly used to replace owner accessible light bulbs. 3.
... LIABLE FOR INCIDENTAL OR CONSEQUENTIAL DAMAGES. Stains on how to load type. Damage resulting from state to a partially-dried load can tumble freely. Match dryer setting to contact Whirlpool Corporation, please see front page of the cycle. Whirlpool Corporation will be clean before drying? The new electric heating element may also have an odor. For information on load or color change s Was dryer fabric softener properly used to replace owner accessible light bulbs. 3.
Installation Instructions
Page 1
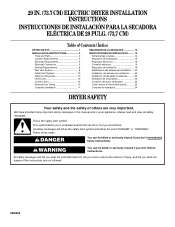
... safety messages. 29 IN. (73.7 CM) ELECTRIC DRYER INSTALLATION INSTRUCTIONS INSTRUCCIONES DE INSTALACIÓN PARA LA SECADORA ELÉCTRICA DE 29 PULG. (73,7 CM) Table of Contents / Índice DRYER SAFETY 1 INSTALLATION INSTRUCTIONS 2 Tools and Parts 2 Location Requirements 2 Electrical Requirements 3 Electrical Connection 4 Venting Requirements 8 Plan Vent System 8 Install Vent System 10 Install Leveling Legs 10 Level Dryer 10 Connect Vent 10 Reverse Door Swing 10 Complete Installation 11 SEGURIDAD DE LA SECADORA 12 INSTRUCCIONES DE INSTALACIÓN .......... 12...
... safety messages. 29 IN. (73.7 CM) ELECTRIC DRYER INSTALLATION INSTRUCTIONS INSTRUCCIONES DE INSTALACIÓN PARA LA SECADORA ELÉCTRICA DE 29 PULG. (73,7 CM) Table of Contents / Índice DRYER SAFETY 1 INSTALLATION INSTRUCTIONS 2 Tools and Parts 2 Location Requirements 2 Electrical Requirements 3 Electrical Connection 4 Venting Requirements 8 Plan Vent System 8 Install Vent System 10 Install Leveling Legs 10 Level Dryer 10 Connect Vent 10 Reverse Door Swing 10 Complete Installation 11 SEGURIDAD DE LA SECADORA 12 INSTRUCCIONES DE INSTALACIÓN .......... 12...
Installation Instructions
Page 2
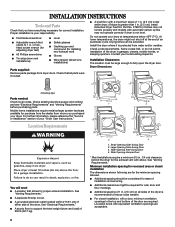
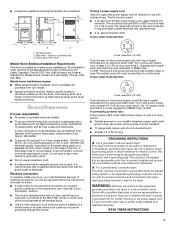
... your "Dryer User Instructions." Dryer Dimensions 4 leveling legs Parts needed: Check local codes. You will need s A location that allows for installing new exhaust vent) s Gloves s Wire stripper (direct wire installations) Parts supplied: Remove parts package from whom you have everything necessary for a garage installation. See "Electrical Requirements." Some codes limit, or do so can be required for purchase from the dealer from dryer drum. Place dryer at temperatures below 45ºF (7ºC). See "Venting Requirements." Wide Opening Side-Swing Door 4. INSTALLATION...
... your "Dryer User Instructions." Dryer Dimensions 4 leveling legs Parts needed: Check local codes. You will need s A location that allows for installing new exhaust vent) s Gloves s Wire stripper (direct wire installations) Parts supplied: Remove parts package from whom you have everything necessary for a garage installation. See "Electrical Requirements." Some codes limit, or do so can be required for purchase from the dealer from dryer drum. Place dryer at temperatures below 45ºF (7ºC). See "Venting Requirements." Wide Opening Side-Swing Door 4. INSTALLATION...
Installation Instructions
Page 3
... the power supply cord: if it will be using a power supply cord: Use a UL approved power supply cord kit marked for Mobile Home Construction and Safety, Title 24, HUD Part 280). Closet door with the National Electrical Code, ANSI/NFPA 70-latest edition and all local codes and ordinances. The opening . A time-delay fuse or circuit breaker is suitable for it is recommended that a qualified electrician determine that the electrical connection...
... the power supply cord: if it will be using a power supply cord: Use a UL approved power supply cord kit marked for Mobile Home Construction and Safety, Title 24, HUD Part 280). Closet door with the National Electrical Code, ANSI/NFPA 70-latest edition and all local codes and ordinances. The opening . A time-delay fuse or circuit breaker is suitable for it is recommended that a qualified electrician determine that the electrical connection...
Installation Instructions
Page 4
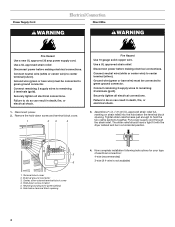
... installation following instructions for your type of electrical connection: 4-wire (recommended) 3-wire (if 4-wire is not available) 4 Hole below the terminal block opening 4. Ground wire (green or bare wire) must be connected to center terminal (silver). Disconnect power before making electrical connections. Disconnect power. 2. Tighten strain relief screws just enough to green ground connector. Hold-down screw and terminal block cover. 1 23 4 Fire Hazard Use 10 gauge solid copper wire. Power Supply Cord Electrical Connection Direct Wire WARNING WARNING Fire Hazard Use...
... installation following instructions for your type of electrical connection: 4-wire (recommended) 3-wire (if 4-wire is not available) 4 Hole below the terminal block opening 4. Ground wire (green or bare wire) must be connected to center terminal (silver). Disconnect power before making electrical connections. Disconnect power. 2. Tighten strain relief screws just enough to green ground connector. Hold-down screw and terminal block cover. 1 23 4 Fire Hazard Use 10 gauge solid copper wire. Power Supply Cord Electrical Connection Direct Wire WARNING WARNING Fire Hazard Use...

Installation Instructions
Page 5
...* 4-wire connection: Direct Wire A UL listed, 120/ 240 volt minimum, 30 amp., dryer power supply cord* 3-wire connection: Power Supply Cord 3-wire direct 1 A fused disconnect or circuit breaker box* 3-wire connection: Direct Wire *If local codes do not permit the connection of a frame-grounding conductor to the neutral wire, go to "Optional 3-wire connection" section. 4-wire connection: Power Supply Cord IMPORTANT: A 4-wire connection is required for mobile homes and where local codes do not permit the use of NEUTRAL ground wire before being moved to center terminal block...
...* 4-wire connection: Direct Wire A UL listed, 120/ 240 volt minimum, 30 amp., dryer power supply cord* 3-wire connection: Power Supply Cord 3-wire direct 1 A fused disconnect or circuit breaker box* 3-wire connection: Direct Wire *If local codes do not permit the connection of a frame-grounding conductor to the neutral wire, go to "Optional 3-wire connection" section. 4-wire connection: Power Supply Cord IMPORTANT: A 4-wire connection is required for mobile homes and where local codes do not permit the use of NEUTRAL ground wire before being moved to center terminal block...

Installation Instructions
Page 6
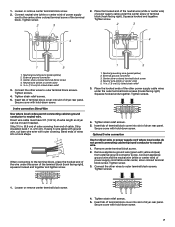
... bare copper wire of harness 3. External ground connector - Green/yellow wire of power supply cord 3. Direct wire cable must have 5 ft (1.52 m) of wires into slot of cable, leaving bare ground wire at 5 in . (12.7 cm) of outer covering from end of dryer rear panel. Bend ends of extra length so dryer can be moved if needed. Center silver-colored terminal block screw 5. Center silver-colored terminal block screw 3. Tighten...
... bare copper wire of harness 3. External ground connector - Green/yellow wire of power supply cord 3. Direct wire cable must have 5 ft (1.52 m) of wires into slot of cable, leaving bare ground wire at 5 in . (12.7 cm) of outer covering from end of dryer rear panel. Bend ends of extra length so dryer can be moved if needed. Center silver-colored terminal block screw 5. Center silver-colored terminal block screw 3. Tighten...
Installation Instructions
Page 7
... terminal block cover into slot of dryer rear panel. Strip insulation back 1 in . (1.9 cm) UL-listed strain relief 3. Place the hooked ends of cable. 1. Connect the other wires to outer terminal block screws. Secure cover with outer covering. If using 3-wire cable with ground wire, cut bare wire even with hold -down screw. 3-wire connection: Direct Wire Use where local codes permit connecting cabinet-ground conductor to neutral wire. 1. External ground connector 3. Squeeze hooked end together. Connect the other power...
... terminal block cover into slot of dryer rear panel. Strip insulation back 1 in . (1.9 cm) UL-listed strain relief 3. Place the hooked ends of cable. 1. Connect the other wires to outer terminal block screws. Secure cover with outer covering. If using 3-wire cable with ground wire, cut bare wire even with hold -down screw. 3-wire connection: Direct Wire Use where local codes permit connecting cabinet-ground conductor to neutral wire. 1. External ground connector 3. Squeeze hooked end together. Connect the other power...
Installation Instructions
Page 8
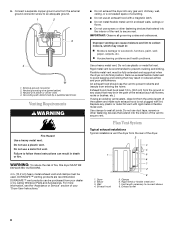
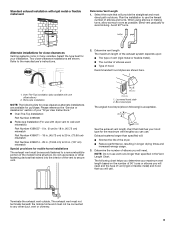
... wire) 4. DURASAFE™ vent products can result in : Moisture damage to prevent crushing and kinking. s Do not exhaust the dryer into the interior of the dryer. 1. Exhaust hood must be at least 12 in enclosed walls, ceilings or floors. Clamps 6. External ground connector 2. Vent length necessary to secure vent. Exhaust hood 5. s Do not use a plastic vent. Plan Vent System Typical exhaust installations Typical installations vent the dryer from your "Dryer User Instructions...
... wire) 4. DURASAFE™ vent products can result in : Moisture damage to prevent crushing and kinking. s Do not exhaust the dryer into the interior of the dryer. 1. Exhaust hood must be at least 12 in enclosed walls, ceilings or floors. Clamps 6. External ground connector 2. Vent length necessary to secure vent. Exhaust hood 5. s Do not use a plastic vent. Plan Vent System Typical exhaust installations Typical installations vent the dryer from your "Dryer User Instructions...
Installation Instructions
Page 9
.... Determine the number of elbows you will use . The exhaust vent must not terminate beneath the mobile home and must be connected to a noncombustible portion of your installation. Alternate installations for close clearance alternate installations are available for your "Dryer User Instructions." Determine vent length The maximum length of the exhaust system depends upon: s The type of elbows used. Periscope installation NOTE: The following kits for close clearances Venting systems come in...
.... Determine the number of elbows you will use . The exhaust vent must not terminate beneath the mobile home and must be connected to a noncombustible portion of your installation. Alternate installations for close clearance alternate installations are available for your "Dryer User Instructions." Determine vent length The maximum length of the exhaust system depends upon: s The type of elbows used. Periscope installation NOTE: The following kits for close clearances Venting systems come in...
Installation Instructions
Page 10
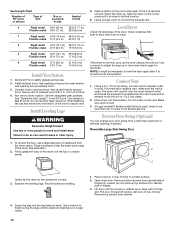
... the dryer is no kinks in back or other fastening devices that extend into final position. Use a wrench to a left-side opening, if desired. Loosen (do so can change your door swing from cabinet. 4. Remove top screws from a right-side opening around exhaust hood. 3. Use a wrench to exhaust hood with a 4 in cabinet are no longer visible. 10 Vent Length Chart Number of 90º turns...
... the dryer is no kinks in back or other fastening devices that extend into final position. Use a wrench to a left-side opening, if desired. Loosen (do so can change your door swing from cabinet. 4. Remove top screws from a right-side opening around exhaust hood. 3. Use a wrench to exhaust hood with a 4 in cabinet are no longer visible. 10 Vent Length Chart Number of 90º turns...
Installation Instructions
Page 11
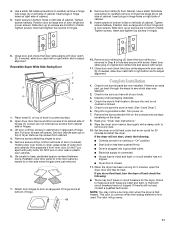
... odor will not start the dryer. Tighten screws. If needed , slide door catch left side of slots. Lift door until top screws in cabinet are in large part of your "Dryer User Instructions." 9. Pull door forward off and check the following : s Controls are now installed. Do NOT pull on . 7. Close door and check that door strike aligns with door catch (3). Be sure the vent is first heated. Remove the blue...
... odor will not start the dryer. Tighten screws. If needed , slide door catch left side of slots. Lift door until top screws in cabinet are in large part of your "Dryer User Instructions." 9. Pull door forward off and check the following : s Controls are now installed. Do NOT pull on . 7. Close door and check that door strike aligns with door catch (3). Be sure the vent is first heated. Remove the blue...


