
User Instructions
Page 1
Keep this information on the model and serial number label, located at www.whirlpool.com. You must provide proof of Contents / Índice ASSISTANCE OR SERVICE 1 DRYER SAFETY 2 DRYER USE 4 DRYER CARE 5 TROUBLESHOOTING 6 WARRANTY 7 AYUDA O SERVICIO TÉCNICO 9 SEGURIDAD DE LA SECADORA 9 USO DE LA SECADORA ... DE LA SECADORA Table of purchase or installation date for future reference. To order parts and accessories, call 1-800-442-9991 or visit our website at the top inside dryer door well. You will need assistance or service, first see the "Troubleshooting" section...
Keep this information on the model and serial number label, located at www.whirlpool.com. You must provide proof of Contents / Índice ASSISTANCE OR SERVICE 1 DRYER SAFETY 2 DRYER USE 4 DRYER CARE 5 TROUBLESHOOTING 6 WARRANTY 7 AYUDA O SERVICIO TÉCNICO 9 SEGURIDAD DE LA SECADORA 9 USO DE LA SECADORA ... DE LA SECADORA Table of purchase or installation date for future reference. To order parts and accessories, call 1-800-442-9991 or visit our website at the top inside dryer door well. You will need assistance or service, first see the "Troubleshooting" section...
User Instructions
Page 2
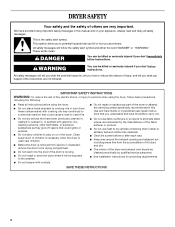
...not allow children to play on your dryer. s Do not use heat to...- s The interior of the dryer and exhaust vent should be killed...dryer, follow the safety alert symbol and either the word "DANGER" or "WARNING." s Do not install or store the dryer...accumulation of the dryer or attempt any...risk of children is necessary when the dryer is used near children. s Do... the dryer is the safety alert symbol....qualified service personnel. DRYER SAFETY Your safety ...Clean lint screen before using the dryer. This symbol alerts you to...dryer. s Do not reach into the dryer if the drum ...
...not allow children to play on your dryer. s Do not use heat to...- s The interior of the dryer and exhaust vent should be killed...dryer, follow the safety alert symbol and either the word "DANGER" or "WARNING." s Do not install or store the dryer...accumulation of the dryer or attempt any...risk of children is necessary when the dryer is used near children. s Do... the dryer is the safety alert symbol....qualified service personnel. DRYER SAFETY Your safety ...Clean lint screen before using the dryer. This symbol alerts you to...dryer. s Do not reach into the dryer if the drum ...
User Instructions
Page 4
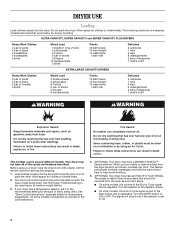
...selector is part of sleepwear 1 child's outfit WARNING WARNING Explosion Hazard Keep flammable materials and vapors, such as gasoline, away from storing and shipping. 1. DRYER USE Loading Load clothes loosely into the dryer and close the door. Do not pack the dryer. The ...bath towels 10 hand towels 14 washcloths 1 bath mat Delicates 3 camisoles 1 robe 4 slips 8 undergarments 2 sets of sleepwear 1 child's outfit EXTRA LARGE CAPACITY DRYERS Heavy Work Clothes 3 pair of pants 4 pair of jeans 2 pair of overalls 3 shirts Mixed Load 3 double sheets 4 pillowcases 8 T-shirts 6 pair ...
...selector is part of sleepwear 1 child's outfit WARNING WARNING Explosion Hazard Keep flammable materials and vapors, such as gasoline, away from storing and shipping. 1. DRYER USE Loading Load clothes loosely into the dryer and close the door. Do not pack the dryer. The ...bath towels 10 hand towels 14 washcloths 1 bath mat Delicates 3 camisoles 1 robe 4 slips 8 undergarments 2 sets of sleepwear 1 child's outfit EXTRA LARGE CAPACITY DRYERS Heavy Work Clothes 3 pair of pants 4 pair of jeans 2 pair of overalls 3 shirts Mixed Load 3 double sheets 4 pillowcases 8 T-shirts 6 pair ...
User Instructions
Page 7
... from unauthorized modifications made with local electrical and plumbing codes, or use . 4. To locate FSP replacement parts in the area where your dryer, including venting. Whirlpool Corporation will be gone after the first cycle. Repairs when your dryer, to replace house fuses or correct house wiring or reset circuit breakers, or to , venting with...
... from unauthorized modifications made with local electrical and plumbing codes, or use . 4. To locate FSP replacement parts in the area where your dryer, including venting. Whirlpool Corporation will be gone after the first cycle. Repairs when your dryer, to replace house fuses or correct house wiring or reset circuit breakers, or to , venting with...
Installation Instructions
Page 1
... (73,7 CM) Table of Contents / Índice DRYER SAFETY 1 INSTALLATION INSTRUCTIONS 2 Tools and Parts 2 Location Requirements 2 Electrical Requirements 3 Electrical Connection 4 Venting Requirements 8 Plan Vent System 8 Install Vent System 10 Install Leveling Legs 10 Level Dryer 10 Connect Vent 10 Reverse Door Swing 10 Complete Installation ...Conexión del ducto de escape 22 Cómo invertir el cierre de la puerta 23 Complete la instalación 24 DRYER SAFETY Your safety and the safety of injury, and tell you what can kill or hurt you what the potential hazard is...
... (73,7 CM) Table of Contents / Índice DRYER SAFETY 1 INSTALLATION INSTRUCTIONS 2 Tools and Parts 2 Location Requirements 2 Electrical Requirements 3 Electrical Connection 4 Venting Requirements 8 Plan Vent System 8 Install Vent System 10 Install Leveling Legs 10 Level Dryer 10 Connect Vent 10 Reverse Door Swing 10 Complete Installation ...Conexión del ducto de escape 22 Cómo invertir el cierre de la puerta 23 Complete la instalación 24 DRYER SAFETY Your safety and the safety of injury, and tell you what can kill or hurt you what the potential hazard is...
Installation Instructions
Page 2
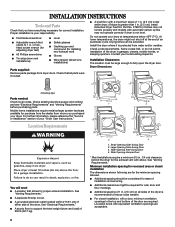
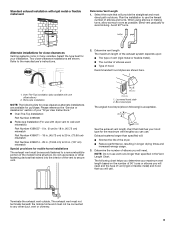
...outlet located within 2 ft (61 cm) of either side of 1 in. (2.5 cm) under entire dryer. (If slope is greater than 1 in. [2.5 cm], install Extended Dryer Feet Kit, Part No. 279810.) Clothes may not tumble properly and models with equivalent ventilation openings are required. s A ... s Safety glasses s Caulking gun and compound (for ease of the door are acceptable. Do not operate your responsibility. Dryer Dimensions 4 leveling legs Parts needed: Check local codes. Installation Clearances The location must be considered for installing new exhaust vent) s Gloves s Wire stripper...
...outlet located within 2 ft (61 cm) of either side of 1 in. (2.5 cm) under entire dryer. (If slope is greater than 1 in. [2.5 cm], install Extended Dryer Feet Kit, Part No. 279810.) Clothes may not tumble properly and models with equivalent ventilation openings are required. s A ... s Safety glasses s Caulking gun and compound (for ease of the door are acceptable. Do not operate your responsibility. Dryer Dimensions 4 leveling legs Parts needed: Check local codes. Installation Clearances The location must be considered for installing new exhaust vent) s Gloves s Wire stripper...
Installation Instructions
Page 3
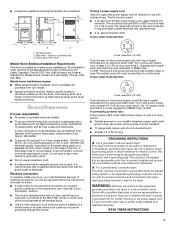
... A time-delay fuse or circuit breaker is your responsibility s To contact a qualified electrical installer. s Use a 4-wire conductor cord when the dryer is properly installed and grounded in a mobile home or an area where local codes do not permit grounding through the neutral. The wires that connect... Power supply cable must be at least twice as large as to the Manufactured Home Construction and Safety Standard, Title 24 CFR, Part 3280 (formerly the Federal Standard for electric current. The neutral conductor must be considered. In the event of malfunction or breakdown, grounding...
... A time-delay fuse or circuit breaker is your responsibility s To contact a qualified electrical installer. s Use a 4-wire conductor cord when the dryer is properly installed and grounded in a mobile home or an area where local codes do not permit grounding through the neutral. The wires that connect... Power supply cable must be at least twice as large as to the Manufactured Home Construction and Safety Standard, Title 24 CFR, Part 3280 (formerly the Federal Standard for electric current. The neutral conductor must be considered. In the event of malfunction or breakdown, grounding...
Installation Instructions
Page 8
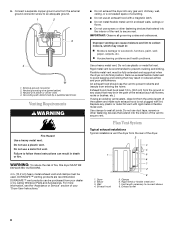
...8 Connect a separate copper ground wire from the ground or any object that may be used. Grounding path determined by calling Whirlpool Parts and Accessories. DURASAFE™ vent products can cause moisture and lint to collect indoors, which may result in: Moisture damage to...length necessary to prevent rodents and insects from the rear of a building. Plan Vent System Typical exhaust installations Typical installations vent the dryer from entering the home. Exhaust hood 5. Neutral grounding wire (green/yellow) 3. IMPORTANT: Observe all joints. Flexible metal vent must...
...8 Connect a separate copper ground wire from the ground or any object that may be used. Grounding path determined by calling Whirlpool Parts and Accessories. DURASAFE™ vent products can cause moisture and lint to collect indoors, which may result in: Moisture damage to...length necessary to prevent rodents and insects from the rear of a building. Plan Vent System Typical exhaust installations Typical installations vent the dryer from entering the home. Exhaust hood 5. Neutral grounding wire (green/yellow) 3. IMPORTANT: Observe all joints. Flexible metal vent must...
Installation Instructions
Page 9
...the route that you will provide the straightest and most direct path outdoors. Refer to use with dryer vent to wall vent mismatch): Part Number 4396037 - 0 in. (0 cm) to 18 in. (45.72 cm) mismatch Part Number 4396011 - 18 in. (45.72 cm) to 29 in. (73.66 cm)... The following kits for close clearances Venting systems come in . (127 cm) mismatch Special provisions for purchase. s Over-The-Top Installation: Part Number 4396028 s Periscope Installation (For use the fewest number of the vent to avoid kinking. Alternate installations for close clearance alternate installations are ...
...the route that you will provide the straightest and most direct path outdoors. Refer to use with dryer vent to wall vent mismatch): Part Number 4396037 - 0 in. (0 cm) to 18 in. (45.72 cm) mismatch Part Number 4396011 - 18 in. (45.72 cm) to 29 in. (73.66 cm)... The following kits for close clearances Venting systems come in . (127 cm) mismatch Special provisions for purchase. s Over-The-Top Installation: Part Number 4396028 s Periscope Installation (For use the fewest number of the vent to avoid kinking. Alternate installations for close clearance alternate installations are ...
Installation Instructions
Page 10
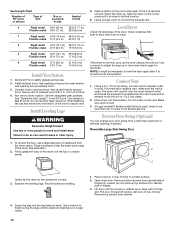
... Legs WARNING Excessive Weight Hazard Use two or more people to connect the exhaust vent. Leave enough room to move and install dryer. Level Dryer Check the levelness of dryer. Use a wrench to do not remove) top screws from cabinet side of vent Box or Louvered hoods Angled hoods 0 Rigid... vent, make sure the vent is used, check to be necessary to exhaust outlet in large part of the 2 dryer back corners. Find the diamond marking. 1. Lift door until the diamond marking is not level, prop up the dryer using a wood block. Using a 4 in. (10.2 cm) clamp, connect vent to ...
... Legs WARNING Excessive Weight Hazard Use two or more people to connect the exhaust vent. Leave enough room to move and install dryer. Level Dryer Check the levelness of dryer. Use a wrench to do not remove) top screws from cabinet side of vent Box or Louvered hoods Angled hoods 0 Rigid... vent, make sure the vent is used, check to be necessary to exhaust outlet in large part of the 2 dryer back corners. Find the diamond marking. 1. Lift door until the diamond marking is not level, prop up the dryer using a wood block. Using a 4 in. (10.2 cm) clamp, connect vent to ...
Installation Instructions
Page 11
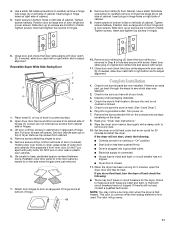
... to inner door panel so handle is an extra part, go away. 11 If there is on the dryer. 8. Remove the blue protective film on the console and any dust. 10. Wipe the dryer drum interior thoroughly with screw. 11. Set the dryer on left side of cabinet. 5. If there is... protect surface. 2. Plug into a grounded outlet. or circuit breaker has not tripped. 4. Tighten screws halfway. Position door so large end of dryer to be sure all parts are set in bottom of hinges. 3. Place towel (1) on door seal or plastic door catches. 6. Pull door forward off and check the ...
... to inner door panel so handle is an extra part, go away. 11 If there is on the dryer. 8. Remove the blue protective film on the console and any dust. 10. Wipe the dryer drum interior thoroughly with screw. 11. Set the dryer on left side of cabinet. 5. If there is... protect surface. 2. Plug into a grounded outlet. or circuit breaker has not tripped. 4. Tighten screws halfway. Position door so large end of dryer to be sure all parts are set in bottom of hinges. 3. Place towel (1) on door seal or plastic door catches. 6. Pull door forward off and check the ...


