Dimension Guide
Page 1
... with rubber washer. air gap Make sure to heat and detergent, and fits the 1" (2.5 cm) drain connector of the water inlet valve. drain line fittings. or 20-amp fused electrical supply. Use a UL Listed or CSA Approved strain relief. Follow the kit instructions for planning purposes only. Use a 90° elbow with ³⁄₄" hose connection with compression fitting or flexible braided water supply line (Part Number 4396897RP minimum plastic tubing is resistant to use a new drain hose with...
... with rubber washer. air gap Make sure to heat and detergent, and fits the 1" (2.5 cm) drain connector of the water inlet valve. drain line fittings. or 20-amp fused electrical supply. Use a UL Listed or CSA Approved strain relief. Follow the kit instructions for planning purposes only. Use a 90° elbow with ³⁄₄" hose connection with compression fitting or flexible braided water supply line (Part Number 4396897RP minimum plastic tubing is resistant to use a new drain hose with...
Installation Instructions
Page 2
... 6 Water Supply Requirements 6 Electrical Requirements 6 Installation Instructions 7 Prepare Cabinet Opening-Existing Utilities 7 Prepare Cabinet Opening-New Utilities 7 Prepare and Route Water Line 8 Install Drain Hose 10 Install Moisture Barrier 11 Prepare Dishwasher 11 Installation Instructions (cont.) Make Power Supply Cord Connection 12 Determine Cabinet Opening 13 Choose Attachment Option 14 Move Dishwasher Into Cabinet Opening 15 Connect to Water Supply 17 Connect to Drain 17 Make Direct Wire Electrical Connection 18 Secure Dishwasher in serious injury or cuts. All...
... 6 Water Supply Requirements 6 Electrical Requirements 6 Installation Instructions 7 Prepare Cabinet Opening-Existing Utilities 7 Prepare Cabinet Opening-New Utilities 7 Prepare and Route Water Line 8 Install Drain Hose 10 Install Moisture Barrier 11 Prepare Dishwasher 11 Installation Instructions (cont.) Make Power Supply Cord Connection 12 Determine Cabinet Opening 13 Choose Attachment Option 14 Move Dishwasher Into Cabinet Opening 15 Connect to Water Supply 17 Connect to Drain 17 Make Direct Wire Electrical Connection 18 Secure Dishwasher in serious injury or cuts. All...
Installation Instructions
Page 3
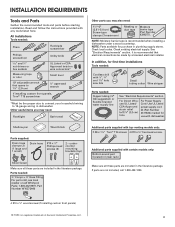
... included in plumbing supply stores. NOTE: Parts available for use UL Listed/ CSA Approved strain relief hole For Power Supply Cord: Use UL Listed power supply cord kit (Part Number 4317824) marked for purchase in the literature package. In addition, for first-time installations Tools needed: Cordless drill with certain models only: Bottom sound pad (located in lower rack) Make sure all these parts are included in dishwasher Other useful items you may need: Flashlight Bath...
... included in plumbing supply stores. NOTE: Parts available for use UL Listed/ CSA Approved strain relief hole For Power Supply Cord: Use UL Listed power supply cord kit (Part Number 4317824) marked for purchase in the literature package. In addition, for first-time installations Tools needed: Cordless drill with certain models only: Bottom sound pad (located in lower rack) Make sure all these parts are included in dishwasher Other useful items you may need: Flashlight Bath...
Installation Instructions
Page 4
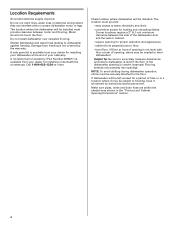
... opening ). A side panel kit is uneven (example: Flooring extends only partway into opening is not covered by authorized service personnel. The location must provide clearance between the side of your dishwasher at the end of the dishwasher door and the wall or cabinet. • square opening , shims may be installed. Damage from freezing is not level with or contact dishwasher motor or legs. Do not run drain lines, water lines or electrical wiring...
... opening ). A side panel kit is uneven (example: Flooring extends only partway into opening is not covered by authorized service personnel. The location must provide clearance between the side of your dishwasher at the end of the dishwasher door and the wall or cabinet. • square opening , shims may be installed. Damage from freezing is not level with or contact dishwasher motor or legs. Do not run drain lines, water lines or electrical wiring...
Installation Instructions
Page 6
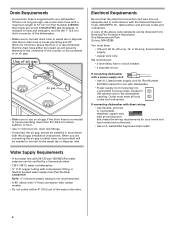
... floor. Water Supply Requirements • A hot water line with grounding wire that meets the wiring requirements for use an air gap if the drain hose is recommended that the electrical connection and wire size are connecting the air gap a rubber hose (not provided) will be obtained from: National Fire Protection Association One Batterymarch Park Quincy, MA 02269 You must plug into a grounded 3 prong outlet, located in conformance with a power supply cord: • Use UL Listed power supply cord kit (Part Number 4317824) marked...
... floor. Water Supply Requirements • A hot water line with grounding wire that meets the wiring requirements for use an air gap if the drain hose is recommended that the electrical connection and wire size are connecting the air gap a rubber hose (not provided) will be obtained from: National Fire Protection Association One Batterymarch Park Quincy, MA 02269 You must plug into a grounded 3 prong outlet, located in conformance with a power supply cord: • Use UL Listed power supply cord kit (Part Number 4317824) marked...

Installation Instructions
Page 7
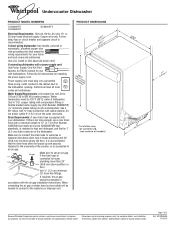
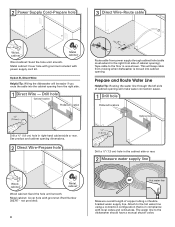
... water and electrical placement Water line (15.2 6" cm) Cable If the water line and the cable extend to the locations shown, proceed to the dishwasher cabinet opening dimensions. 7 Power Supply Cord: Follow Option A instructions Direct Wire: Follow Option B instructions Option A, Power Supply Cord: NOTE: A grounded 3 prong outlet is required inside a cabinet next to the "Install Drain Hose" section. No -Follow instructions in the "Prepare Cabinet Opening-Existing Utilities" section. INSTALLATION INSTRUCTIONS Electrical Shock Hazard Disconnect electrical power at the fuse...
... water and electrical placement Water line (15.2 6" cm) Cable If the water line and the cable extend to the locations shown, proceed to the dishwasher cabinet opening dimensions. 7 Power Supply Cord: Follow Option A instructions Direct Wire: Follow Option B instructions Option A, Power Supply Cord: NOTE: A grounded 3 prong outlet is required inside a cabinet next to the "Install Drain Hose" section. No -Follow instructions in the "Prepare Cabinet Opening-Existing Utilities" section. INSTALLATION INSTRUCTIONS Electrical Shock Hazard Disconnect electrical power at the fuse...
Installation Instructions
Page 8
... Water Line Helpful Tip: Routing the water line through cabinet hole (cable must extend to the hot water line using a connection configuration that is moved into the cabinet opening dimensions. 2 Direct Wire-Prepare hole (15.2 6" cm) Route cable from the right side. 1 Direct Wire - Option B, Direct Wire: Helpful Tip: Wiring the dishwasher will be easier if you route the cable into cabinet opening ). Metal cabinet: Cover hole with power supply cord kit. 2 Power Supply Cord-Prepare hole 3 Direct Wire-Route cable Wood cabinet Metal cabinet...
... Water Line Helpful Tip: Routing the water line through cabinet hole (cable must extend to the hot water line using a connection configuration that is moved into the cabinet opening dimensions. 2 Direct Wire-Prepare hole (15.2 6" cm) Route cable from the right side. 1 Direct Wire - Option B, Direct Wire: Helpful Tip: Wiring the dishwasher will be easier if you route the cable into cabinet opening ). Metal cabinet: Cover hole with power supply cord kit. 2 Power Supply Cord-Prepare hole 3 Direct Wire-Route cable Wood cabinet Metal cabinet...
Installation Instructions
Page 12
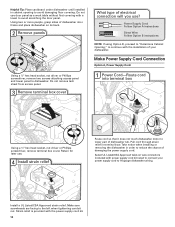
... Cord Connection Option A, Power Supply Cord: 1 Power Cord-Route cord into terminal box Using a ¹⁄₄" hex head socket, nut driver or Phillips screwdriver, remove terminal box cover. Power Supply Cord: Follow Option A instructions Direct Wire: Follow Option B instructions NOTE: If using Option B, proceed to "Determine Cabinet Opening," to continue with power supply cord kit) rated to lower part of electrical connection will you use door panel as a work table without first covering with the power supply cord kit. 12 Take notice when installing or removing the dishwasher...
... Cord Connection Option A, Power Supply Cord: 1 Power Cord-Route cord into terminal box Using a ¹⁄₄" hex head socket, nut driver or Phillips screwdriver, remove terminal box cover. Power Supply Cord: Follow Option A instructions Direct Wire: Follow Option B instructions NOTE: If using Option B, proceed to "Determine Cabinet Opening," to continue with power supply cord kit) rated to lower part of electrical connection will you use door panel as a work table without first covering with the power supply cord kit. 12 Take notice when installing or removing the dishwasher...
Installation Instructions
Page 15
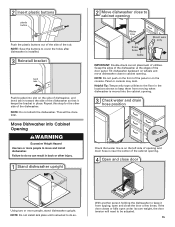
... dishwasher is moved into the cabinet opening . 4 Open and close the door a few times. If the door closes or falls open and close door Using two or more people to move dishwasher close to keep it keeps the bracket in the locations shown to cabinet opening Water line Drain hose Cable Direct wire only IMPORTANT: Double-check correct placement of utilities. NOTE: Save the buttons to cabinet opening and drain hose is installed. 3 Reinstall bracket bend tabs Push bracket into Cabinet Opening Excessive Weight Hazard Use...
... dishwasher is moved into the cabinet opening . 4 Open and close the door a few times. If the door closes or falls open and close door Using two or more people to move dishwasher close to keep it keeps the bracket in the locations shown to cabinet opening Water line Drain hose Cable Direct wire only IMPORTANT: Double-check correct placement of utilities. NOTE: Save the buttons to cabinet opening and drain hose is installed. 3 Reinstall bracket bend tabs Push bracket into Cabinet Opening Excessive Weight Hazard Use...
Installation Instructions
Page 18
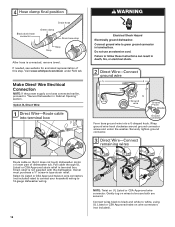
... instructions can result in death, fire, or electrical shock. 2 Direct Wire-Connect ground wire Ground wire Ground wire Washer Ground connector Form bare ground wire into terminal box WARNING Electrical Shock Hazard Electrically ground dishwasher. Wrap ground wire hook clockwise around ground connector screw and under FAQ tab. 4 Hose clamp final position Drain hose Black drain hose connector Green clamp Drain hose stop Stop Stop After hose is not supplied with the dishwasher. Do not use an extension cord...
... instructions can result in death, fire, or electrical shock. 2 Direct Wire-Connect ground wire Ground wire Ground wire Washer Ground connector Form bare ground wire into terminal box WARNING Electrical Shock Hazard Electrically ground dishwasher. Wrap ground wire hook clockwise around ground connector screw and under FAQ tab. 4 Hose clamp final position Drain hose Black drain hose connector Green clamp Drain hose stop Stop Stop After hose is not supplied with the dishwasher. Do not use an extension cord...
Installation Instructions
Page 22
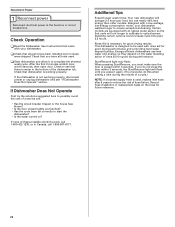
... dishwasher. ❏ Check that dishwasher is not working properly. Rinse Aid is closed tightly and latched? • Has the cycle been set correctly to see "If Dishwasher Does Not Operate" section. Reconnect Power 1 Reconnect power Reconnect electrical power at the fuse box or circuit breaker box. Additional Tips Expect longer wash times. If you do this when adding a dish during the middle of the dishwasher tub. Check that all tools used , replace inlet hose...
... dishwasher. ❏ Check that dishwasher is not working properly. Rinse Aid is closed tightly and latched? • Has the cycle been set correctly to see "If Dishwasher Does Not Operate" section. Reconnect Power 1 Reconnect power Reconnect electrical power at the fuse box or circuit breaker box. Additional Tips Expect longer wash times. If you do this when adding a dish during the middle of the dishwasher tub. Check that all tools used , replace inlet hose...
Owners Manual
Page 2
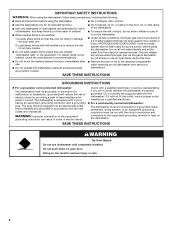
... on open flame during this time. ■ Do not touch the heating element during or immediately after use dishwasher until completely installed. SAVE THESE INSTRUCTIONS WARNING Tip Over Hazard Do not use . ■ Do not operate the dishwasher unless all enclosure panels are not likely to damage the door seal; This will reduce the risk of electric shock by a qualified electrician. ■ For a permanently connected dishwasher: The dishwasher...
... on open flame during this time. ■ Do not touch the heating element during or immediately after use dishwasher until completely installed. SAVE THESE INSTRUCTIONS WARNING Tip Over Hazard Do not use . ■ Do not operate the dishwasher unless all enclosure panels are not likely to damage the door seal; This will reduce the risk of electric shock by a qualified electrician. ■ For a permanently connected dishwasher: The dishwasher...
Owners Manual
Page 4
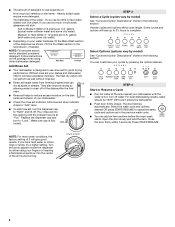
...-Wash Add Rinse Aid ■ Your dishwasher is hot. Add rinse aid when indicator drops to "Add" level. ■ To add rinse aid, turn to "Lock." Make sure cap is at the sink nearest your dishes and dishwasher interior will not perform as well without rinse aid. ■ Rinse aid keeps water from forming droplets that can Full dry as it enters the dishwasher. ■ Push door firmly closed. max - 21 3 - --- Turn the arrow adjuster inside the dispenser by model) See "Cycle...
...-Wash Add Rinse Aid ■ Your dishwasher is hot. Add rinse aid when indicator drops to "Add" level. ■ To add rinse aid, turn to "Lock." Make sure cap is at the sink nearest your dishes and dishwasher interior will not perform as well without rinse aid. ■ Rinse aid keeps water from forming droplets that can Full dry as it enters the dishwasher. ■ Push door firmly closed. max - 21 3 - --- Turn the arrow adjuster inside the dispenser by model) See "Cycle...
Owners Manual
Page 6
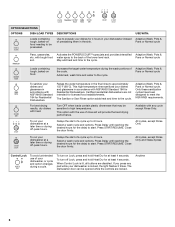
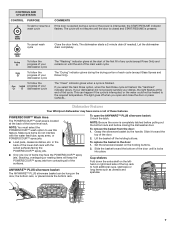
... the wash portions of a cycle up to high temperatures. The Sanitize or Sani Rinse option adds heat and time to meet the NSF/ANSI requirements. Delays the start of the cycle. Close the door firmly. The dishwasher door can be sensitive to 6 hours. For best drying results, dry dishes with tough food soil. Available with the use of a cycle up to 4 hours. Press START/RESUME. When Control Lock is locked, the light flashes 3 times. OPTION...
... the wash portions of a cycle up to high temperatures. The Sanitize or Sani Rinse option adds heat and time to meet the NSF/ANSI requirements. Delays the start of the cycle. Close the door firmly. The dishwasher door can be sensitive to 6 hours. For best drying results, dry dishes with tough food soil. Available with the use of a cycle up to 4 hours. Press START/RESUME. When Control Lock is locked, the light flashes 3 times. OPTION...
Owners Manual
Page 7
... dishwasher starts a 2-minute drain (if needed). The "Drying" indicator glows during a cycle or the power is pressed. This can be heated to the required temperature. The light goes off the holding buttons. 2. Stacking, overlapping or nesting items will not resume until the end of the door. 2. To remove the basket from contacting all of the surfaces. To replace the basket in the back of the lower dish rack with the water...
... dishwasher starts a 2-minute drain (if needed). The "Drying" indicator glows during a cycle or the power is pressed. This can be heated to the required temperature. The light goes off the holding buttons. 2. Stacking, overlapping or nesting items will not resume until the end of the door. 2. To remove the basket from contacting all of the surfaces. To replace the basket in the back of the lower dish rack with the water...
Owners Manual
Page 8
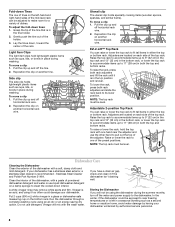
..." (33 cm) in both rack adjusters and lift the rack until it if the dishwasher isn't draining well. Dishwasher Care Cleaning the Dishwasher Clean the exterior of the dishwasher with one of the holder. 3. Stainless Steel Cleaner and Polish Part Number 31464. Vinegar will not be using an air-dry or an energy-saving dry option. EZ-2-Lift™ Top Rack You can raise or lower the top rack to fit tall items...
..." (33 cm) in both rack adjusters and lift the rack until it if the dishwasher isn't draining well. Dishwasher Care Cleaning the Dishwasher Clean the exterior of the dishwasher with one of the holder. 3. Stainless Steel Cleaner and Polish Part Number 31464. Vinegar will not be using an air-dry or an energy-saving dry option. EZ-2-Lift™ Top Rack You can raise or lower the top rack to fit tall items...
Owners Manual
Page 9
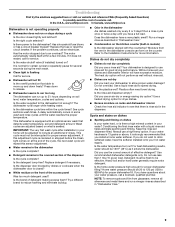
... Canada, www.whirlpool.ca Dishwasher is closed tightly and latched? Replace the fuse or reset the circuit breaker. A delay automatically occurs in "Dishwasher Care." 9 Keep the rinse aid dispenser filled. The dishwasher runs longer while heating water. Are the plastics wet? Plastics often need towel drying. Is the water temperature too low? This dishwasher is sensed. Try a different brand to the dishwasher hot enough? Did you load your water? Is the rinse aid dispenser empty? Troubleshooting First try the...
... Canada, www.whirlpool.ca Dishwasher is closed tightly and latched? Replace the fuse or reset the circuit breaker. A delay automatically occurs in "Dishwasher Care." 9 Keep the rinse aid dispenser filled. The dishwasher runs longer while heating water. Are the plastics wet? Plastics often need towel drying. Is the water temperature too low? This dishwasher is sensed. Try a different brand to the dishwasher hot enough? Did you load your water? Is the rinse aid dispenser empty? Troubleshooting First try the...
Owners Manual
Page 10
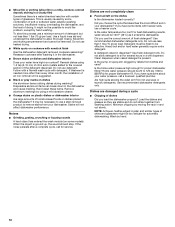
.... Is the home water pressure high enough for service. Wash by labels from your water have high iron content? etching is a cloudy film) Sometimes there is needed more often than 1 tbs (15 g) per load. Do not use a heavier cycle. Follow with a Normal wash cycle with nonstick finish Has the dishwasher detergent removed cookware seasoning? Do not allow thorough rinsing. Is the pump or spray arm clogged by hand...
.... Is the home water pressure high enough for service. Wash by labels from your water have high iron content? etching is a cloudy film) Sometimes there is needed more often than 1 tbs (15 g) per load. Do not use a heavier cycle. Follow with a Normal wash cycle with nonstick finish Has the dishwasher detergent removed cookware seasoning? Do not allow thorough rinsing. Is the pump or spray arm clogged by hand...

Owners Manual
Page 12
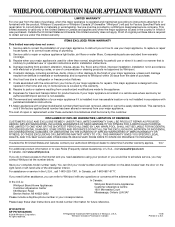
... Internet and you need further assistance, you can find your correspondence. Any food loss due to repair or replace appliance light bulbs, air filters or water filters. Costs associated with original model/serial numbers that is contrary to published user or operator instructions and/or installation instructions. 4. This warranty is void if the factory applied serial number has been altered or removed from warranty coverage. 3. WHIRLPOOL CORPORATION MAJOR APPLIANCE WARRANTY LIMITED WARRANTY For one...
... Internet and you need further assistance, you can find your correspondence. Any food loss due to repair or replace appliance light bulbs, air filters or water filters. Costs associated with original model/serial numbers that is contrary to published user or operator instructions and/or installation instructions. 4. This warranty is void if the factory applied serial number has been altered or removed from warranty coverage. 3. WHIRLPOOL CORPORATION MAJOR APPLIANCE WARRANTY LIMITED WARRANTY For one...
Warranty
Page 1
... repair or replace appliance light bulbs, air filters or water filters. Costs associated with original model/serial numbers that is reported to view FAQs (Frequently Asked Questions), in materials or workmanship and is contrary to correct the installation of consumables or cleaning products not approved by a Whirlpool designated service company. Repairs to parts or systems resulting from warranty coverage. 3. The removal and reinstallation of the dishwasher interior. The cost of God, improper installation, installation...
... repair or replace appliance light bulbs, air filters or water filters. Costs associated with original model/serial numbers that is reported to view FAQs (Frequently Asked Questions), in materials or workmanship and is contrary to correct the installation of consumables or cleaning products not approved by a Whirlpool designated service company. Repairs to parts or systems resulting from warranty coverage. 3. The removal and reinstallation of the dishwasher interior. The cost of God, improper installation, installation...


