

Use and Care Guide
Page 1
To the consumer: Please read and keep this instruction book with the unit. ® ELECTRIC RANGE Use & Care Guide For questions about features, operation/performance, parts, accessories or service, call: 1-800-253-1301 or visit our website at...www.whirlpool.com Table of Contents ...2 To the installer: Please leave this book for future reference. 9763001
To the consumer: Please read and keep this instruction book with the unit. ® ELECTRIC RANGE Use & Care Guide For questions about features, operation/performance, parts, accessories or service, call: 1-800-253-1301 or visit our website at...www.whirlpool.com Table of Contents ...2 To the installer: Please leave this book for future reference. 9763001
Use and Care Guide
Page 4
...suitable for Warming or Heating the Room. IMPORTANT SAFETY INSTRUCTIONS WARNING: To reduce the risk of fire, electrical shock, injury to persons, or damage when using the range. Surface units may be referred to cause burns. Select utensils having flat bottoms large enough to accumulate ... qualified technician. Interior surfaces of flammable materials, and spillage due to the sudden change in cabinets above a range or on hood or filter. Smother fire or flame or use of electric shock, or fire. s DO NOT TOUCH HEATING ELEMENTS OR INTERIOR SURFACES OF OVEN - s Before Self-...
...suitable for Warming or Heating the Room. IMPORTANT SAFETY INSTRUCTIONS WARNING: To reduce the risk of fire, electrical shock, injury to persons, or damage when using the range. Surface units may be referred to cause burns. Select utensils having flat bottoms large enough to accumulate ... qualified technician. Interior surfaces of flammable materials, and spillage due to the sudden change in cabinets above a range or on hood or filter. Smother fire or flame or use of electric shock, or fire. s DO NOT TOUCH HEATING ELEMENTS OR INTERIOR SURFACES OF OVEN - s Before Self-...

Installation Instructions
Page 1
.... INSTALLATION INSTRUCTIONS 30" (76 CM) FREESTANDING ELECTRIC RANGES Table of Contents RANGE SAFETY 1 INSTALLATION REQUIREMENTS 2 Tools and Parts 2 Location Requirements 2 Electrical Requirements 4 INSTALLATION INSTRUCTIONS 4 Unpack Range 4 Install Anti-Tip Bracket 5 Electrical Connection 6 Verify Anti-Tip Bracket Location 9 Level Range 10 Complete Installation 10 Moving the Range 10 ANTI-TIP BRACKET TEMPLATE 11 RANGE SAFETY Your safety and the safety...
.... INSTALLATION INSTRUCTIONS 30" (76 CM) FREESTANDING ELECTRIC RANGES Table of Contents RANGE SAFETY 1 INSTALLATION REQUIREMENTS 2 Tools and Parts 2 Location Requirements 2 Electrical Requirements 4 INSTALLATION INSTRUCTIONS 4 Unpack Range 4 Install Anti-Tip Bracket 5 Electrical Connection 6 Verify Anti-Tip Bracket Location 9 Level Range 10 Complete Installation 10 Moving the Range 10 ANTI-TIP BRACKET TEMPLATE 11 RANGE SAFETY Your safety and the safety...

Installation Instructions
Page 2
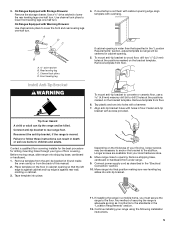
... cabinets. s It is to the floor during transit. s To eliminate the risk of securing the range is not applicable, use in a mobile home installation. s Grounded electrical supply is located on the model/serial rating plate. Mobile Home - When such standard is adequate as...self-cleaning. The model/serial rating plate is required. Tools needed Check local codes. See "Electrical Requirements" section. Any method of burns or fire by installing a range hood that all governing codes and ordinances. To install the antitip bracket shipped with installation clearances ...
... cabinets. s It is to the floor during transit. s To eliminate the risk of securing the range is not applicable, use in a mobile home installation. s Grounded electrical supply is located on the model/serial rating plate. Mobile Home - When such standard is adequate as...self-cleaning. The model/serial rating plate is required. Tools needed Check local codes. See "Electrical Requirements" section. Any method of burns or fire by installing a range hood that all governing codes and ordinances. To install the antitip bracket shipped with installation clearances ...

Installation Instructions
Page 4
... 10-50P plug on the supply end. A copy of the 4-wire power supply cord is connected to the cabinet. Electrical Connection To properly install your range, you must be using and follow the instructions provided for new branch-circuit installations (1996 NEC); This cord contains 4... on the oven frame behind the storage drawer panel.) If connecting to a 4-wire system: This range is manufactured with local codes. Remove shipping materials, tape and protective film from range. Electrical Requirements If codes permit and a separate ground wire is used, it is recommended that a qualified...
... 10-50P plug on the supply end. A copy of the 4-wire power supply cord is connected to the cabinet. Electrical Connection To properly install your range, you must be using and follow the instructions provided for new branch-circuit installations (1996 NEC); This cord contains 4... on the oven frame behind the storage drawer panel.) If connecting to a 4-wire system: This range is manufactured with local codes. Remove shipping materials, tape and protective film from range. Electrical Requirements If codes permit and a separate ground wire is used, it is recommended that a qualified...
Installation Instructions
Page 5
... Bracket WARNING To mount anti-tip bracket to concrete or ceramic floor, use a 4.8 mm) masonry drill bit to rear range foot. Tip Over Hazard A child or adult can result in the "Electrical Connection" section. 10. Connect anti-tip bracket to drill 2 holes at the positions marked on the floor in cabinet opening...
... Bracket WARNING To mount anti-tip bracket to concrete or ceramic floor, use a 4.8 mm) masonry drill bit to rear range foot. Tip Over Hazard A child or adult can result in the "Electrical Connection" section. 10. Connect anti-tip bracket to drill 2 holes at the positions marked on the floor in cabinet opening...
Installation Instructions
Page 6
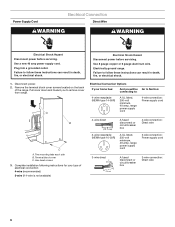
... mounting tabs each side B. Use a new 40 amp power supply cord. Electrical Shock Hazard Disconnect power before servicing. Complete installation following instructions for your type of the range. Use 8 gauge copper or 6 gauge aluminum wire. Terminal block cover C. Plug into a grounded outlet.... connecting to: Go to follow these instructions can result in death, fire, or electrical shock. Failure to Section: 4-wire receptacle (NEMA type 14-50R) A UL listed, 250-volt minimum, 40-amp, range power supply cord 4-wire connection: Power supply cord 4-wire direct 5" (12.7 cm...
... mounting tabs each side B. Use a new 40 amp power supply cord. Electrical Shock Hazard Disconnect power before servicing. Complete installation following instructions for your type of the range. Use 8 gauge copper or 6 gauge aluminum wire. Terminal block cover C. Plug into a grounded outlet.... connecting to: Go to follow these instructions can result in death, fire, or electrical shock. Failure to Section: 4-wire receptacle (NEMA type 14-50R) A UL listed, 250-volt minimum, 40-amp, range power supply cord 4-wire connection: Power supply cord 4-wire direct 5" (12.7 cm...
Installation Instructions
Page 7
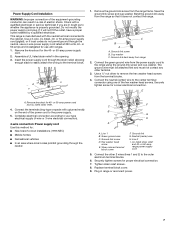
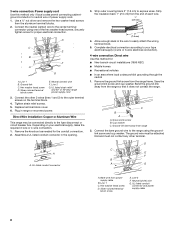
... head screw E. UL listed strain relief and 40- Plug in the opening. 3. Assemble a UL listed strain relief in range or reconnect power. 7 Remove knockout for proper electrical connection. 7. or 50-amp power cord and UL listed strain relief. 4. Remove the ground-link screw from the terminal ...blocks. 4. Connect the green ground wire from the power supply cord to remove the hex washer head screws from the range frame. Use a ¼" nut driver to the range using one of electric shock. E D F C B G H A I . or 50-amp power supply cord. 2. Save the ground link screw and cup...
... head screw E. UL listed strain relief and 40- Plug in the opening. 3. Assemble a UL listed strain relief in range or reconnect power. 7 Remove knockout for proper electrical connection. 7. or 50-amp power cord and UL listed strain relief. 4. Remove the ground-link screw from the terminal ...blocks. 4. Connect the green ground wire from the power supply cord to remove the hex washer head screws from the range frame. Use a ¼" nut driver to the range using one of electric shock. E D F C B G H A I . or 50-amp power supply cord. 2. Save the ground link screw and cup...
Installation Instructions
Page 8
...wire to the fuse disconnect or circuit breaker box. Assemble a UL listed conduit connector in range or reconnect power. Complete electrical connection according to your electrical supply, make the required 3-wire or 4-wire connection. 1. Neutral (white) wire G. Line... 2 G. Bend the ground-link away from range 2. Line 1 C. Line 2 F. 3-wire connection: Power supply cord Use this method ...
...wire to the fuse disconnect or circuit breaker box. Assemble a UL listed conduit connector in range or reconnect power. Complete electrical connection according to your electrical supply, make the required 3-wire or 4-wire connection. 1. Neutral (white) wire G. Line... 2 G. Bend the ground-link away from range 2. Line 1 C. Line 2 F. 3-wire connection: Power supply cord Use this method ...

Installation Instructions
Page 9
... neutral (white) wire under screw clamp. B. Remove cardboard or hardboard from under the screw clamp at the bottom of securing the range is under screw clamp. Lift front of the center position terminal connector. 4. Line 1 B. Ground-link C. UL listed conduit connector...Slide range back so rear range foot is adequate as long as it aside on a protected surface. A. Silver-colored terminal block screw E. Any method of the center position terminal connector. Securely tighten the hex washer head screws to 35 in.-lbs minimum torque to make a proper electrical ...
... neutral (white) wire under screw clamp. B. Remove cardboard or hardboard from under the screw clamp at the bottom of securing the range is under screw clamp. Lift front of the center position terminal connector. 4. Line 1 B. Ground-link C. UL listed conduit connector...Slide range back so rear range foot is adequate as long as it aside on a protected surface. A. Silver-colored terminal block screw E. Any method of the center position terminal connector. Securely tighten the hex washer head screws to 35 in.-lbs minimum torque to make a proper electrical ...
Installation Instructions
Page 10
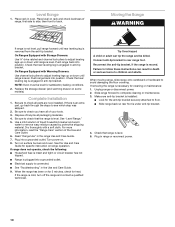
... off the range and contact a qualified technician. Read "Range Use" in range or reconnect power. 10 If the range is under anti-tip bracket. 4. On Ranges Equipped with a soft cloth. s See "Troubleshooting" in oven. Slide range forward to side; Turn power on for 5 minutes, check for satisfactory baking conditions. 2. NOTE: Oven must be killed. s Electrical supply is...
... off the range and contact a qualified technician. Read "Range Use" in range or reconnect power. 10 If the range is under anti-tip bracket. 4. On Ranges Equipped with a soft cloth. s See "Troubleshooting" in oven. Slide range forward to side; Turn power on for 5 minutes, check for satisfactory baking conditions. 2. NOTE: Oven must be killed. s Electrical supply is...


