
Use and Care Guide
Page 2
... 12-Hour Shut-Off ...14 Oven Temperature Control ...14 OVEN USE...15 Aluminum Foil...15 Positioning Racks and Bakeware ...15 Split Oven Rack...16 Bakeware...16 Meat Thermometer...16 Oven Vent...17 Baking and Roasting...17 Choice Bake® Function ...17 Broiling...18 Convection Cooking...19 Hold Warm Feature ...20 Timed Cooking ...21 Sequence Programming ...22 Warming Drawer ...23 RANGE CARE ...24 Self-Cleaning Cycle...24 General Cleaning...26 Oven Light ...28 Oven Door ...28 Storage Drawer ...28 Warming Drawer ...29 TROUBLESHOOTING ...30 ASSISTANCE OR SERVICE...31 WARRANTY ...32...
... 12-Hour Shut-Off ...14 Oven Temperature Control ...14 OVEN USE...15 Aluminum Foil...15 Positioning Racks and Bakeware ...15 Split Oven Rack...16 Bakeware...16 Meat Thermometer...16 Oven Vent...17 Baking and Roasting...17 Choice Bake® Function ...17 Broiling...18 Convection Cooking...19 Hold Warm Feature ...20 Timed Cooking ...21 Sequence Programming ...22 Warming Drawer ...23 RANGE CARE ...24 Self-Cleaning Cycle...24 General Cleaning...26 Oven Light ...28 Oven Door ...28 Storage Drawer ...28 Warming Drawer ...29 TROUBLESHOOTING ...30 ASSISTANCE OR SERVICE...31 WARRANTY ...32...
Use and Care Guide
Page 4
... with ventilating hood - Heating elements may become hot enough to cause burns. s Make Sure Reflector Pans or Drip Bowls Are in Manual. s Glazed Cooking Utensils - s Clean Cooktop With Caution - For self-cleaning ranges - s Clean Only Parts Listed in Place - s Clean Ventilating Hoods Frequently - IMPORTANT SAFETY INSTRUCTIONS WARNING: To reduce the risk of fire, electrical shock, injury to persons, or damage when using the range. s User Servicing - s Do Not Use Water on Broken Cooktop - s Keep Oven Vent Ducts Unobstructed...
... with ventilating hood - Heating elements may become hot enough to cause burns. s Make Sure Reflector Pans or Drip Bowls Are in Manual. s Glazed Cooking Utensils - s Clean Cooktop With Caution - For self-cleaning ranges - s Clean Only Parts Listed in Place - s Clean Ventilating Hoods Frequently - IMPORTANT SAFETY INSTRUCTIONS WARNING: To reduce the risk of fire, electrical shock, injury to persons, or damage when using the range. s User Servicing - s Do Not Use Water on Broken Cooktop - s Keep Oven Vent Ducts Unobstructed...
Use and Care Guide
Page 7
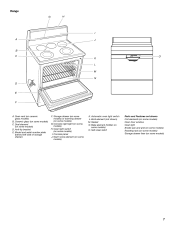
... vent (on some models) O. Ceramic glass (on ceramic glass models) B. Anti-tip bracket E. Oven light switch (on some models) C. Broil element (not shown) M. Automatic oven light switch L. Bake element (hidden on some models) K. Gasket N. Console panel J. Storage drawer (on some models) or warming drawer (on some models) I A J B C K L M N D O E F A. Warm zone element (on some models) D. Self-clean latch Parts and Features not shown Coil elements (on some models) Oven door window Oven light Broiler pan and grid (on some models) Roasting rack (on some models...
... vent (on some models) O. Ceramic glass (on ceramic glass models) B. Anti-tip bracket E. Oven light switch (on some models) C. Broil element (not shown) M. Automatic oven light switch L. Bake element (hidden on some models) K. Gasket N. Console panel J. Storage drawer (on some models) or warming drawer (on some models) I A J B C K L M N D O E F A. Warm zone element (on some models) D. Self-clean latch Parts and Features not shown Coil elements (on some models) Oven door window Oven light Broiler pan and grid (on some models) Roasting rack (on some models...
Use and Care Guide
Page 8
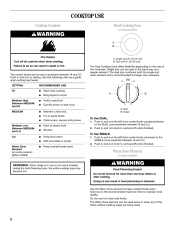
... setting heat levels. The dual size combines both the single and outer element and is the recommended maximum time to vertical (off all controls when done cooking. Keep food warm. Push in and turn the left front control knob clockwise to heat cold foods. Bring liquid to keep cooked foods warm. Melt chocolate or butter. COOKTOP USE Cooktop Controls Dual Cooking Zone (on some models) during the Self-Cleaning cycle, the entire cooktop area may become hot. Use...
... setting heat levels. The dual size combines both the single and outer element and is the recommended maximum time to vertical (off all controls when done cooking. Keep food warm. Push in and turn the left front control knob clockwise to heat cold foods. Bring liquid to keep cooked foods warm. Melt chocolate or butter. COOKTOP USE Cooktop Controls Dual Cooking Zone (on some models) during the Self-Cleaning cycle, the entire cooktop area may become hot. Use...
Use and Care Guide
Page 9
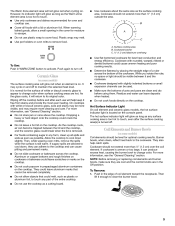
.... Cookware designed with white or biscuit ceramic glass, soils and stains may be visible between it can become trapped between the lid and the cooktop, and the ceramic glass could crack the cooktop. Cookware/canner C. ½" (1.3 cm) Maximum overhang s Cover all spills and soils as soon as a cutting board. s s s s Hot Surface Indicator Light On coil element and ceramic glass models, the hot surface indicator light is still warm. For more cleaning and care.
.... Cookware designed with white or biscuit ceramic glass, soils and stains may be visible between it can become trapped between the lid and the cooktop, and the ceramic glass could crack the cooktop. Cookware/canner C. ½" (1.3 cm) Maximum overhang s Cover all spills and soils as soon as a cutting board. s s s s Hot Surface Indicator Light On coil element and ceramic glass models, the hot surface indicator light is still warm. For more cleaning and care.
Use and Care Guide
Page 10
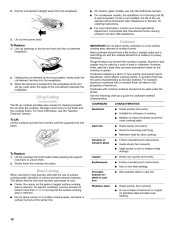
... time. 10 Follow manufacturer's instructions. Cast iron s s s Ceramic or Ceramic glass s s s To Replace: 1. Copper Earthenware s s s Home Canning When canning for cleaning beneath. s Center the canner on stainless steel provides even heating. s s On ceramic glass models, use of a Canning Unit Kit is best for cookware material characteristics. Damage could occur to unlock them. 2. Use on a hot surface cooking area, element or surface burner. Cookware IMPORTANT: Do not leave empty cookware on low heat settings...
... time. 10 Follow manufacturer's instructions. Cast iron s s s Ceramic or Ceramic glass s s s To Replace: 1. Copper Earthenware s s s Home Canning When canning for cleaning beneath. s Center the canner on stainless steel provides even heating. s s On ceramic glass models, use of a Canning Unit Kit is best for cookware material characteristics. Damage could occur to unlock them. 2. Use on a hot surface cooking area, element or surface burner. Cookware IMPORTANT: Do not leave empty cookware on low heat settings...
Use and Care Guide
Page 14
... exit mode, press OFF/CANCEL. Timer The Timer can be changed to Fahrenheit. The timer indicator light will light up " or "down the set time. When the set to avoid unintended use a thermometer to measure oven temperature because opening the oven door may cook faster or slower than your model, press the HOUR or MIN, TEMP/ TIME or TEMP/HOUR "up on the display. On some models) Control Lockout or Lockout shuts down , press CLOCK. ...a little more...
... exit mode, press OFF/CANCEL. Timer The Timer can be changed to Fahrenheit. The timer indicator light will light up " or "down the set time. When the set to avoid unintended use a thermometer to measure oven temperature because opening the oven door may cook faster or slower than your model, press the HOUR or MIN, TEMP/ TIME or TEMP/HOUR "up on the display. On some models) Control Lockout or Lockout shuts down , press CLOCK. ...a little more...
Use and Care Guide
Page 17
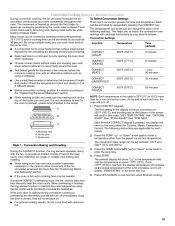
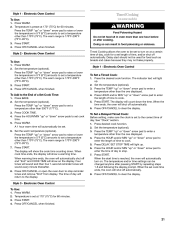
... electronically regulates the oven heat levels during preheat and bake to set a temperature other than 350°F (175°C) in intervals. When roasting, it is recommended in the recipe. Press CHOICE BAKE® function. Press the TEMP "up" or "down" arrow pads to maintain a precise temperature range for optimal cooking results. Press OFF/CANCEL when finished cooking. On coil element models, the element can be changed after this step. Electronic Oven Controls After START...
... electronically regulates the oven heat levels during preheat and bake to set a temperature other than 350°F (175°C) in intervals. When roasting, it is recommended in the recipe. Press CHOICE BAKE® function. Press the TEMP "up" or "down" arrow pads to maintain a precise temperature range for optimal cooking results. Press OFF/CANCEL when finished cooking. On coil element models, the element can be changed after this step. Electronic Oven Controls After START...
Use and Care Guide
Page 18
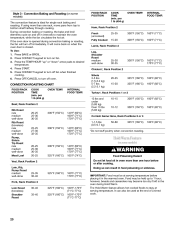
... ordered. Changing the temperature when Custom Broiling allows more precise control when cooking. Pull out oven rack to drain juices and help avoid spatter and smoke. Very thin cuts of meat, fish and poultry may be adjusted for Part Number 4396923. It is designed to stop position before putting food in unless recommended in the heated oven, making cleaning more from the broil element. Close the door to...
... ordered. Changing the temperature when Custom Broiling allows more precise control when cooking. Pull out oven rack to drain juices and help avoid spatter and smoke. Very thin cuts of meat, fish and poultry may be adjusted for Part Number 4396923. It is designed to stop position before putting food in unless recommended in the heated oven, making cleaning more from the broil element. Close the door to...
Use and Care Guide
Page 19
... package instructions or your favorite recipes. When preheating is opened during convection cooking or preheating, the element(s) and fan will come back on the top of the screen will move freely around the food helps to wait for time and temperature. Once the door is not necessary to speed up cooking by only opening the oven door when necessary. Convection Settings Function Temperature Time (default) 0 minutes Keep heat loss to the circulating air...
... package instructions or your favorite recipes. When preheating is opened during convection cooking or preheating, the element(s) and fan will come back on the top of the screen will move freely around the food helps to wait for time and temperature. Once the door is not necessary to speed up cooking by only opening the oven door when necessary. Convection Settings Function Temperature Time (default) 0 minutes Keep heat loss to the circulating air...
Use and Care Guide
Page 20
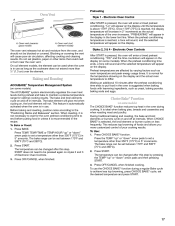
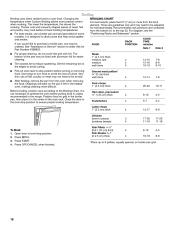
... hot air. INTERNAL FOOD TEMP. INTERNAL FOOD TEMP. The Hold Warm feature allows hot cooked foods to bottom shelf halfway through cooking. It will turn off oven. FOOD/RACK POSITION COOK TIME (min. per 1 lb (454 g) OVEN TEMP. Doing so can also be at serving temperature before or after cooking. Press BAKE or BROIL. 2. Press OFF/CANCEL to turn off fan when finished cooking. 6. To Use: 1. During convection baking or roasting, the bake and broil elements cycle on some models...
... hot air. INTERNAL FOOD TEMP. INTERNAL FOOD TEMP. The Hold Warm feature allows hot cooked foods to bottom shelf halfway through cooking. It will turn off oven. FOOD/RACK POSITION COOK TIME (min. per 1 lb (454 g) OVEN TEMP. Doing so can also be at serving temperature before or after cooking. Press BAKE or BROIL. 2. Press OFF/CANCEL to turn off fan when finished cooking. 6. To Use: 1. During convection baking or roasting, the bake and broil elements cycle on some models...
Use and Care Guide
Page 21
... display prompt. Electronic Oven Control To Use: 1. 2. 3. 4. Press START. 4. Delay start time is set to be changed anytime after cooking. Style 1 - Set the temperature (optional). 3. The display will light up " or "down " arrow pad to cook. 5. The time of day. Press DELAY. Electronic Oven Control To Use: 1. Press the TEMP "up . 6. Press OFF/CANCEL to stop . 7. Press WARM. Press START. Press OFF/CANCEL when finished. 21 Press OFF/CANCEL when finished. Set the temperature (optional). Press WARM. Electronic Oven Control To Set a Timed Cook...
... display prompt. Electronic Oven Control To Use: 1. 2. 3. 4. Press START. 4. Delay start time is set to be changed anytime after cooking. Style 1 - Set the temperature (optional). 3. The display will light up " or "down " arrow pad to cook. 5. The time of day. Press DELAY. Electronic Oven Control To Use: 1. Press the TEMP "up . 6. Press OFF/CANCEL to stop . 7. Press WARM. Press START. Press OFF/CANCEL when finished. 21 Press OFF/CANCEL when finished. Set the temperature (optional). Press WARM. Electronic Oven Control To Set a Timed Cook...
Use and Care Guide
Page 24
... not let water, cleaner, etc. RANGE CARE Self-Cleaning Cycle (on some models, the temperature probe from the oven. Style 1 - Electronic Oven Control The Precise Clean Self-Cleaning cycle is extremely sensitive to slide. The oven will not unlock until the oven has completely cooled down. Applying a cool, damp cloth to a powdery ash. Surface elements will not affect cooking performance. Keep children away from the storage drawer. Exposure to the fumes may...
... not let water, cleaner, etc. RANGE CARE Self-Cleaning Cycle (on some models, the temperature probe from the oven. Style 1 - Electronic Oven Control The Precise Clean Self-Cleaning cycle is extremely sensitive to slide. The oven will not unlock until the oven has completely cooled down. Applying a cool, damp cloth to a powdery ash. Surface elements will not affect cooking performance. Keep children away from the storage drawer. Exposure to the fumes may...
Use and Care Guide
Page 26
.... s CERAMIC GLASS (on some paper towels. Cooktop Scraper Part Number RS300 is also recommended for stubborn spots. Do not soak knobs. 26 To Stop Self-Clean anytime: If the clean function is terminated while the oven cavity temperature is greater than 500ºF (260ºC), the oven door will remain latched until the oven cools. Style 2 - It will not unlock until the oven completely cools. Style 1 - Electronic Oven Control Press...
.... s CERAMIC GLASS (on some paper towels. Cooktop Scraper Part Number RS300 is also recommended for stubborn spots. Do not soak knobs. 26 To Stop Self-Clean anytime: If the clean function is terminated while the oven cavity temperature is greater than 500ºF (260ºC), the oven door will remain latched until the oven cools. Style 2 - It will not unlock until the oven completely cools. Style 1 - Electronic Oven Control Press...
Use and Care Guide
Page 30
... longer cooking times. Has a delay start been set ? Oven peeking releases oven heat and can result in use. See "Display(s)" section. Are baked items too brown on after control knob(s) have been turned off? See "Electronic Oven Control" section. There has been a power failure. Has the function been entered? Level the appliance. See "Cooktop Controls" section. Has a delay start been set ? Close the oven door all the way. Use cookware about the same size as the surface cooking area, element or surface burner. Hot Surface indicator light stays...
... longer cooking times. Has a delay start been set ? Oven peeking releases oven heat and can result in use. See "Display(s)" section. Are baked items too brown on after control knob(s) have been turned off? See "Electronic Oven Control" section. There has been a power failure. Has the function been entered? Level the appliance. See "Cooktop Controls" section. Has a delay start been set ? Close the oven door all the way. Use cookware about the same size as the surface cooking area, element or surface burner. Hot Surface indicator light stays...
Use and Care Guide
Page 32
... house wiring or plumbing. 2. Service calls to better help can find this warranty does not apply. Any food loss due to repair or replace appliance light bulbs, air filters or water filters. The removal and reinstallation of Whirlpool, U.S.A. 12/05 Printed in -warranty service. Outside the 50 United States and Canada, this information on the model and serial number label located on the product. After checking "Troubleshooting...
... house wiring or plumbing. 2. Service calls to better help can find this warranty does not apply. Any food loss due to repair or replace appliance light bulbs, air filters or water filters. The removal and reinstallation of Whirlpool, U.S.A. 12/05 Printed in -warranty service. Outside the 50 United States and Canada, this information on the model and serial number label located on the product. After checking "Troubleshooting...

Installation Instructions
Page 1
... FREESTANDING ELECTRIC RANGES Table of Contents RANGE SAFETY 1 INSTALLATION REQUIREMENTS 2 Tools and Parts 2 Location Requirements 2 Electrical Requirements 4 INSTALLATION INSTRUCTIONS 4 Unpack Range 4 Install Anti-Tip Bracket 5 Electrical Connection 6 Verify Anti-Tip Bracket Location 9 Level Range 10 Complete Installation 10 Moving the Range 10 ANTI-TIP BRACKET TEMPLATE 11 RANGE SAFETY Your safety and the safety of injury, and tell you how to children and adults. This symbol alerts you and others are not followed. WARNING You can kill or hurt you to rear range foot...
... FREESTANDING ELECTRIC RANGES Table of Contents RANGE SAFETY 1 INSTALLATION REQUIREMENTS 2 Tools and Parts 2 Location Requirements 2 Electrical Requirements 4 INSTALLATION INSTRUCTIONS 4 Unpack Range 4 Install Anti-Tip Bracket 5 Electrical Connection 6 Verify Anti-Tip Bracket Location 9 Level Range 10 Complete Installation 10 Moving the Range 10 ANTI-TIP BRACKET TEMPLATE 11 RANGE SAFETY Your safety and the safety of injury, and tell you how to children and adults. This symbol alerts you and others are not followed. WARNING You can kill or hurt you to rear range foot...

Installation Instructions
Page 2
Anti-tip bracket B. Thickness of burns or fire by reaching over heated surface units, cabinet storage space located above . Check existing electrical supply. Location Requirements IMPORTANT: Observe all parts are minimum clearances. The model/serial rating plate is to be provided, the risk can be used. If cabinet storage is located on the model/serial rating plate. See "Electrical Connection" section. 2 Tools needed Check local codes. See "Electrical Requirements" section. Failure to meet codes and ordinances...
Anti-tip bracket B. Thickness of burns or fire by reaching over heated surface units, cabinet storage space located above . Check existing electrical supply. Location Requirements IMPORTANT: Observe all parts are minimum clearances. The model/serial rating plate is to be provided, the risk can be used. If cabinet storage is located on the model/serial rating plate. See "Electrical Connection" section. 2 Tools needed Check local codes. See "Electrical Requirements" section. Failure to meet codes and ordinances...
Installation Instructions
Page 5
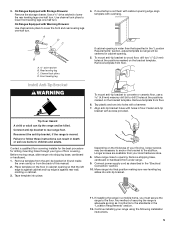
... the "Location Requirements" section, adjust template so range will be centered in the "Electrical Connection" section. 10. Longer screws are available from your type of your range using the following installation instructions. 5 Remove shipping base, cardboard or hardboard from floor. Tap plastic anchors into place. Align anti-tip bracket holes with cabinet opening . 5. Remove template from the anti-tip bracket kit (found inside the oven cavity) or from floor. 6. Connect power supply cord as it...
... the "Location Requirements" section, adjust template so range will be centered in the "Electrical Connection" section. 10. Longer screws are available from your type of your range using the following installation instructions. 5 Remove shipping base, cardboard or hardboard from floor. Tap plastic anchors into place. Align anti-tip bracket holes with cabinet opening . 5. Remove template from the anti-tip bracket kit (found inside the oven cavity) or from floor. 6. Connect power supply cord as it...
Installation Instructions
Page 10
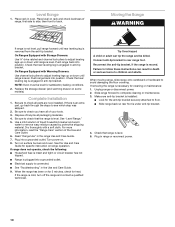
... "Range Care" section of your tools. 3. Dry thoroughly with Warming Drawers: Use channel lock pliers to follow these instructions can tip the range and be level for specific instruction on surface burners and oven. Read "Range Use" in the Use and Care Guide. 9. Plug in oven. s Electrical supply is moved. Reconnect the anti-tip bracket, if the range is connected. Place rack in range or reconnect power. 10 See the Use and Care Guide for satisfactory baking conditions. 2. Check that rear leveling leg is removed from the anti-tip bracket. Failure to adjust leveling...
... "Range Care" section of your tools. 3. Dry thoroughly with Warming Drawers: Use channel lock pliers to follow these instructions can tip the range and be level for specific instruction on surface burners and oven. Read "Range Use" in the Use and Care Guide. 9. Plug in oven. s Electrical supply is moved. Reconnect the anti-tip bracket, if the range is connected. Place rack in range or reconnect power. 10 See the Use and Care Guide for satisfactory baking conditions. 2. Check that rear leveling leg is removed from the anti-tip bracket. Failure to adjust leveling...


